This is a special guest post from Matthew Robbins at MFractor. You can find him on Twitter at @matthewrdev.
Let’s say you’re a Xamarin.Forms developer and you’re starting out on a brand new app: a single screen, T-shirt ordering app. You’ve got the specs, the backend is mostly done, and all that’s left is for you to click File -> New Solution and get started. Exciting times!
We know that this is straight-forward for a Xamarin.Forms developer; we build our UIs in XAML to create native user interfaces that maximize shared code and use the MVVM pattern for our app logic ensuring good architecture and testabilty.
However, the development process can be made easier by using MFractor, a productivity extension for Visual Studio for Mac.
MFractor is a mobile-first refactoring tool for Visual Studio for Mac that contains a slew of features that are handy when building Xamarin apps. We can use MFractor to create view models, detect and fix XAML code issues, generate XAML code snippets, navigate easily through Android resources, and much more.
So, let’s make our T-shirt app and learn how to make our app development easier with the help of MFractor!
Making The App
We’ll start by creating a new project for our app, MyTShirt and adding some controls to our main page, MyTShirtPage.xaml.
- An
Imagewhere our apps logo will sit. - A
LabelandEntryfor our customers name. - A
LabelandEntryfor our customers email address. - A
Buttonour customer can click to order their t-shirt!
The XAML, complete with data binding, will look a little like this:
MyTShirt.xaml
<?xml version="1.0" encoding="utf-8"?>
<ContentPage xmlns="http://xamarin.com/schemas/2014/forms"
xmlns:local="clr-namespace:MyTShirt"
xmlns:x="http://schemas.microsoft.com/winfx/2009/xaml"
x:Class="MyTShirt.MyTShirtPage">
<Image />
<StackLayout Orientation="Horizontal">
<Label Text="Name: "/>
<Entry Text="{Binding CustomerName}"/>
</StackLayout>
<StackLayout Orientation="Horizontal">
<Label Text="Email: "/>
<Entry Text="{Binding CustomerEmail}"/>
</StackLayout>
<Button Command="{Binding OrderTShirt}"/>
</ContentPage>Easy!
But we’ve accidentally made a mistake in our XAML… Can you spot it?
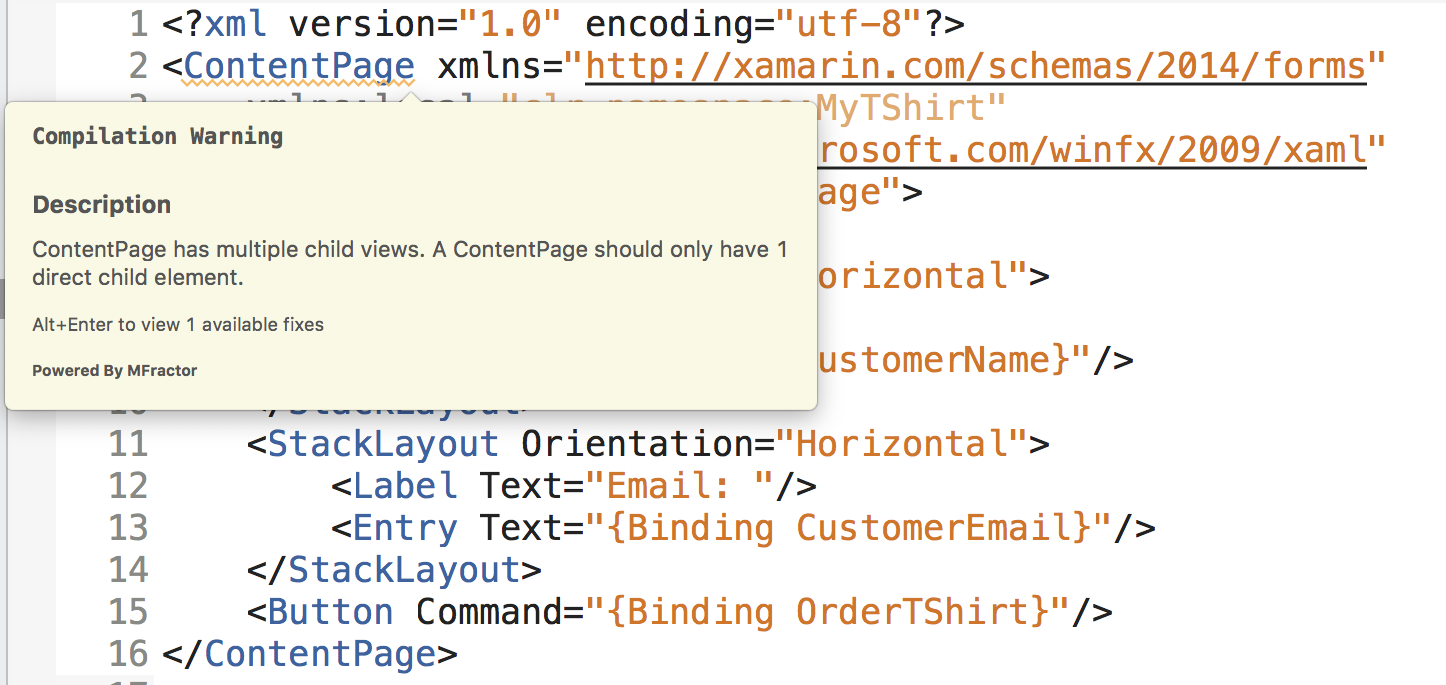
We’ve put all of our controls directly inside the ContentPage instead of a view group such as a grid or stack layout. If we ran our app, we’d only see our image control! This is a common and easy-to-make mistake when creating a new screen that causes a hard-to-find runtime bug.
MFractor’s XAML analyzer detects this bug and marks it as a code warning directly inside our XAML editor. Now, instead of having to run our app to discover the bug, it’s clearly highlighted in the editor and we can hover over it to view the issue in detail:
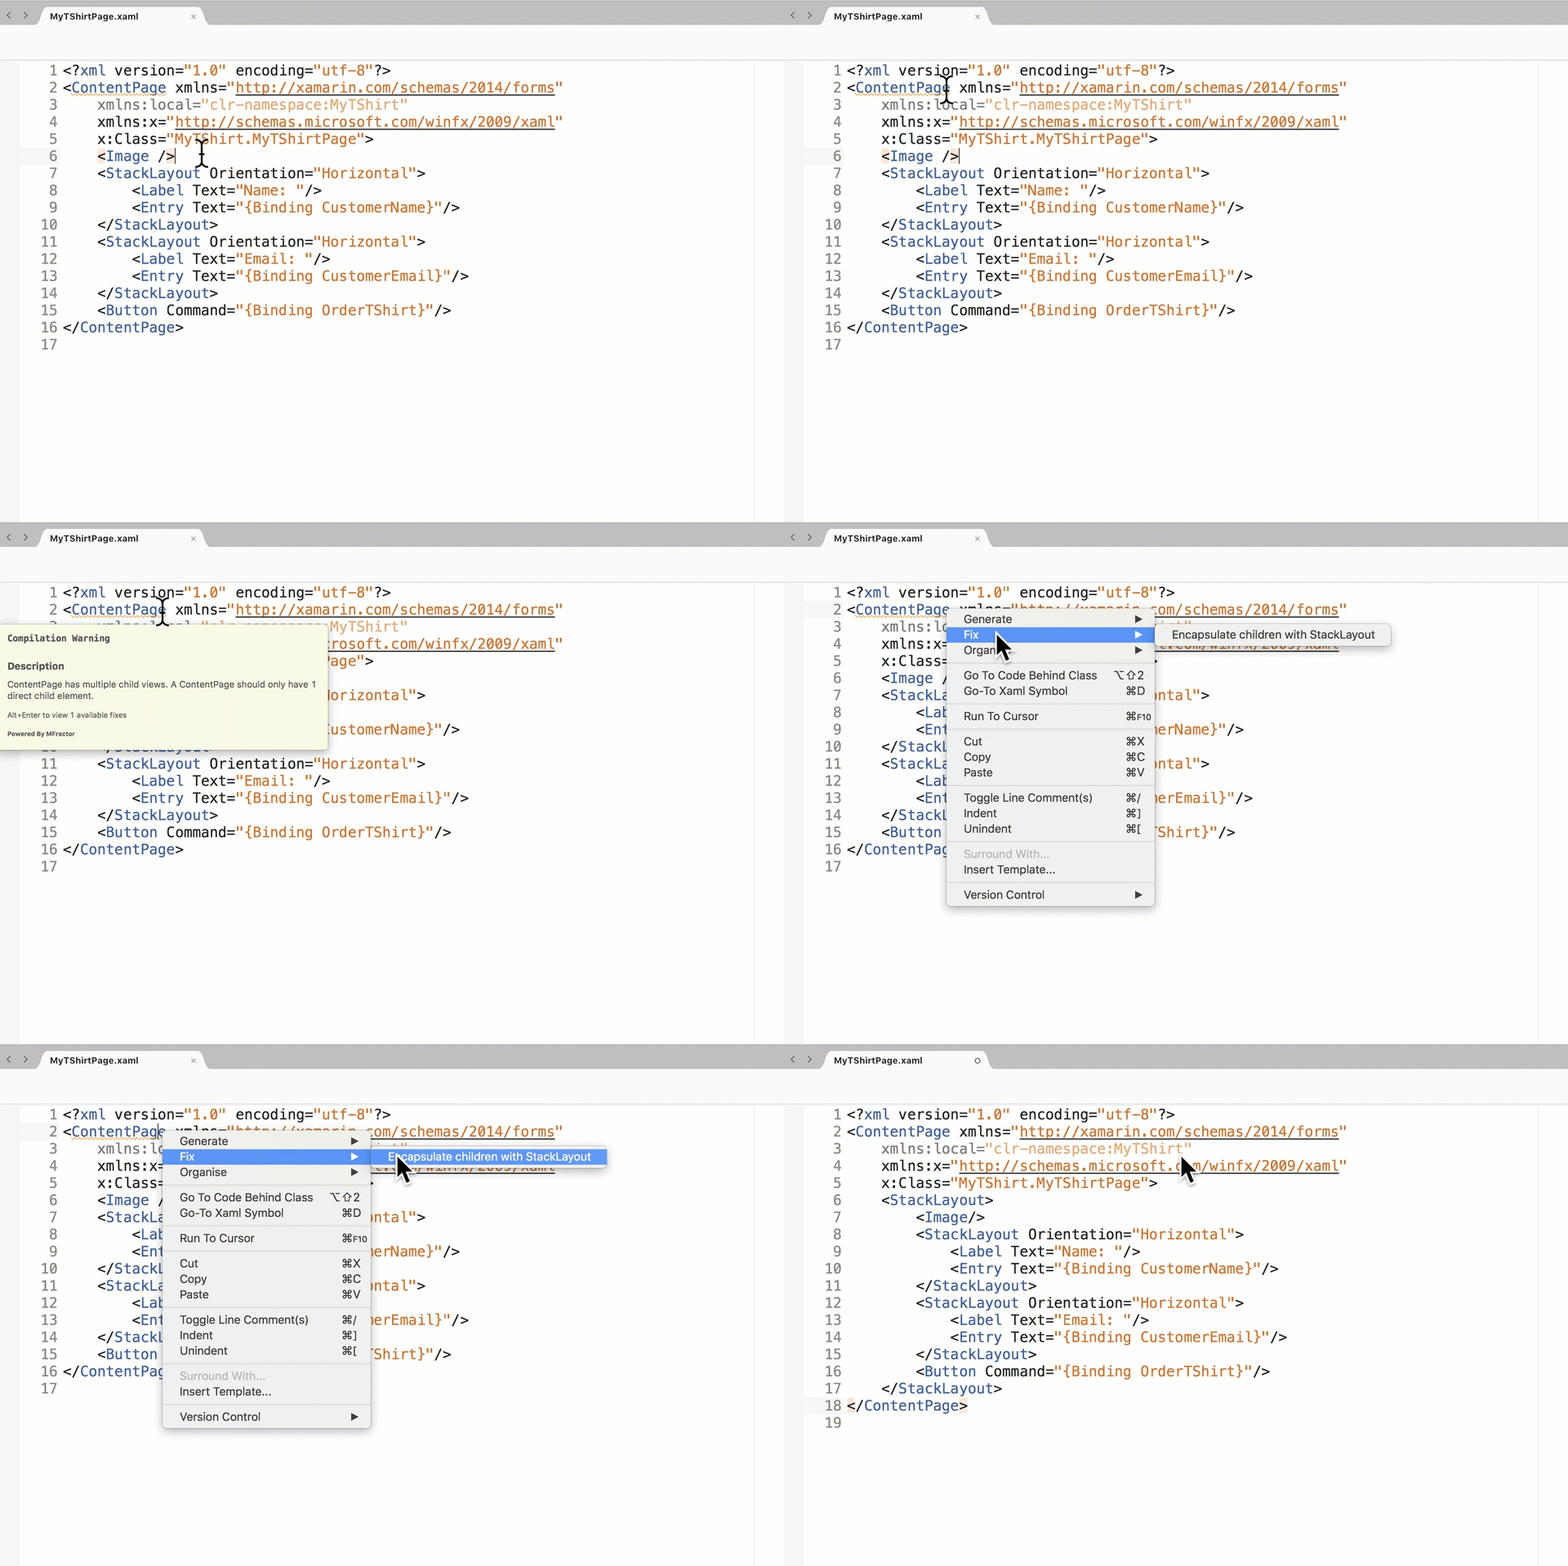
MFractor also offers a solution to this issue; by right-clicking on the affected code and selecting Encapsulate content with StackLayout, we can wrap all of ContentPage‘s children with a stack layout to quickly resolve the bug:
MFractor offers over fifty XAML code inspections that detect everything from missing controls to missing view model bindings to value conversion type flow issues.
By highlighting code issues in the editor, MFractor prevents issues from appearing at compile time or even worse, runtime. This saves us precious development time so we can spend time writing code instead of fixing bugs.
For more documentation MFractors XAML analysis, see:
- Detecting a content page has multiple, direct children.
- Fixing a content page with multiple, direct children.
Adding An Image Logo
Next, let’s add an image logo to our page by setting the Source property of our image.
Unfortunately, this image doesn’t yet exist in our iOS or Android project resources, so it wouldn’t appear when we run our app.
MFractor’s missing image inspection detects this bug. We’re told through code issues that the image is missing from our iOS and Android apps, and we can simply press Alt+Return on the issue to import the missing image!
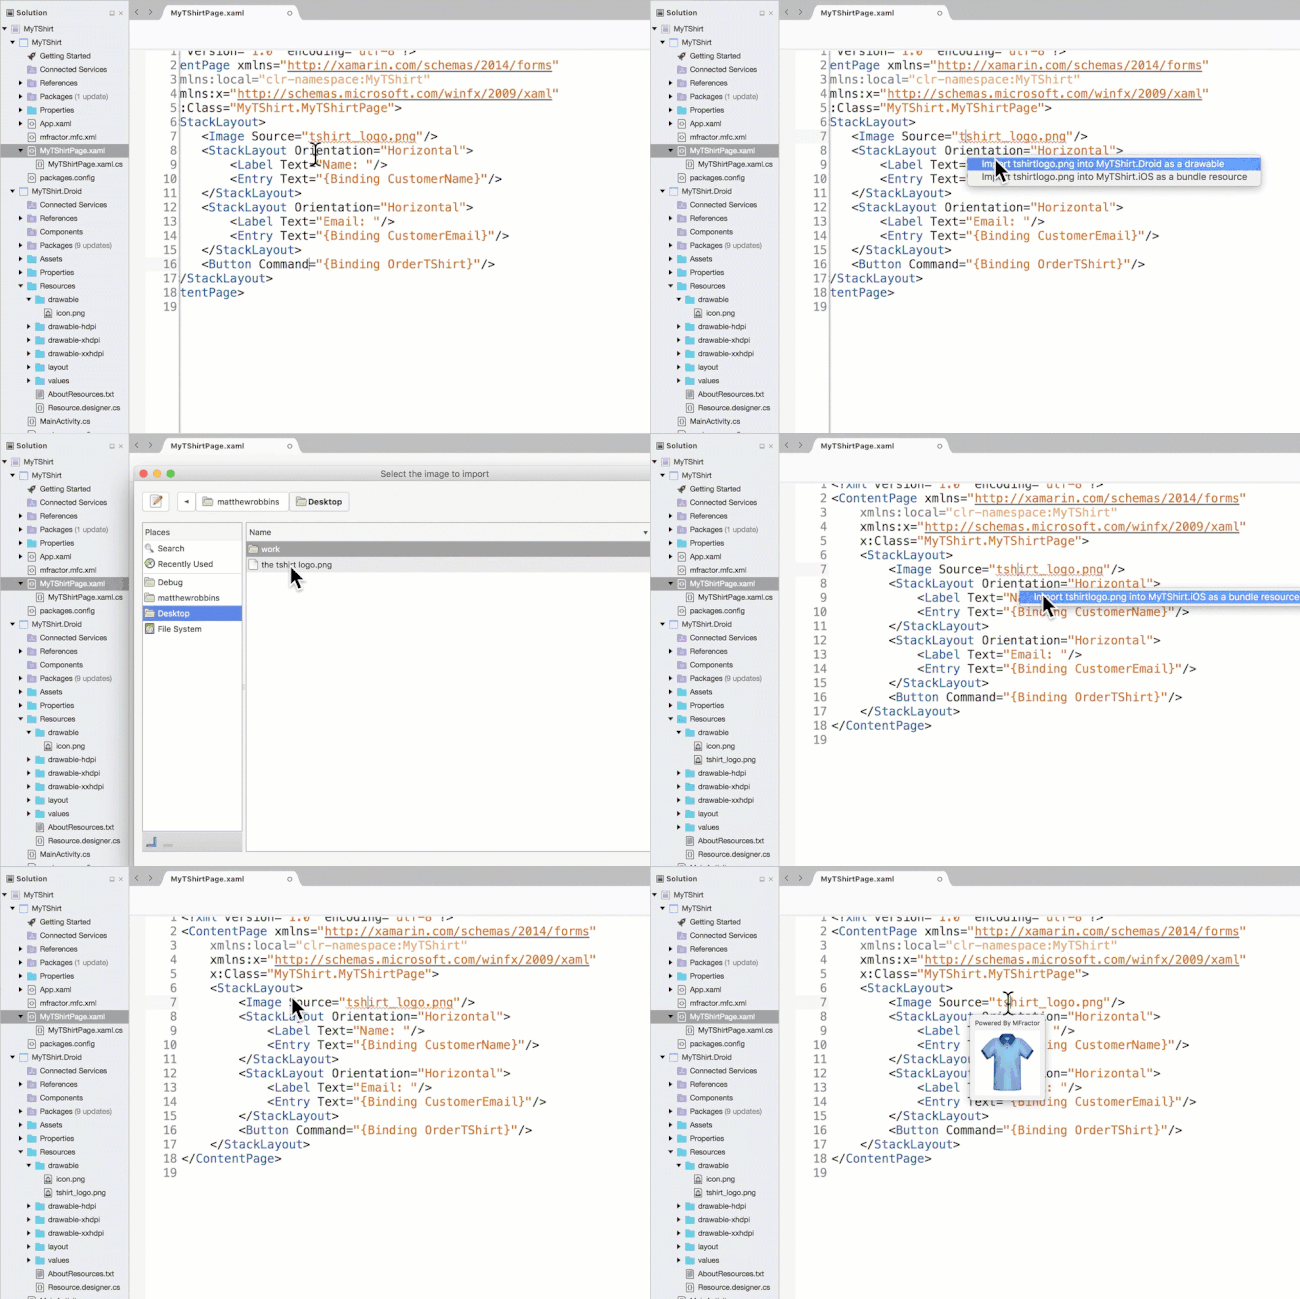
Too easy! We can also hover over the image reference and view our freshly imported image in MFractor’s image tooltip.
To learn more about MFractor’s image tooling for Xamarin.Forms, see:
- Missing image detection. (Professional Only)
- Importing images from your XAML. (Professional Only)
- Image tooltips.
Create Our View Model
Next, let’s create the view model for our page.
Instead of manually creating the view model class and then writing out our bindings, MFractor makes this dead simple.
Just right click anywhere in the XAML page and select Generate a new ViewModel for XAML view:
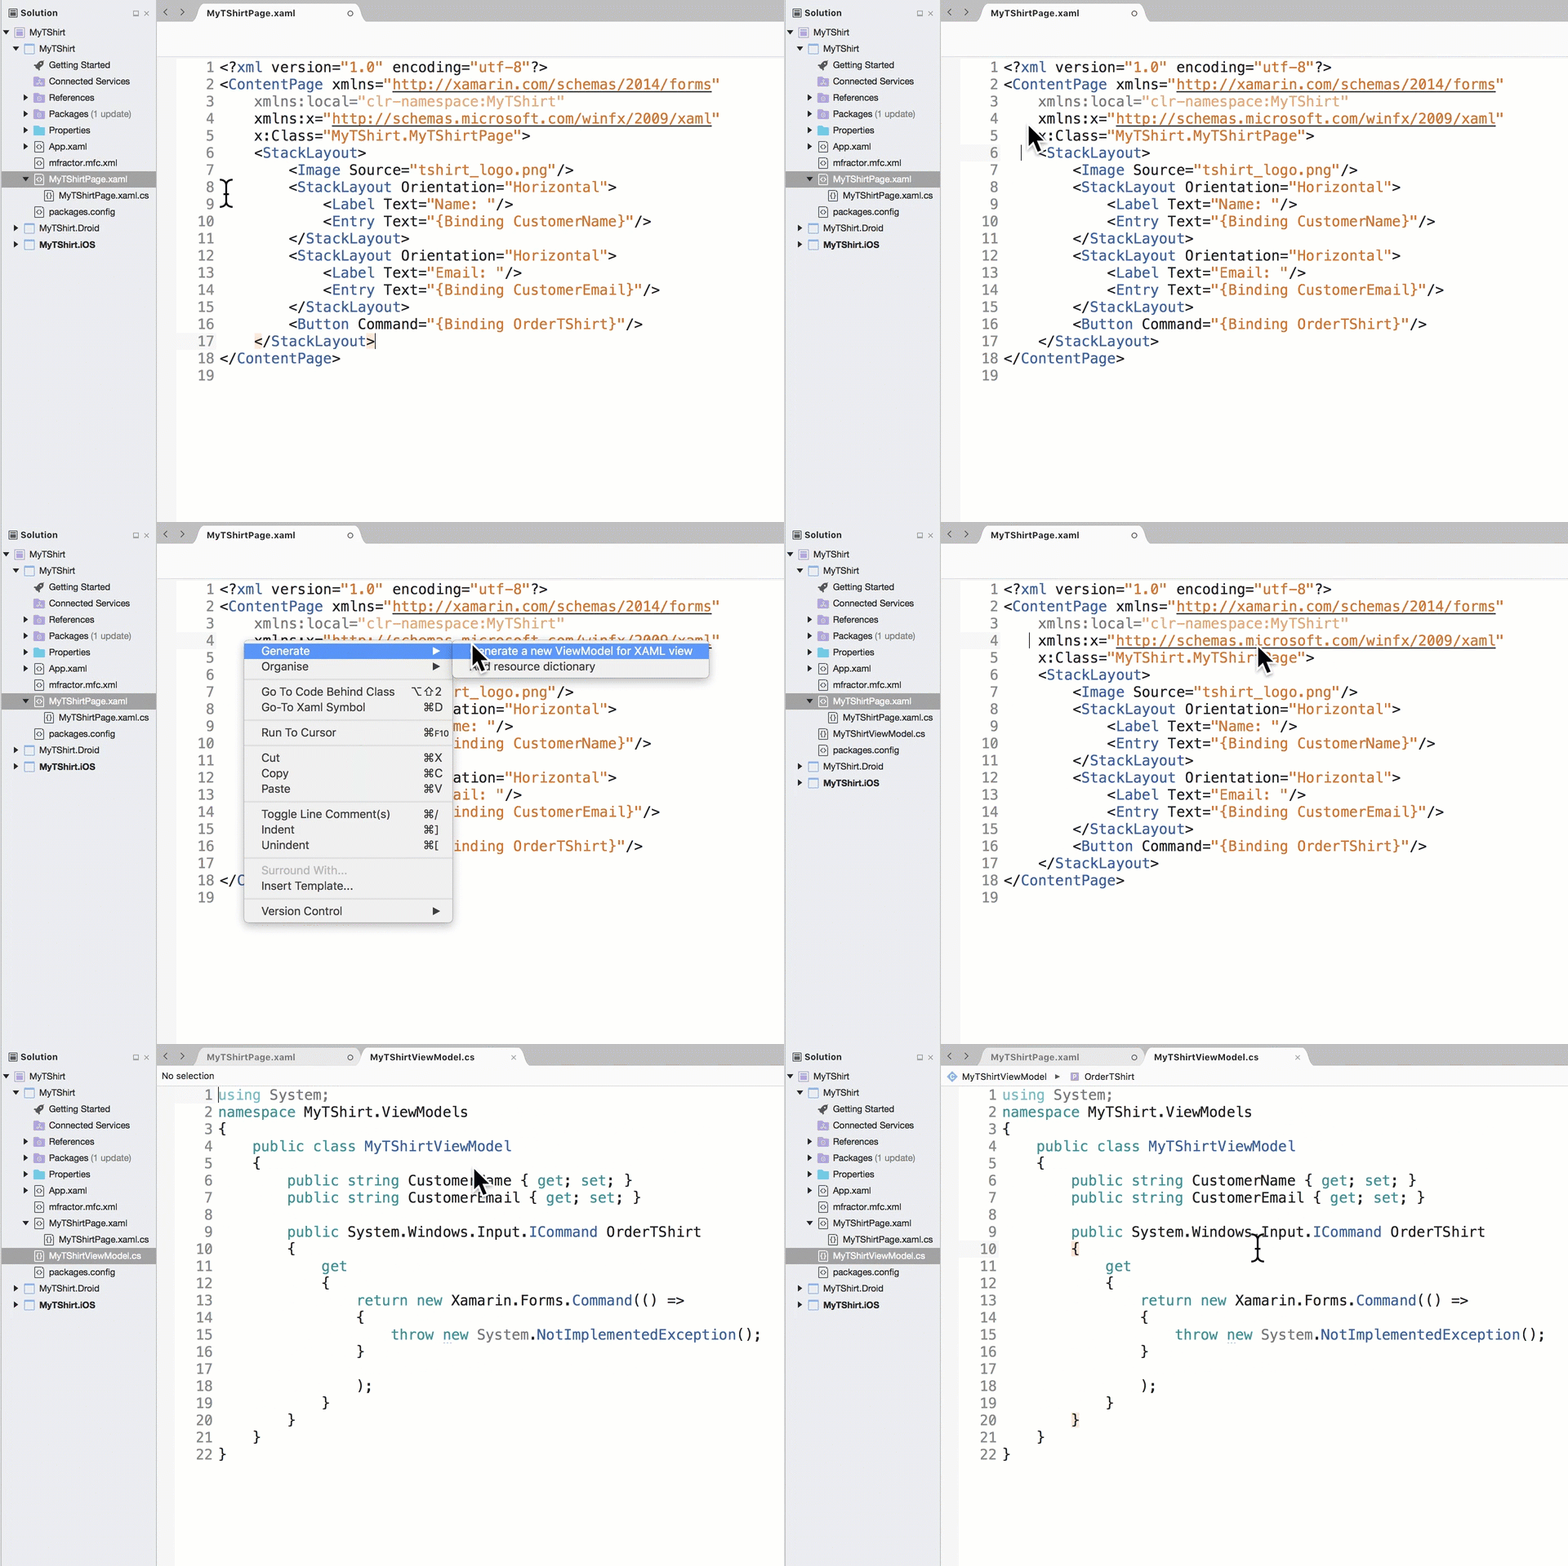
MFractor will check all data-bindings in the page, generate a new class named MyTShirtViewModel, and then implement all the data-bindings into the view model as public properties. It will even generate a command stub for the buttons OrderTShirt command!
MFractor will honor the Page and ViewModel naming convention when generating new view models. It will also consider the MyTShirtPage and MyTShirtViewModel associated through this naming convention.
Voila! In a very short amount of time we’ve built the shell of our T-shirt app, ready for the app logic to be written.
To learn more about MFractor’s view model tooling for Xamarin.Forms, see:
MFractor for Xamarin.Android and C#
MFractor isn’t just for Xamarin.Forms developers, you can also supercharge your Xamarin Native development with a suite of very useful tools for Xamarin.Android and C#.
For Xamarin.Android
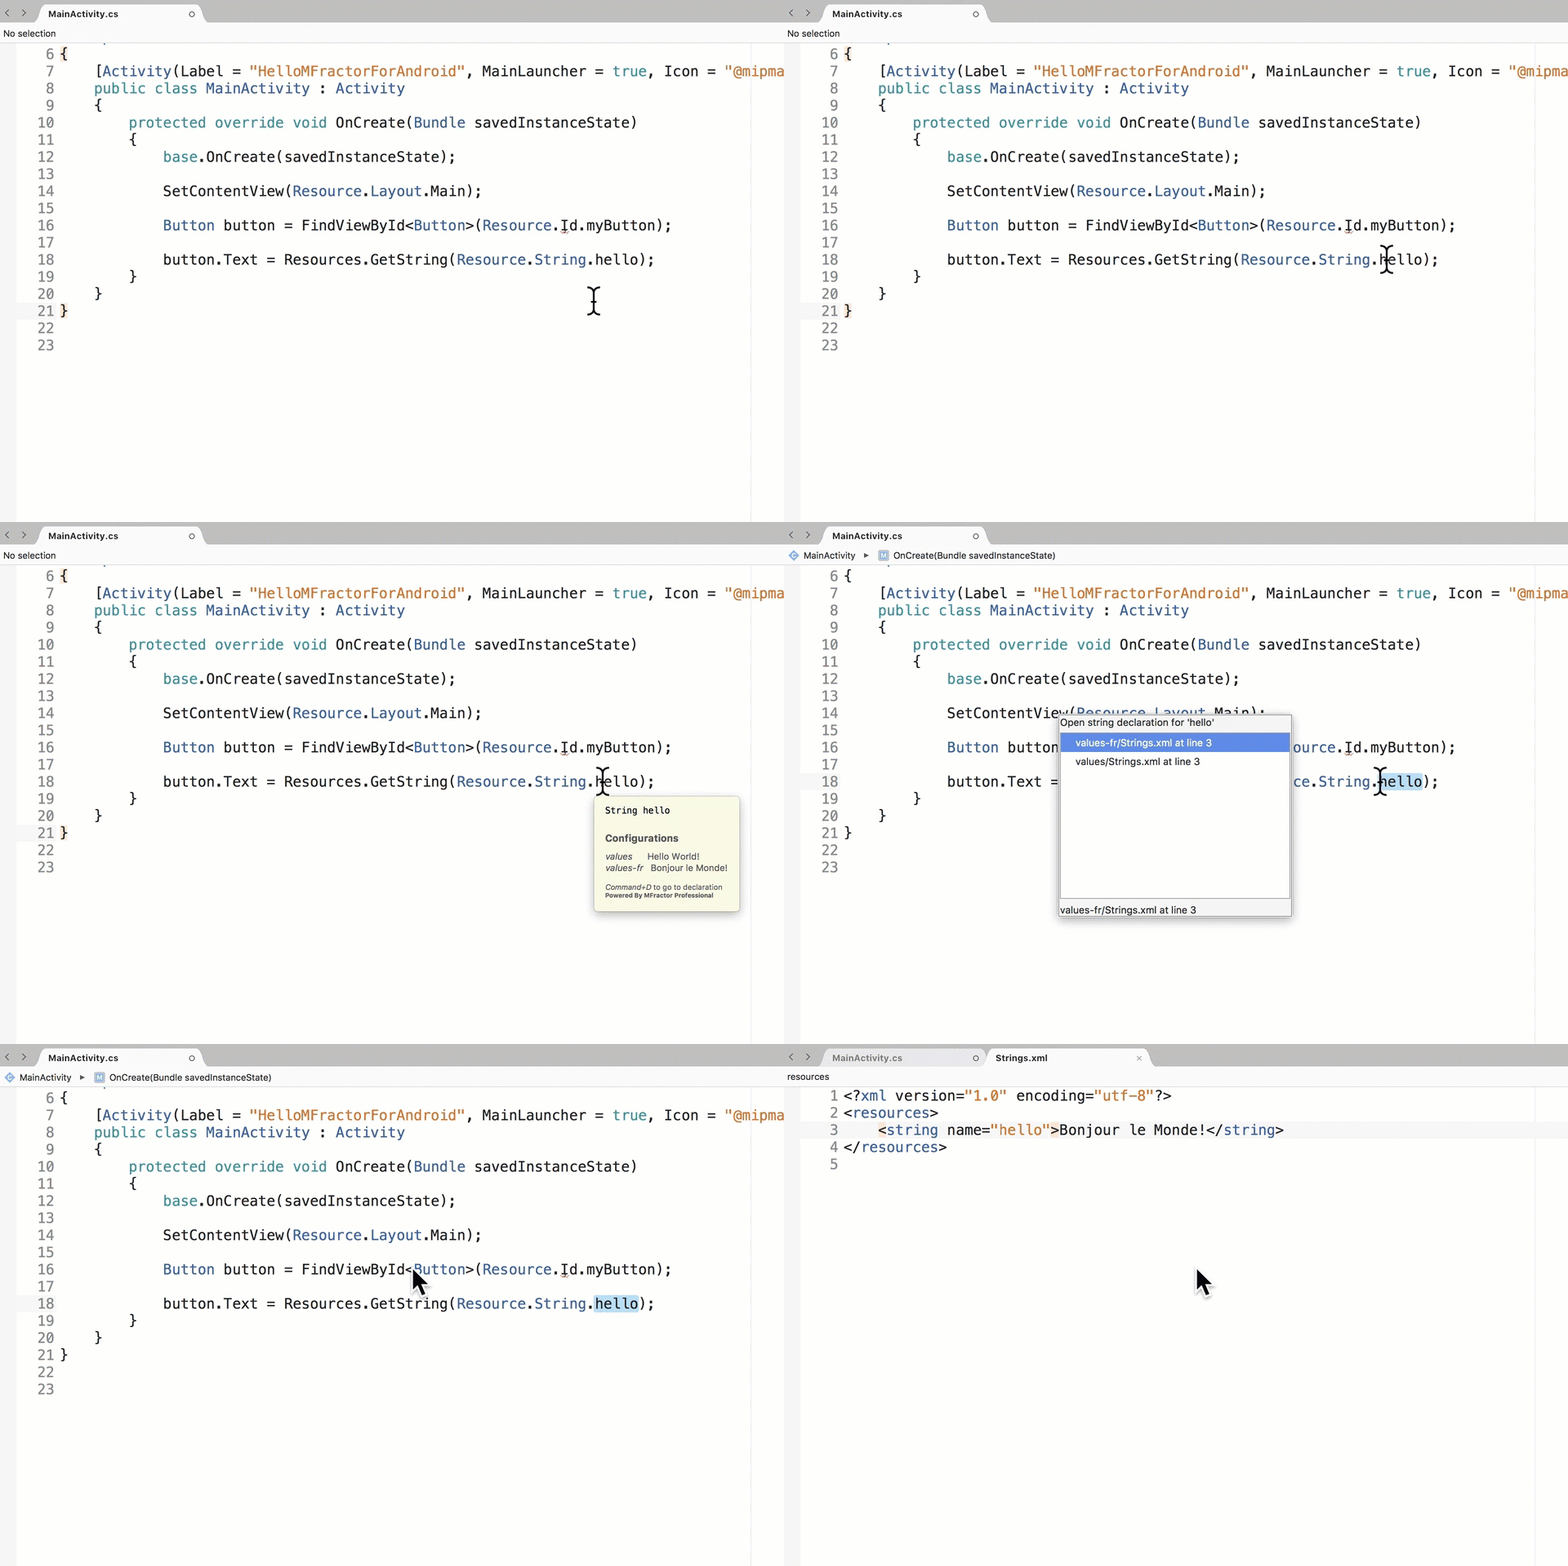
Use resource tooltips to view in-depth information about a particular Android resource and then easily jump it:
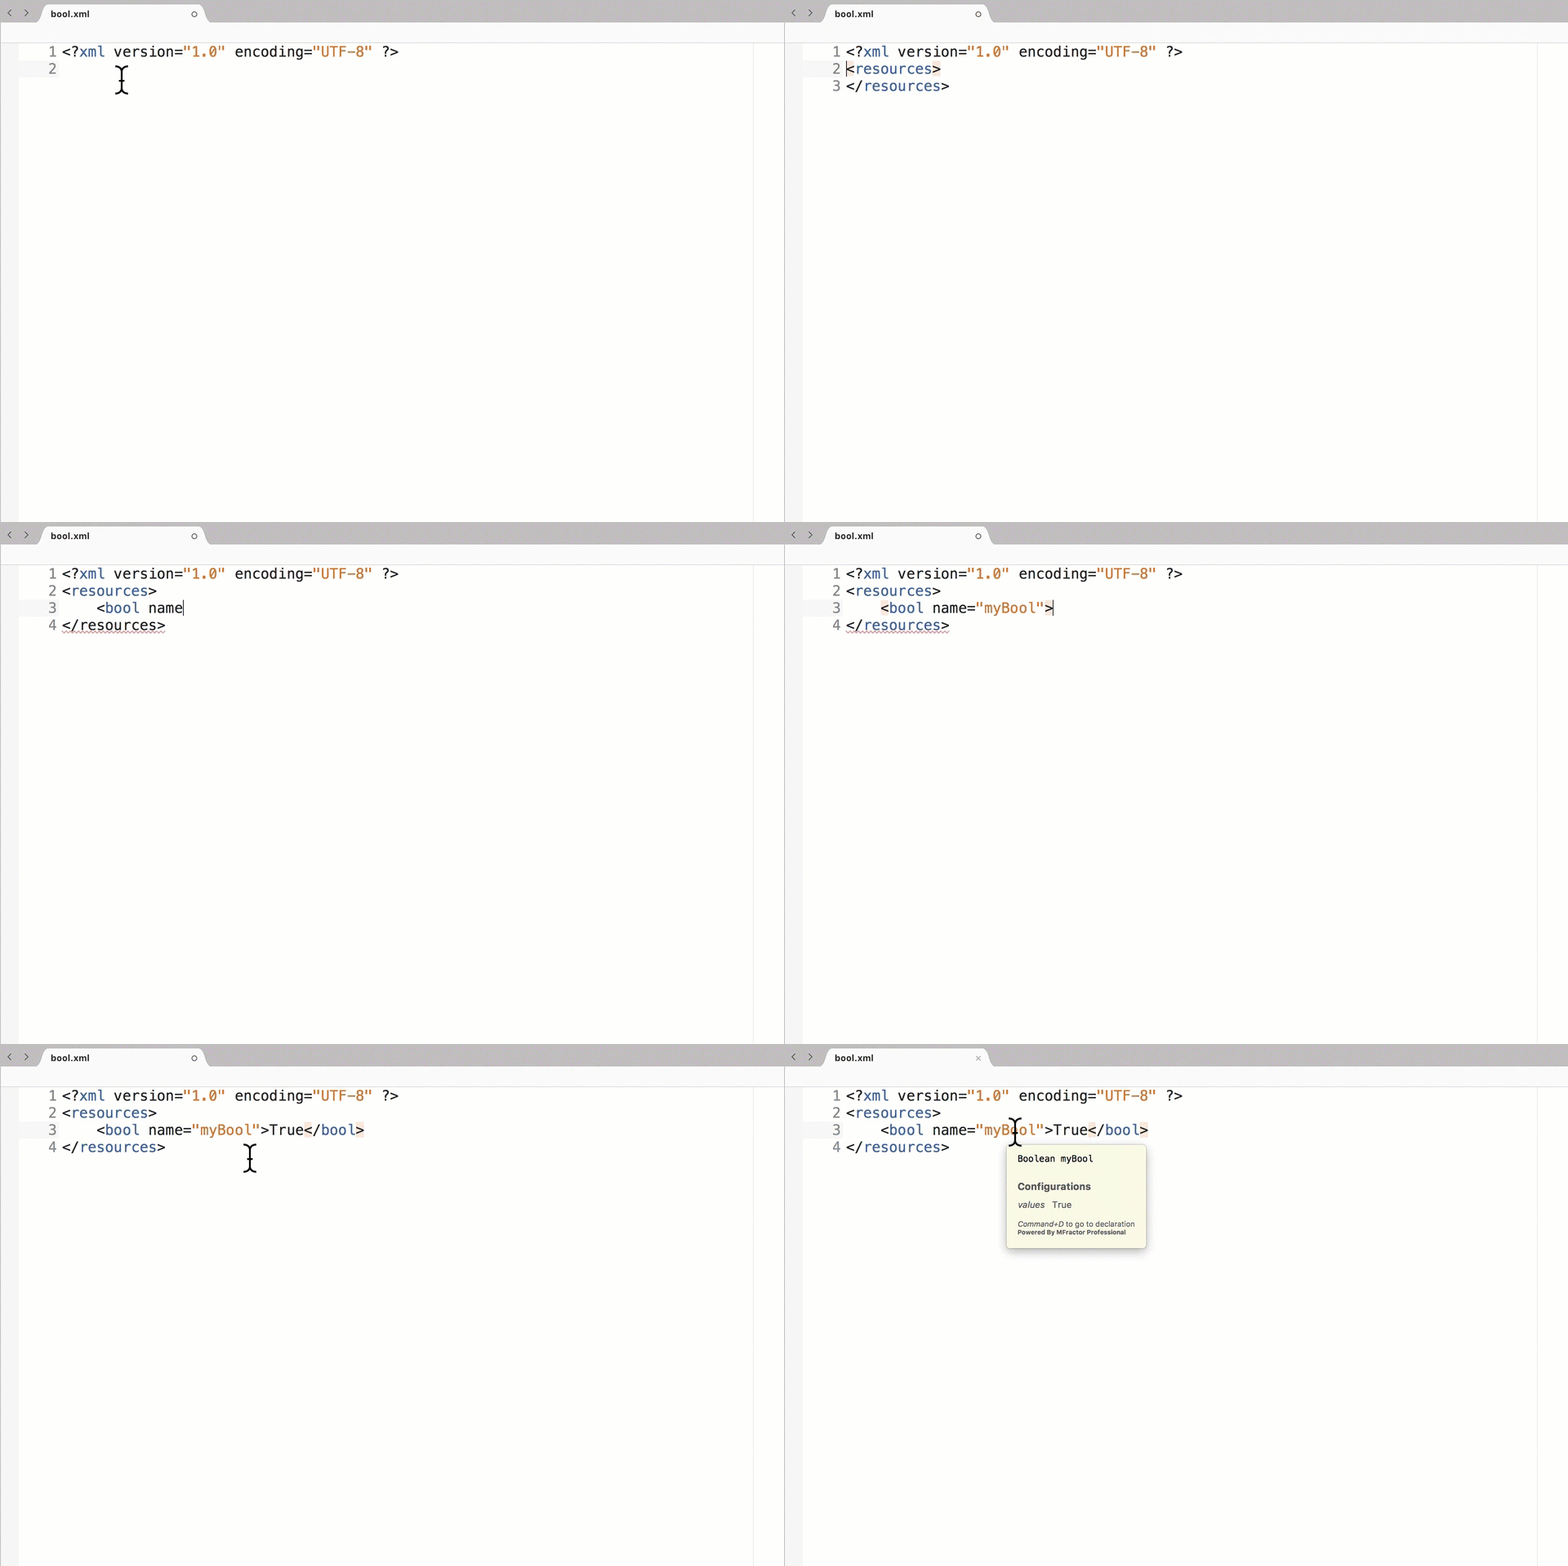
You can also use Resource IntelliSense to build your resource files quickly:
For C# (Premium Only)
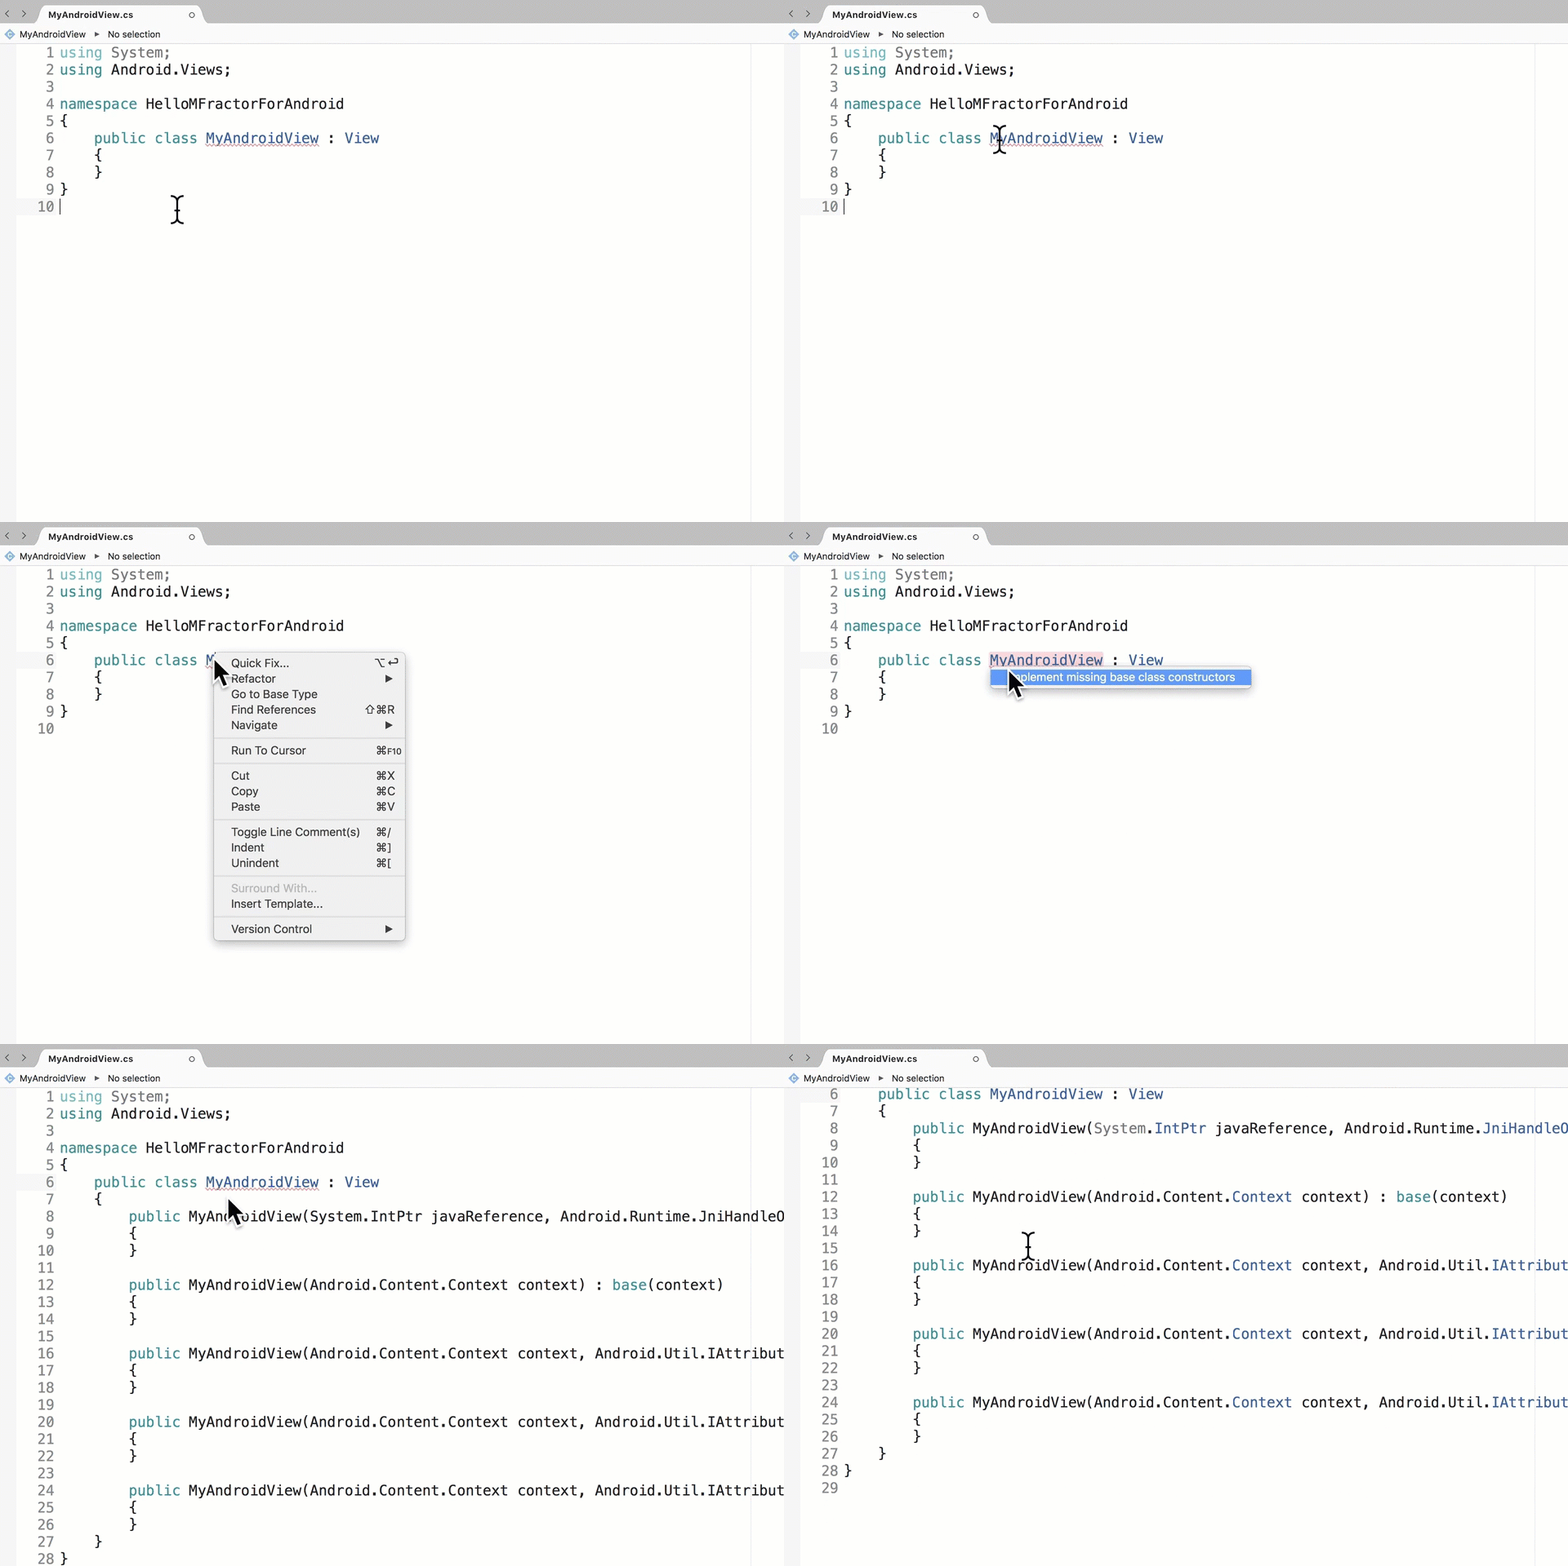
Bulk create missing base class constructors:
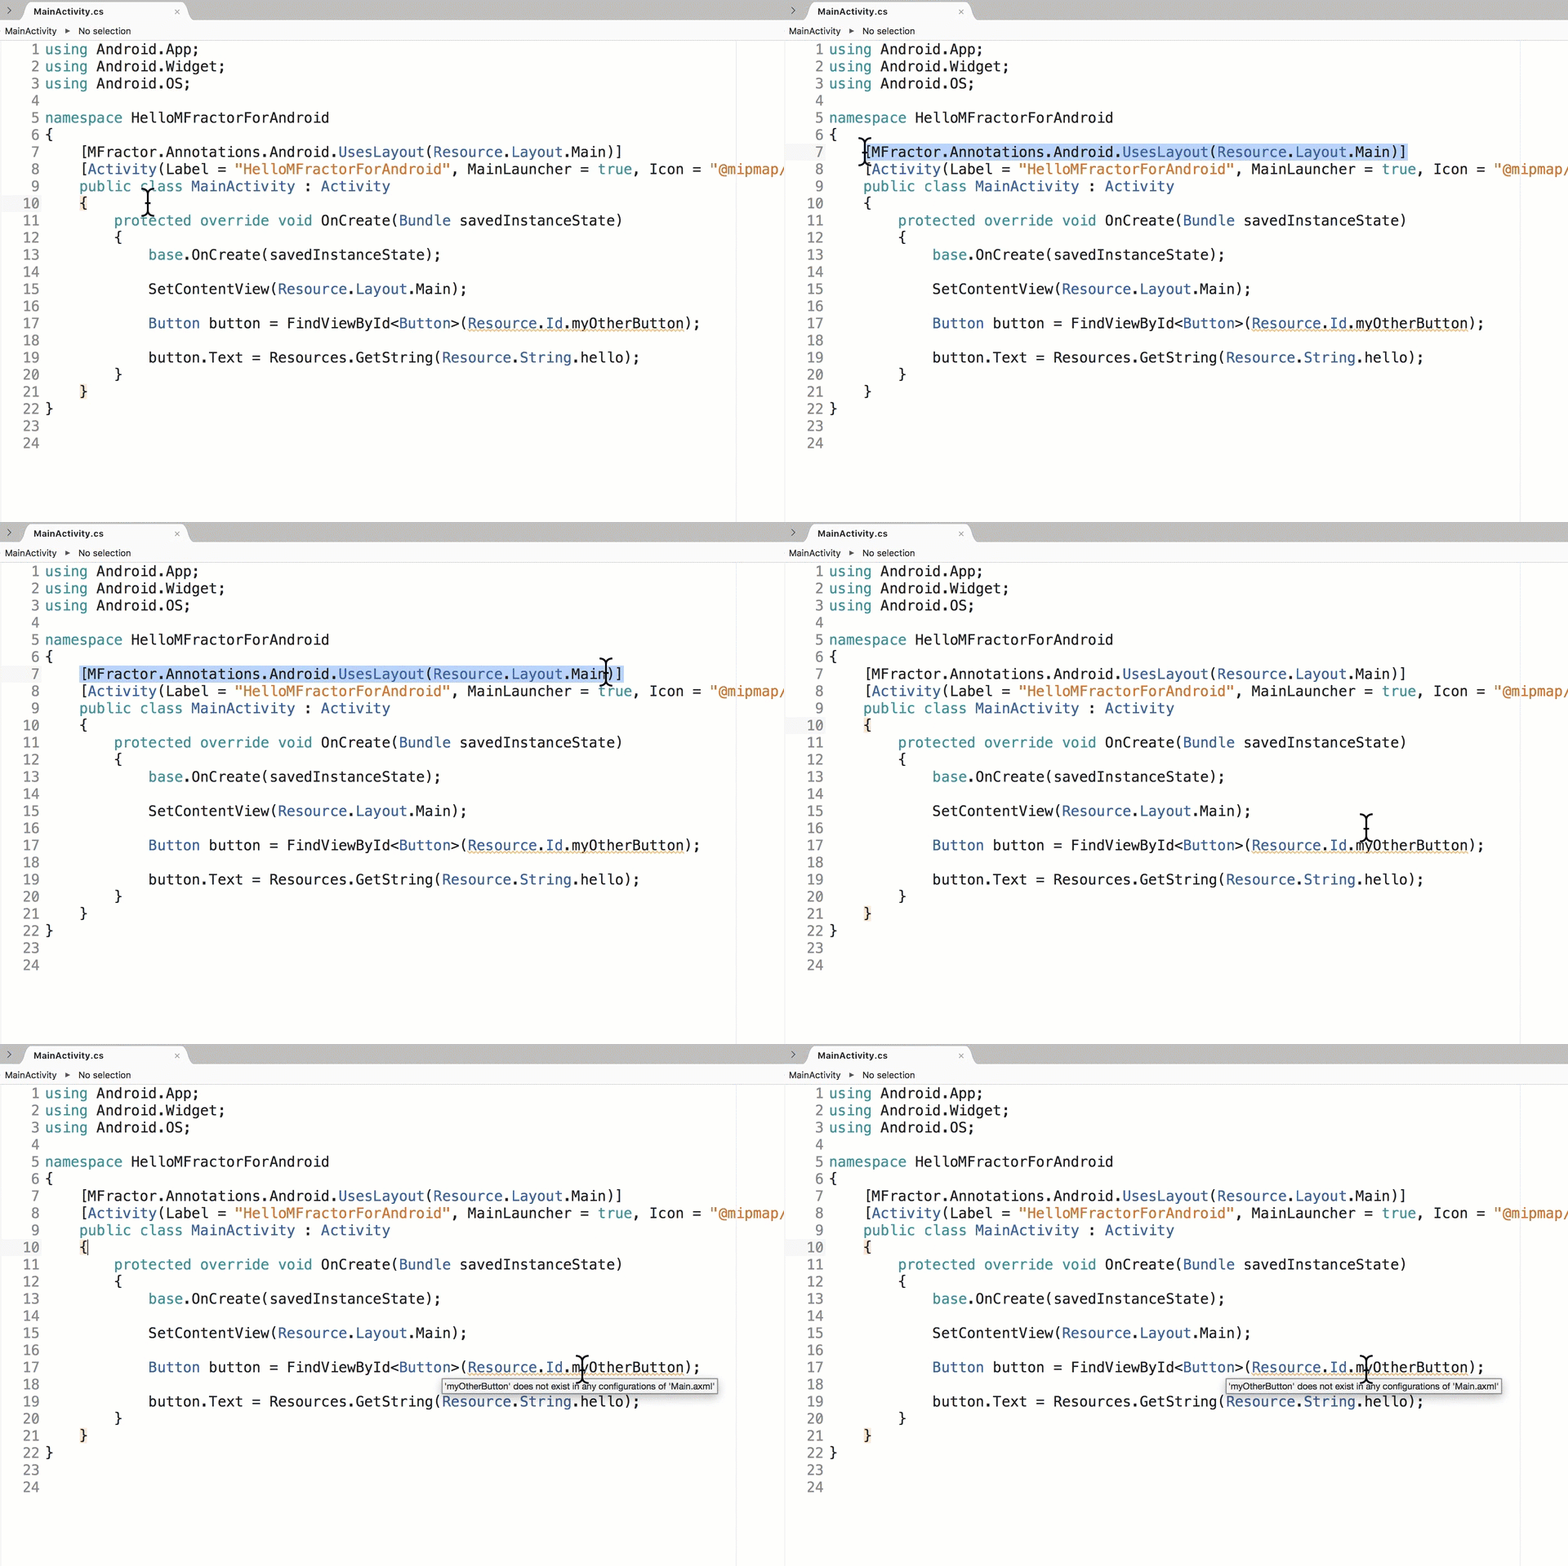
Use the Android C# API code analysis to find tricky Android issues, such as missing views in a layout:
Get MFractor
Now I bet you’re wondering just how you can get MFractor for Visual Studio for Mac.
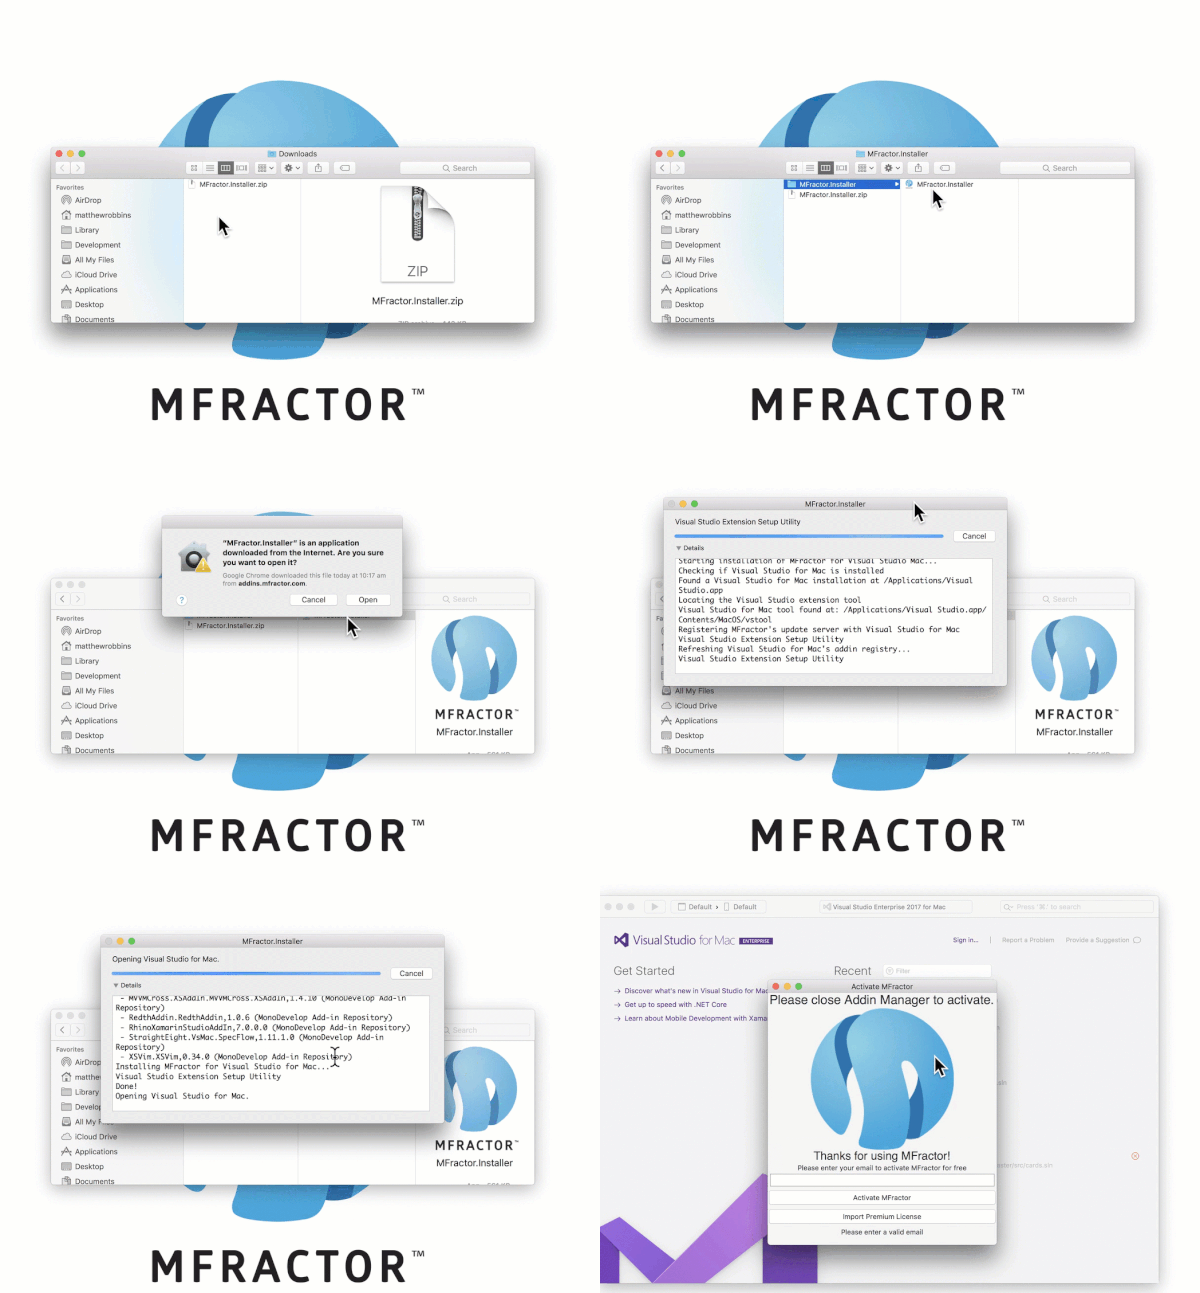
It’s simple! To access MFractor Lite for free, just download the MFractor.Installer app, run it, and activate MFractor using your email address:
If you’d like C# tooling, advanced Xamarin.Forms tools (such as image analysis), or the ability to change the code MFractor creates, you can purchase an MFractor Professional license.
MFractor Professional is $299AUD per user per year; licenses can be purchased at https://https://https://www.mfractor.com/buy.
Summary
In this article, I’ve only started to scratch the surface of how MFractor can help you be a more productive Xamarin developer. There are still many useful tools you can use, including control importing, value conversion tooling, or generating XAML code snippets.
If you’d like to learn more about MFractor, reach out to me on Twitter, Slack, or viaemail.
Matthew Robbins, Creator of MFractor
