
Windows 10 tweaks, optimizations, and build tips for pro audio workstations / DAWs – Part 2 of 3
For all the caveats and other things to be aware of, please read Part 1. It’s very important for you to understand the nature of this tweak guide, its support status, and how it should be used. It also helps to know what parts to start with. 🙂
Permalink for the start of this guide: https://aka.ms/Win10AudioTweakGuide. Please use this URL when sharing.
This is Part 2 of 3. Once they become available, you may find the other posts here:
- Part 1: Introduction and PC picking/building
- Part 2: What to tweak proactively, and what to consider doing
- Part 3: What not to do when tweaking your digital audio workstation
It’s important to note again that this is an unofficial guide. The tweaks and tips here are not necessarily supported by or recommended by Microsoft, the Windows team, or the companies involved in building the hardware and software you are using. I’ve put this out based on my own experience and research. As with any list of “tweaks”, use these at your own risk and expense. Agree, disagree, or otherwise have an opinion on anything here? Please drop me a note in the comments.
Now, with all that out of the way, on to the post-build tweaks. In part 1 I covered things to look for when building or buying a PC. With those decisions made, it’s time to consider what changes you may make.
Some of these may not sound like “tweaks”, but they can make a real difference. Why aren’t there pages of tweaks in this section? Because there aren’t pages of tweaks that anyone should tell anyone else to do to their workstation without a whole lot of other information available. Like I mentioned in part 1, I strongly disagree with one-size-fits-all types of tweak lists, so I’ve broken this up into a few sections.
What to do or tweak proactively
A typical PC build has a number of dials you can tweak and changes you can make to modify performance characteristics. These are the few things I generally recommend everyone do, with a few caveats noted. Most of these are also the things I do on my own workstation builds before I ever get recording or measuring.
Remember, many have a perfectly fine experience without doing any tweaks at all. Your mileage may vary based on the hardware you picked, and your own needs, but Windows isn’t something which needs a massive investment of your time to make it possible to use for music creation and editing.
Do pick a good audio interface with native ASIO drivers
Technically part of the setup / build info in the previous post, but I decided to include it here rather than edit that one.
First, a quick plug for the DAWbench Low-latency performance database. Not all audio interfaces are created equal, and most but not all audio interfaces with Windows support have an ASIO driver (a requirement for the best performance on Windows).
You can use ASIO4ALL (an ASIO wrapper around WDM) or straight-up WDM/WASAPI audio in a pinch, especially if you want to work on a laptop without any external interface, but you’ll get much lower latency and more tracks when using a supported external interface with an ASIO driver.
As to the type of interface, here’s a quick cheat sheet:
- USB: the simplest to choose. Supported by everything. Windows 10 includes an in-box USB Audio Class 2 driver, but it is not intended for musicians. Always install the vendor-supplied ASIO driver
- PCIe: This is what I use, but my interface is quite old at this point. PCIe interfaces are few and far between now, but some of the best performing ones are PCIe.
- PCI/PCIx: You can still find old PCI/PCIx devices out there. In some cases, you can get these to work through adapters that plug into PCIe. However, I don’t recommend this approach unless you have a large investment you need to leverage.
- Thunderbolt: Windows 10 supports Thunderbolt 3, officially. Most interfaces are Thunderbolt 2. If you have the correct TB3->2 adapter (the Apple one tends to work well, as does the Startech, but go with what your peripheral manufacturer recommends as often only one of the two will work), most of these will work. Note that when setting up TB, you’ll need the Intel app and drivers, the motherboard drivers, and the audio interface driver. In the BIOS, you’ll often need to enable Thunderbolt and set the permissions so that you can connect any device to it.
- Firewire: Folks have gotten Firewire to work, but it’s very hit and miss. If you must support an old Firewire interface, search around for others who have gotten it to work with your motherboard. If purchasing new, I recommend staying away from Firewire.
- AVB: Windows does not currently have in-box support for AVB. Most AVB interfaces also support USB or Thunderbolt connections to a PC.
- Dante: Dante interfaces typically come with their own drivers and setup instructions, which work on Windows 10. One of our studio buildings on campus has a large Dante installations in the world, but I have not yet visited it in-person.
- On-board audio, Soundblaster, etc. These are not designed for musician use, so performance will vary. However, we’ve done work so that Surface devices can hit reasonably low latency levels with on-board audio. If your DAW supports WASAPI/WDM audio, you can use these directly. If not, you can use the free ASIO4ALL wrapper.
Do disable unused peripherals in the BIOS
To avoid potential conflicts, I find it helpful to disable, in the BIOS, anything you do not plan to use. This goes to simplifying your configuration to have as few potential sources of issues as possible. Specifically, I recommend disabling:
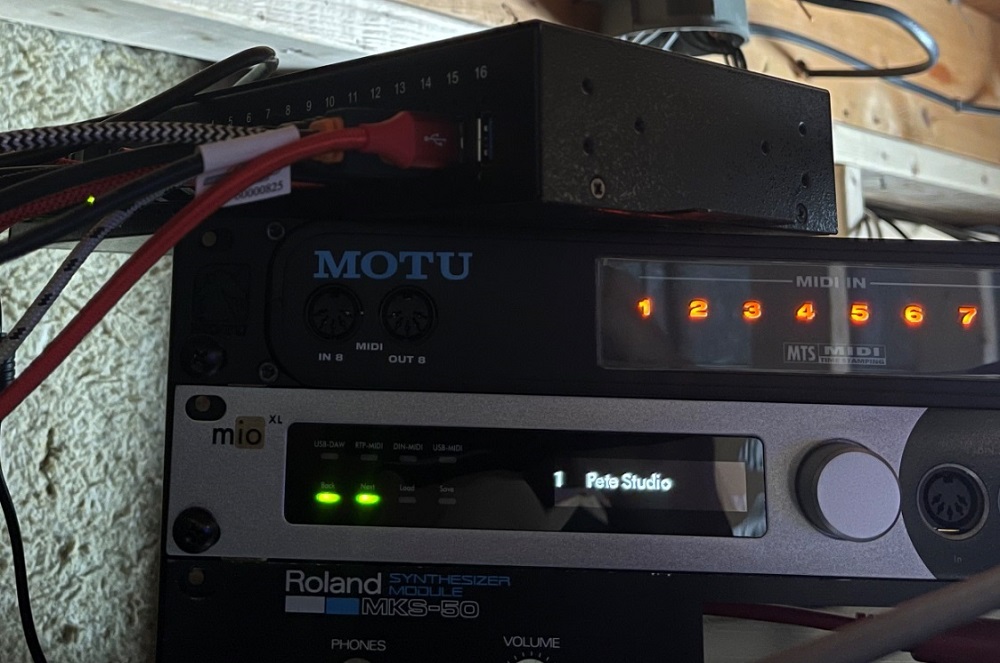
- On-board audio, if you use your interface for Windows audio as well as DAW work. I use my MOTU interface for both Windows audio and DAW/ASIO audio. Not all interfaces support both ASIO and Windows audio at the same time, however.
- SATA controllers/ports you aren’t using, assuming they share resources with other components on the motherboard
- WiFi if you don’t plan to use it Wired networking is almost always superior. If you have a laptop without an Ethernet port, you can get an USB->Ethernet adapter. WiFi is a common source of DPC latency, which can cause audio glitches.
- On-board graphics if you are using a discrete video card. You can keep both, but I’ve found this to be more trouble than it’s worth. In a gaming laptop you’ll see both tied together mostly to preserve battery life and to lower heat. On a desktop, just use the discrete card if you have it. Bonus is you won’t have the integrated graphics robbing you of memory you need for DAW use.
Doing this in the BIOS before you first install Windows will help keep the device tree simpler, and also avoid allocating any resources, installation of unnecessary drivers, etc. It also prevents them from reactivating after an update, which is something that usually happens when you disable them in Device Manager.
Will this make the PC perform better? Maybe, but not necessarily. Reducing the number of components will help with debugging, and will provide you more options for allocation of slots/resources on the board.
Tip: Simplify your configuration in the BIOS before installing Windows.
Do maximize your memory speed
I mentioned in the previous post that it can be worth having memory that is rated higher than the minimum for your CPU. The motherboard memory compatibility list will usually tell you which speeds it can handle.
Having memory that can handle higher clock speed than the minimum for your CPU can often help with memory-intensive tasks like video and audio editing, sample manipulation, and more. Look for memory, on the compatibility list, that is a couple steps above the minimum and has an XMP (eXtreme Memory Profile) setting that your motherboard can use to setup the memory.
In the BIOS setup, you’ll typically need to manually select the XMP setting for your memory. Most BIOS setups default to a minimum speed, and most RAM lists two profiles you can pick from.
I don’t suggest getting the most expensive RAM out there, as that is rarely worth the premium price. In my case, my processor specifies DDR4-2666. I have DDR4-3200 installed. There’s lots more info out there in overclocker forums, especially regarding latency, but really, just picking something slightly above minimum is easy to do without getting too technical.
Finally, get the optimal number of channels of memory. This varies by motherboard and CPU, as well as by the memory itself and the organization of the chips on them. It varies most between Intel and AMD processors, or with signficant gaps in processor generations. The motherboard vendor site will usually have information on this in the manual or their support documents.
Tip: Memory performance can make a real difference, especially if you work with large sample libraries. Slightly overclocking your memory is an often overlooked source of performance.
Do consider your USB connections
I mentioned some of this in the previous post, but I’ll summarize here.
- Understand, from the motherboard manual, how the USB ports are connected. Some may be direct to CPU/chipset, some may go to on-motherboard or in-chassis hubs. You almost always have more options here with a desktop vs a laptop.
- If using USB audio, try to keep your audio interface on its own, or at the least, keep it away from mouse and keyboard and any wireless dongles (headsets, bluetooth, wifi, etc.), as well as away from any slow USB 1.x devices. You want to minimize contention here.
- Use good hubs. Not all hubs are created equal. There are articles on the net that cover MTT vs STT hubs and more (these are primarily of concern with USB 2 hubs with 1.1 (like most MIDI) devices attached). But good quality powered hubs can be both more reliable and faster than many of the cheap bus-powered hubs. This is true regardless of operating system.
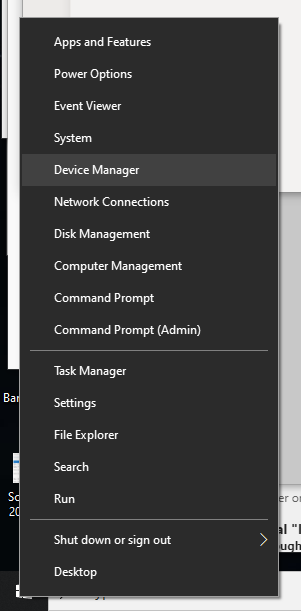
If you want to see how your devices are connected to Windows, you can open Device Manager (using Windows+X or right-click the start menu button for the power user menu, or by typing “Device Manager” into search).
Once in Device Manager, from the View menu select “Devices by Connection”. Once there, open up the USB host controller (and any other nodes of interest) and see how deeply nested the devices are. Depending upon the setup of your motherboard, and if you have any PCIe cards with USB ports (common on new graphics cards, for example), you may have USB ports and devices enumerated in a few places.
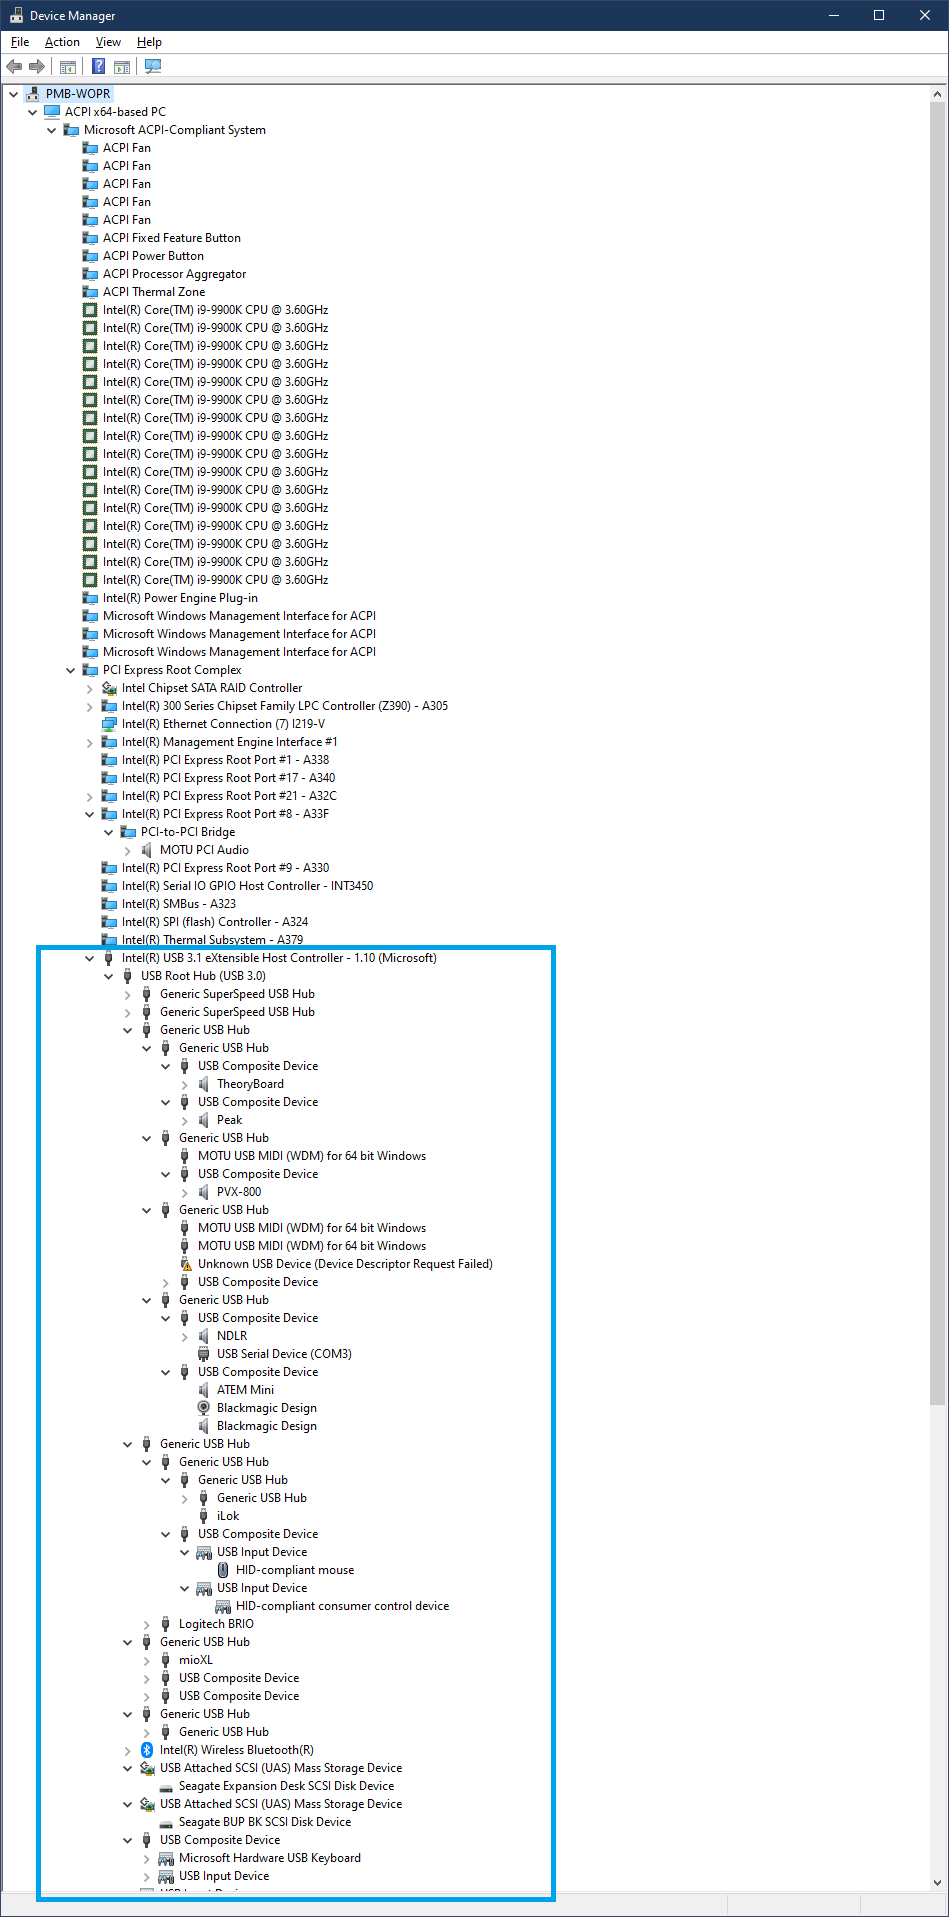
The above is a snapshot in time of my setup. It’s not perfect, but it works well enough. 🙂
Most devices, including USB MIDI, are fine when nested down a few hubs deep, as long as you have decent hubs. It’s not something to stress much about unless you’re daisy-chaining a bunch of hubs. The ones to really pay attention to, for DAW use, are the USB audio interfaces, and looking to see what else is on the same branch of the tree with that interface. That said, as with anything else, test both before and after you move anything around to see if the change had any real impact.
I don’t use USB for audio (I use PCIe). For my USB MIDI devices and interfaces, I use two of these 16 port hubs: Coolgear USB3-16U1, both bought used on eBay (included power supplies, but not rack ears), as my primary hubs. I may add a third one soon, but likely brand new given that these haven’t shown up on ebay for quite some time now.
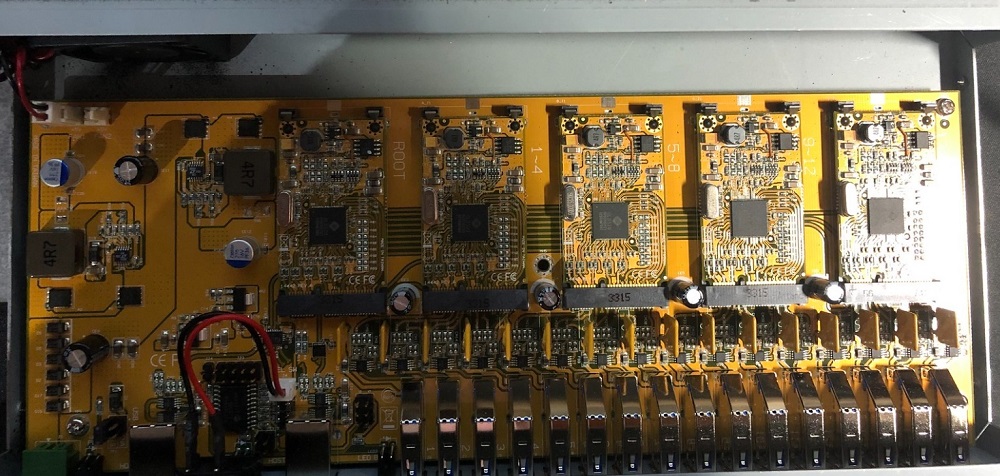
Here’s the info link. They have a fan in them, but because I don’t use them to charge anything, and they have airflow around the cases, I found that I could disconnect the fan without any negative consequences. Your mileage may vary. If you’re curious as to what they look like inside, I have Coolgear 16 port hub tear-down photos here.
Hub up above my desk:
Hub behind me, hanging from the ceiling:
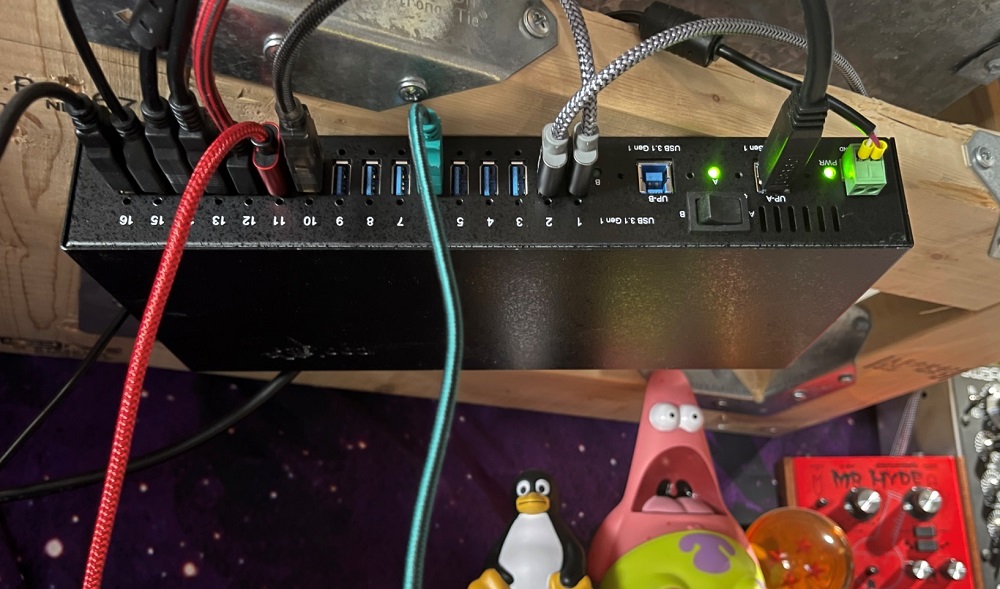
By this point, you’ve probably noticed that my basement office/studio lacks basic things like finished walls and ceiling. I blame synths for this weird set of personal priorities. At least I insulated it before winter.
If you’re interested in what’s inside one of these coolgear hubs, you can find my Coolgear 16 port hub teardown here.
Do use a recent and supported version of Windows 10
Each release of Windows 10 is like a new operating system. The spring releases have historically focused on features while the fall releases focus on stability.
There’s one release, in-particular, which I recommend you avoid: 1903. That release had a change in the kernel which negatively impacted audio performance. That was fixed in Windows 10 1909 and further tweaked in Windows 10 2004.
Additionally, versions of Windows 10 from 1903 onward include the FLS slot allocation change which enables you to load more plugins in your DAW.
Unless you can measure before and after, and intend to stay completely offline, I don’t recommend sticking to a single old release of Windows 10. If you do so, you will eventually run into issues with support from third parties, with the lack of bug fixes for tech you use, and more. For example, we fixed Bluetooth MIDI issues in multiple recent releases of Windows 10.
But if you know what you’re doing, don’t need support from hardware and software companies (please don’t tie up their support folks with questions on old operating systems), and don’t want any of the later features, and will keep the PC offline, then that’s entirely up to you. 🙂
That all said, as musicians, you may want to wait before upgrading to the most recent version, so you can let others be the early adopters and guinea pigs. That’s true on macOS and Linux as well. I cover the tools to do that on Windows 10, below.
Do use a maximum power/performance plan when plugged into power
Next up is the power/performance plan. No one wants to waste power, but there are real trade-offs when it comes to DAWs.
Windows wants to save power, as much as possible, especially when running on battery. This is good for the environment, and also good for battery life in laptops. Without various power savings options in place and active, the typical laptop would get hardly any runtime out of its battery.
Normally, Windows will shut down USB devices when in a power-saving mode. This is like how classic spinning rust drives will spin down when not in use. That saves quite a bit of power and wear, but in that case, the drives have spin-up time when you try to access them. You’ll notice similar behavior with some Bluetooth devices where they take a little bit to wake up.
But some USB devices, especially those related to audio, don’t like to have their power messed with, so we need to tell Windows to leave these alone. Otherwise, the devices sometimes fail to wake back up with Windows, or suffer bandwidth issues, or just plain don’t work. If every USB device were perfectly implemented, this wouldn’t be a problem. But reality sometimes gets in the way of things.
To get into the power management section of Windows, choose Start->Settings (the gear icon) and then click on “System”
From there, select “Power & sleep”
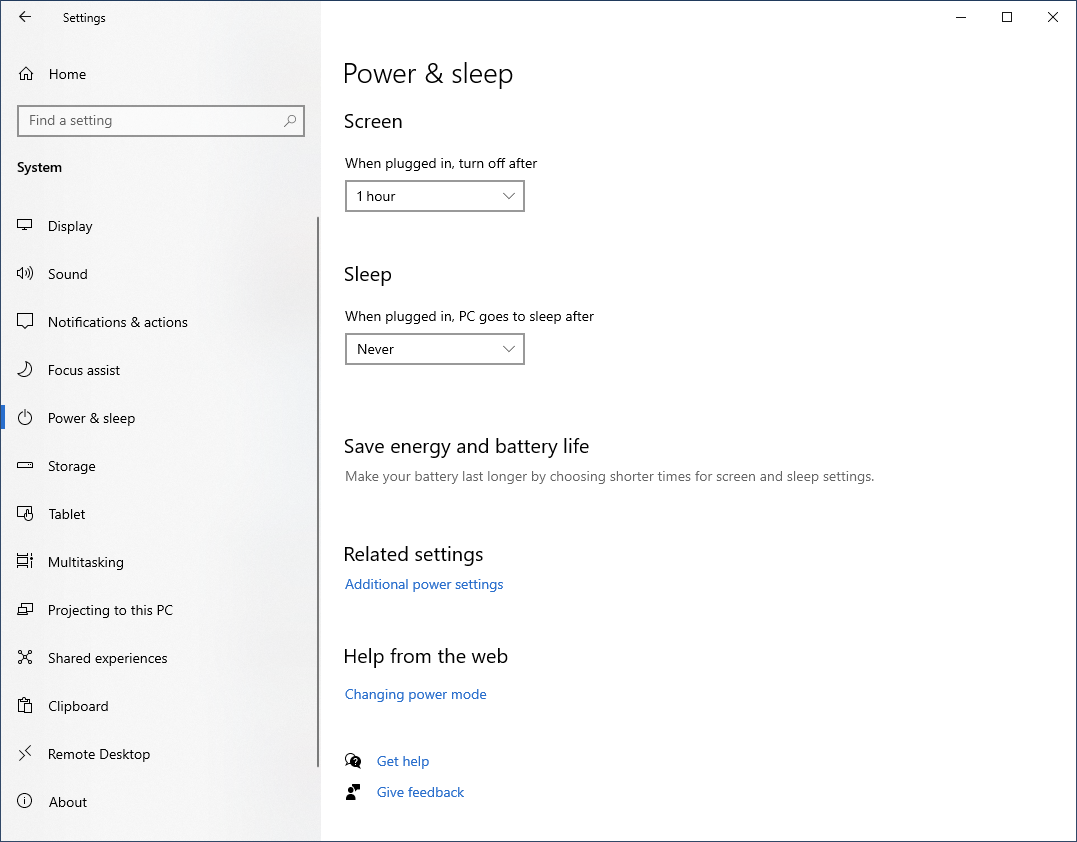
This settings page has only the basics. Those are sufficient for most users, but we’ll need to go a bit further.
Click the “Additional power settings” link. At the time of this writing, that pulls up the classic Power Options in control panel. (We’ve been slowly migrating settings from the Control Panel to the Settings app with each version of Windows, so it’s possible that these options may be in the Settings app when you read this.)
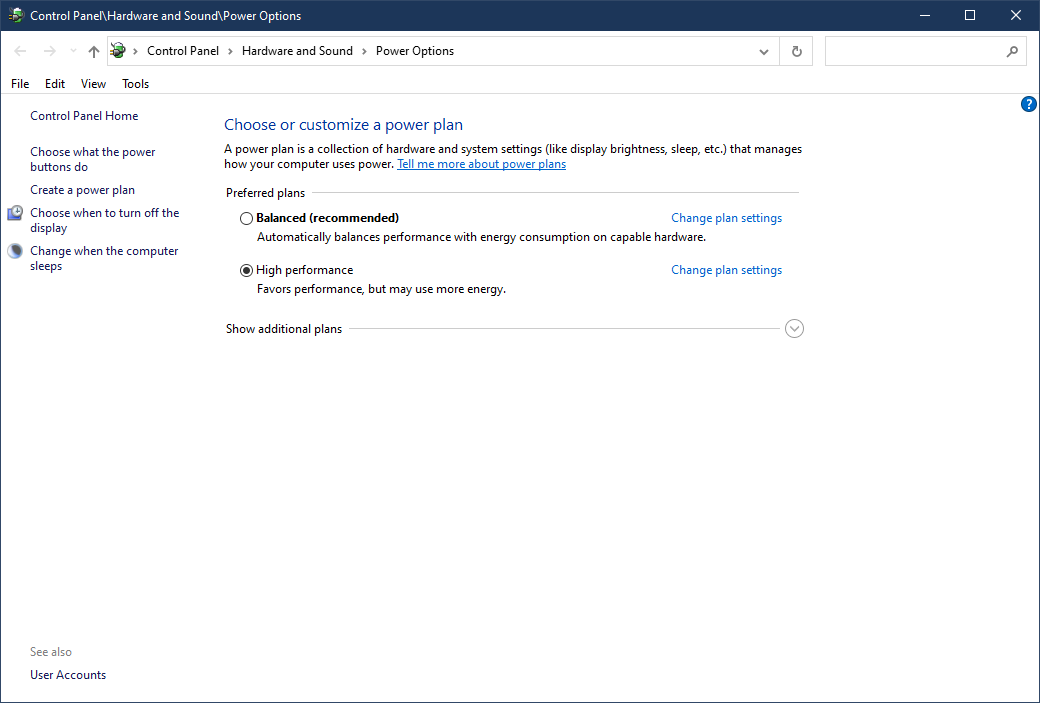
First thing to do, on a desktop, is change to High Performance mode. Again, understand that there is an environmental impact to this, and also a component longevity impact if you don’t have sufficient cooling in your PC. If you are using a laptop, this will burn through your battery more quickly. In fact, some laptops limit the options here.
Then click the “change plan settings” link. That will bring you to a page with the same options we have in the main Settings app.
Click “Change advanced power settings”
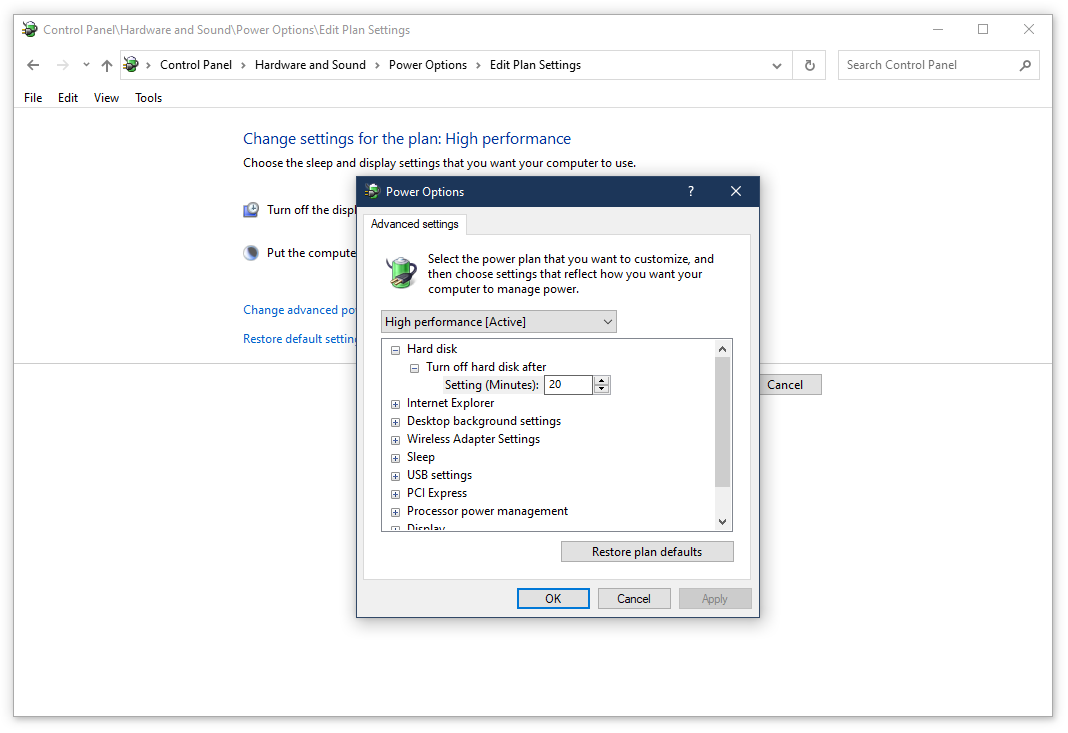
Here’s what I recommend:
- Turn off hard disk after (minutes): If you rely on a spinning rust hard drive for anything in music production, turn this setting up to something that will cover the gaps between times when you access this drive in a session. You really just want to avoid having to spin the drive up because you changed a preset or loaded a new sample. If you use only SSDs, this has no impact.
- Sleep: If you turn your PC off when not in use, I recommend setting the Sleep setting to “Never”.
- USB Settings: The USB selective suspend is the main one you want to be concerned with here. Set this to “Disabled”. Note that you can also turn this off on a device-by-device basis by using the Device Manager, but I have not verified that these settings survive an OS upgrade or a driver update.
- Processor power management: This is already set through the plan, but you want the minimum processor state to be 100%. Also see the notes about C and P-states below.
There are other settings there that you may be interested in, but the above are the most important to concern yourself with for audio production.
For those who want a way to switch power plans using a script (for DAW use vs normal use, or for when traveling vs in the studio), check out the PowerShell and WMI information in this blog post. I’ve also just put together a blog post for using the powercfg utility to easily and quickly switch between active profiles. You can find that post here.
Tip: Of all the possible tweaks, the power settings are some of the most impactful.
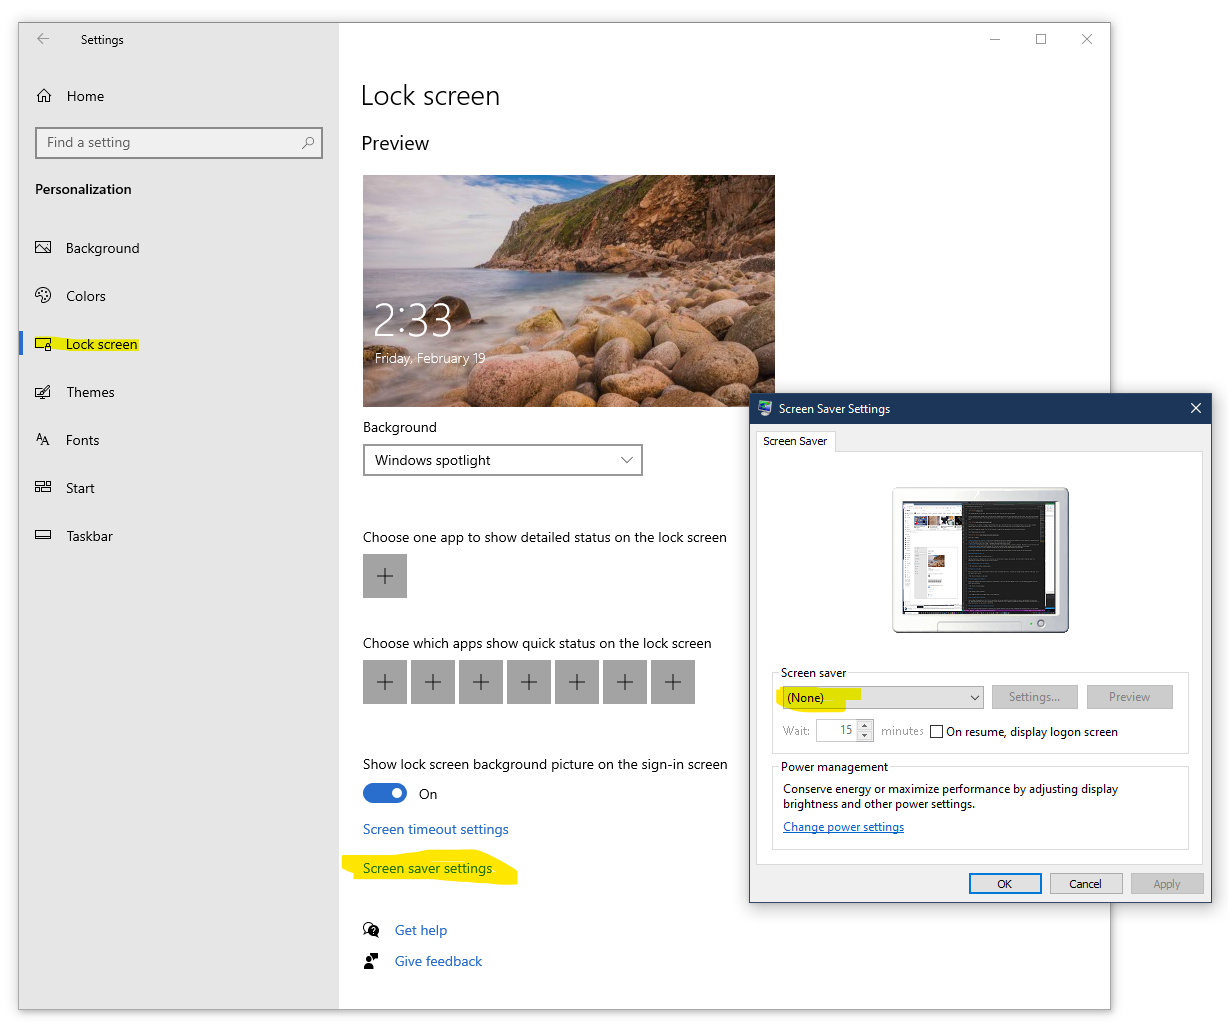
Do disable any screen saver
Most folks I know don’t bother with screensavers these days. When a screensaver might kick in, the power plan settings typically blank the screen anyway. If you don’t need it, don’t load it. Be sure yours is set to “none” through the settings app.
Do have and test a backup plan
This seems weird to have a tweak list, but I can’t tell you how many times I speak with folks, who make music for a living, but who have no backup strategy. This isn’t limited to Windows, of course. It’s human nature to think that bad things only happen to other people.
No one wants to lose work, but very few people have a sound (and tested) backup strategy. You want an approach which handles:
- Your own mistakes, like accidentally deleting something
- Archives of old work that you no longer want taking up live drive space
- Reverting to older versions of your work (this may be just file renaming, or duplicating folders)
- Ransomware that encrypts all your data
- Natural and man-made disasters that destroy your equipment
There are many ways to backup your work. I recommend using at least two approaches.
- Live sync to the cloud: I use OneDrive, but there are any number of services out there that offer this. This provides a cloud backup, but it’s more for sharing between my PCs than a real backup. When I want an actual cloud backup, I copy to a separate folder that I don’t otherwise touch, and ensure that is sync’d with OneDrive. One issue with live sync like these, vs an offline backup, is that it will live sync your mistakes, deletes, and should it happen to you, ransomware-encrypted files.
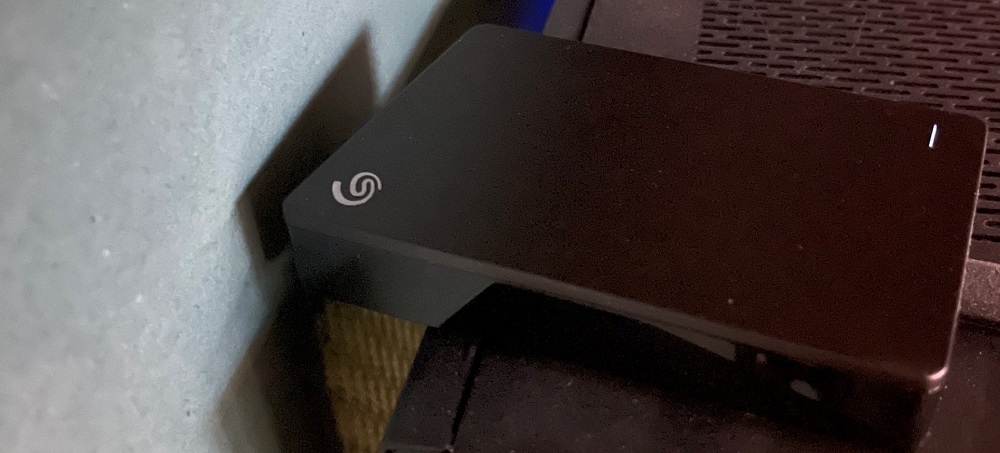
- Offline backup: This is easy to do. There are many USB or network-attached backup solutions which also contain backup software. Use one for true backups of your data. I use them for anything I can’t reasonably reinstall, so I don’t back up applications or the OS itself, but do backup all my data.
- Off-premises backup: Drives fail. Houses get struck my lightning, or worse. This is important to consider should your home or devices suffer some sort of disaster. There are many services online which offer off-premises backups. If you make a living from your work, or consider the time you spent making music to be valuable, you’ll want an off-premises backup strategy of some sort.
Whether you use an automated approach, or you manually back up at key milestones, make sure the backup is never older than what it would pain you or cost you significantly to recreate. IOW, backup often enough so that you only lose as much work as you are willing to recreate.
Most importantly, test your restore. Backups don’t help if you find that you’re missing something important to be able to restore your missing data.
Tip: Losing work stinks, but it happens. Back it up to minimize loss.
Do let Windows settle in after an install/upgrade
After a new install, Windows will do a bunch of housekeeping including updates, search indexing, and more. These can negatively impact performance, but are usually finished after your PC has been idle for a couple hours.
One easy way to do this is to let the install run at the end of your day, and then just let the PC be idle for a bit.
I recommend you not make any big decisions until that has wrapped up.
Tip: Don’t measure performance right after a new install or upgrade.
Do set up Windows Update to be more convenient
This is a large topic which requires a lot of details. I may post it here in the future in a separate post, but for now, let me point you to this forum post. The permalink here will point to the final location for this content, so please use it when sharing: https://aka.ms/control-windows-update
The Supported ways to control Windows Update in Windows 10
That covers how to set the timing of updates in Windows 10 Home and Pro, and also how to use Group Policy in Windows 10 Pro to completely disable updates, if that is appropriate to your setup.
At a minimum, remember that you can defer upgrades in Windows before you start a project. That way you are not interrupted with an OS upgrade during the life of that project. In extreme cases, you can turn off updates/upgrades completely as explained in the link above. (Note that turning off updates through Group Policy only works with Windows 10 Pro, not Windows 10 Home).
Tip: Updates are important, but we provide some ways to minimize their impact.
What to consider doing if necessary
These are things that generally won’t hurt to do in a workstation, but have more potential trade-offs (either your time, or some features) than the previous list. Doing these proactively will be ok as nothing here is likely to harm your PC. But I generally recommend you do things here only when you realize there’s a problem that they will fix, and you test to confirm that.
I very strongly believe in measuring before the change and then after the change. It’s important because you really want to make as few changes as possible, both to make life easier for yourself, but also to maximize compatibility with current and future software.

Disable gaming-focused network optimizers/accelerators
Many laptops (and some desktop motherboards) come with gaming accelerators for networking. They may be great for gaming, but in my personal experience, these are incompatible with low-latency audio. I not only disable them, I completely uninstall their companion apps and drivers whenever possible. Since discovering this, I don’t buy any PCs for my family that have these accelerators built in.
But do test before and after doing this. This recommendation almost made it into the “always do” section, but I haven’t tried out every gaming network accelerator out there.
In my personal experience, sticking with Intel, Realtek, and other standard LAN ports on motherboards is preferable to some of the gaming-focused options. But with laptops and pre-built desktops, you don’t really have the choices you have with desktop self-builds. Given that most commercial desktops and powerful laptops are built with gamer specs, you are likely to run into this with commercial offerings.
Tip: Gaming optimizations are often at odds with audio optimizations, especially when it comes to graphics or networking.
Consider disabling Cortana speech recognition
Cortana voice recognition can be useful, especially for accessibility. If you do not need voice commands for your PC, you can disable Cortana and prevent any poorly-timed interruptions.
If you want to disable Cortana, one easy way to do it is to disallow online voice recognition. This is a privacy setting.
Start->Settings->Privacy->Speech
Turn off “Online speech recognition”
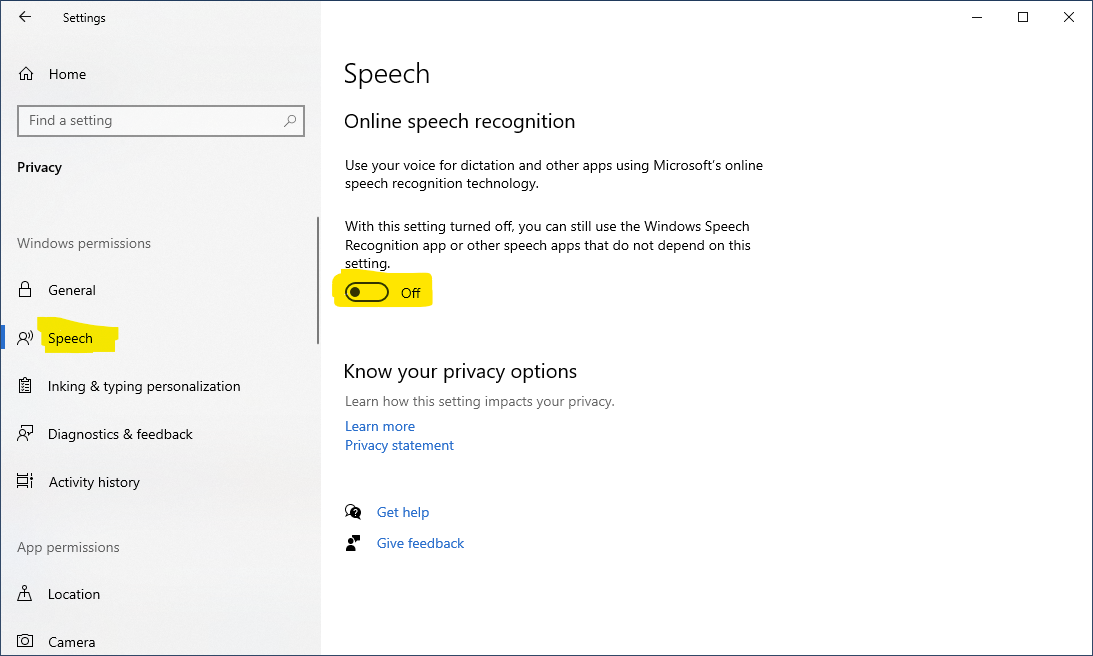
Once this is applied, the Cortana halo will disappear from the search box on your task bar.

You can also disable Cortana in Group Policy, but I’ve found the privacy setting to work well.
Tip: Cortana can be very useful, but not necessarily when recording.
Consider uninstalling plugins you don’t use
Some folks are plugin hoarders. You know who you are. 🙂
Some DAW software does an automatic scan, and in some cases load and activation of plugins, during startup. The startup time for these DAWs tends to be proportional to the number of plugins you have in your VST folders.
Tip: If the plugin does not spark joy…
Consider setting Windows audio and ASIO to use the same settings
I use my MOTU PCIe 424 and 4 24 i/o rack units both for DAW work and for normal Windows audio. The MOTU device allows both to be used at the same time. Because of that, to avoid glitching, I need to have my Windows audio and the ASIO audio set to the same bit depth and sample rate. In my case that is 96/24.
I’ve found some interesting things with my specific setup. I encourage you to take a look at these and consider doing them with your own setup.
- I found that, for my device, 96k/24 was the most stable setup, regardless of buffer sizes. For some reason, running at 48k would eventually run into glitching and issues where I’d get a bit-crushing like effect because something wasn’t working correctly. I’m almost positive this is an issue specific to the MOTU, but it is worth looking into.
- I always make sure my rack units are turned on before the PC is powered up. If I do not do that, the MOTU racks will sometimes not pick up the correct sync settings. Although I think this is specific to the MOTU devices, it’s not a bad idea to ensure your non-USB powered interfaces are powered up before your PC is.
I share these only in case you run into something similar. Each interface will have its quirks, especially one as old as the PCIe 424.
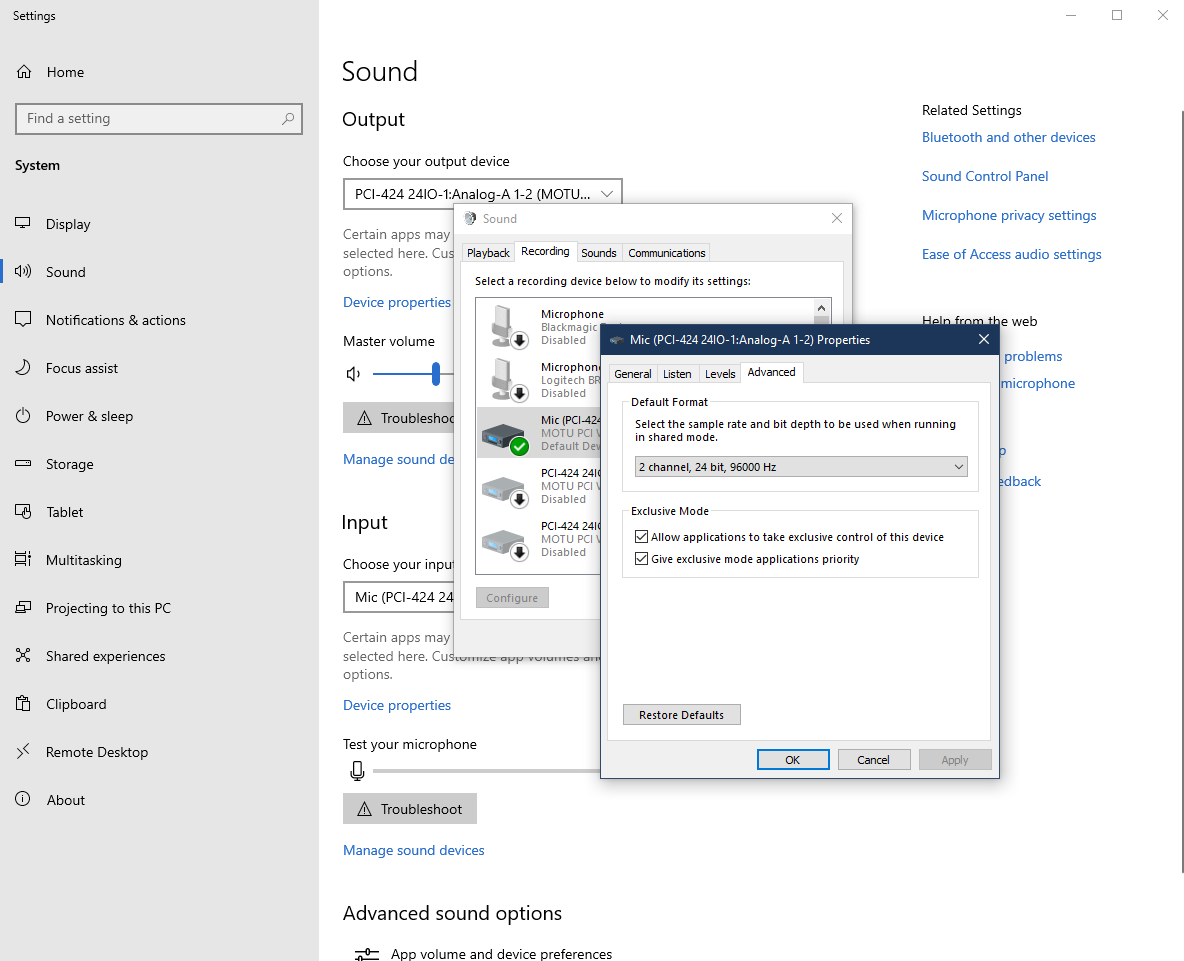
If you do this, you want to make sure that each and every input and output is set to the same settings. Unfortunately, you do need to do this individually. (I have 96 inputs so this was a chore.)
Tip: If you use your audio interface for both DAW and Windows audio, try not to make it work too hard. Use the same settings for both.
Consider reducing the impact of auto-run applications
Windows has two main places to set up apps that will run with every log in. The first is the Task Manager. The second is the registry (although there is more than one place in the registry)
Some auto-run applications have little to no impact on audio production, and some may be required for your setup. But others may be a problem in your specific situation. As always, test your performance before and after.
Task Manager
In task manager (Search->Task Manager, or pick it from the control-alt-delete options), you can see the apps that are scheduled to start when you log into the PC. Here’s a snapshot of what it shows on my PC:
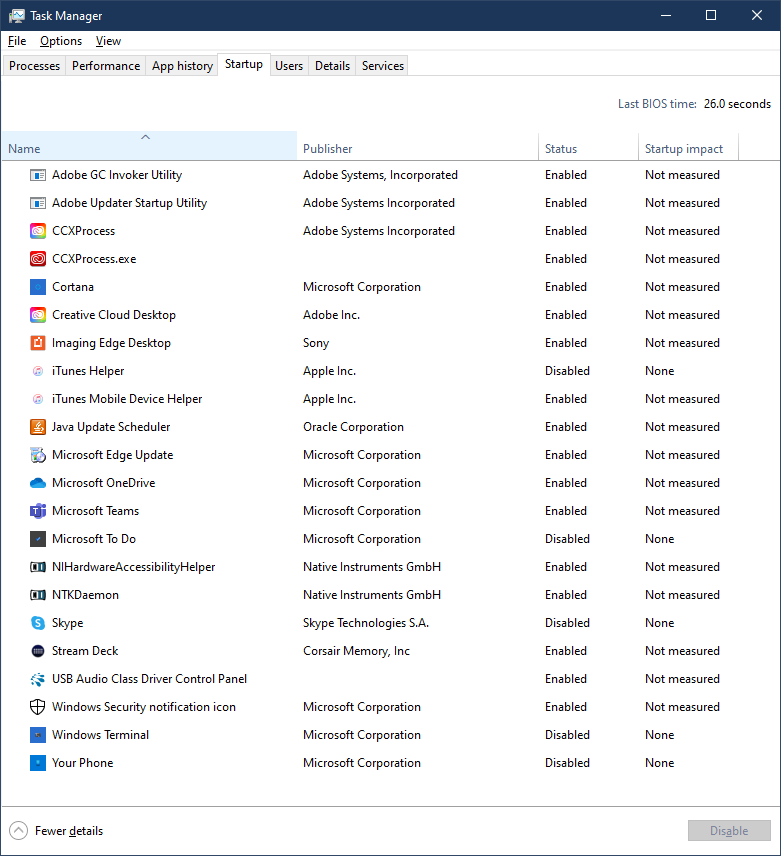
There are a number of startup apps in the above list that I could disable, and some which I would if this PC were used solely for audio work. But not also that there are some (iConnectivity, Native Instruments) which are necessary for my DAW. Just be careful of which ones you set to Disabled.
Registry
The registry entries for startup apps is a bit more of work to get into. That said, they are typically reflected in the Task Manager, at least for the Run ones. The RunOnce ones tend to be for install tasks or other single-use restart tasks.
So, after managing them in task manager, you can take a look in the registry.
Search->Regedit to get into the registry editor. You will need administrator permissions to make changes.
Once open, you’ll want to look at each of these entries:
- HKEY_CURRENT_USER\SOFTWARE\Microsoft\Windows\CurrentVersion\Run
- HKEY_CURRENT_USER\SOFTWARE\Microsoft\Windows\CurrentVersion\RunOnce
- HKEY_LOCAL_MACHINE\SOFTWARE\Microsoft\Windows\CurrentVersion\Run
- HKEY_LOCAL_MACHINE\SOFTWARE\Microsoft\Windows\CurrentVersion\RunOnce
Before you change anything in the registry, I recommend that you export that branch of the tree. That’s easy to do by right-clicking on it and then selecting “export”
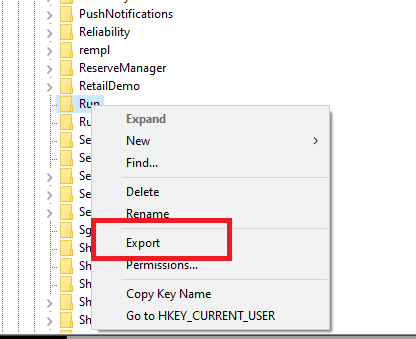
Once you have exported the keys/values, compare what you see in the Run paths to what you see in Task Manager. If you see something in the registry that is not in Task Manager, and you are the only user of the system, and you are sure you do not need it, you may delete it from the right pane.
If you see something in the RunOnce path that you do not recognize, I recommend caution. It’s true that some viruses/malware have used this path, but it’s also used by installers, restoring your browser tabs on reboot, etc.
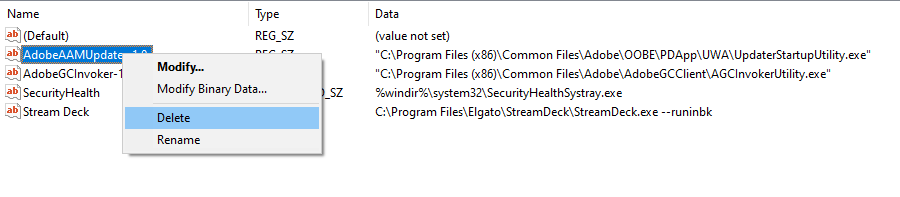
Again, make sure you’ve exported the values before you delete anything. You may need the generated .reg file to revert back should the change not be useful.
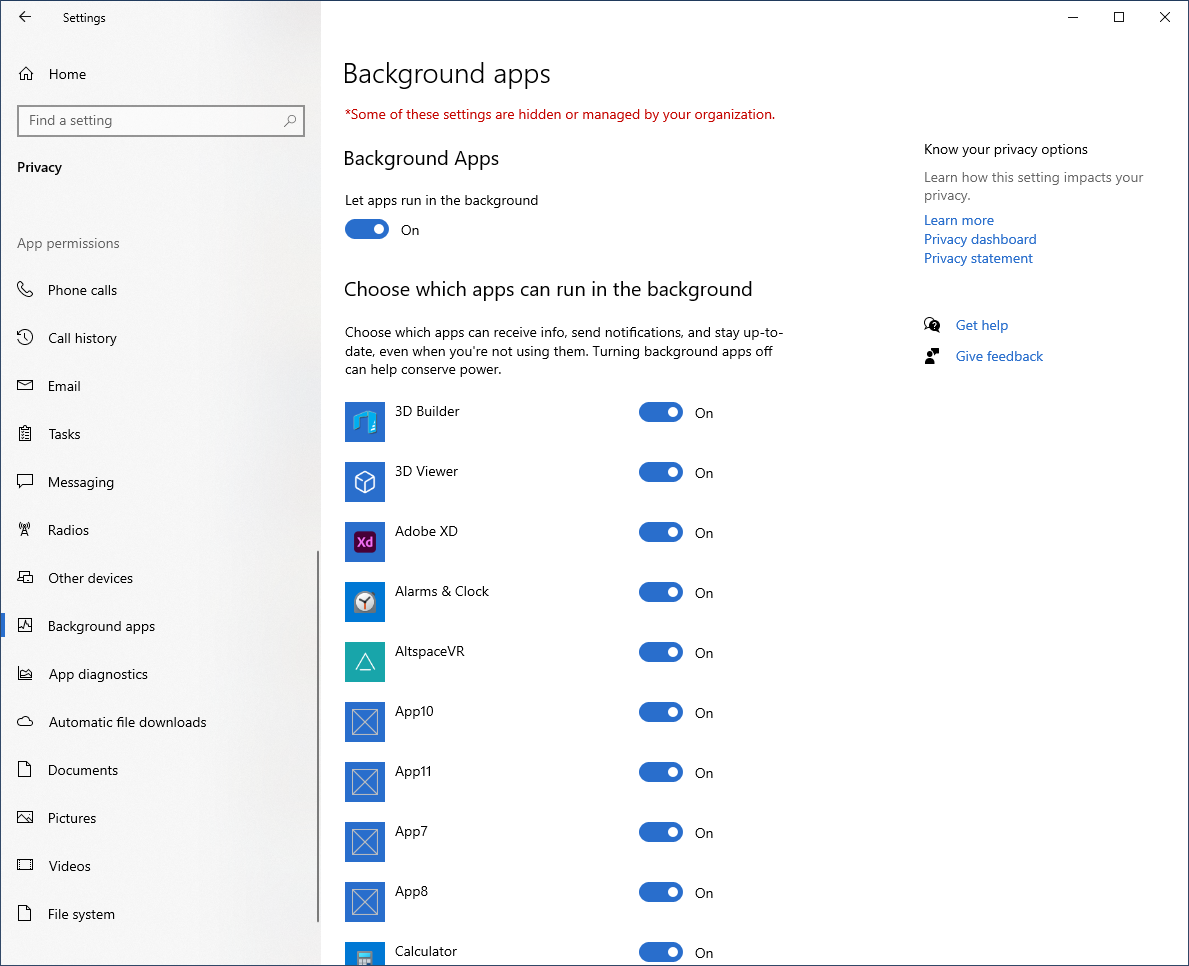
Consider turning off background apps
These rarely cause any issues, but if you measure an impact, you can turn them off in-whole or individually.
Settings->Privacy->Background Apps
Then turn them off as-needed. Just because something has the permission here does not mean it is actually running in the background. So, as always, measure before and afterwards.
Consider uninstalling apps you don’t need
Pre-build desktops and laptops tend to come with a lot of apps. While most collectively refer to this as “bloatware”, that’s a little unfair, as there are really three classes of pre-installed apps:
- Vendor-supplied apps for managing their system. This typically includes apps to check for driver updates, open support tickets, etc. I don’t use these, even on my kids’ PCs, but they are there to serve a purpose. Personally, I tend to uninstall these from my kids’ PCs. My own PC, being a custom build, never has this concern.
- Product-placement OEM pre-installs. The PC business is a very low margin industry, so PC OEMs will sell drive space to pre-install apps. On a DAW PC, these game trials, anti-virus trials, etc. are not needed. Again, if you build your own PC and use a retail copy of Windows 10, you won’t run into these. If you are using a commercial system, I would especially recommend uninstalling any third-party antivirus products, as well as anything else you don’t want to see. Keep in mind that these apps are part of why you could pay the low price you could for that PC. That doesn’t mean that you have to keep them, though.
- Product placements in Windows 10. There are a few of these that show up from time to time. Candy Crush was one which many folks have brought up. If you don’t want these, you can right-click their start menu entry and uninstall them in most cases. If they are a stub placeholder (the actual app is not installed), you usually can’t uninstall them (there is no actual app installed), but you can delete the start menu icon.
Tip: Not all pre-installs are “bloat”, and not all “bloat” impacts runtime performance. Evaluate each one individually.
Consider keeping a powered USB 2 (not 3) hub around
It’s getting more difficult to find new USB 2 hubs out there. So, if you have one hanging around, hold on to it. The primary reason is that these are useful in situations where a USB peripheral (controller keyboard, synth, audio interface) doesn’t play well with the USB 3+ ports on your PC. This is typically a problem with either the device itself, or the controller on your USB port on the PC.
When that happens, it’s almost always enough to just put a USB 2 hub in between the peripheral and the PC. This has saved me from some issues with older microcontroller programmers, and at least one old MIDI controller.
Tip: A USB 2 hub can help with old USB devices that won’t work on a USB 3 port
Consider a wired mouse and keyboard vs wireless
Bluetooth can be useful for MIDI, but I recommend minimizing its use to the places where you really need it (like BLE MIDI controllers, rather than PC peripherals like mice).
Gamers have long since learned that they’ll get the best performance from a wired mouse and keyboard. For music creation, I recommend the same, but for different reasons. While gamers are concerned mostly about mouse lag and jitter, for music, I’m concerned about DPC latency and also analog audio interference.
Networking in general is a source of potential DPC (Deferred Procedure Call) latency (driver-caused kernel “pauses” which can negatively impact audio), but wireless technology tends to be one of the biggest offenders after graphics. DPC latency above certain thresholds causes audio glitching and drop-outs. If a poorly-written driver takes too long to respond, you can even get a blue screen from a timeout.
Bluetooth mice and headsets (we’ll talk about that in a second) have a constant conversation going with your PC. For maximum performance audio production, we want to limit anything which is not core to the task at hand. Doing a bunch of other tweaks, but then using wireless peripherals, can lead to disappointing results.
In any case, this is something to test before and after any change. It’s not an absolute statement of something you must do to have a functional music production workstation.
Tip: A Bluetooth mouse and keyboard is certainly more convenient, but I recommend going wired for both to minimize potential issues.
Consider using wired headphones vs wireless
My Yamaha studio monitors are the primary way I listen to everything on my PC. Late at night, however, and to listen to another mix reference, I use headphones. I happen to use wireless RF headphones here, not WiFi or Bluetooth. They are connected to the headphone jack of my monitor switcher, so the PC never sees them, and they are always available.
I generally recommend staying away from wireless headphones, or bluetooth headphones when mixing, but they’re often fine. If you haven’t yet purchased headphones, strongly consider going with traditional wired. If you already have a set, try with and without them to see how they’ll behave with your DAW.
For me, the convenience of wireless here, for the amount of time I actually use them, outweighed the negatives and potential performance impact. The largest negative I had with wired was that I, because I prefer closed over-ear headsets, would always hear the cable dragging noises any time I moved my head even a little. Drove me nuts.
As with Bluetooth, this is not an absolute statement of something you must do. But the more sources of potential latency and glitching you have, the more likely you are to have latency or glitching. 🙂
Tip: Wireless headsets can cause DPC latency, listening audio latency, and also add interference noise, but this is highly variable by brand and sources of other interference in the area, and are often worth it just for the convenience.
Consider disabling WiFi and Bluetooth completely
As mentioned above, WiFi and Bluetooth are two potential sources of DPC latency. The amount they add depend upon their proximity to the endpoint/router, how strong that signal is, the strength of the antenna, the amount of other interference in the room, and the driver software itself. I don’t do this by default because, in many cases, one or both are perfectly fine. Plus, you need Bluetooth if you want to use BLE MIDI. I have Bluetooth enabled on my desktop PC, but like I mentioned above, I don’t use it for anything other than BLE MIDI.
When you are in a studio setting, I recommend you always go wired for your network, and minimize your reliance on Bluetooth peripherals. Strongly consider which uses you need vs which ones you have “just because”. The potential interference / problems scales with the number of devices using the technology, and the amount of data going over the air. At large events we run, the amount of Bluetooth and WiFi devices in the room can really impact performance, so we go wired with everything we can.
Tip: WiFi and Bluetooth are very useful, but can add DPC latency. Reserve them for when they’re needed.
Consider disabling C-States / Idle states
When you come across tweak lists, you’ll almost always see a mention of C-states. C states are an ACPI (Advanced Configuration and Power Interface) feature for controlling when the CPU turns off features to save power. Higher C states typically turn off more of the processor than lower C-states. What specifically happens varies by processor. P-states are a similar concept, but related to power consumption. The two work together to minimize heat and battery usage in a processor.
I don’t change these BIOS settings myself, but I’ve seen some cases where others have proved that they had a more stable system after making a change in their BIOS to disable C-states.
For C-States, C0/C1 is active and high performance. If you want to have the PC in max performance mode, disable all C states higher than C1 (including disabling sub-settings like C1E). Each BIOS, if it enables access to this (most laptops do not), will have a slightly different way of enabling/disabling these. In some cases, the BIOS may have a single switch to turn off CPU idle states.
Here’s a Dell article with a listing of most of the C-states. There are many other similar lists out on the internet.
As with any other change like this, I recommend testing and measuring before and after you make the change. It’s too easy to think something made a difference when it really didn’t. Additionally, if you disable C-states, I recommend turning off your PC (or putting it to sleep) when you will be away from it for a while.
Tip: Manually setting C-states may make no difference in your rig, or they may make a huge difference. Be sure to measure.
Consider setting your NVIDIA card to max performance
Hat tip to the folks on GearSlutz for this setting. It made a huge difference on one PC, but has made little to no difference on some others. For that reason, it’s not a “must do”, but as with others, it’s a “measure before and after” type of setting. Some plugins use 3d rendering, and most DAWs are rendered using hardware accelerated graphics (DirectX, OpenGL, etc.) these days. But more importantly, this setting, at the time, reduced DPC latency with the NVIDIA card.
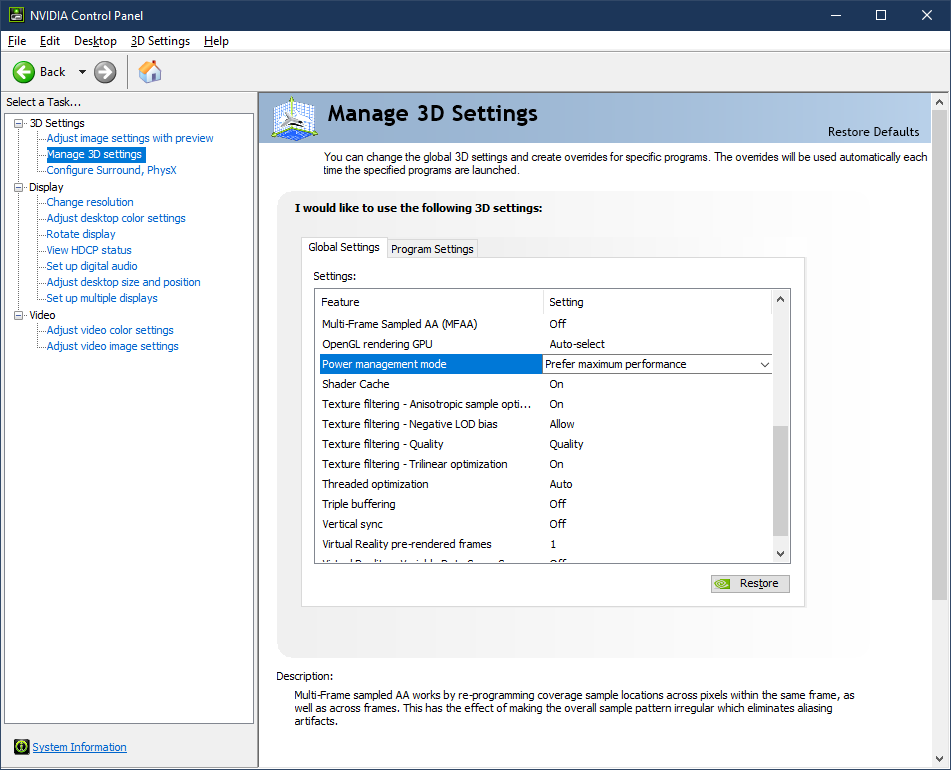
If you have an NVIDIA graphics card in your PC, go into the NVIDIA control panel and select the “Manage 3D settings” node from the left.
Then scroll down the Global settings until you see “Power management mode”. Set that to “Prefer maximum performance”. That’s the setting that was tested. However, if you use your PC for gaming, the newer “Adaptive” setting has been shown to perform better.
Keep in mind that pegging your NVIDIA card with this setting is not best for heat or loudness of the card fans. The somewhat newer Adaptive mode may actually be better for you. Measure before and after, of course.
Consider setting up Controlled Folder Access
This is a new one for many folks. Controlled Folder Access is a Defender technology designed to protect data from ransomware and other potential threats. It locks down folders so that only applications you pick can access them. It does all this even for zero-day exploits/malware that is unknown to the tools at the time.
Ransomware, in case you are not familiar, is a type of malware which encrypts all your data using a strong key and algorithm that you are not able to break, and then demands payment (usually in bitcoin) to decrypt some or all of the files. Some businesses have had to pay $20,000 or more to decrypt files. Over 10% of ransomware ransoms are over $5,000. Ransomware impacts Windows, MacOS, Linux, Android, and more.
If turned on, your Documents folders are protected using this technology. But you will want to allow your DAW applications to write to the Documents folder on your PC. Most known apps are already allowed access, but you can customize this in the Settings app.
Start->Settings->Update & Security->Windows Security and then “Open Windows Security”
You can also get to this by searching for “Security” in the search box on the task bar, and then picking “Windows Security”
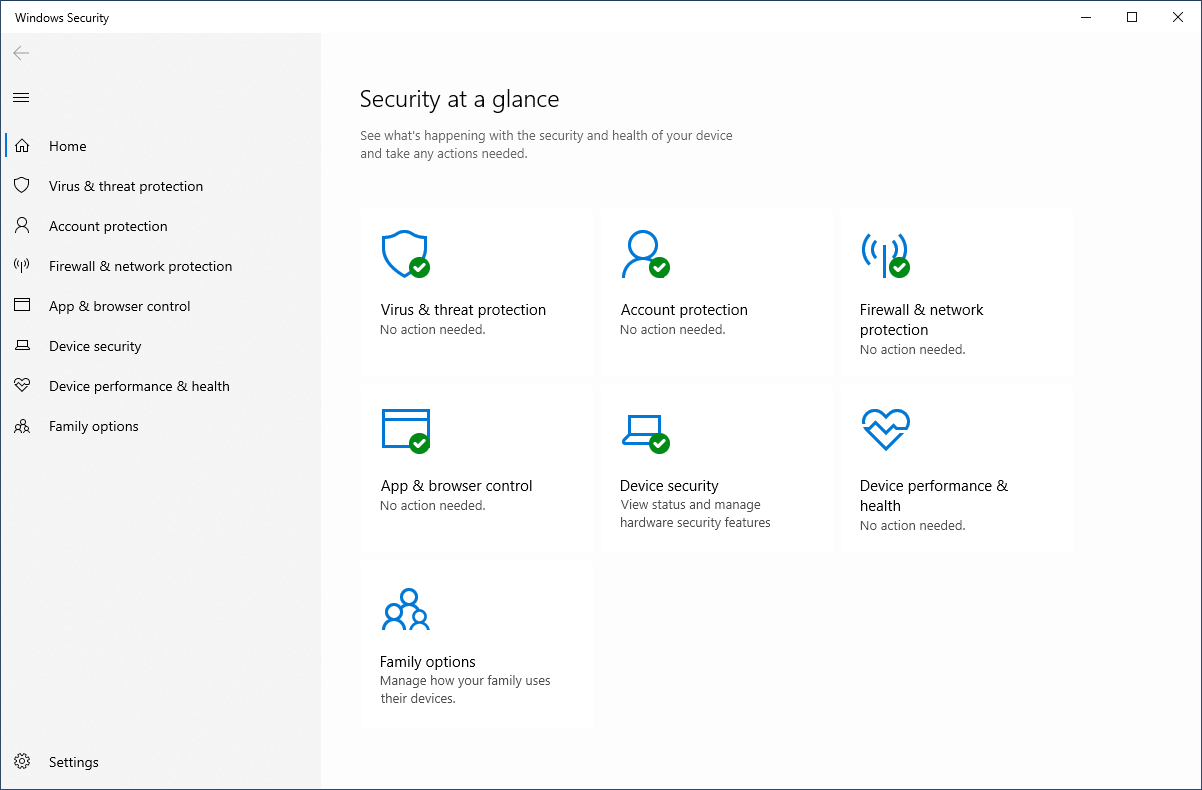
Then choose “Virus & threat protection”. Finally, click “Manage ransomware protection”

You can then click the “Allow an app through Controlled folder access” link. If your DAW was recently blocked, that is the easiest way to add it to the list. If not, you’ll need to pick the DAW main .exe file from the file system.
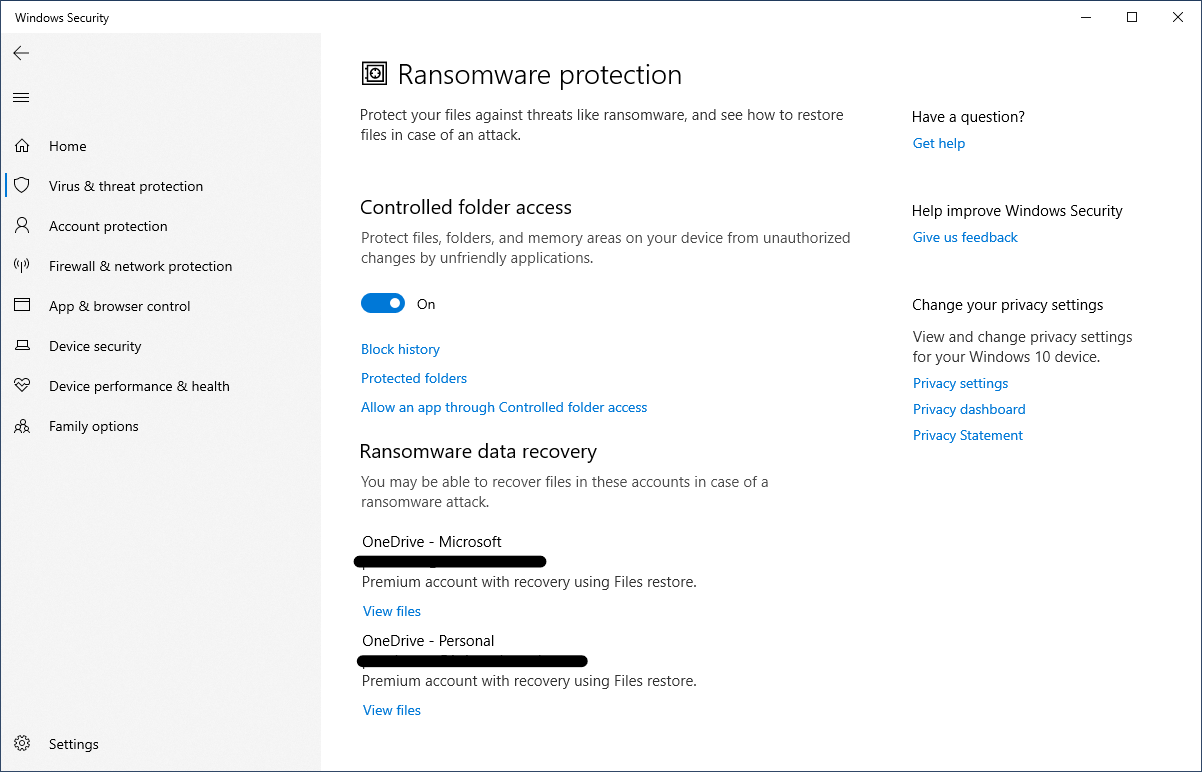
You can also just turn off controlled folder access, but I do not recommend that unless you are running into a problem you can’t get around using the tools provided. Some tweak guides recommend just turning this off, instead of showing how you can ensure that the DAW has the right access to the right folders.
The service provided here could be extremely valuable to you should you run into ransomware at some point. Ransomware is growing in impact. Back in 2017 it was generating over $25 million in revenue for hackers. By the end of 2019, it was $11.5 billion USD. Estimates vary greatly because many businesses and individuals do not like to disclose how much they’ve paid in ransoms.
Of course, the majority of those big numbers are from businesses, but individuals are also targeted. It costs under $100 for a ransomware kit that anyone can use to target others and generally ruin your life. $5000 may not be much to a business, but to most individuals, that is a large sum to come up with on short notice, and is potentially ruinous.
Tip: Enable and use the built-in protection unless you have actually measured a negative impact on your audio production which you can’t get around by providing access to the folders through the tools.
Consider adding your sample folders to the Windows Security exclusion list
Some folks have reported that excluding their sample folders from virus scanning had a huge impact on performance. I don’t work with samples much, so it’s not something I’ve experienced. That said, if you have your samples all together, or at least your third-party samples and your other samples in known locations, you can exclude those folders from virus scanning.
In the Windows Security app, go to Virus & threat protection -> Virus & threat protection settings -> Exclusions -> Add or remove exclusions
You can exclude an entire folder to that, to exclude it from scanning.
Additionally, you could even exclude your DAW process itself from any scanning. If you use only trusted plugins, this may be another option for you to explore. But, of course, test before and afterwards.
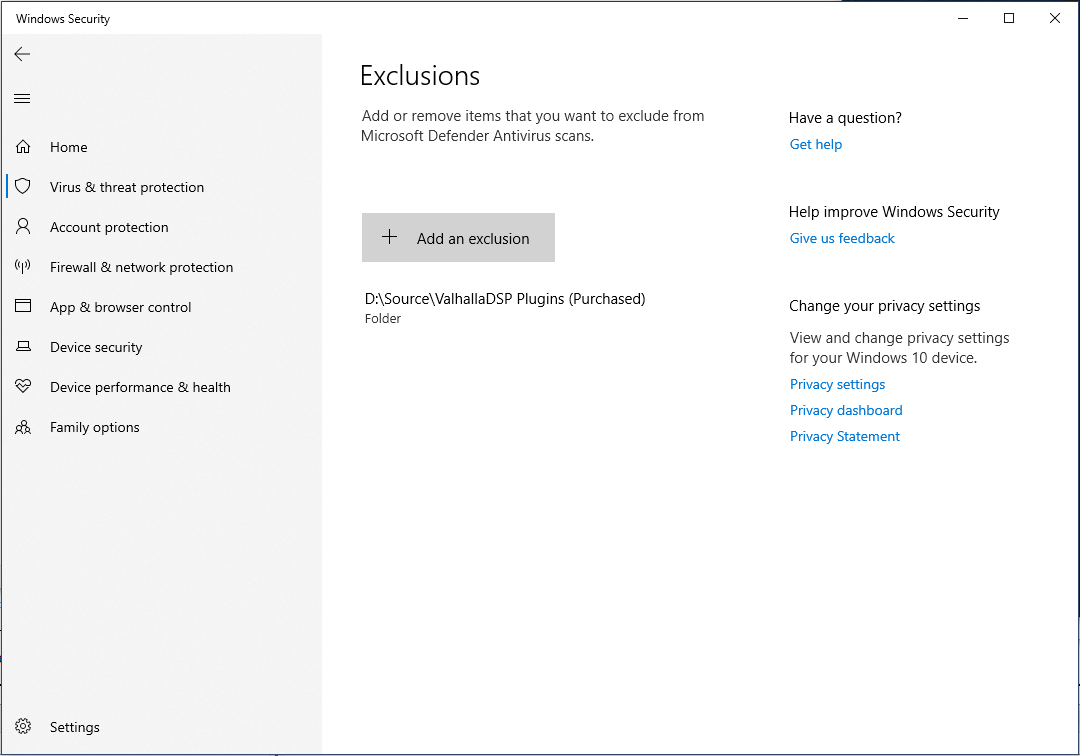
( I’ve excluded the Valhalla folder because Defender was picking up one of their products as a false positive for quite some time. )
Tip: Don’t let virus protection get in the way of loading your samples.
Consider disabling app updates and live tile in the Store
I haven’t personally experienced a negative impact here, or measured one, but others in music production sometimes come to me to say that the background updates for the Store application have negatively impacted their audio production. Given who these folks are, and the fact that the impact can vary wildly based on the size of the packages and your bandwidth, I’m inclined to trust their assessment.
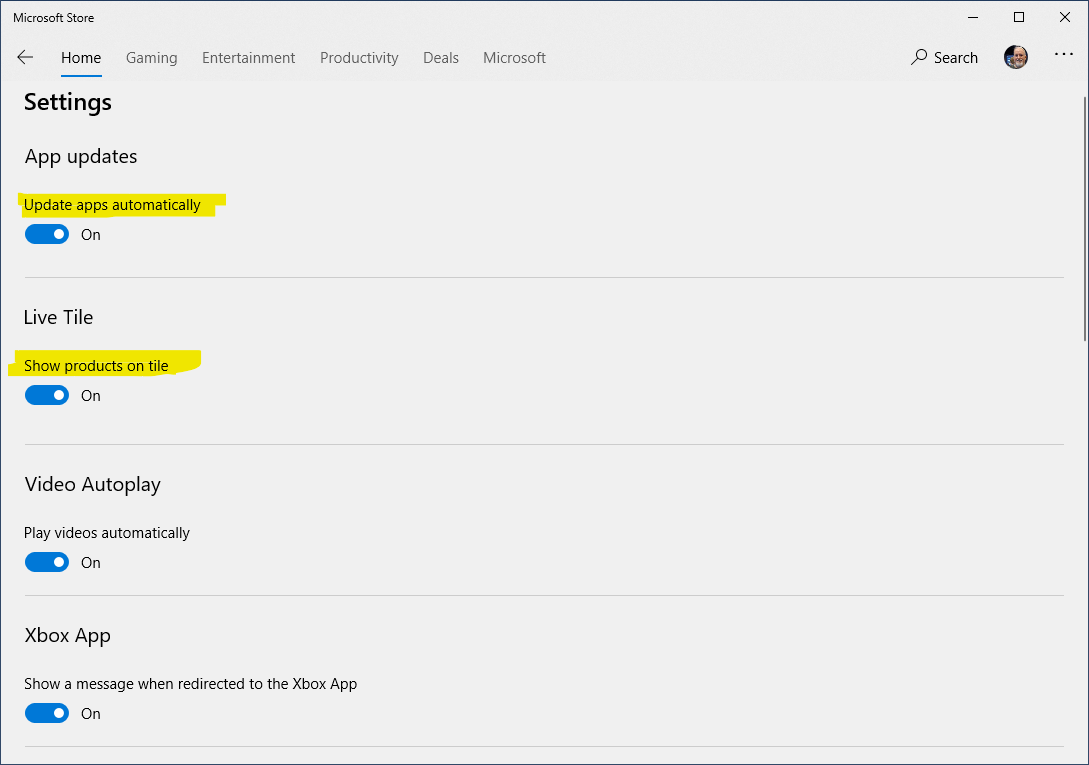
There are two settings for the Store app that you can turn off if you have seen interference from this app. The first is the option to update apps automatically. This is a convenient feature, but it does cause some network traffic and disk IO.
The second is the Live Tile for the store. Again, I haven’t measured this, but some folks have come to me to say that it was causing issues.
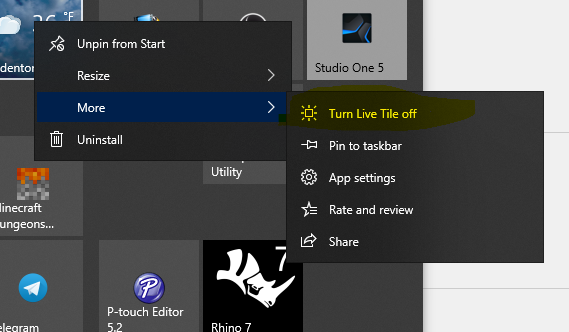
That will not impact the live tiles for individual apps. For those, right-click the tile in the start menu, and disable each individually.
App updates are convenient, and live tiles can be useful. Up to you to measure and decide if they are negatively impacting your DAW performance.
I know that some folks have gone out of their way to completely uninstall the Store application. I personally don’t recommend that at all as there are driver companion apps (like Thunderbolt DCH configuration apps) and other useful apps (like my MIDI SysEx tool and the MIDIberry App among many others) that are delivered through the Store. Additionally, other musician-focused features may use the Store for delivery in the future.
Tip: Always measure before and after any change, to be sure that you are not disabling features for no real benefit.
That’s it for the PC tweaks I recommend applying or trying.
Things to do when you record
So, you’re ready to record. Other than everything else discussed, is there anything you should do for each recording session? Yes, there are just a few things I recommend here.
Do a clean boot
Before recording, I do a full reboot. For many people, this will be unnecessary, but my PC is on for days at a time, and I do all sorts of testing and other work on this. When I get ready to record, I like to do a clean boot before I get started. It only takes a minute, and I need to close most of my apps anyway.
Tip: I find it inconvenient, but some folks even have a separate profile set up for creating music, and boot / log into that.
Close your other apps
Any running application is going to take some amount of CPU and memory. This is not to be confused with apps which were put to sleep, or services which are not yet woken up. I’m talking about your browser, or a media player, or document authoring, etc. If you have memory and processing time to spare, these are often ok to keep going. But if you want to maximize DAW performance, close these out.
I’ve found that browsers, in particular, tend to cause me problems with large recording sessions. I always close out my browsers (I use both Google Chrome and Microsoft Edge Chromium).
Pay extra attention to apps sitting in your tray which may pop up alerts or other interruptions. Chat clients, social, etc. I also make sure to shut down any apps that are doing background checks and updates, like Creative Cloud, the Java Updater, Teams, etc. I leave OneDrive up because I use it when recording (my documents folder syncs to OneDrive automatically.)
Tip: Keep your CPU and memory free for your recording
Put PC in focus mode
This is optional, especially if you’ve shut down all your apps, but I still recommend it.
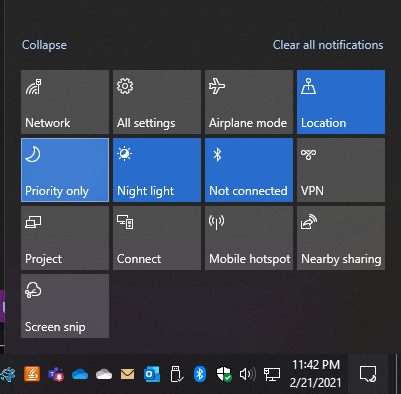
Focus assist is a mode in Windows which filters desktop notifications based on your settings. This isn’t perfect, because not every app uses the toast notifications for their alerts, but many do. Whenever I record a video or present, I make sure this is on to “Priority only” or “Alarms only”. I recommend the same for when recording music.
Summary
There was a lot here. But if you focus in on the items that I recommend for any system, the list of actual tweaks is quite short. In fact, it’s really about setting up your environment, and then making sure your PC doesn’t go to sleep, or put USB devices to sleep. Beyond that, most things are optional for specific PCs or use-cases. That’s all by design.
Although there are millions of things you can do on a PC, the vast majority of them fall into the realm of extreme performance tuning, and tend to require a lot of babysitting. We’re focusing on DAW production, not a hobby of overclocking, here.
In this part, I covered the must-do items, and the maybe-do items. In the next part, I’ll cover some things I see often in tweak guides, but don’t recommend doing at all.
But if you find additional tweaks that work for your setup, and you have measured their impact (performance, stability, features), that’s excellent.
I’m sure there are lots of other suggestions for tweaks. If you have a personal favorite, go ahead and put it in the comments below. I may learn some new tricks, and readers here will have another item to consider. Keep in mind that most tweaks do not apply to all systems or apps, and that any claim should be measured before and after before being shared with others.
Housekeeping: I know that what to tweak or not tweak in Windows can lead to heated discussions. The comments section isn’t a democracy, so please keep it respectful and on-topic. I have no issues deleting comments that I don’t consider appropriate for this venue, based on my own criteria. Please also do not post links to third-party apps which automate tweaks, privacy settings, updates, etc. I cannot endorse any of these, and generally consider them a bad thing to use unless folks measure the impact of each and every change rather than just blanket-applying some tweak list.
The DAW PC tweak series
This is Part 2 of 3. Once available, you may find the other posts here:
- Part 1: Introduction and PC picking/building
- Part 2: What to tweak proactively, and what to consider doing
- Part 3: What not to do when tweaking your digital audio workstation
Permalink for the start of this guide: https://aka.ms/Win10AudioTweakGuide
Thanks for reading!
I recommend installing a second DAW only Windows dual boot. I code and game too, so having a windows just for daw let's me reduce certain kinds of functions to help keep audio stability instead of supporting my coding productivity. For example, I really don't need the JRE to be running, or my raid management software, or even one drive while I'm loading the cpus with physical and analog simulations. It's a nice compromise. It also let's me trial out updates before I let the daw boot take them, and it easier to make a drive image of the daw...
My Windows 10 system just started to nag me to update from 1909 to 20H2, so I made the switch. For the first time in my experience after doing the update, my USB MIDI interfaces (mixture of MOTU Micro/MIDI Express/MTP AV) got re-ordered, which left me to re-configure Cubase again to get what interface had what synths attached to them. I expect to see this behavior when I forget to power on one of my MIDI interfaces and Cubase also loses its mind trying to figure out what MIDI interface is which. But the order persisted through multiple reboots, so...
Mex... Would like to say don't use Windows in the first place but thanks to VTS legacy many will find that impossible.
Regarding interfaces try to stick to optical when you can and when you don't use properly engineerd USB one and if it's not try to feed it with clean power source (not from MB even if you are connected you have good PSU). Also try to use best USB port for the job (usually service/maintenance one or special purpose one if you have it). If it's internal it will be PCIe anyway.
...
Hi Lazar
Looks like you’re looking at it more from an audio consumption approach. All good. But my comments here come from a musician/creative side, where they’ll need more IO, and generally use native ASIO drivers from the manufacturers (almost all musician-focused manufacturers provide those). Their DAC requirements also tend to be different.
ASIO4ALL is good when you must have an ASIO interface to your hardware. But for other uses, it doesn’t really provide much benefit.
But thanks for chiming in on the audiophile side. I often neglect to include those folks in my thinking.
Pete