The Visual Studio 2010 SDK adds several project templates to Visual Studio that let you create and share custom controls. These are called extensibility projects. In addition to compiling the control, the extensibility project prepares it for publication by incorporating it into a VSIX extension. A VSIX control extension can be shared by publishing it to the Visual Studio gallery, or by sending it directly to interested developers.
There is currently no extensibility web control project template in the Visual Studio SDK, but you can make your own by following the steps in this walkthrough. The walkthrough is divided into two parts:
- Creating and publishing a custom web control the manual way.
- Creating and publishing an extensibility web control project template.
On completion of the second part, you will have an extensibility project template that makes creating and publishing a web control a straightforward process.
In the first part of this walkthrough, you will learn to
- Create a custom web control.
- Test the web control in the Visual Studio experimental instance.
- Prepare the web control for publication.
- Publish the web control to the Visual Studio Gallery.
- Install the web control from the Visual Studio Gallery.
- Remove the web control from the Visual Studio Gallery.
Prerequisites
To follow this walkthrough, you must have a working knowledge of web controls, creating new projects, setting project properties, and using the Visual Studio experimental instance. You must have both Visual Studio 2010 and the Visual Studio 2010 SDK installed on your computer.
Creating and publishing your web control from scratch
To create and publish your custom web control when no project template is available, start with an existing extensibility control project and modify it to create an extensibility web control project.
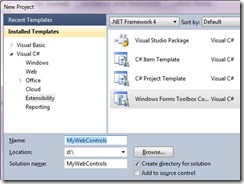
1. Open Visual Studio and create a new Visual C#/Extensibility/Windows Forms Toolbox Control project named MyWebControls. Check Create directory for solution before clicking OK.
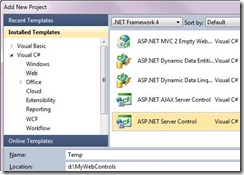
2. Add a new Visual C#/ASP.NET Server Control project named Temp to the solution.
Merging the project files.
1. Rename the file Temp/ServerControl1.cs to Temp/ColorTextControl.cs.
2. Delete the file MyWebControls/ToolboxControl.cs.
3. Copy the file Temp/ ColorTextControl.cs to the MyWebControls project.
4. Remove the Temp project from the solution.
Merging the project references
1. Add the following references to the project:
- Microsoft.CSharp
- System.Data.DataSetExtensions
- System.Web
- System.Xml.Linq
2. Remove the following references from the project:
- System.Data
- System.Windows.Forms
- System.Xml
Creating the web control
1. Open the file ColorTextControl.cs in the code editor.
2. Change the namespace to MyWebControls.
3. In the ToolboxData attribute, replace both occurrences of ServerControl1 with ColorTextControl.
These values specify the opening and closing tags generated for the control when it is dragged from the Toolbox into a web page at design time. They must match the name of the control class, which is also the name of the control that will appear in the toolbox.
4. Add a ProvideToolBoxControl attribute to the control class.
The first argument to this attribute is the name of the assembly, which is the same as the namespace when the project is generated. The color text control will appear in a category in the toolbox with this name.
The start of the control class source code now looks like this:
namespace MyWebControls
{
    [DefaultProperty("Text")]
    [ToolboxData("<{0}:ColorTextControl runat=server></{0}:ColorTextControl>")]
    [ProvideToolboxControl("MyWebControls", false)]
    public class ColorTextControl : WebControl
    {
5. Replace the get method of the default Text property with this code:
get
{
    String s = (String)ViewState["Text"];
    return "<span style='color:green'>' + s + "</span>";
}
This surrounds the text with a span tag that colors it green.
6. Open the file Properties/AssemblyInfo.cs in the code editor.
7. Replace the AssemblyVersion Revision number with the “*” character.
[assembly: AssemblyVersion("1.0.0.*")]
Custom toolbox controls are cached and refreshed only when the assembly signature changes. By incrementing the assembly revision number with each build, the cache is always refreshed.
Testing your web control
Before publishing your web control, test it out in an experimental instance of Visual Studio.
1. Press F5 to launch an experimental instance of Visual Studio.
2. From the Tools menu, select the Extension Manager. The MyWebControls extension appears and is enabled.
3. Close the Extension Manager.
4. Create a new ASP.NET web application project.
5. Open default.aspx in Source mode.
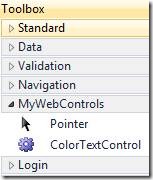
6. Open the toolbox. You should see ColorTextControl in the category MyWebControls.
7. Drag a ColorTextControl to the body of the web page.
8. Add a Text attribute with the value Think Green! to the ColorTextControl tag. The resulting tag should look like this:
<cc1:ColorTextControl ID="ColorTextControl1" Text="Think Green!" runat="server" />
9. Press F5 to launch the ASP.NET Development Server.
The ColorTextControl should render something like this:
10. Close the ASP.NET Development Server.
11. Close the experimental instance of Visual Studio.
Preparing your web control for publication
Before you can publish your control to the Visual Studio Gallery, you need an icon and a screen shot. The icon you supply appears next to the extension in the Extension Manager.
1. If you have an icon image file, add it to your project as an existing item. Otherwise, add a new image file to your project and edit the image to represent the control. In this walkthrough, we use an icon called Color.bmp, which shows the Color letter “A” on a yellow field.
2. If you have a screenshot image file, add it to your project as an existing item. Otherwise, create a screenshot image file and add it to your project. In this walkthrough, we use a screen shot called ScreenShot.bmp, which shows the control as it appears in a web page.
3. Open the file source.extension.vsixmanifest for editing.
4. Change the Description to Color Text Web Control.
5. Set the Icon to Color.bmp and the Preview Image to ScreenShot.bmp.
6. Change the Author, Version, and so forth, as desired.
7. Save and close the manifest file, then rebuild the project as a Release build. Publishing your web control
Publishing your web control
You are now ready to publish your web control to the Visual Studio gallery.
1. Launch your web browser and navigate to http://visualstudiogallery.msdn.microsoft.com.
2. Click the sign in link in the upper right-hand corner.
3. Sign in with your Windows Live ID. If you don’t have one, you can create one here.
4. Click the Upload button in the upper right-hand corner.
5. In Step 1: Extension Type, select Control, then click Next.
6. In Step 2: Upload, select I would like to upload my control. The Select your control text box appears.
7. Click the Browse button and select the MyWebControls.vsix file located in the project bin/Release folder. Click Next.
8. In Step 3: Basic Information, you see the information you entered into the manifest editor. The description you entered appears in the Summary field.
9. Set the Category to ASP.NET and the Tags to toolbox, web control. You can enter a more detailed description at this time.
10. Read and agree to the Contribution Agreement, then type the text image into the text box.
11. Click Create Contribution. A warning appears that This page has not yet been published.
12. Click Publish.
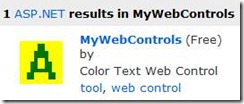
13. Search the Visual Studio Gallery for MyWebControls. The MyWebControls extension listing appears.
Installing your web control
Now that your web control is published, install it in Visual Studio and test it there.
1. Return to Visual Studio.
2. From the Tools menu, select Extension Manager.
3. Click Online Gallery, then search for MyWebControls. The MyWebControls extension listing appears.
4. Click the Download button. After the extension downloads, click the Install button. Your web control is now installed in Visual Studio.
6. Create a new ASP.NET web application project.
7. Open default.aspx in Source mode.
8. Open the toolbox. You should see ColorTextControl in the category MyWebControls.
Removing your control from the Visual Studio Gallery
In the next part of this walkthrough, you will create your web control from a project template. In preparation, delete your web control.
1. Return to your web browser.
2. Click the My Contributions link in the upper left-hand corner. The MyWebControls listing appears.
3. Click Delete to remove your web control until you upload it again.
4. Return to Visual Studio.
5. From the Tools menu, select Extension Manager.
6. Select MyWebControls, then click Uninstall.
7. Restart Visual Studio to complete the uninstall process.
This is the end of part one of this walkthrough. Part two shows you how to create and publish an extensibility web control project template based on the web control project you created above. To continue, please see Walkthrough– Publishing an Extensibility Web Control Project Template (Part 2 of 2).
 Short Bio: Martin Tracy is a senior programmer writer for the Visual Studio Project and Build team. As part of VS 2010, he has documented numerous features of the MSBuild system and Visual Studio platform. His long term focus is on developing infrastructure to support richly featured web applications. Martin has a long career in real-time software development, from artificial hearts and smart prosthetics to adaptive aeronautic controls. Martin holds a Masters degree in Dance Ethnology from the University of California, Los Angeles (UCLA), and a Bachelors degree in Asian Culture from Brown University, Rhode Island. He lives in Snohomish, WA with his extended family and loves to play accordion and watch anime in his spare time.

![clip_image002[4] clip_image002[4]](https://devblogs.microsoft.com/visualstudio/wp-content/uploads/sites/4/2010/05/8512.clip_image0024_thumb_31B549FB.jpg)
![clip_image004[4] clip_image004[4]](https://devblogs.microsoft.com/visualstudio/wp-content/uploads/sites/4/2010/05/0272.clip_image0044_thumb_77C6070E.jpg)





0 comments