

In the 17.8 Preview 1 version of Visual Studio 2022 we have updated the HTTP file editor to enable you to externalize variables to make testing your Web APIs across different environments easier. This update also includes support to handle secrets in a secure fashion. To access these new features, you’ll need to install 17.8 Preview 1, or later, which you can do with the link below.
In previous releases if you wanted to use a variable in an HTTP file in Visual Studio, the variable would have to be defined directly in the HTTP file itself. This makes it more difficult to test different environments with the same HTTP file, and it also makes it hard to exercise web APIs that require secrets. In this post you’ll learn about how you can define variables in external file(s) and then reuse those variables across different HTTP files. You’ll also learn the different ways that you can secure your secrets and reuse those in a secure way in HTTP files. Before we get to the secrets support let’s take a look at the environment file support first.
Environment file overview
When working with HTTP files in Visual Studio 2022 you can define multiple HTTP requests that you can execute from within the IDE. In previous releases you were able to define variables that could be used throughout the file. In this release you can externalize variables so that you can define different sets of values, environments, to be used. This also enables you to use the same environments across different HTTP files.
To support different environments, you can add an HTTP request environment file which has the filename httpenv.json. You can also store user-specific values in an httpenv.json.user file, but we will get to that later in this post. Before we get to the httpenv.json file, let’s look at a small HTTP file that has a few requests defined.
@TemplatesApi_HostAddress = localhost:44320
@searchTerm=api
@templatePackId=MadsKristensen.AspNetCore.Miniblog
@numToSkip=5
@numToTake=2

GET https://{{TemplatesApi_HostAddress}}/api/search/{{searchTerm}}
###
GET https://{{TemplatesApi_HostAddress}}/api/templatepack/{{templatePackId}}
###
GET https://{{TemplatesApi_HostAddress}}/api/templatepack/{{numToSkip}}/{{numToTake}}
###
In this file you can see that we’ve defined a few variables, the lines that start with @ define the variables. Since these variables are defined in the file, it may be difficult to exercise this app across different environments. For example, if we want to test the API that is running locally, we will use the localhost address. To exercise an app that has been published to a public endpoint, we may want to use a public URL instead of localhost. Let’s look at the first request that is defined in this sample.
GET https://{{TemplatesApi_HostAddress}}/api/search/{{searchTerm}}
###
In this request we are using the following variables.
- TemplatesApi_HostAddress
- searchTerm
Both variables have been defined at the top of this file. If we send the request in the HTTP editor, the values for those variables will always be what is defined in the file. Now we want to externalize these two variables so that we can test the API in different environments. We will create a file named httpenv.json. This file should be in the same folder as the HTTP file, or a folder above it. Visual Studio will look for that file in the folder where the HTTP file exists. If it’s not found, VS will look at through the parent directories to find it. When a file is found named httpenv.json, Visual Studio will stop searching for the file. The nearest file to the HTTP file found will be used. In this case I’ll add the httpenv.json to the same folder where the HTTP file is. In this specific example I have placed this file in a folder where an ASP.NET Core Web API project exists. That’s required to access ASP.NET Core User Secrets which we will discuss soon, but you can place these files in any directories, you do not need a .NET project to use these files. The contents of the file are below.
{
  "dev": {
    "TemplatesApi_HostAddress": "localhost:44320",
    "searchTerm": "wpf"
  },
  "remote": {
    "TemplatesApi_HostAddress": "dotnetnew-api.azurewebsites.net",
    "searchTerm": "mads"
  }
}
Note: Starting in 17.8 Preview 2, the names of the environment files will change to http-client.env.json and http-client.env.json.user. httpenv.json and httpenv.json.user will not be used after that.
In the httpenv.json file shown above we have defined two different environments, dev and remote. Both environments have defined the two variables that we discussed above. You can define any number of environments in these files. After editing the httpenv.json file you may need reload, or make an edit to, the http file for the environment file to be discovered. After adding this file, you should see the environments dropdown populated with the environments defined in the file. That is shown in the following image.
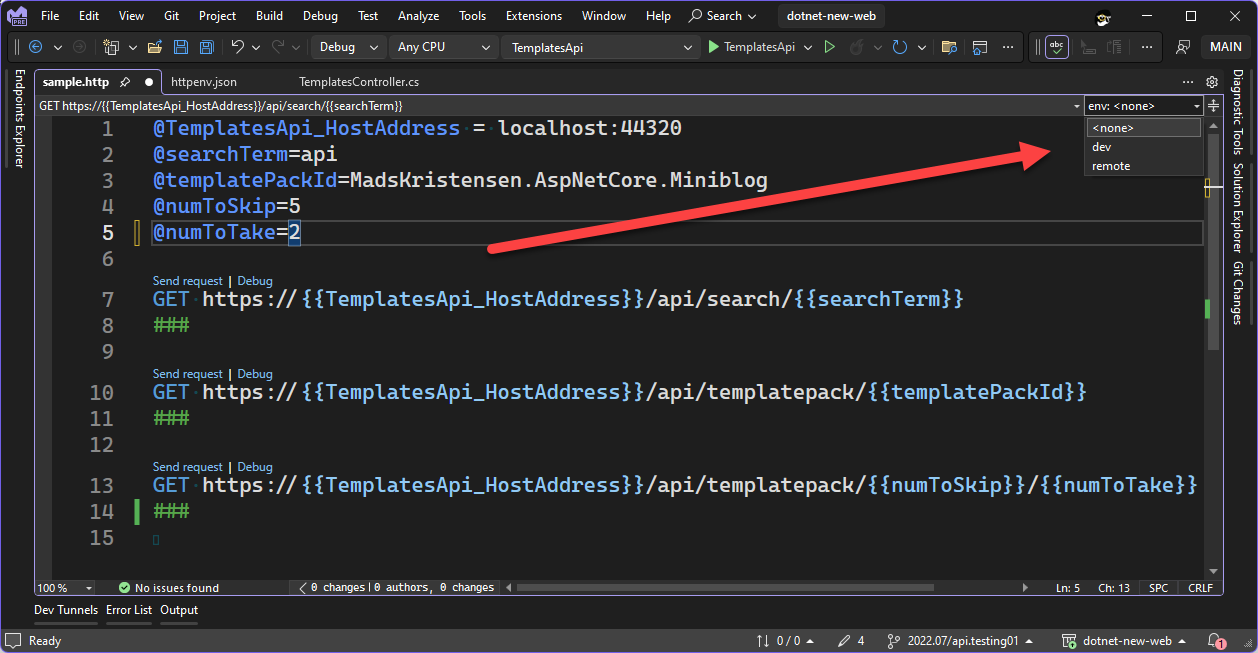
In the screenshot above you can see the environment selector, in the expanded state. You can see the two environments, dev and remote. Let’s start by selecting the dev environment. You can use the keyboard shortcut F6 to access the environment picker in the HTTP editor. Now that we have defined those two variables in the environment file, you should remove those from the HTTP file. Variables defined directly in the HTTP file will always win over variables defined in the environment file. Let’s switch the environment to remote and send the first request in the HTTP file. Below is the Request tab of the Response View after the request was sent.
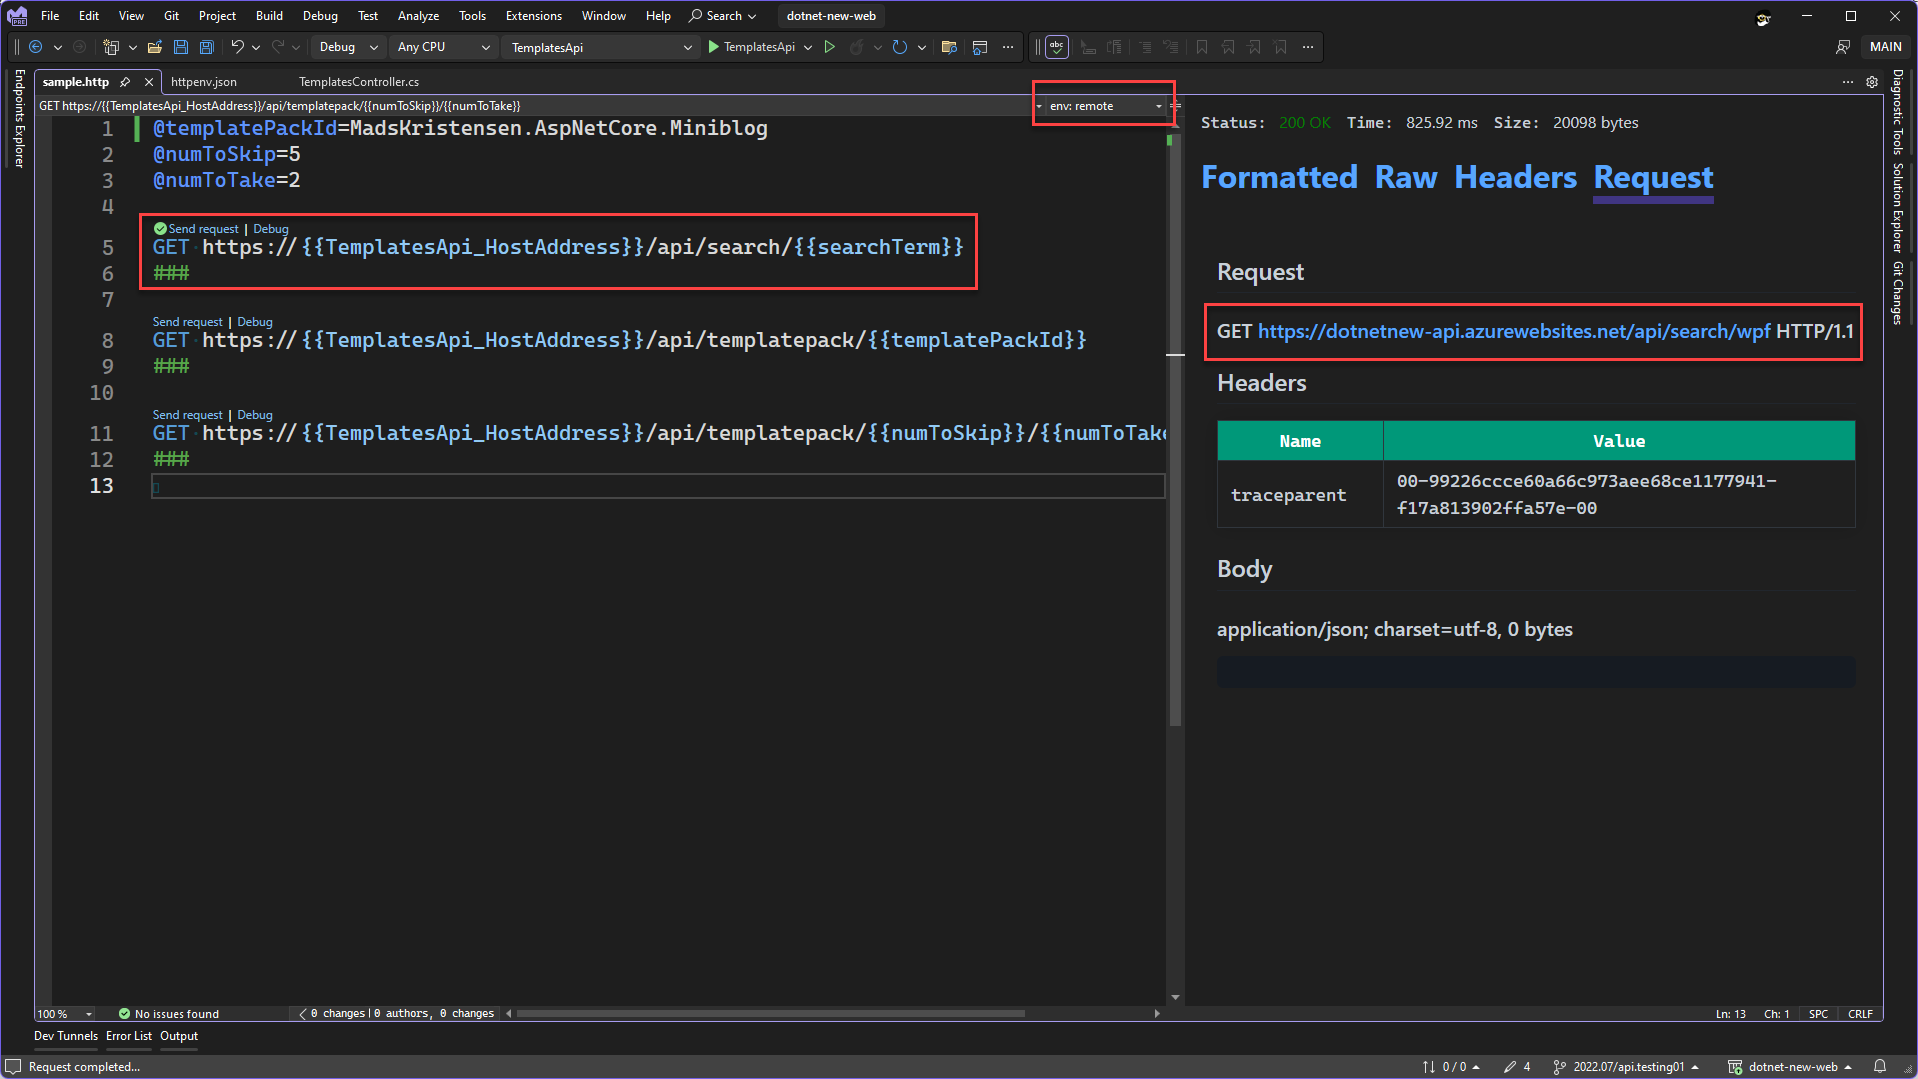
In the image above the important parts have been highlighted. You’ll notice that the selected environment is remote. From the full URL that is shown on the Request tab we can see that the value for the TemplatesApi_HostAddress used was dotnetnew-api.azurewebsites.net and the value for searchTerm used was wpf. For the first request in the HTTP file, we can now easily switch from the dev environment which uses the localhost address and the remote environment which uses a public URL. Now we can move the other variables into the environment file so that we don’t have any values hard coded in this file. The updated HTTP file and httpenv.json file are shown below.
Updated HTTP file
GET https://{{TemplatesApi_HostAddress}}/api/search/{{searchTerm}}
###

GET https://{{TemplatesApi_HostAddress}}/api/templatepack/{{templatePackId}}
###

GET https://{{TemplatesApi_HostAddress}}/api/templatepack/{{numToSkip}}/{{numToTake}}
###
Updated httpenv.json file
{
  "dev": {
    "TemplatesApi_HostAddress": "localhost:44320",
    "searchTerm": "wpf",
    "templatePackId": "Boxed.Templates",
    "numToSkip": "3",
    "numToTake": "2"
  },
  "remote": {
    "TemplatesApi_HostAddress": "dotnetnew-api.azurewebsites.net",
    "searchTerm": "wpf",
    "templatePackId": "Boxed.Templates",
    "numToSkip": "50",
    "numToTake": "6"
  }
}
As shown above, we have removed all the variables that were defined in the HTTP file and defined them in both environments in the httpenv.json file. The HTTP editor will remember that last used environment. If you switch to an environment that doesn’t have a variable that’s used in the HTTP file, you’ll receive a warning in the HTTP editor. This can also happen if you don’t have an environment selected but the HTTP file uses a variable that is not defined in the HTTP file. To see this in action, switch the environment to none as shown in the next screenshot.

In the previous screenshot you can see the warnings that are being generated by the HTTP editor. In this case the cursor was hovering over the TemplatesApi_HostAddress variable usage. There are two warnings being shown here, one that the variable used is not defined and another indicating that the URL is not valid for an HTTP request. The subsequent requests in the file show similar warnings. When you select an environment from the dropdown, the warnings will go away. Let’s move on to discuss user specific settings.
User specific settings
When making Web API requests you may need to define certain variables that are user specific and not meant to be shared with the team. This is different from using secrets which we will discuss soon. A user specific value is any value that an individual developer wants to test with but doesn’t want to share with the team. Since the httpenv.json file will be checked in by default it wouldn’t be appropriate to add user specific values to this file. Instead, you can create a file named httpenv.json.user that is in the same folder as the httpenv.json file. Files that end with .user should be excluded from source control by default when using the Visual Studio source control features. When the httpenv.json file is loaded, it will look for a sibling httpenv.json.user file. If a variable is defined in an environment in both the httpenv.json file and the httpenv.json.user file, the value in the httpenv.json.user file will win.
Let’s build on top of the previous example where we had a dev and remote environment where we defined a searchTerm to be used. Imagine that you’re the developer investigating a bug in the API that handles the route api/search. The bug only appears when the searchTerm is set to ‘maui’. In that case you want to send ‘maui’ for searchTerm but not impact your team by changing the value in the base httpenv.json file. We will add a new file named httpenv.json.user that is in the same folder as the httpenv.json file. In that file we will define the searchTerm value in the dev environment. Below you can see the contents of the httpenv.json.user file for this case.
{
  "dev": {
    "searchTerm": "maui"
  }
}
In the httpenv.json.user file we have defined the new value for searchTerm in the dev environment. We only defined the value for the specific item that we want to override. Since we only need this value in the dev environment, we don’t need to define any other values. We also don’t need to define any other values that are present in the httpenv.json file. You can also add variables, and environments, in the httpenv.json.user file which don’t exist in the httpenv.json file. Let’s look at the result after we send this request. The Request tab in the Response View is shown below for this request.
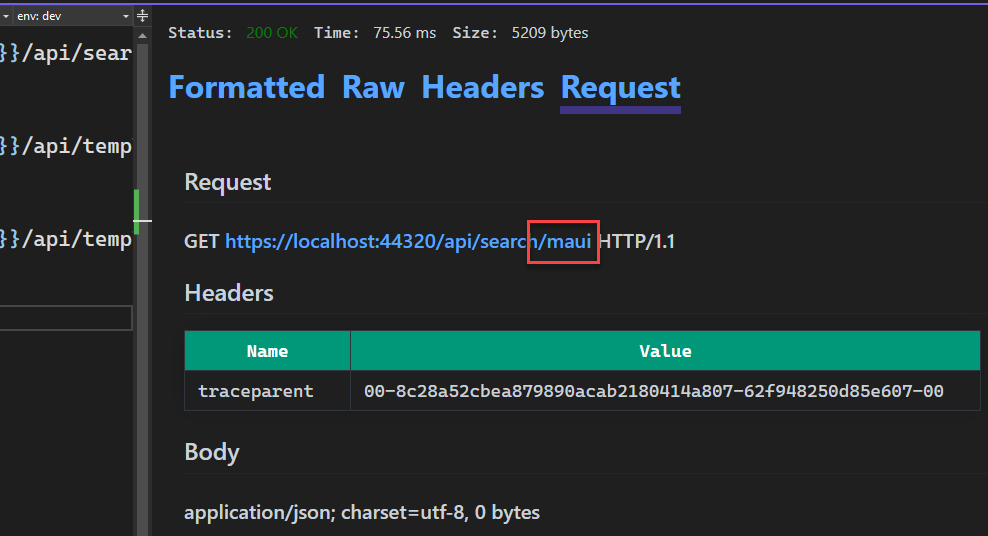
In the above image we can see that ‘maui’ was used as the value for searchTerm instead of ‘wpf’. To extend this, you can define additional values in the user file as needed. As mentioned, the .user file should be excluded from source control, but you should always double check that before committing your changes.
The order of precedence for the variables usage is below. Once a match is found that value will be used, and other sources ignored.
- Variable declared in the HTTP file
- Variable declared in the httpenv.json.user file
- Variable declared in the httpenv.json file
When working across multiple environments, its best to avoid variables declared in the HTTP file unless you are sure those values will not change. Now that we have covered user specific values, let’s look at how you can use secrets in a secure fashion in your HTTP requests.
Using secrets
When working with Web APIs its common to need to use a secret in a request. To support secrets in a secure fashion we have added support for accessing secrets in three different ways.
- Secrets in ASP.NET Core user secrets
- Secrets encrypted with Windows DPAPI
- Secrets in Azure Key Vault
When using a secret, the metadata for the secret can go in either the httpenv.json.user file or the httpenv.json file. From the three providers listed above the only one that is team friendly is Azure Key Vault. The other two providers a user specific and those should be declared in the httpenv.json.user file. Let’s look at how these secrets can be defined. We will look at each of the providers listed above.
Using secrets from ASP.NET Core User Secrets
When using secrets in development, one option is to use ASP.NET Core User Secrets. Let’s say that you have a secret named ‘config:templatesApiKeyDev’ in user secrets. To use a value from user secrets, the HTTP environment file needs to be in the same folder as the ASP.NET Core project you are using. To use the value defined in user secrets from the httpenv.json or httpenv.json.user file use the syntax below to define a new variable named ‘templatesApiKey’. Below is an updated version of the httpenv.json.user file which we used previously.
{
  "dev": {
    "searchTerm": "maui",
    "templatesApiKey": {
      "provider": "AspnetUserSecrets",
      "secretName": "config:templatesApiKeyDev"
    }
  }
}
Here we have defined a new variable named templatesApiKey and configured it to look up the value for the secret in the user secrets. This uses a property, provider, which determines how the secret should be looked up. Currently we support three values for provider, which are below.
- AspnetUserSecrets
- AzureKeyVault
- Encrypted
We will explore the other options for this value below. This is not currently extensible, but if you’re interested in extending this, please let us know.
Going back to the AspnetUserSecrets example, to use this variable in the HTTP file, reference it like you would a standard variable. As you are typing in the HTTP file you should see the variable, as well as its value in the Completion list. See the image below.
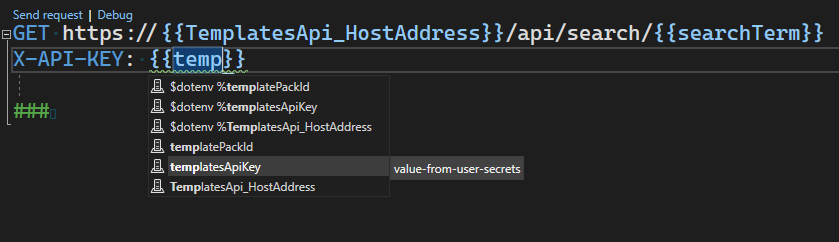
In the image you can see the variable in the completion list. Note: in this preview we display the secret value as well, but it will be masked in an upcoming update. The request that was added to the HTTP file is below.
GET https://{{TemplatesApi_HostAddress}}/api/search/{{searchTerm}}
X-API-KEY: {{templatesApiKey}}

###
After sending this request, we can inspect the value of the header being passed in on the Request tab in the Response View. The result is shown in the image below.
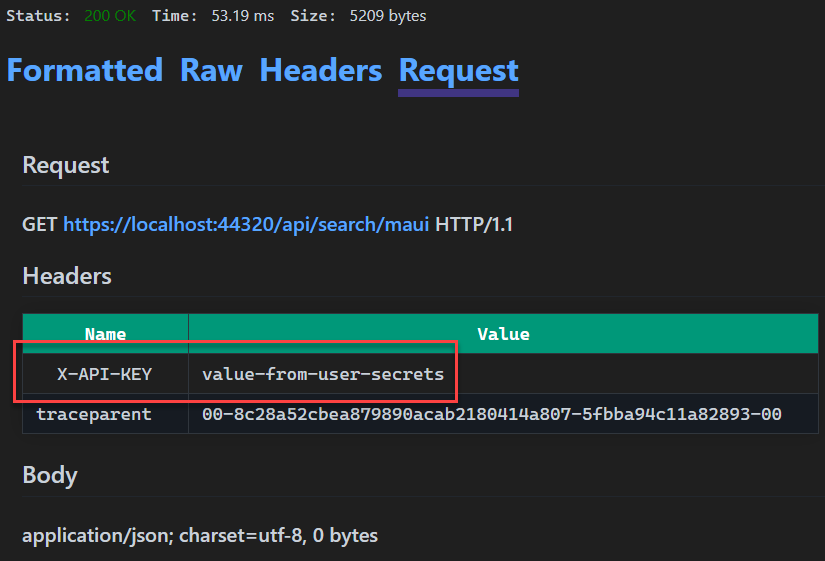
As expected, when the request was sent the value for the X-API-KEY header was value-from-user-secrets as expected. Now we have seen how you can use values from user secrets in the HTTP file. Let’s look at the Azure Key Vault provider now.
Using secrets from Azure Key Vault
Azure Key Vault is one of several key management solutions in Azure which can be used for secrets management as well as managing other artifacts securely. From the secrets stores that are currently support in the HTTP environment file, Key Vault is the best choice when sharing secrets across different users. The other two options are not easily shared. To use a value from Azure Key Vault we will need to define a new variable and add the correct metadata to access that secret. Below you’ll see an updated version of the httpenv.json.user file which has a new variable that gets it value from Azure Key Vault.
{
  "dev": {
    "searchTerm": "maui",
    "templatesApiKey": {
      "provider": "AspnetUserSecrets",
      "secretName": "config:templatesApiKeyDev"
    },
    "otherSecret": {
      "provider": "AzureKeyVault",
      "keyVaultName": "sayedapi-keyvault-01",
      "secretName": "SayedSecretValue1",
      "resourceId": "/subscriptions/21e74a87-523d-4a15-87e9-8c5eb2df7716/resourceGroups/sayed-api-demo1"
    }
  }
}
In the JSON file above we’ve defined a new variable, otherSecret, which pulls its value from Azure Key Vault. The properties defined on otherSecret are summarized below.
| Name | Description |
| provider | For Key Vault always use AzureKeyVault |
| keyVaultName | The name of the Key Vault that contains the secret. Note: in a future update this property may not be removed. |
| secretName | Name of the secret to extract. |
| resourceId | Azure Resource Id for the specific Key Vault to access. |
You can find the value for the keyVaultName and resourceId in the Azure Portal. Find the Key Vault that contains the secret you want to use. Then go to Settings > Properties to find both the name and the resourceId to use. For secretName, that is the name of the secret that you’ll find on the Secrets page in the Azure Portal. To access a secret in Azure Key Vault you must be signed into Visual Studio with an account which has access to the given Key Vault. Now that we’ve gone over the support for Key Vault secrets, let’s see it in action. Below is a new request that was added to the HTTP file to use this secret value. Note: the properties in the Azure Key Vault section may change in a future update.
GET https://{{TemplatesApi_HostAddress}}/api/search/{{searchTerm}}
X-CUSTOM-SECRET: {{otherSecret}}
###
NOTE: Starting in 17.9 the format for Azure Key Vault has been updated, use the syntax below. The keyVaultName property was removed and the resourceId property now contains the full resourceId URL from Azure which contains the key vault name.
"otherSecret": {
  "provider": "AzureKeyVault",
  "secretName": "SayedSecretValue1",
  "resourceId": "/subscriptions/21e74a87-523d-4a15-87e9-8c5eb2df5516/resourceGroups/sayed-api-demo1/providers/Microsoft.KeyVault/vaults/sayedapi-keyvault-01"
}
In this request we are passing a custom header, X-CUSTOM-SECRET, and populating its value from otherSecret. When this request is sent, we can look at the Request tab in the Response View to see the value for this header. That is shown in the image below.
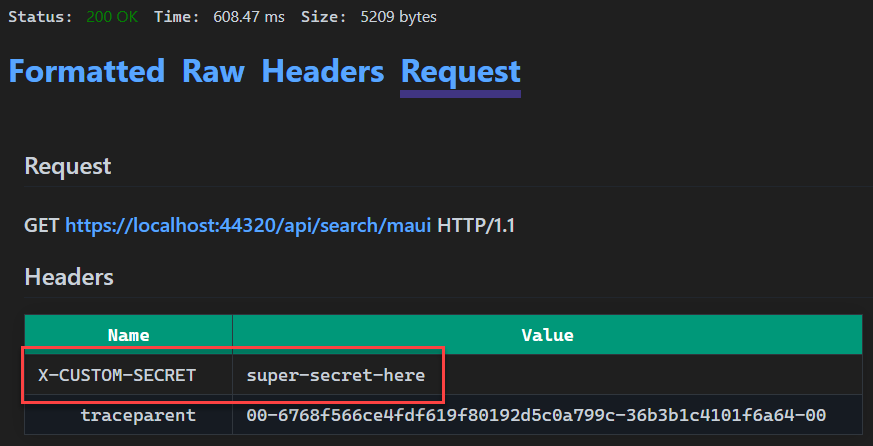
In the above screenshot we can see that the value for X-CUSTOM-HEADER was set to super-secret-here, that is the value that is stored in Key Vault for this secret. Now that we have discussed the support for Azure Key Vault, let’s move on to the only remaining secret support.
Using secrets encrypted with Windows DPAPI
When working on Windows there is a Data Protection API, aka DPAPI, which can be used to encrypt sensitive data. This is a commonly used method to encrypt values which is used by many different applications, including ones shipped by Microsoft. In Visual Studio when you create a web publish profile, the password is encrypted with the Data Protection API and stored in a .user file. When encrypting values with DPAPI, the encrypted values are always machine specific and in the case of this usage it’s also user specific. These values cannot be shared with other users. Below is an updated version of the httpenv.json.user file that now includes a secret encrypted with DPAPI.
{
  "dev": {
    "searchTerm": "maui",
    "templatesApiKey": {
      "provider": "AspnetUserSecrets",
      "secretName": "config:templatesApiKeyDev"
    },
    "otherSecret": {
      "provider": "AzureKeyVault",
      "keyVaultName": "sayedapi-keyvault-01",
      "secretName": "SayedSecretValue1",
      "resourceId": "/subscriptions/21e74a87-523d-4a15-87e9-8c5eb2df7716/resourceGroups/sayed-api-demo1"
    },
    "secretValue": {
      "provider": "Encrypted",
      "value": "AQAAANCMnd8BFdERjHoAwE/Cl+sBAAAA5qwfg4+Bhk2nsy6ujgg3GAAAAAACAAAAAAAQZgAAAAEAACAAAAAqNXhXc098k1TtKmaI4cUAbJVALMVP1zOR7mhC1RBJegAAAAAOgAAAAAIAACAAAABKu4E9WC/zX5LYZZhOS2pukxMTF9R4yS+XA9HoYF98GzAAAAAzFXatt461ZnVeUWgOV8M/DkqNviWUUjexAXOF/JfpJMw/CdsizQyESus2QjsCtZlAAAAAL7ns3u9mEk6wSMIn+KNsW/vdAw51OaI+HPVrt5vFvXRilTtvGbU/JnxsoIHj0Z7OOxlwOSg1Qdn60zEqmlFJBg=="
    }
  }
}
The last entry is the one that we are discussing here. The value for provider is Encrypted and the value for value is the encrypted string. We don’t currently have support for you to encrypt a value, but we will add that support soon. In the meantime, it’s very easy to encrypt a value using the Data Protection API. A sample console application to encrypt the value is shown below.
using System.Security.Cryptography;
using System.Text;

string stringToEncrypt = "Hello, World!";
byte[] encBytes = ProtectedData.Protect(Encoding.Unicode.GetBytes(stringToEncrypt), optionalEntropy: null, scope: DataProtectionScope.CurrentUser);
string base64 = Convert.ToBase64String(encBytes);
Console.WriteLine(base64);
The console application above requires the System.Security.Cryptography.ProtectedData NuGet package to be referenced. For the encrypted value to work in the HTTP file, you must encrypt with the scope set to DataProtectionScope.CurrentUser. Later we will add support in Visual Studio 2022 so that you don’t have to manually encrypt these values. Now that we have populated the httpenv.json.user file with the new secret, we can use it like how we did the other two secrets. A new request using this secret is shown below.
GET https://{{TemplatesApi_HostAddress}}/api/search/{{searchTerm}}
X-CUSTOM-SECRET: {{secretValue}}

###
When we send this request the value for the custom header will be displayed on the Request tab in the Response View. See the following image.
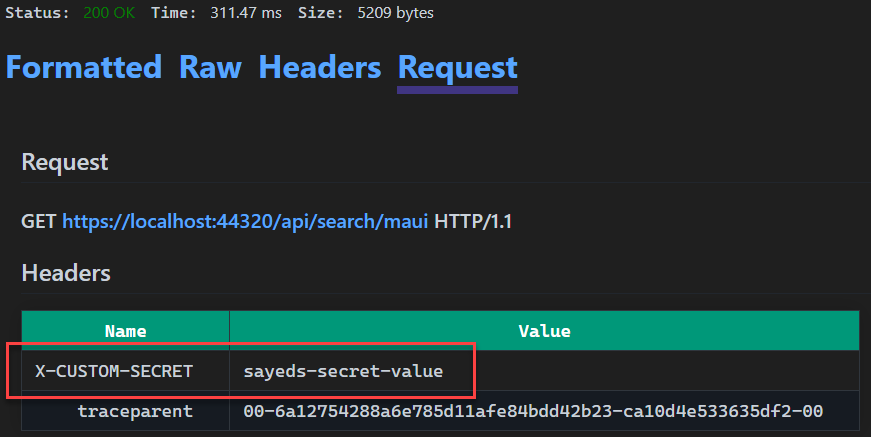
We can see that the secret value was passed in as expected. Now that we have discussed how to use the secrets in your HTTP request as well as secrets, let’s move on to some of the other features that have been added to the HTTP editor in this release.
New support for HTTP file syntax
In my last blog post related to the HTTP Editor we mentioned that there is still a lot of syntax that the HTTP file has support for in the VS Code REST Client extension that is missing from the Visual Studio 2022 support. In this release we have added some support for additional syntax. The list of new syntax that is supported is below.
| Function | Description |
| $randomInt | Generates a random integer.
Format when calling this is {{$randomInt [min max]}} where the min and max values are optional. Note: we currently have a bug that always returns the max value when specifying min and max values. That will get fixed in an upcoming release. |
| $datetime | Generates a datetime string. Formats supported include ISO8601, RFC1123 or a custom format.
Format when calling this is {{$datetime rfc1123|iso8601|“custom format” [offset option]. |
| $timestamp | Generates a UTC timestamp. Default behavior generates a timestamp from the current time. With options you can generate an offset timestamp.
Format when calling this is {{$timestamp [offset option]}}. |
| $localdatetime | Generates a datetime string in your local time zone.
Format when calling this is {{$localdatetime rfc1123|iso8601|“custom format” [offset option]}}. |
| $processenv | Returns the value of the provided process environment variable.
Format when using this is {{$processEnv envVarName}}. |
| $dotenv | Returns the value of the provided variable in a .env file.
Format when using this is {{$dotenv variableName}}. |
These are special variable declarations which will generate a value with the given parameters. We will first look at the first four and then cover the remaining two. Some of the following requests will use the free open-source website httpbin.org. This is a third-party website and not affiliated with Microsoft. This is a great website to assist in your API development. Look at the homepage for how you can use this awesome resource beyond what I show here. The request below shows some examples of the first four functions from the table above.
GET https://httpbin.org/headers
X-1RandomInt: {{$randomInt}}
X-2DateTime: {{$datetime iso8601}}
X-3DateTime: {{$datetime rfc1123}}
X-4DateTime: {{$datetime rfc1123 1 d}}
X-5DateTime: {{$datetime "dd-MM-yyyy" 1 y}}
X-6TimeStamp:{{$timestamp}}
X-7TimeStamp:{{$timestamp 1 y}}
X-8LocalDateTime: {{$localDatetime rfc1123}}
X-9LocalDateTime: {{$localDatetime iso8601}}
X-10LocalDateTime: {{$localDatetime iso8601 1 y}}

###
Before we go over everything that this request does, let’s quickly look at the result of this request. The result is below.
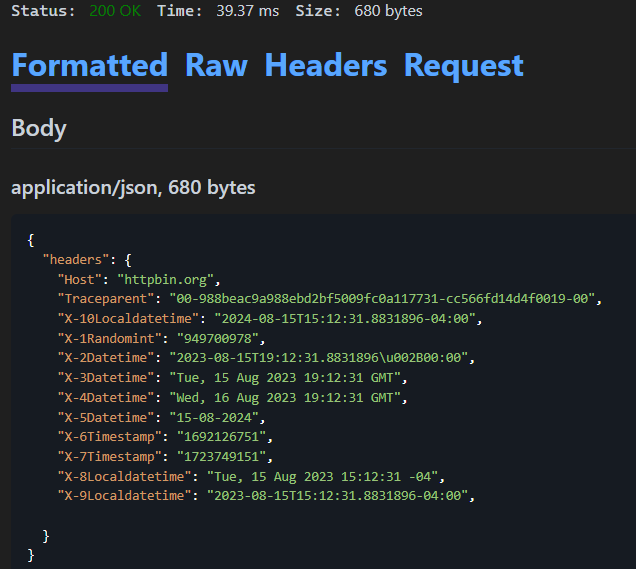
In this sample I’m calling the special variables to generate the values and then passing them into the headers of the request. I’m doing this because this is the best way to demo this. You can also pass these values into the body of the request as well.
We can see the value for X-1RandomInt is a random integer as expected. When calling $randomInt you can specific a min max value like this example {{$randomInt 1 100}} which should generate a random integer from 1 (inclusive) to 100 (exclusive). Unfortunately, we have a bug in this preview where this syntax will always return the max value specified. That’s why I didn’t include an example of that in the sample request above. We will fix this issue in an upcoming preview.
In some cases, you may need to generate a datetime which is based on the current datetime but is offset by a specified amount of time. You can use option/offset for this. Consider the sample {{$datetime rfc1123 1 d}}, this says, return the current datetime offset by 1 day. In the image above showing the response you can see that the value returned was one day ahead of the previous header which didn’t have any offset/option specified.
When using $datetime to generate a datetime string, we need to specify the format of the string to return, either ISO8601 or RFC1123. The format string is required. This will return the current datetime in the specified format. You can also generate a datetime string which is offset from the current time using the offset and option parameters. The value for offset should be an integer and the value for the option parameter is shown in the table below.
| Option | Description |
| y | Year |
| M | Month |
| w | Week |
| d | Day |
| h | Hour |
| m | Minute |
| s | Second |
| ms | Millisecond |
These values for the option in the datetime variable are the same for the other datetime functions. Consider this example {{$datetime “dd-MM-yyyy” 1 y}}, in this case a datetime will be generated for 1 year from the time the request was sent and will be returned in the format dd-MM-yyyy. Note: in the current preview you should use lowercase strings for the option except for M for Month. In a later release this may change.
The timestamp is seconds since the Unix Epoch in UTC time (DateTimeOffset.ToUnixTimeSeconds()).
The $localdatetime is like $datetime, the difference being that $localdatetime returns a datetime in the current local time zone. $datetime returns the datetime in UTC. Now that we have covered $randomInt and the datetime variables let’s move on to discuss the remaining two special variables.
$processEnv and $dotenv
When developing APIs as you exercise the API you may need to access environment variables or variables defined in a .env file. To access an environment variable, we can use $processEnv. For example, to get the value for the USERNAME environment variable use the following syntax {{$processEnv USERNAME}}. You can also get the value for an environment variable by using the value for another variable as the name of the environment variable. Look at the sample request below.
GET https://httpbin.org/headers
X-1Username: {{$processEnv USERNAME}}
X-2ApiSecret: {{$processEnv API_SECRET}}

###
For the sample above, I have created an environment variable API_SECRET and set the value to ‘mySecretValueHere’.
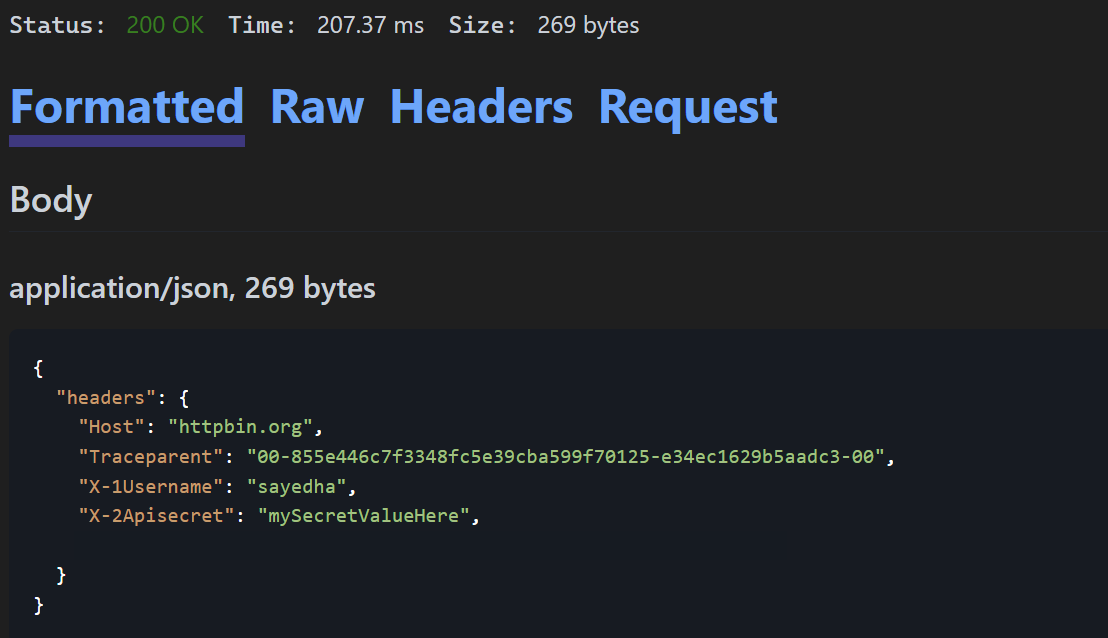
When the request was sent the value for X-1Username was populated from the USERNAME environment variable, and the same happens for X-2ApiSecret. If you use $processEnv to try to access an environment variable which doesn’t exist, you will get a warning in the HTTP editor. Now let’s move on to discuss $dotenv.
When using $processEnv you can get environment variables that are defined on the machine/process. In some cases you may need to get the value for an variable that has been defined in a .env file. For these cases you can use the other special variable $dotenv. The format for using $dotenv is the same as $processEnv. I’ve created a file named .env in the project folder with the following contents.
USERNAME=sayedFromDotenv
API_SECRET=secretFromDotenv
When using $dotenv you should see completions in the HTTP editor for all the variables defined. See the image below.
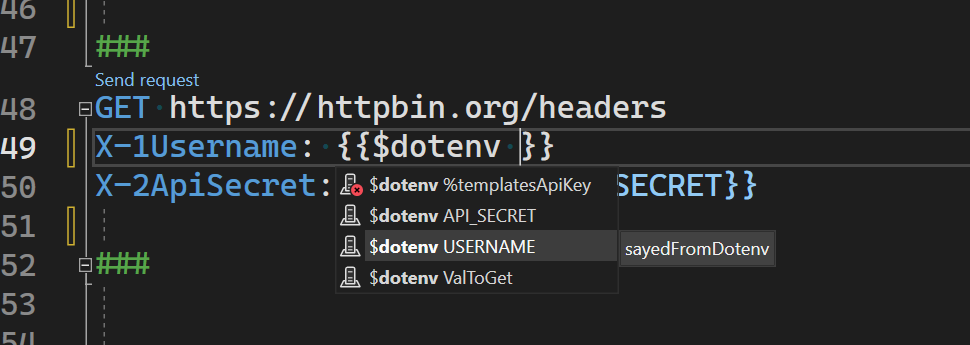
In the above image you can see that we are getting completions for the three variables that I defined in the .env file. Below is a request that we can use to try out $dotenv.
GET https://httpbin.org/headers
X-1Username: {{$dotenv USERNAME}}
X-2ApiSecret: {{$dotenv API_SECRET}}

###
When we send this request the result will be what’s shown in the following image.
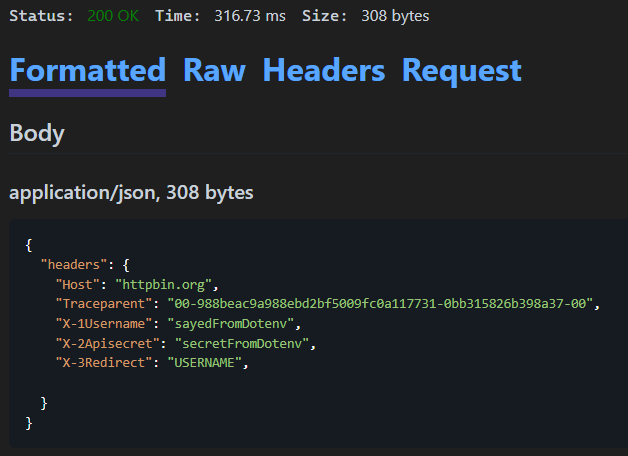
As expected, we get the value for USERNAME in X-1Username and the value for API_SECRET in X-2ApiSecret. When working with .env files remember that these files are typically NOT checked in and contain user specific values and even may contain secrets. This file may not be excluded from source control by default today, so be careful if you use these files to not check in any secret values. We’ve covered all the updates in this release, so we will close out this post after the Resources section.
Resources
- Docs for using HTTP files in Visual Studio 2022
- Recent blog post published by Sayed discussing Web API features in Visual Studio 2022
- Safe storage of app secrets in development in ASP.NET Core | Microsoft Learn
- Azure Key Vault Overview – Azure Key Vault | Microsoft Learn
Closing
In this post we covered a lot of updates that have been added to the HTTP editor including support for multiple environments, how to use secrets securely and the new syntax that we support. As I mentioned in my previous blog post we still have a lot of work to bring the HTTP file experience to parity with the Visual Studio Code REST Client extension. We will continue investing in this experience to improve the experience. From the items that I identified in my previous blog post the current priority is going to be adding support for taking a value from a request and passing it to a subsequent request. This will open a lot of scenarios for testing, and it’s highly used in HTTP files found in GitHub.
Most of the updates that we delivered in this release were inspired by feedback from users like yourself. You can share feedback with us via Developer Community: report any bugs or issues via report a problem and share your suggestions for new features or improvements to existing ones. You can also leave a comment here or reach out to Sayed on Twitter at @SayedIHashimi.
@SayedIHashimi
Good progress!
Do you support Windows Authentication using current user credentials (e.g. similar to curl –ntlm -u : url) ?
Hello Michael, I don’t believe that this will work today but I’m not sure. If you could try it and it’s not working, it would be great if you could file a Feedback Ticket https://learn.microsoft.com/en-us/visualstudio/ide/how-to-report-a-problem-with-visual-studio?view=vs-2022.
Is it possible to get an HMAC function, similar to the random int function that’s already there? For the APIs that I call, I need to calculate the HMAC of a secret + the current date in order to authenticate.
This is not very useful without a Bearer token in the Authorization header.
You can add the bearer token just like I passed in the custom headers. If that doesn’t work, could you explain why? I’d like to understand if the support we added doesn’t work for you so we can look more into it.
Is it possible set a keyboard hotkey to send the request from the editor?
Hello, you can use CTRL-ALT-S to Send Request. If you ever forget you can right, click on a request in the HTTP file and you’ll see Send Request with the shortcut in the context menu.
IT.AI.IO.101.K.CH.K.MA.TE….EOM>