
We’re excited to announce that our new Git tooling is now the default source control experience in Visual Studio 2019, beginning with version 16.8. We’ve been working on this experience over the last year, iterating based on your feedback to build out key features, enhance performance, and fine tune quality. Above all, we’ve focused on improving discoverability for your common workflows and simplifying navigation to reduce context-switching. Regardless of whether you are part of a large team or working on a personal project, whether you are an experienced developer or just starting out, we strongly believe the new Git experience in Visual Studio 2019 will have something for you. Here’s seven reasons why we think you should try it out.

Git Productivity in Visual Studio 2019
Redesigned Git repository creation
To get started with Git, Visual Studio lets you add your local code to Git and GitHub with a single click. The Create a Git repository dialog contains the new integrated GitHub sign-in flow, similar to what we offer for Microsoft accounts. Here, you can set the repository to be publicly visible or switch it to private. That makes it securely accessible to only you and any designated collaborators. In addition to GitHub, you can also push your code to an existing remote repository. This can be one you’ve already created on Azure DevOps or any other provider. And finally, you can choose to create a local-only Git repository if you are not ready to push to a remote host.
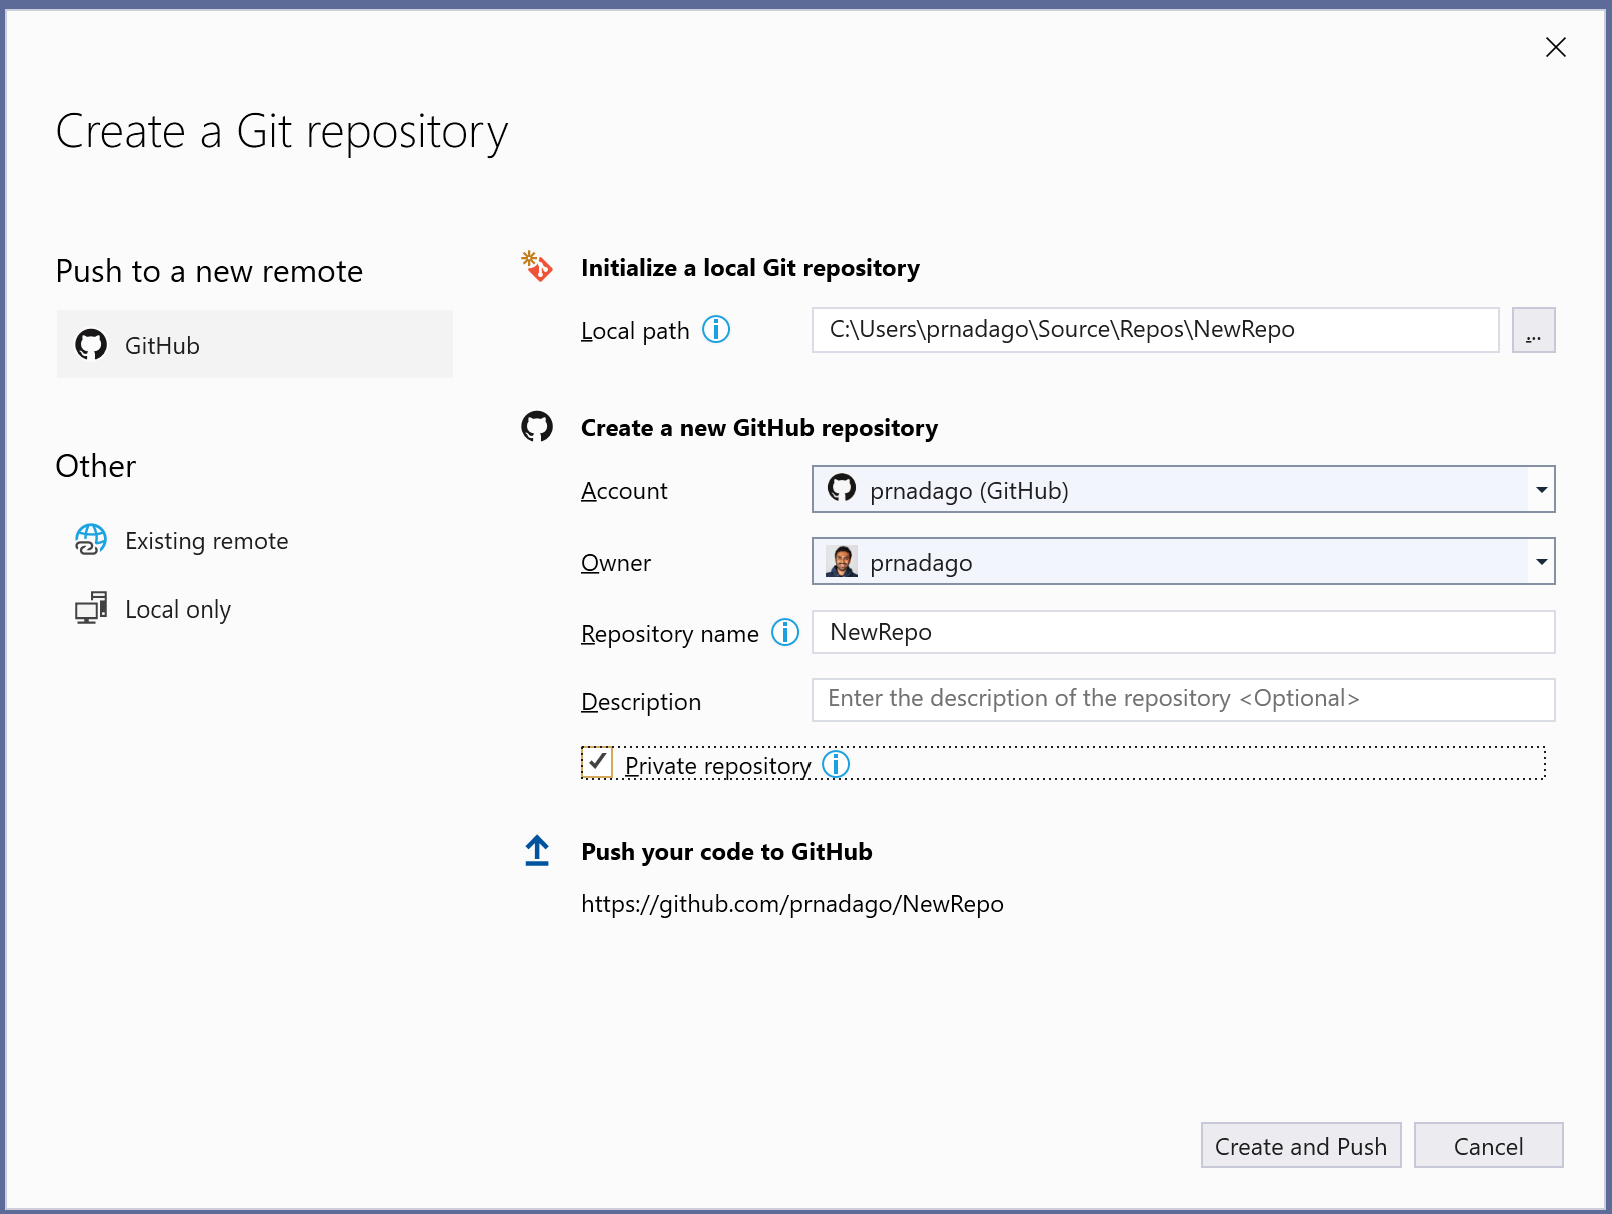
Create Repository dialog
Accessible top level Git menu
You can now access your favorite Git features using the top level Git menu. It’s at easy reach through the Alt+G keyboard shortcut. This menu also has the Local Repositories submenu. By expanding it, you can easily switch between local Git repositories you have previously opened in Visual Studio.
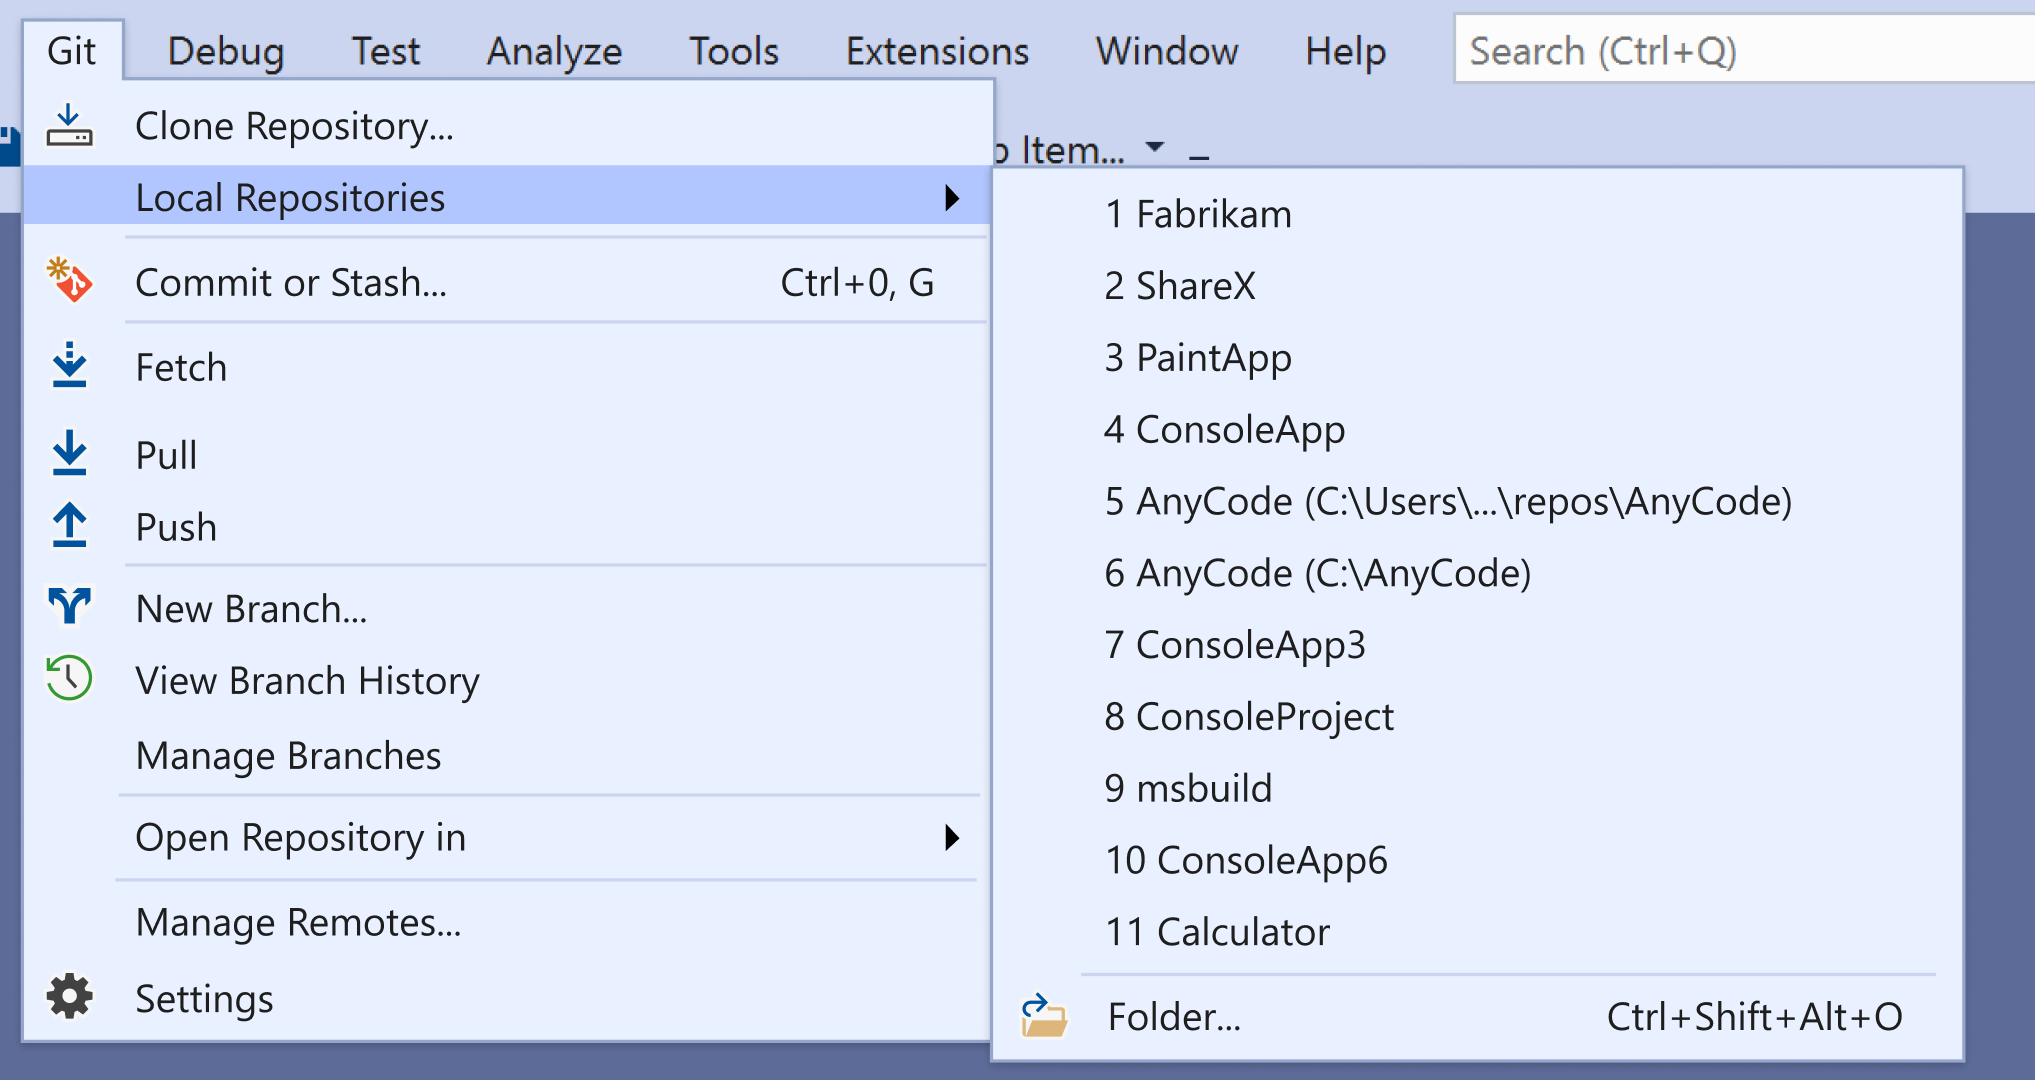
Git menu with Local Repositories list
View files in Solution Explorer
After you’ve opened or cloned a Git repository, Visual Studio helps you get straight to your code. Solution Explorer loads the root of the repository and scans the directory for any View files. Instead of having to search for your .sln file to open it, Visual Studio detects and loads the solution automatically. If your repository has more than one .sln file, then Solution Explorer shows you the list of available views to choose from. Subsequently, you can toggle between the currently open Solution (view) and the list of Views by using the Switch Views button in the Solution Explorer Toolbar.

Switch Views in Solution Explorer
Streamlined inner loop Git Changes window
The new Git Changes window is designed to provide quick access to commonly used Git operations that you need while you are coding. You can create new branches, stash, stage, amend, and commit changes, all from the same place without switching pages or losing context. Moving to the top of the window, you’ll see handy fetch, pull, and push buttons. They allow you to sync commits and tags with your remotes (that’s right, multiple remotes!). The Git Changes window also has an indicator displaying the number of outgoing and incoming commits. This indicator functions as a link to take users to the Git Repository window. From there, you can view a summary of your outgoing and incoming commits before you sync.
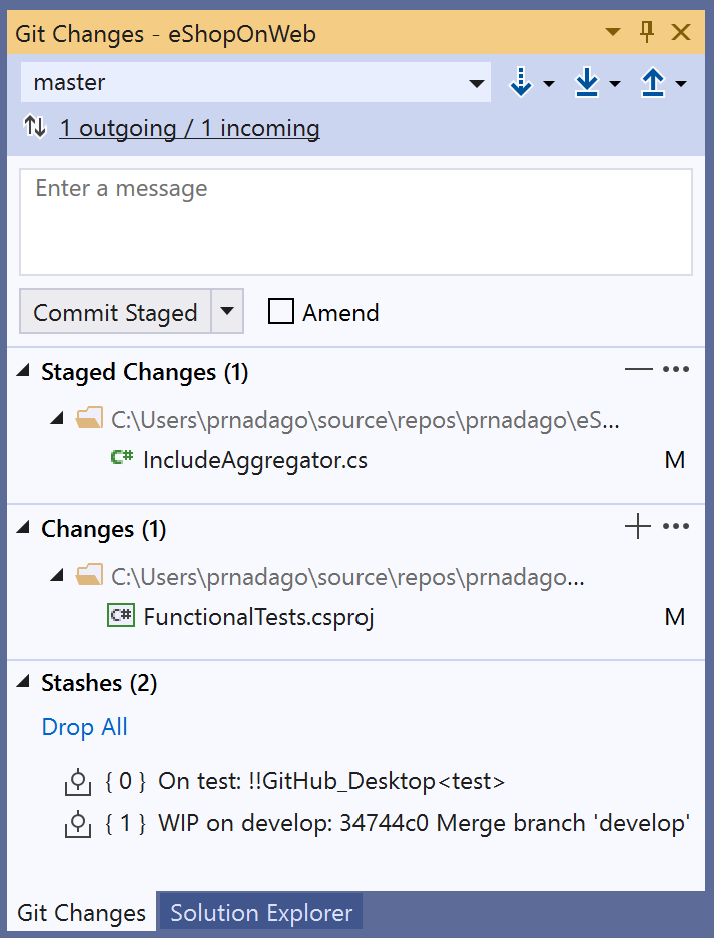
Staged Changes and Stashes in the Git Changes Window
Full screen Git Repository window
If you like browsing and managing your repository, you no longer need to leave Visual Studio. The new Git experience comes with a rich Git Repository window that makes it easy to visualize the entire history of your repository. You can right click on a branch to perform operations like merge, rebase, reset, and cherry pick. Moreover, the Repository window is accessible through the Git menu, the View menu, and the status bar.
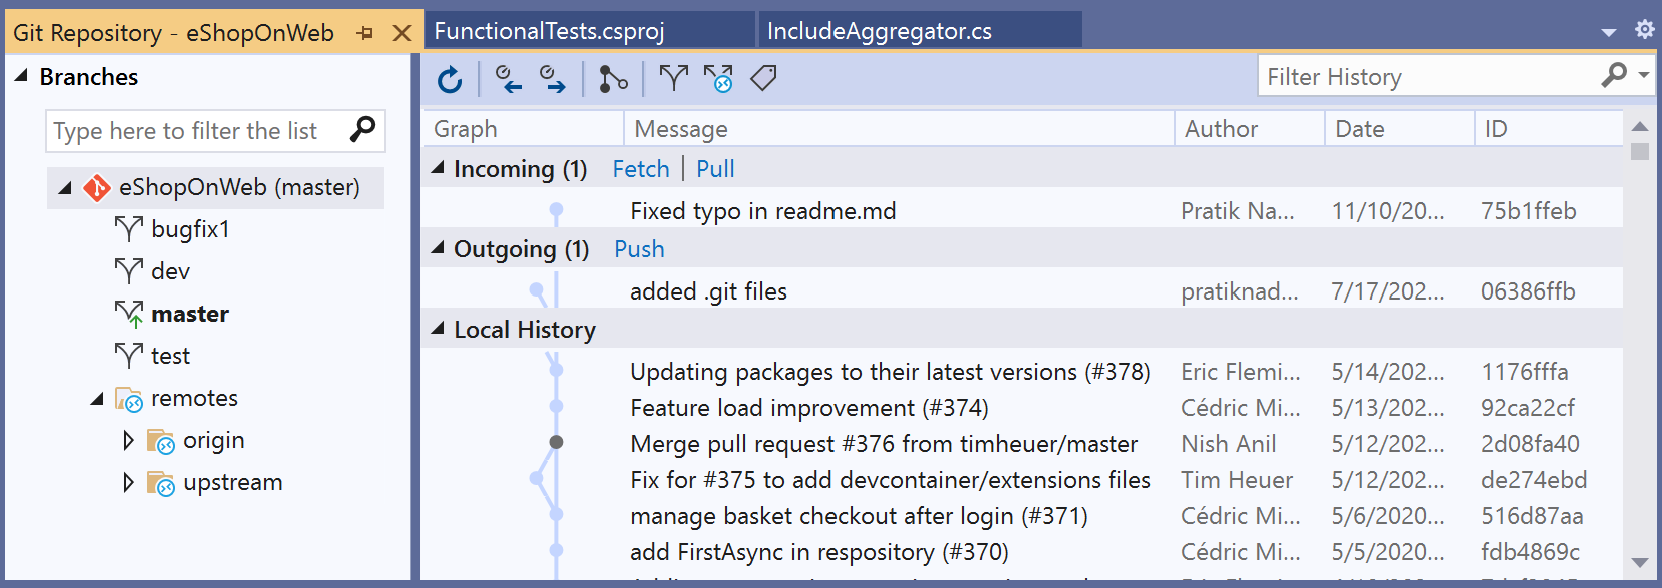
Branch History in the Git Repository Window
Enhanced merge conflict resolution
If you run into a merge conflict, Visual Studio now guides you through the process of resolving it. The Git Changes tool window clearly lists unmerged changes. Also, it displays a status message specifying that conflict resolution is in progress. Further, a gold info bar in the conflicting file prompts you to open the Merge Editor. Once you’re there, the three-way Merge Editor takes you through each conflict in the file. In other words, it allows you to compare lines and even individual word-level differences. Moreover, you can accept all current or incoming changes at the file level with a single click.
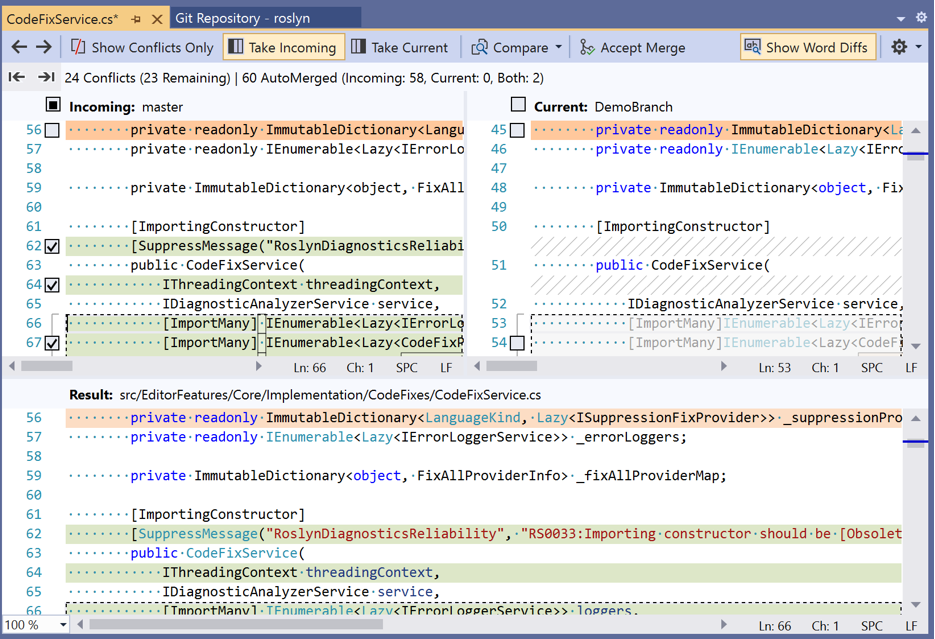
Merge Conflict Resolution with the Merge Editor
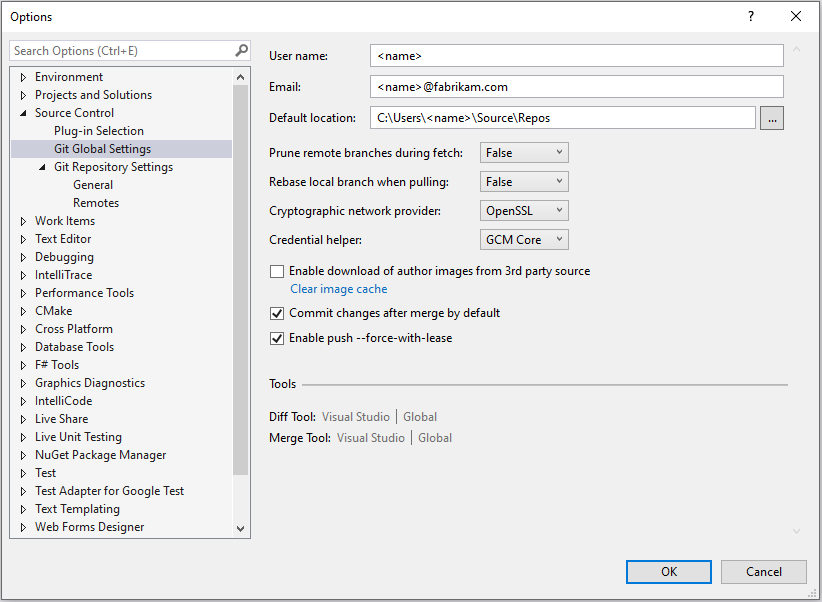
Customizable experience
We want you to be able to personalize your Git experience. To change any of your preferences at the repository level or the global level, go to Git – Settings in the menu bar. This will take you to the consolidated Tools – Options pane for Source Control.
Git Settings in Tools – Options dialog
However, if these features aren’t working out for you, it’s possible to revert back to the full Team Explorer experience. Go to Tools – Options – Environment – Preview Features and toggle the New Git user experience checkbox. Please let us know why!
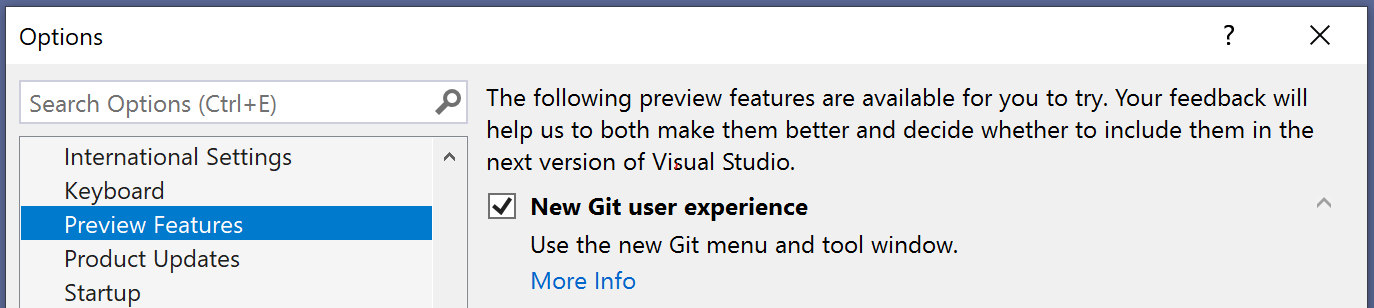
New Git user experience Preview Feature flag
This is just the beginning
To summarize, from the new Git menu, you can clone, create, or open repositories. You can use the integrated Git tool windows to commit and push changes to your code, manage branches, sync your remote repositories, and resolve merge conflicts. Find the full list of capabilities in the Release Notes. Learn how to use the features in our documentation. Most importantly, join the conversation on Developer Community to weigh in on what we’re building next. And please provide feedback as we continue to enhance the Git experience in Visual Studio!
This is just horrible!
Now not only the window is super-slow and redraws ten times on each click, but also you don’t have a combined view of all branches
How this can be an improvement ???
I hate it. It replaced nicely nested right click submenus with a bunch of buttons…
Seems like it just takes more work/clicks to accomplish the same task, sure the UI looks nicer but I don’t use VS for how nice it looks.
The integration to Devops just seems bad as well.
Somehow magically, the option to create new Azure Devops Repos is no longer there anywhere. We have so many projects hosted on Azure Devops and wanted to keep it that way for a while but it seems with the ‘improvements’ a very useful feature is gone. I wish I hadnt even upgraded.
一直使用git功能,非常喜欢,但是更新后出现提交非常慢,提交一次要消耗几个小时的时间,而且之前的界面非常好用,新的这个git界面体验真的太差了,如果用100评分的话,我给只能给1分