

Hello Flutter developers!
After recently reading about how Pieces.app uses ONNX runtime inside a Flutter app, I was determined to try it myself. This article shows a summary of the journey I took and provides a few tips for you if you want to do the same.
Since we have FFI in Dart for calling C code and ONNX Runtime offers a C library, this is the best way to integrate across most platforms. Before I walk down that path, I decide to have a look at pub.dev to see if anyone did this before me. My thinking here is that anything running ONNX Runtime is a good starting point, even if I must contribute to the project to make it do what I need. In the past, if a plugin lacked functionality, I would fork it, write what was missing and then use the fork as a git dependency. If it was appropriate, I would also open a PR to upstream the changes.
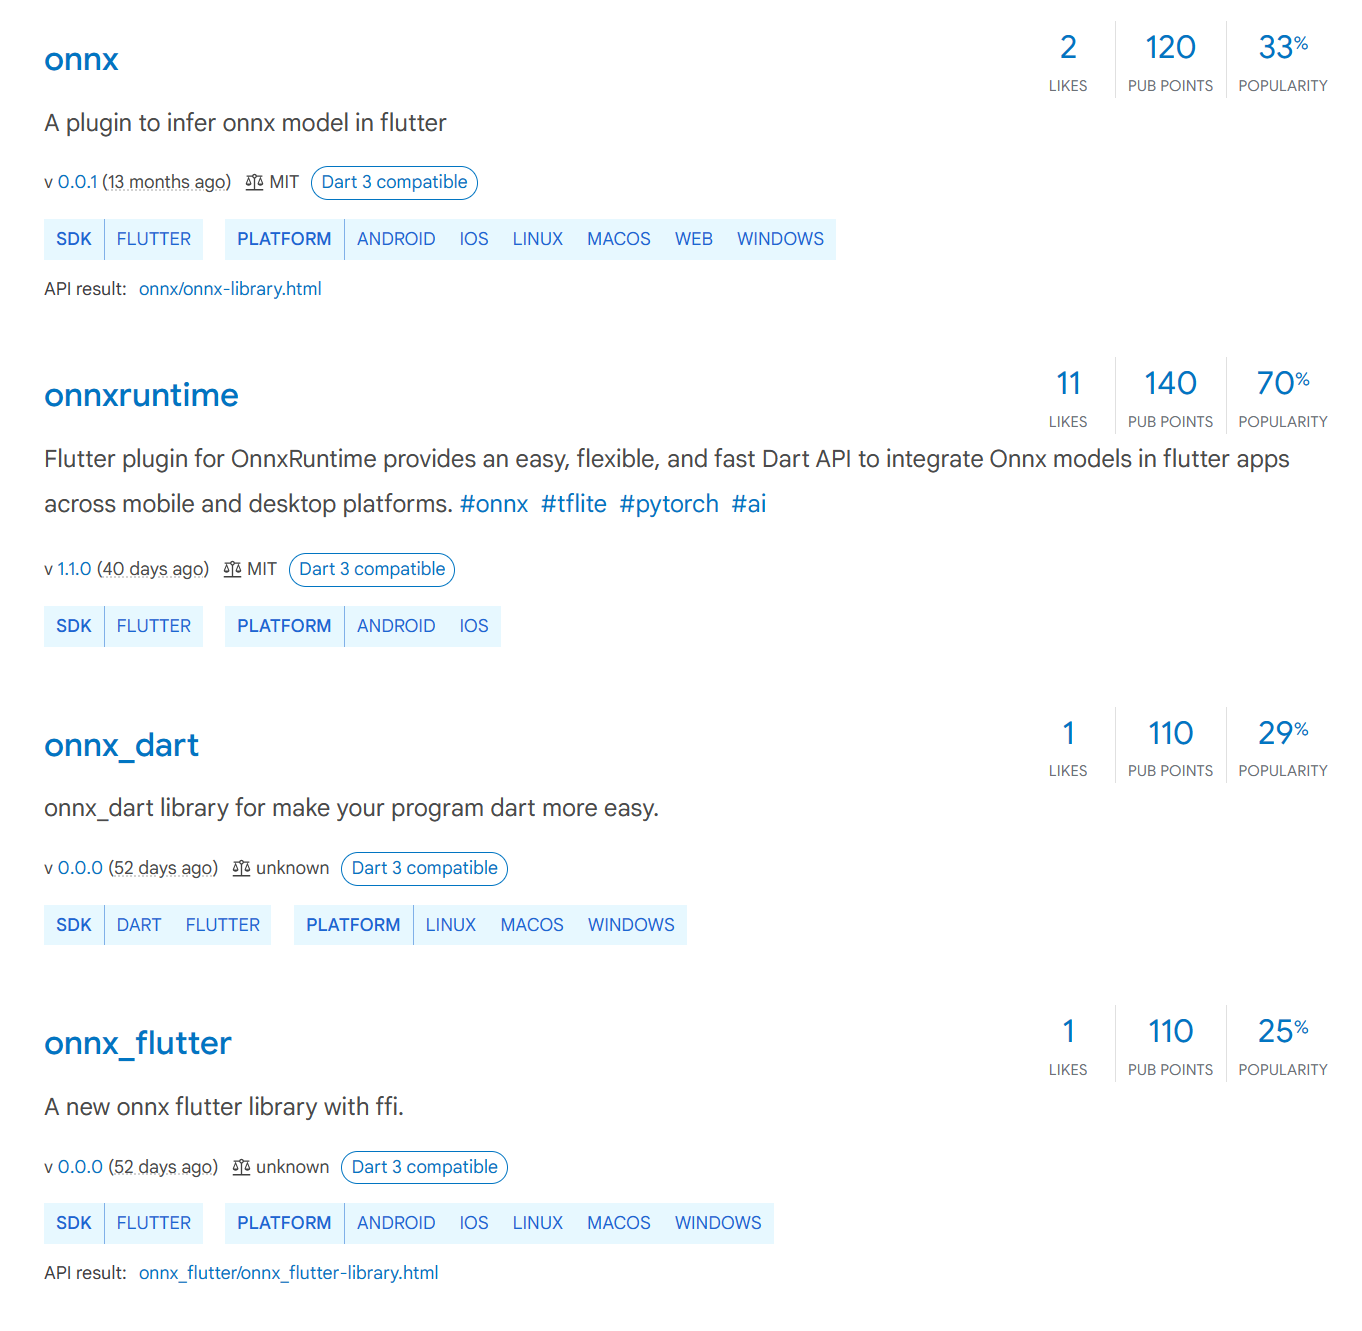
Figure 1: Searching for ONNX on pub.dev
If I’m searching for ONNX, four packages show up. As it sometimes happens on pub.dev, some packages are started and published but not finished. After looking at the code, I concluded that only onnxruntime has enough work put into it that it’s worth giving a shot. At first glance, it seems to only run on Android and iOS, but after looking at the code, I see it is based on the ONNX Runtime C Library and it uses Dart FFI, which means I can make it run on other platforms down the line. Off I go with a brand new flutter project flutter create onnxflutterplay and then flutter pub add onnxruntime.
The library comes with an example. It seems to be an audio processing sample, which is far too complicated for where I am right now. I want to understand the basics and run the simplest ONNX model I can think of. This will also prove to me that the plugin works. I start searching for the simplest model I can think of and end up with the model from the ONNX Runtime basic usage example. It takes two float numbers as input and outputs their sum. I follow the instructions and generate my first ever ORT model. This is how the model looks like in Netron.
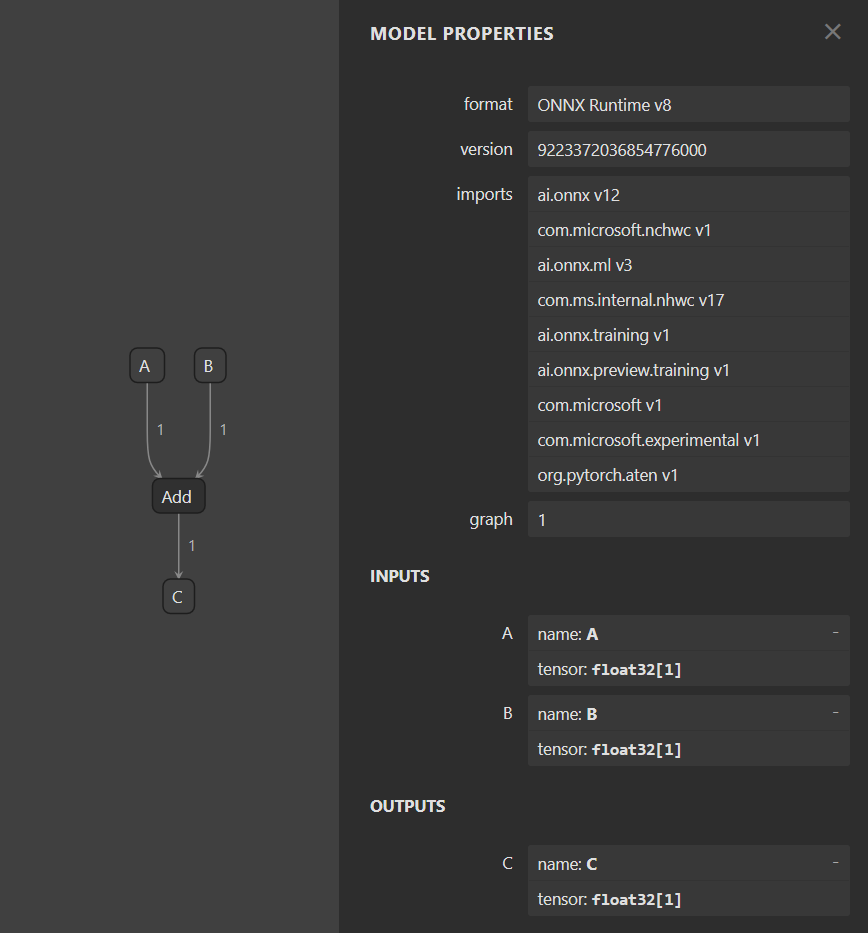
Figure 2: Netron app showing a simple model
To figure out how to use the model, I have a few resources at my disposal. First, I have the sample code from the model repo, which is Swift code and might be intimidating, but is well documented and quite similar to Kotlin and Dart. I need to be comfortable looking at other languages anyway, since most AI researchers use Python. I see the names “A”, “B” and “C” and the float type being used explicitly. The other resource I have is a test from the flutter plugin. It uses simple data types for input and output, which shows me how to pack “A” and “B” inputs properly. You can see the complete code on GitHub. This is what I end up with:
![A screenshot of code. The code is as follows:
void _inferSingleAdd() async {
OrtEnv.instance.init();
final sessionOptions = OrtSessionOptions();
final rawAssetFile = await rootBundle.load("assets/models/single_add.ort");
final bytes = rawAssetFile.buffer.asUint8List();
final session = OrtSession.fromBuffer(bytes, sessionOptions);
final runOptions = OrtRunOptions();
final inputOrt = OrtValueTensor.createTensorWithDataList(
Float32List.fromList([5.9]),
);
final inputs = {'A':inputOrt, 'B': inputOrt};
final outputs = session.run(runOptions, inputs);
inputOrt.release();
runOptions.release();
sessionOptions.release();
// session.release();
OrtEnv.instance.release();
List c = outputs[0]?.value as List;
print(c[0] ?? "none");
}](https://devblogs.microsoft.com/surface-duo/wp-content/uploads/sites/53/2023/12/a-screenshot-of-code-the-code-is-as-follows-vo.png)
Figure 3: Code for inferring the simple model
I run into some exceptions with the session.release() call. From my investigations, this library might expect to be called from an isolate and I am not doing that yet. To move past the errors, I simply commented that line – but if I was doing this for a production app I would give the isolate a try and investigate further. For now, this will do.
Next step in my journey is to try a larger model. My end goal here is to work with images, and I feel prepared to start using the simplest model I can find. The perfect model to continue with is one that takes an image input and only applies some color filter or other easy to debug operation. I start looking for such a model but can’t find one. I land on a style transfer model from the ONNX Model Zoo archive. I pick the mosaic pretrained model and I immediately open it in Netron.
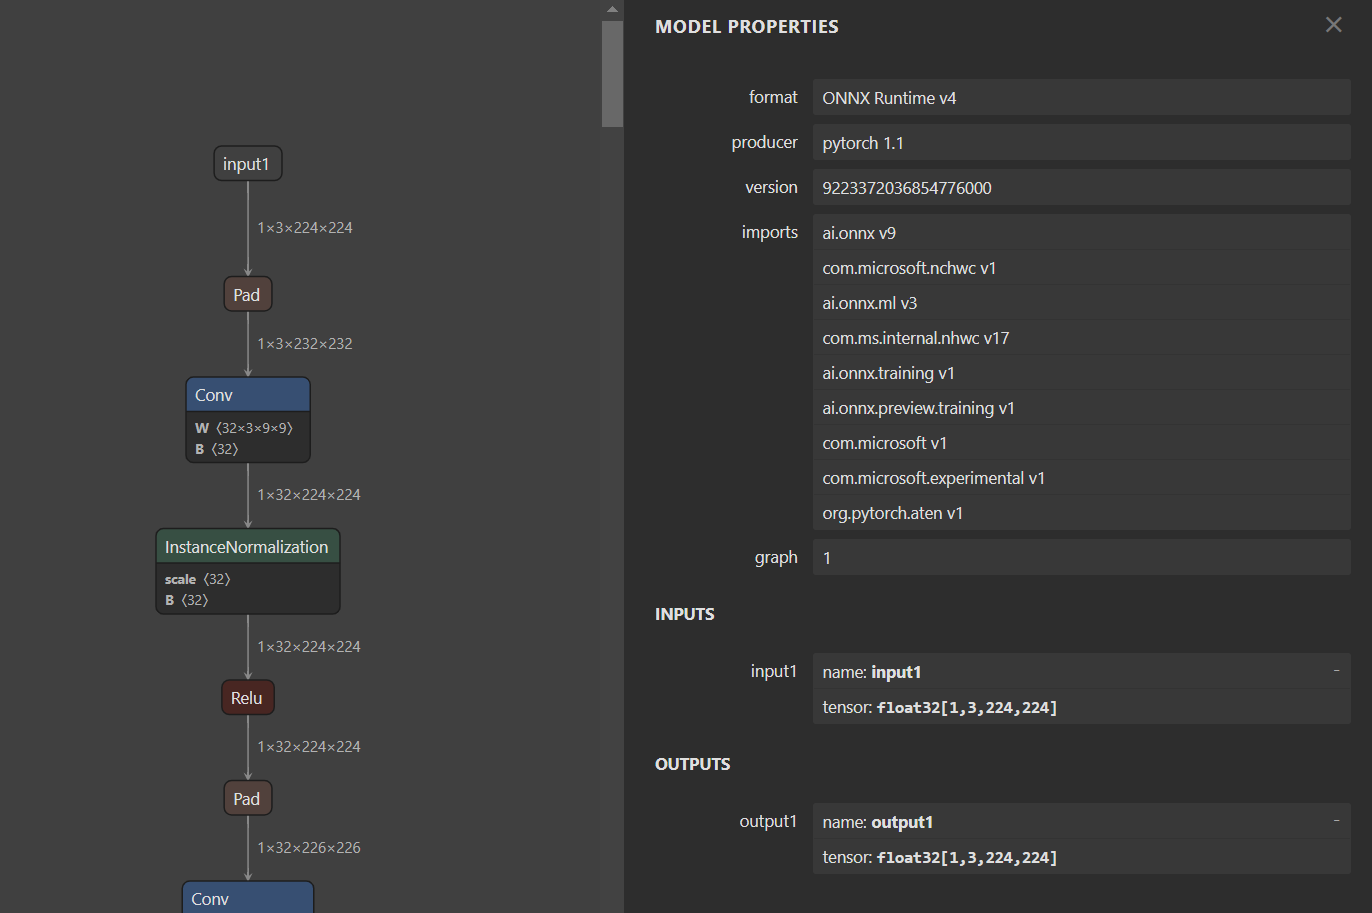
Figure 4: Netron showing a complex model
You can clearly see the input and output there: float32[1,3,224,224]. The numbers in brackets represent the shape of the tensor. The shape is important because we process our input and output to match that shape. When that shape was not respected, I usually got a runtime error telling me it expected something else. You can feed some models raw PNG or JPEG files, but not this model. This model requires a bit of processing.
I did not know about tensor shapes before this work, so maybe it’s worth pausing a bit to discuss what it means. If you have a simple matrix with 10 rows of 100 elements each, the shape is [10, 100]. The shape is the number of elements on each of the axes of the tensor. For an experienced computer vision machine learning developer, I expect that something like [1, 3, 224, 224] immediately screams “one image with 3 channels per pixel (Red, Green, Blue) of size 224 by 224 pixels”.
I first convert the ONNX file into ORT format and then add it to the app. I also prepare an image. I do not want to fiddle with resizing and transforming the input or output yet, so I fire up mspaint and make a 224 by 224 pixels, completely red image. During debugging, I also make a half red, half green image.

Figure 5: Red square

Figure 6: Half red, half green square
A red image of the exact size I need provides me with a simple to debug input. Working with ONNX Runtime or Machine Learning in general proves to be a lot of pre- or post-processing.
For example, colors for each pixel are represented differently in Flutter or Android compared to these ONNX models. To drive this point, let’s consider an unusual 1×10 image. We have 10 pixels in total. Each has 4 color components. Let’s number each pixel 1 to 10 and each color component R (Red), G (Green), B (Blue) and A (Alpha). In the sample below, Flutter stores the image as:
R1 G1 B1 A1 R2 G2 B2 A2 R3 G3 B3 A3 […] R10 G10 B10 A10
From what I see, due to how tensor reshaping works, to get the right ONNX Runtime Tensor, the image data must look like this:
R1 R2 R3 […] R10 G1 G2 G3 […] G10 B1 B2 B3 […] B10
Reordering the colors and dropping the Alpha component to fit this format is our pre-processing and the code looks like this:
![A screenshot of code. The code is as follows:
Future<List<double>> imageToFloatTensor(ui.Image image) async {
final imageAsFloatBytes = (await image.toByteData(format: ui.ImageByteFormat.rawRgba))!;
final rgbaUints = Uint8List.view(imageAsFloatBytes.buffer);
final indexed = rgbaUints.indexed;
return [
...indexed.where((e) => e.$1 % 4 == 0).map((e) => e.$2.toDouble()),
...indexed.where((e) => e.$1 % 4 == 1).map((e) => e.$2.toDouble()),
...indexed.where((e) => e.$1 % 4 == 2).map((e) => e.$2.toDouble()),
];
}](https://devblogs.microsoft.com/surface-duo/wp-content/uploads/sites/53/2023/12/a-screenshot-of-code-the-code-is-as-follows-fu.png)
Figure 7: Code for converting image to tensor
Working with a red image here helps me debug the actual numbers I see in the tensor data. I expect to see 50176 (224×224) occurrences of the value 255 (maximum for red), followed by all zeros (green and blue). The result I get back from the model output also needs to be processed back to a Flutter image. This does the exact opposite of the input processing. Notice that I added the alpha back and set it to 255:
![A screenshot of code. The code is as follows:
Future<ui.Image> floatTensorToImage(List tensorData) {
final outRgbaFloats = Uint8List(4 * 224 * 224);
for (int x = 0; x < 224; x++) {
for (int y = 0; y < 224; y++) {
final index = x * 224 * 4 + y * 4;
outRgbaFloats[index + 0] = tensorData[0][0][x][y].clamp(0, 255).toInt(); // r
outRgbaFloats[index + 1] = tensorData[0][1][x][y].clamp(0, 255).toInt(); // g
outRgbaFloats[index + 2] = tensorData[0][2][x][y].clamp(0, 255).toInt(); // b
outRgbaFloats[index + 3] = 255; // a
}
}
final completer = Completer<ui.Image>();
ui.decodeImageFromPixels(outRgbaFloats, 224, 224, ui.PixelFormat.rgba8888, (ui.Image image) {
completer.complete(image);
});
return completer.future;
}](https://devblogs.microsoft.com/surface-duo/wp-content/uploads/sites/53/2023/12/a-screenshot-of-code-the-code-is-as-follows-fu-1.png)
Figure 8: Code for converting tensor to image
When working with images, input and output are usually formatted the same way and post-processing mirrors what you do in pre-processing. You can feed the pre-processing into post-processing directly, without running the model and then render the results, to validate they are symmetrical. This does not mean that the model will work well with the data, but it can surface issues with your processing.
And here is the result, using a photo of an Eurasian blue tit by Francis Franklin:
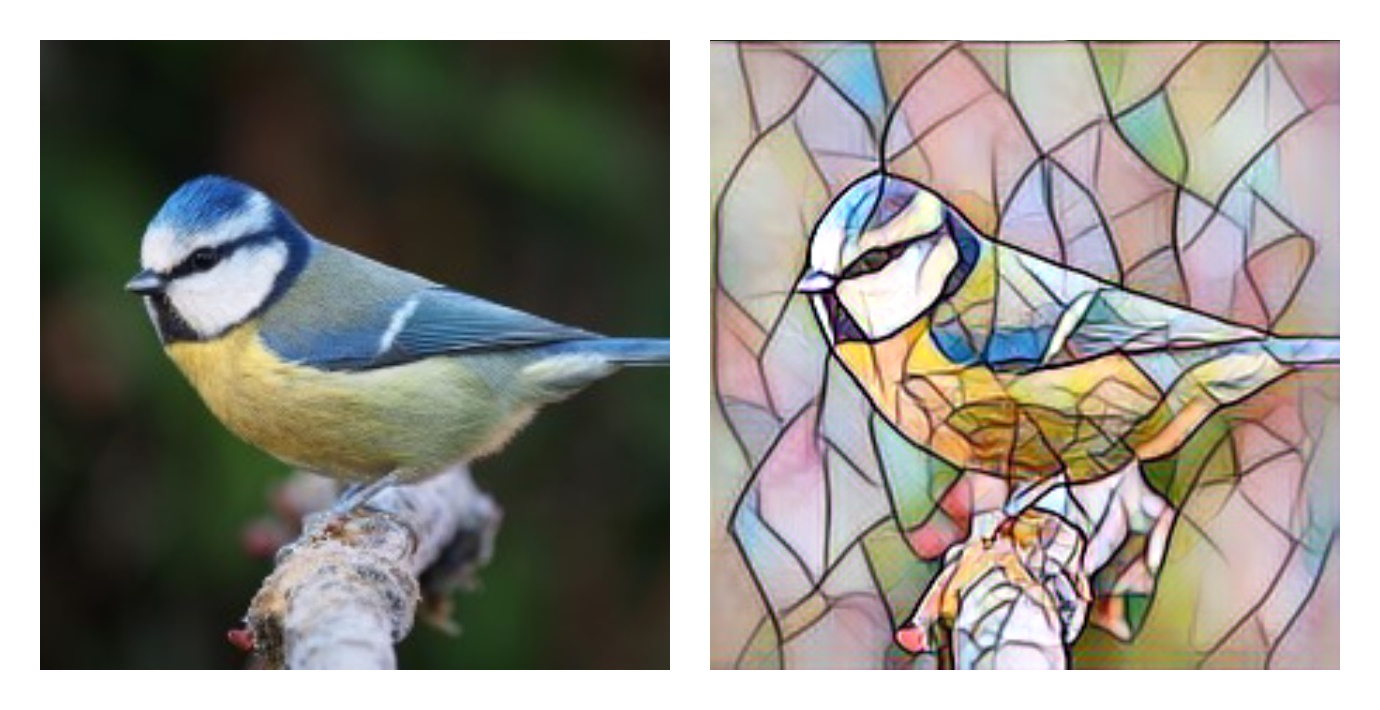
Figure 9: Bird image before and after stylizing as mosaic
Throughout this journey, I learned that making small steps is the way to go. Working with ORT can feel like using a black box and taking baby steps is essential for understanding the input and output at every stage.
Call to action
- Clone the project from GitHub and continue from there, or follow along the article and build your own project from scratch.
Thanks for this very inspirational post!
Near “I land on a style transfer model from the” there is a broken link:
https://github.com/onnx/models/tree/main/archive/vision/style_transfer/fast_neural_style
that should be changed to the working:
https://github.com/onnx/models/tree/main/validated/vision/style_transfer/fast_neural_style
Fixed! Thanks for letting us know.