
Hello prompt engineers,
Just this week, OpenAI announced that their chat app and website can now ‘hear and speak’. In a huge coincidence (originally inspired by this Azure OpenAI speech to speech doc), we’ve added similar functionality to our Jetpack Compose LLM chat sample based on Jetchat.
The screenshot below shows the two new buttons that enable this feature:
- Microphone – press to start listening and then speak your query
- Speaker-mute – when the app is speaking the response, press this button to stop.
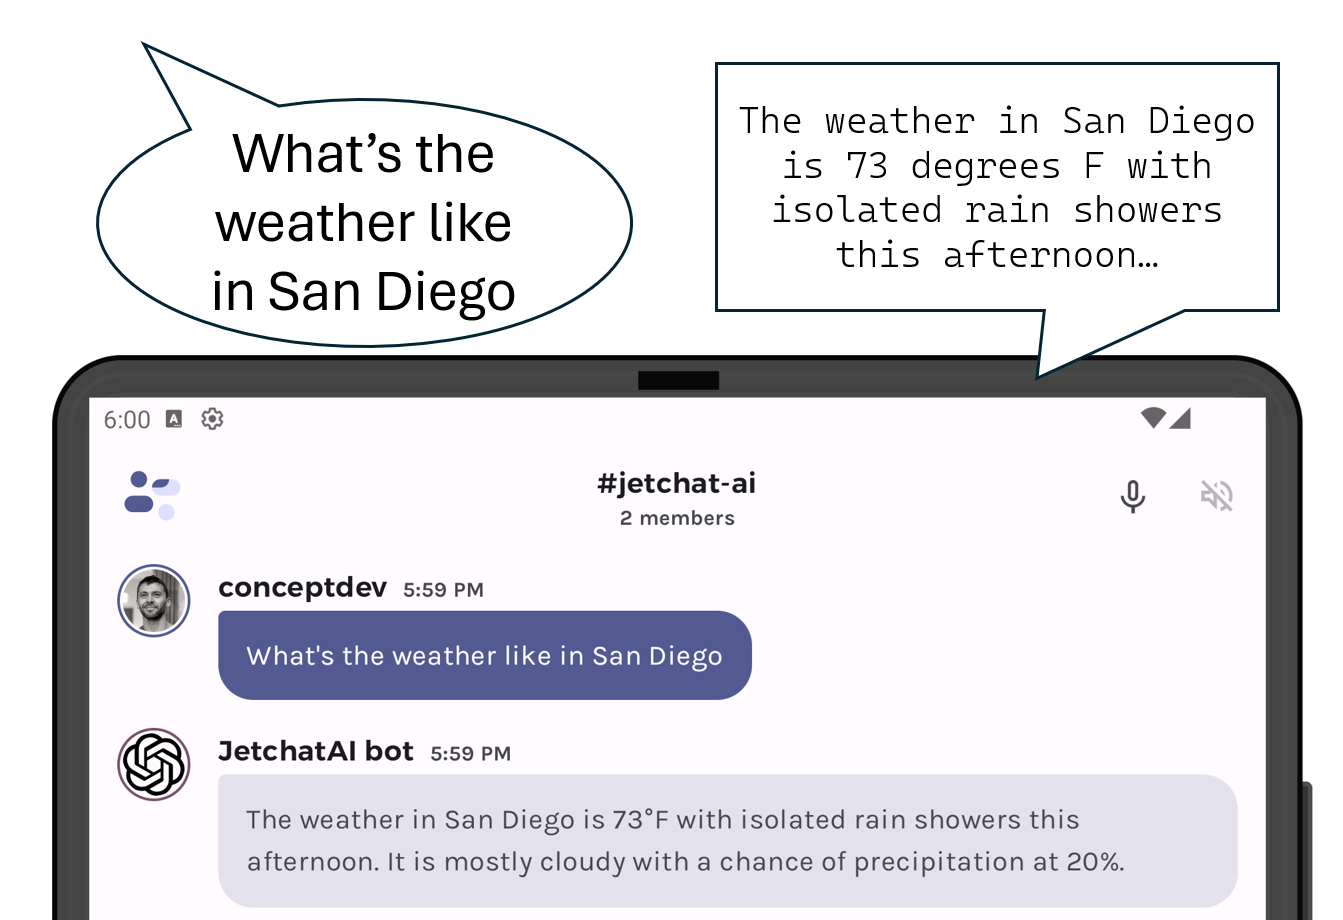
Figure 1: The microphone and speaker-mute icons added to Jetchat
The speech that is transcribed will be added to the chat as though it was typed and sent directly to the LLM. The LLM’s response is then automatically spoken back through the speakers/headset. Both the speech-in and speech-out functionality will use built-in Android APIs.
Speech in
To listen to the user’s question and create a prompt for the LLM, we’re going to use the Android SpeechRecognizer API. We don’t want the phone to be in permanent listen-mode, so the user will have to tap the microphone icon before speaking. This requires us to:
- Configure permissions in AndroidManifest.xml
- Check/ask for permission in code
- Initialize API with context
- Add API methods to listen for speech and send text to the view model
- Wire up UI button to start listening
Set & check permissions
In order for the app to access the microphone, it must request the RECORD_AUDIO permission in AndroidManifest.xml:
<uses-permission android:name="android.permission.RECORD_AUDIO"/>
and then call this checkPermission function in the NavActivity.onCreate function:
private fun checkPermission() {
    if (Build.VERSION.SDK_INT >= Build.VERSION_CODES.M) {
        ActivityCompat.requestPermissions(
            this,
            arrayOf<String>(Manifest.permission.RECORD_AUDIO), RecordAudioRequestCode
        )
    }
}
Assuming the user agrees, the app will be able to listen to their spoken questions.
Add listening code
On the ChannelNameBar composable, there’s a new parameter onListenPressed, which is called when the icon is clicked (see the “Wire up…” section below). This function is implemented in the ConversationFragment and passed through the ConversationContent composable.
The speechToText object is initialized as part of the fragment’s onCreate function and takes a number of parameters including setting the expected language. This is so the API can access the context required for its constructor:
speechToText = SpeechRecognizer.createSpeechRecognizer(this.context)
speechToText.setRecognitionListener(this)
recognizerIntent = Intent(RecognizerIntent.ACTION_RECOGNIZE_SPEECH)
recognizerIntent.putExtra(RecognizerIntent.EXTRA_LANGUAGE_PREFERENCE, "US-en")
Once that’s initialized, the listen function gets called via the view model and starts listening for speech to transcribe:
speechToText.startListening(recognizerIntent)
The rest of the functions required to support the API are also implemented in the fragment. When some text is successfully transcribed, the result is passed to the view model via setSpeech.
The MainViewModel.setSpeech function inserts the text into the existing ‘workflow’ for new messages, so it gets added in the user interface and the existing code is triggered to send to the LLM.
fun setSpeech (text: String) {
    onMessageSent(text)
}
Once onMessageSent is called, the app behaves as if the query was input via the keyboard.
Speech out
To read the model’s responses aloud, we’ve used the Android TextToSpeech API. Like the SpeechToText class, it gets initialized in the fragment’s onCreate function:
tts = TextToSpeech(this.context, this) // context, fragment
activityViewModel.setSpeechGenerator(tts)
Notice the second constructor parameter is a reference to the fragment itself – this is because we’ve implemented the TextToSpeech.OnInitListener interface on the fragment. The mute button state (disabled except when there is audio generated) is based on those callback functions.
In the onMessageSent function, after a response has been received from the OpenAiWrapper and displayed in the UI, the code will also read it aloud:
textToSpeech.speak(chatResponse, TextToSpeech.QUEUE_FLUSH, null,"")
As with the speech recognition implementation, there is minimal change to the existing logic of the app.
Access the Android context
As mentioned above, both APIs need to be configured with a Context, so they are created and initialized in the ConversationFragment with references set in the MainViewModel. The MainViewModel encapsulates the speech-related APIs and exposes methods that are called from the Jetpack Compose UI.
The other reason for implementing the functionality on the fragment is that we need to implement the interfaces RecognitionListener and TextToSpeech.OnInitListener, for instance to capture and update the mutable state speechState.
NOTE: you will also see a method
setContexton theMainViewModel– this is used by the Sqlite implementations for vector caching and history embedding – and is not related to the speech features.
Wire up the Jetpack Compose UI
The above snippets show how the speech recognition and text-to-speech APIs are wired up. The next code snippet shows how the user interface triggers the functionality from the view model via composables in Conversation.kt. The speech UI controls (record and mute) are added as icons to the ChannelNameBar composable. In the composable where the icons are declared you can see these functions and state are used to trigger events on the view model:
-
onListenPressed() -
speechState -
onStopTalkingPressed()
// "Microphone" icon
IconButton(onClick = {
    onListenPressed()
}) {
    Icon(
         imageVector = when (speechState) {
         SpeechState.LISTENING -> Icons.Filled.KeyboardVoice
         else -> Icons.Outlined.KeyboardVoice
    },
    tint = when (speechState) {
         SpeechState.LISTENING -> MaterialTheme.colorScheme.primary
         else -> MaterialTheme.colorScheme.onSurfaceVariant
    },
    modifier = Modifier.clip(CircleShape),
    contentDescription = stringResource(id = R.string.enable_mic)
    )
}
// "End speaking" icon
IconButton(
    onClick = {
        onStopTalkingPressed()
    },
    enabled = when (speechState) {
            SpeechState.SPEAKING -> true
            else -> false
         }
     ) {
     Icon(
         imageVector = Icons.Outlined.VolumeOff,
         modifier = Modifier.clip(CircleShape),
         contentDescription = stringResource(id = R.string.mute_tts)
     )
}
These are set in the ConversationContent composable and implemented in the ConversationFragment, calling into functions or mutable state (eg. the speechState) defined in the fragment.
One last thing…
After adding this feature that reads out every response, it started driving me crazy while testing other features. I added a flag Constants.ENABLE_SPEECH that should be set to true to use these features, but false when you are testing or otherwise don’t wish to utilize the SpeechRecognition and TextToSpeech functionality. This could be an application preference in future.
If you’re running the sample and find the speech features not working, check that ENABLE_SPEECH = true in Constants.kt and that you agreed to the permissions dialog when the app started.
Resources and feedback
See the Azure OpenAI documentation for more information on the wide variety of services available for your apps.
We’d love your feedback on this post, including any tips or tricks you’ve learned from playing around with ChatGPT prompts.
If you have any thoughts or questions, use the feedback forum or message us on Twitter @surfaceduodev.
There will be no livestream this week, but you can check out the archives on YouTube.
Ilike it, there’s a GitHub repository where i can find the code?
yes, it’s at https://github.com/conceptdev/droidcon-sf-23/