Weekend Scripter: Use PowerShell to Manage Your Windows Azure Deployments
Summary: Guest blogger, Microsoft evangelist Brian Hitney, discusses using Windows PowerShell to create and to manage Windows Azure deployments.
Microsoft Scripting Guy, Ed Wilson, is here. Today we have guest blogger, Brian Hitney. Brian is a developer evangelist at Microsoft. You can read more by Brian in his blog, Structure Too Big Blog: Developing on the Microsoft Stack.
Hi everyone, Brian Hitney here. I’m a developer evangelist at Microsoft, and I focus on Windows Azure. Recently, I was asked to give a presentation to the Windows PowerShell User Group in Charlotte, North Carolina about managing Windows Azure deployments with Windows PowerShell. I have not done too much work with Windows PowerShell and Windows Azure, so this was a perfect opportunity to learn!
Getting started with Windows Azure
To begin, let us briefly talk about Windows Azure. Windows Azure is the cloud computing platform by Microsoft. It is comprised of a number of offerings and services, the most obvious being application and virtual machine hosting. There are also storage facilities to store tabular data, binary objects such as documents, images, and so on. Of course, it includes SQL Azure, which is a fully managed, redundant SQL Server instance. What makes cloud computing so attractive is that it scales based on your needs. You can run a small website easily in an extra small instance (2 cents/hour, or about $15.00/month), or you can hit a button to scale out to dozens of 8 CPU servers.
Now that we know what it is, you will need an account. If you have a MSDN subscription, you are already there and you have some great benefits as part of your subscription. If not, you are still in luck because you can use Azure for free for 90 days.
Note: Oh, and a shameless plug: If you want to learn about the cloud and would like a fun activity to do in the process, check out our @home with Windows Azure project or RockPaperAzure. Both are designed to be fun, hands-on exercises.
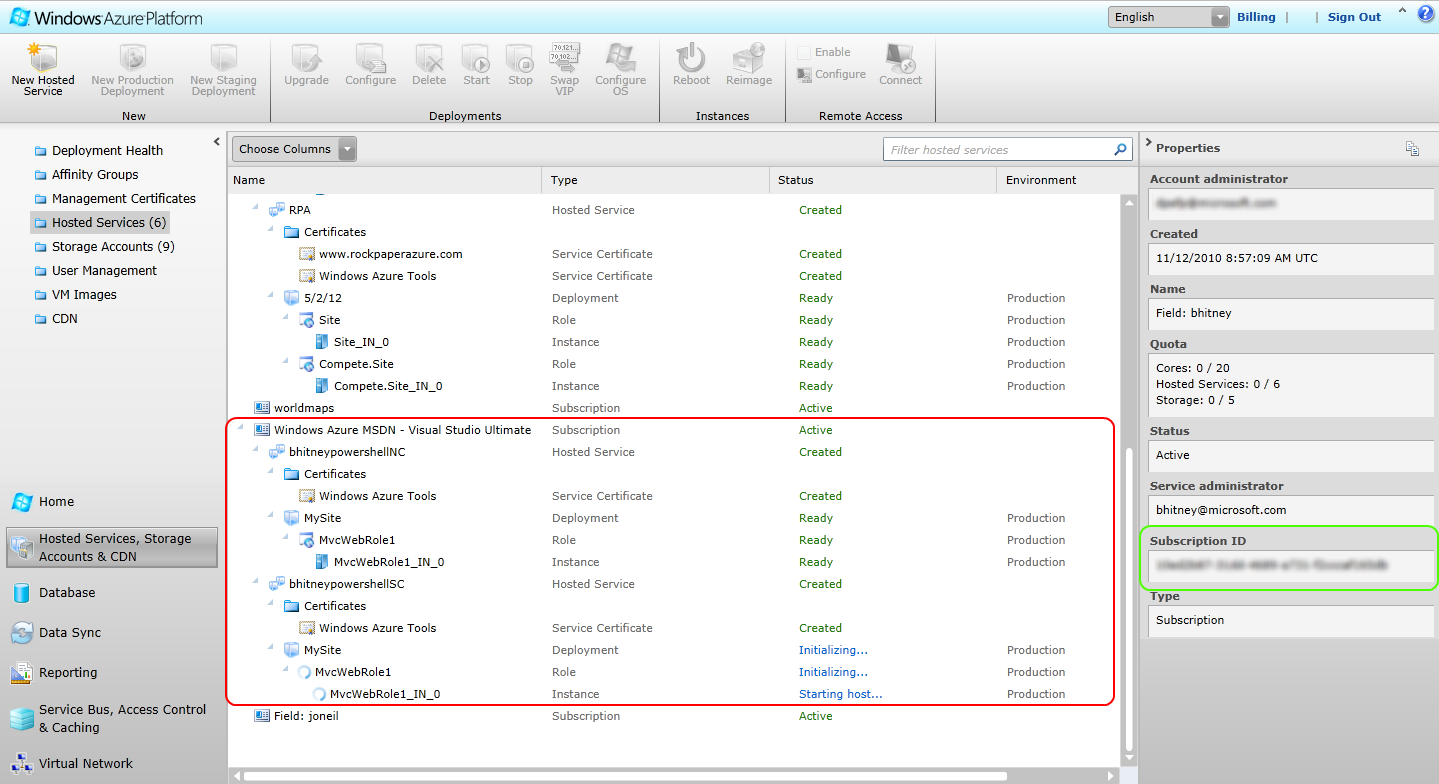
Now that we know what Windows Azure is and how to get an account, let’s talk about the portal. The current version of the Windows Azure Platform is Silverlight based, and you would typically upload your files, create new hosted services, and so on, directly through this portal. An application consists of two files: a package file (.cspkg) and a configuration file (.cscfg), usually created from within Visual Studio. As a platform-as-a-service, Windows Azure manages the operating system, IIS, and patches automatically. In the following portal screenshot, you will see I have a number of subscriptions, and within my MSDN subscription, I have two hosted services. You cannot tell from the screenshot without looking at the properties, but the top service (in the red box) is located in the North Central datacenter, and the bottom service (still coming online) is in the West Europe datacenter. There are four datacenters in North America, two in Europe, and two in Asia.
Adding Windows PowerShell to the mixture
Phew! We are finally ready to talk scripting! In addition to the portal, Windows Azure offers a REST-style management API that we can leverage (it is secured with X.509 certificates). Writing against this directly, while not impossible, is not a very fun task. Fortunately, there are Windows Azure PowerShell Cmdlets on CodePlex that wrap the complexity into simple to use cmdlets for creating and managing our Azure services.
Set up the project and upload certificate
The first step is to upload an X.509 certificate to the Windows Azure Management Portal. In a typical enterprise or managed environment, certificate requests would be managed through a central IT department with an internal certification authority (CA). For individual use, it’s simply easiest to create self-signed certificates. There is a lot of documentation about the various ways to do this, so we won’t go into that here. Check out How to Create a Management Certificate for Windows Azure or Windows Azure PowerShell Cmdlets for more information about creating a management certificate.
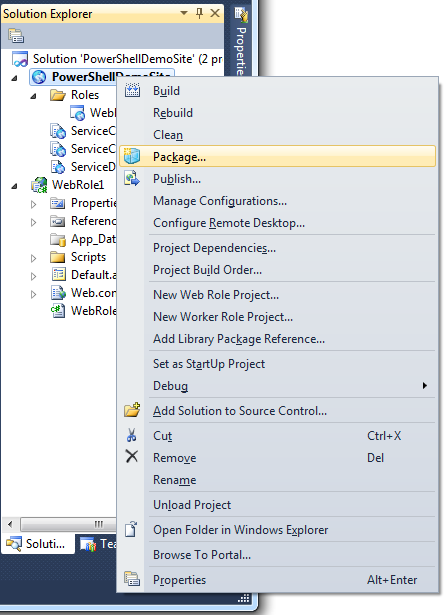
Developers will typically be working with Visual Studio, and there are a number of project templates for cloud applications. The templates make it easy to build a cloud app from the ground up, but it’s also easy to create an empty cloud project, and bring preexisting websites and applications into the cloud project. In many cases, little or no code change is necessary to an ASP.NET-driven website. To download the SDK for Visual Studio, or to check out the other toolkits available, visit Windows Azure Downloads. As mentioned previously, a Windows Azure application will compile to two files, a package file and a configuration file. For sake of convenience, they are attached at the end of this blog in a zip file. They can also easily be created in Visual Studio by right-clicking the Solution Explorer and selecting Package as shown in the following image.
Setting up a new hosted service
In this demo, we will set up a new hosted service by using Windows PowerShell. In fact, we’ll do this in two separate datacenters (North Central and West Europe). We’ll also create a storage account for each application that is in the same datacenter. It’s typically a best practice to have at least one storage account in each datacenter where an application is hosted for performance and reduced bandwidth charges.
Set up the variables
To begin, we will set up some variables for our script:
Import-Module WAPPSCmdlets
$subid = “{your subscription id}”
$cert = Get-Item cert:\CurrentUser\My\01784B3F26B609044A56AC5B1CFEF287321420F5
$storageaccount = “somedemoaccount”
$storagekey = “{your key}”
$servicename_nc = “bhitneypowershellNC”
$servicename_we = “bhitneypowershellWE”
$storagename_nc = “bhitneystoragenc”
$storagename_we = “bhitneystoragewe”
$globaldns = “bhitneyglobal”
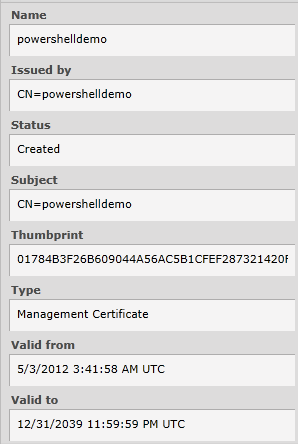
Your subscription ID can be obtained from the portal by clicking your account (shown earlier in the green box in the dashboard). You can obtain the thumbprint of a management certificate directly from your local certificate store (or by examining the file, if not in the local store). Or as shown here, you can look at the thumbprint in the portal by clicking Management Certificates and looking at the properties after you select the certificate:
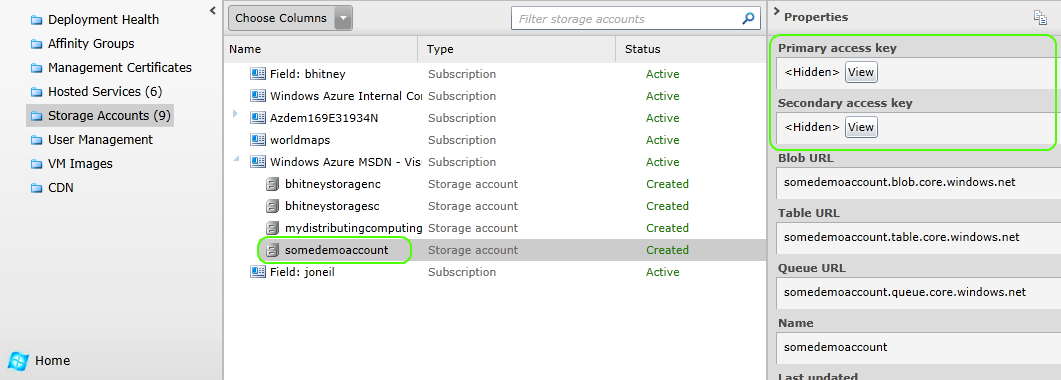
In the following image, the somedemoaccount storage account is my “master storage account.” It’s where I’ll dump my diagnostics data (more on that in another blog post) and all of my global data that isn’t specific to a single deployment. Every storage account has a name (for example, somedemoaccount) and two access keys, which can be obtained from the dashboard also.
However, we will actually be creating storage accounts in script, too.
The $servicename variables are simply DNS names that will be created for our deployment. When they are deployed, the North Central deployment will have an addressable URL as bhitneypowershellNC.cloudapp.net, and the West Europe URL will be bhitneypowershellWE.cloudapp.net.
The $storagename variables are the names of the storage accounts we’ll be creating for these deployments. Although not completely necessary in this context, I’m including this primarily as an example.
Persist your profile information
One of the neat things you can do with the Windows Azure PowerShell cmdlets is save the subscription and related profile information into a setting that can be persisted for other scripts:
# Persisting Subscription Settings
Set-Subscription -SubscriptionName powershelldemo -Certificate $cert -SubscriptionId $subid
# Setting default Subscription
Set-Subscription -DefaultSubscription powershelldemo
# Setting the current subscription to use
Select-Subscription -SubscriptionName powershelldemo
# Save the cert and subscription id for subscriptions
Set-Subscription -SubscriptionName powershelldemo -StorageAccountName $storageaccount -StorageAccountKey $storagekey
# Specify the default storage account to use for the subscription
Set-Subscription -SubscriptionName powershelldemo -DefaultStorageAccount $storageaccount
This means that we don’t have to constantly define the certificate thumbprint, keys, subscription IDs, and so on. They can be recalled by using Select-Subscription. This will make writing future scripts easier, and the settings can be updated in one place instead of having to modify every script that uses these settings.
Set up the storage account and hosted service
Now let’s set up the storage account and hosted service:
# Configure North Central location
New-StorageAccount -ServiceName $storagename_nc -Location “North Central US” | Get-OperationStatus –WaitToComplete
New-HostedService -ServiceName $servicename_nc -Location “North Central US” | Get-OperationStatus –WaitToComplete
New-Deployment -serviceName $servicename_nc –StorageAccountName $storagename_nc `
-Label MySite `
-slot staging -package “D:\powershell\package\PowerShellDemoSite.cspkg” –configuration “D:\powershell\package\ServiceConfiguration.Cloud.cscfg” | Get-OperationStatus -WaitToComplete
Get-Deployment -serviceName $servicename_nc -Slot staging `
| Set-DeploymentStatus -Status Running | Get-OperationStatus -WaitToComplete
Move-Deployment -DeploymentNameInProduction $servicename_nc -ServiceName $servicename_nc -Name MySite
We’re creating a new storage account, and because the operation is asynchronous, we’ll pipe Get-OperationStatus –WaitToComplete to have the script wait until the operation is done before continuing. Next, we will create the hosted service. The hosted service is the container and the DNS name for our application. When this is done, the service is created; however, nothing is yet deployed. Think of it as a reservation.
Deploy the code
We will deploy the code by using the New-Deployment command. In this case, we’ll deploy the service (note the paths to package files) to the staging slot with a simple label of MySite. Each hosted service has a staging and production slot. Staging is billed and treated the same as production, but staging is given a temporary URL to be used as a smoke test prior to going live.
By default, the service is deployed, but in the stopped state, so we’ll set the status to running with the Set-DeploymentStatus command. When it is running, we’ll move it from staging to production with the Move-Deployment command.
We’ll also repeat the same thing for our West Europe deployment. Let’s say, though, that we’d like to programmatically increase the number of instances of our application. That’s easy enough to do:
#Increase the number of instances to 2
Get-HostedService -ServiceName $servicename_nc | `
Get-Deployment -Slot Production | `
Set-RoleInstanceCount -Count 2 -RoleName “WebRole1”
This is a huge benefit of scripting! Imagine being able to scale an application programmatically either to a set schedule (Monday-Friday, or perhaps during the holiday or tax seasons), or based on criteria such as performance counters or site load.
When we have more than one instance of an application in a given datacenter, Windows Azure will automatically load balance incoming requests to those instances. But let’s set up a profile by using the Windows Azure Traffic Manager to globally load balance.
# Set up a geo-loadbalance between the two using the Traffic Manager
$profile = New-TrafficManagerProfile -ProfileName bhitneyps `
-DomainName ($globaldns + “.trafficmanager.net”)
$endpoints = @()
$endpoints += New-TrafficManagerEndpoint -DomainName ($servicename_we + “.cloudapp.net”)
$endpoints += New-TrafficManagerEndpoint -DomainName ($servicename_nc + “.cloudapp.net”)
# Configure the endpoint Traffic Manager will monitor for service health
$monitors = @()
$monitors += New-TrafficManagerMonitor –Port 80 –Protocol HTTP –RelativePath /
# Create new definition
$createdDefinition = New-TrafficManagerDefinition -ProfileName bhitneyps -TimeToLiveInSeconds 300 `
-LoadBalancingMethod Performance -Monitors $monitors -Endpoints $endpoints -Status Enabled
# Enable the profile with the newly created traffic manager definition
Set-TrafficManagerProfile -ProfileName bhitneyps -Enable -DefinitionVersion $createdDefinition.Version
This is more straightforward than it might seem. First we are creating a profile, which is essentially asking what global DNS name we would like to use. We can CNAME our own DNS name (such as www.mydomain.com) if we’d like, but the profile will have a *.trafficmanager.net name. Next we are setting up endpoints. In this case, we are telling it to use both the North Central and West Europe deployments as endpoints.
Set up the monitor
Next, we will set up a monitor. In this case, the Traffic Manager will watch Port 80 of the deployments, requesting the root (“/”) document. This is equivalent to a simple HTTP GET of the webpage, but it opens up possibilities for custom monitoring pages. If these requests generate an error response, the Traffic Manager will stop sending traffic to that location.
When it is complete, we can browse to this application by going to “bhitneyglobal.trafficmanager.net.” There you have it—from nothing to a geo-load-balanced, redundant, scalable application in a few lines of script!
Now let’s tear it all down!
# Cleanup
Remove-TrafficManagerProfile bhitneyps | Get-OperationStatus -WaitToComplete
Remove-Deployment -Slot production -serviceName $servicename_nc
Remove-Deployment -Slot production -serviceName $servicename_we | Get-OperationStatus -WaitToComplete
Remove-HostedService -serviceName $servicename_nc
Remove-HostedService -serviceName $servicename_we | Get-OperationStatus -WaitToComplete
Remove-StorageAccount -StorageAccountName $storagename_nc
Remove-StorageAccount -StorageAccountName $storagename_we | Get-OperationStatus –WaitToComplete
The full script and zip download can be found in the Script Repository.
Happy scripting!
~Brian
Thank you, Brian, for sharing your time and knowledge. This is an awesome introduction to an exciting new technology.
I invite you to follow me on Twitter and Facebook. If you have any questions, send email to me at scripter@microsoft.com, or post your questions on the Official Scripting Guys Forum. See you tomorrow. Until then, peace.
Ed Wilson, Microsoft Scripting Guy


 Light
Light Dark
Dark
0 comments