Summary: Microsoft SharePoint MVP and guest blogger, Todd Klindt, talks about using Windows PowerShell to back up a SharePoint environment.
Microsoft Scripting Guy, Ed Wilson, is here. Please welcome back guest blogger, Todd Klindt. Todd also has a blog at http://www.toddklindt.com/blog/default.aspx and you can find him on Twitter @ToddKlindt. Take it away Todd…
When I set up a new SharePoint environment for a customer, whether it’s big or small, I always have the disaster recovery talk with them. There are a few different disaster recovery options, and each is right depending the circumstances. In some cases I suggest big expensive enterprise backup solutions. In other cases, I tell them to perform a SQL Server database backup and be done with it. Each situation is different and requires some discussion to decide which disaster recovery solution is appropriate. In a few cases, I’ve suggested the built-in farm backups in SharePoint. Farm backups don’t get a lot of respect, and some of that disrespect is well earned. One of the common complaints is that they’re not easy to schedule.
There’s got to be a fun, easy way to do this in Windows PowerShell…
With SharePoint 2010, if you wanted to schedule a farm backup by using Backup-SPFarm, you had to do this complicated dance of using the Windows Task Scheduler to execute a .cmd file that fires up Windows PowerShell, which executes a .ps1 file. All it needed was a marble and a mousetrap to be complete.
SharePoint 2013 requires Windows PowerShell 3.0, which introduces a new object, ScheduledJob. To learn all about them, see about_Scheduled_Jobs. In this blog post, I’m going to walk you through using the job functionality in Windows PowerShell to easily schedule a full farm backup in SharePoint. You can then use this technique for smaller farms or non-production farms, where rudimentary backups are okay. Enough ado—let’s take a look at how to do it.
Create your script
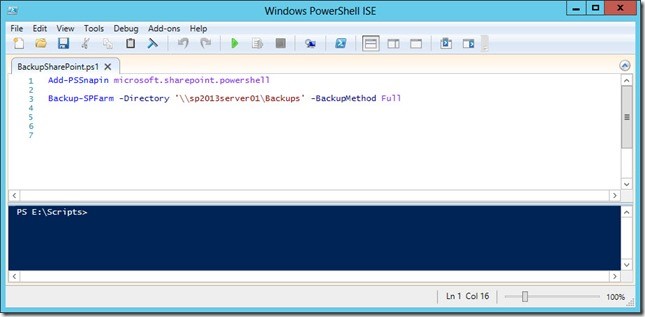
The first step is to create your backup script. This is the thing we’re going to schedule to run. It doesn’t need to be anything fancy. When I was testing this, here’s the script I used:
Add-PSSnapin microsoft.sharepoint.powershell
Backup-SPFarm -Directory ‘\\sp2013server01\Backups’ -BackupMethod Full
Nothing fancy at all. It adds the SharePoint snap-in (because we aren’t starting this from the SharePoint Management Shell), and it runs the simplest of Backup-SPFarm scripts. It does a full farm backup and saves it into the share at \\sp2013server01\Backups. All the same rules apply as when using this from Central Admin or interactively in Windows PowerShell. You must specify a UNC path, not a local directory. The backup activities are spread out amongst the servers in your farm, so a local path won’t cut it. The server running SQL Server gets in on the fun too, so your UNC path must be accessible from that server, and the account that the SQL Server service is running as must have Read/Write access to it.
Although this blog post is about backups, you can schedule a script to do anything. It could generate a report about Site Collection owners. It could upload files to a SharePoint document library. It could warm up all your web apps. It could email your friends a link to your favorite new meatloaf recipe…anything. Your imagination is the limit. Whatever your script is, make sure you run it from an interactive prompt to verify that it works. It’s much easier to troubleshoot that way than after you’ve scheduled it.
Create the scheduled job
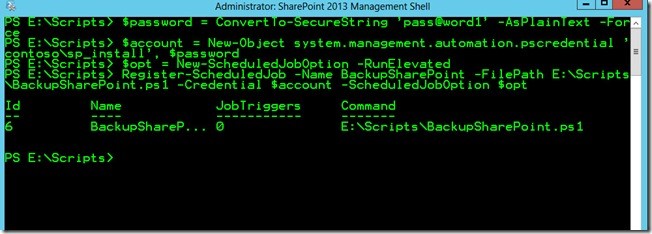
Now that we’ve got a working script, let’s turn that into a scheduled job. There are some mechanics to this, but it’s pretty easy to get the hang of it. Here’s how it looked when I created the scheduled job to run my backup script:
$password = ConvertTo-SecureString ‘pass@word1’ -AsPlainText -Force
$account = New-Object system.management.automation.pscredential ‘contoso\sp_install’, $password
$opt = New-ScheduledJobOption -RunElevated
Register-ScheduledJob -Name BackupSharePoint -FilePath E:\Scripts\BackupSharePoint.ps1 -Credential $account -ScheduledJobOption $opt
Because we’re scheduling this to run, we need to tell Windows who to run it as. The first two lines deal with that. The first line creates an object, $password, that stores an encrypted version of the account’s password. The next line takes that and the account’s name and creates a PSCredential object. The third line creates an object, $opt, that is the options we’re going to set on our scheduled job. There are a bunch of different options we can set and New-ScheduledJobOption does a good job of outlining them. In our case, we need to make sure the script runs as Elevated. There are other options, such as Run on battery, which I hope doesn’t apply to any of your servers.
The next line registers our new scheduled job. You have to give it a name. I named mine BackupSharePoint, so there was no confusion as to what that Job does. I plan on winning the lottery some day; and when I do, I want to leave things as nice as possible for my former coworkers. That way, if I blow all my lottery winnings on Pez dispensers, maybe I can get my old job back.
We specify the FilePath to the script we want to schedule. Point that to the script we wrote earlier. The Register-ScheduledJob cmdlet also supports running only a snippet of Windows PowerShell script, instead of a script file. I prefer the file route because that gives me some flexibility. If I decide I want to do something differently, I can easily change the text in the .ps1 file as opposed to tweaking the ScheduledJob object.
We pass our Credential object so Windows PowerShell knows who to run the job as, and then, we pass it our options. That’s it, the job has been created and it’s ready to do our bidding. Well, all except for one bit, but we’ll cover that in a minute.
Test the scheduled job
When we registered our job, you might have noticed that one particularly important piece of information was missing. We have the “who,” and we have the “what.” We have a “where” and even a “how.” What we don’t have is a “when.” The “when” is the whole point of this! Don’t worry, we’ll get to that…
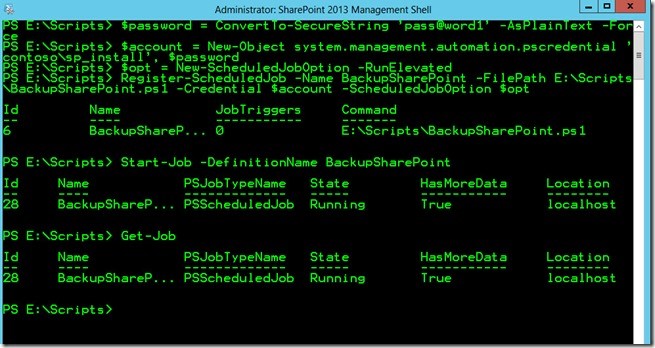
Before I schedule the job I want to test it. I know what you’re thinking, “We’ve already tested it.” We’ve already tested the script, but we haven’t tested the job. The job has a couple of other attributes that I wanted to make sure were good before I went any farther. We can use Start-Job to run our job the way Windows PowerShell will when it runs it as part of a schedule. Here’s what it looked like when I tested the job:
Start-Job -DefinitionName BackupSharePoint
I used Start-Job, passed it the name we gave the scheduled job, and off it ran. We can run Get-Job to see what jobs are currently running. The state will change to Completed when it has finished. When the job shows Completed, and you’ve verified that the backup actually worked (check the “spbackup.txt” file and search for “error”), we can schedule the job.
Schedule the job
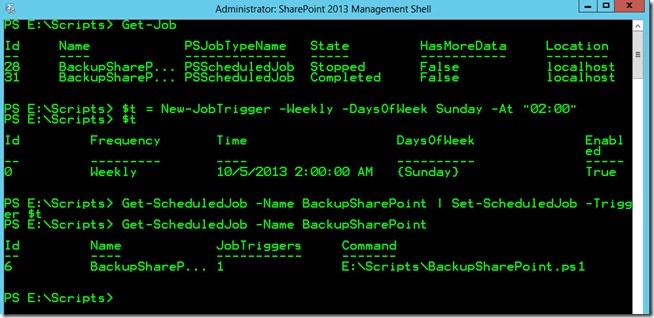
When scheduling jobs, Windows PowerShell uses “triggers.” Jobs can be started by time or by events, so trigger is a pretty good word for them. In my case, I wanted the backups to run at 2:00 AM Sunday. To do that, I used the New-JobTrigger cmdlet. Here’s how it looked:
$t = New-JobTrigger -Weekly -DaysOfWeek Sunday -At “02:00”
Get-ScheduledJob -Name BackupSharePoint | Set-ScheduledJob $job -Trigger $t
New-JobTrigger is a pretty easy going cmdlet. I want my job to run weekly, it has a –Weekly parameter. I want it to run on Sunday, it has a –DaysOfWeek parameter that takes Sunday as a parameter. If I wanted my job to run multiple days of the week, I could put multiple days there. It’s very easy to configure. If it were any easier to use, it would need one of those big “Easy” buttons on it.
After I created my new JobTrigger object, I assigned it to the scheduled job I already created. I did that with a double-teaming of Get-ScheduledJob and Set-ScheduledJob. If I wanted to be fancy, I could have created my trigger and assigned it to my scheduled job when I first registered it. I’m new to scheduled jobs though, so I decided baby steps were the way to go. When I create my next scheduled job, I may throw caution to the wind and register it with the trigger in one step. I’ll make sure I eat a healthy breakfast beforehand.
Now our job is defined and scheduled to run every Sunday morning at 2:00. If you’re curious and poke around, you’ll see this is leveraging the Windows Task Scheduler in the background. I can use the Get-ScheduledTask cmdlet to see all the Task Scheduler tasks. In the following screenshot, I filtered on all the Scheduled Tasks that are associated with Windows PowerShell:
Get-ScheduledTask | Where-Object -Property TaskPath -Value *powershell* -Like
If you want to dig into the task more, you can get the object and look at its properties by using Get-Member to discover them and Select-Object to display them.
Triumphant conclusion
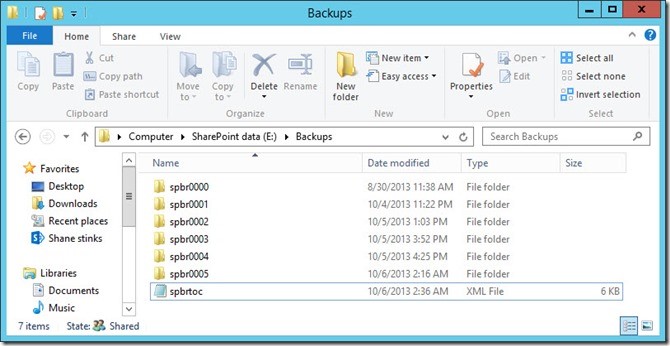
I’m happy to report that my scheduled job performed admirably. Sunday morning after I got up and got my wits about me with some coffee, I checked. Sure enough. There was a SharePoint backup in my Backup folder.
Remember that there’s a lot you can do with these scheduled jobs. Backups are just scratching the surface. I hope this blog post inspires you to automate more of your Windows PowerShell tasks.
~Todd
Thank you, Todd, for sharing your time and knowledge.
I invite you to follow me on Twitter and Facebook. If you have any questions, send email to me at scripter@microsoft.com, or post your questions on the Official Scripting Guys Forum. See you tomorrow. Until then, peace.
Ed Wilson, Microsoft Scripting Guy


0 comments