Summary: Guest blogger, Gershon Levitz, talks about modifying DNS settings with Windows PowerShell.
Microsoft Scripting Guy, Ed Wilson, is here. Today we have a new guest blogger, Gershon Levitz. Gershon is a senior technical writer for Hyper-V at Microsoft.
The floor is yours, Gershon…
There are times when I need to change the DNS settings and use specific DNS servers. Then after I am done, I want to go back and use the DNS settings provided by DHCP. I can make these changes manually, but it would require a number of manual steps. Because I needed to do this on a regular basis, I investigated how to automate this by using Windows PowerShell.
Being fairly new to Windows PowerShell, I thought this was going to be a simple exercise—similar to writing a batch script. The actual Windows PowerShell cmdlets are fairly simple. However, I still needed to figure out how to run a Windows PowerShell script (ExecutionPolicy) and how to create a shortcut to the script file so that I could double-click an icon to run the scripts.
I created two simple Windows PowerShell scripts, one to modify the DNS settings to use specific DNS servers and another to set the DNS settings to automatic. In this blog post, I will walk you through the steps to create these scripts, and the steps needed to run the scripts from shortcuts without having to open a Windows PowerShell session.
Identify the name of the adapter
The first thing you need to find out is the name of the adapter that you want to change. To list the network adapters, run the Get-NetAdapter Windows PowerShell cmdlet. In my case, the adapter name that I want to modify is Wi-Fi.
Script #1: Modify DNS server settings
This script will set the Wi-Fi adapter to use the following DNS servers:
- DNS Server 1: 1.1.1.1
- DNS Server 2: 2.2.2.2
If the adapter is set to get its IP address automatically from a DHCP server, the cmdlet only overrides the DNS settings that are received from the DHCP server, and the adapter will continue to receive its IP address from the DHCP server.
Note You need to run the following command from an elevated command prompt.
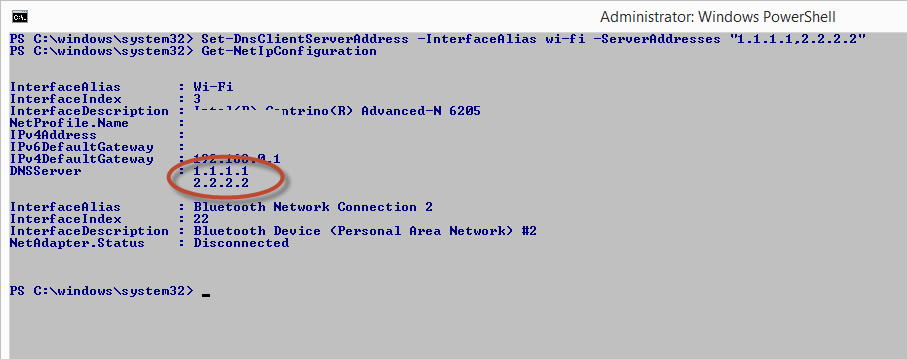
Notice that the value for the –InterfaceAlias parameter is the name of the adapter from the previous image. Replace 1.1.1.1 and 2.2.2.2 with the IP addresses of the DNS servers you want to use.
Set-DnsClientServerAddress -InterfaceAlias Wi-Fi -ServerAddresses "1.1.1.1","2.2.2.2"
After running the command, run GetNetIPConfiguration to confirm the change to the DNS servers.
Or you can use the Get-DnsClientServerAddress cmdlet.
After you have the syntax of the command, and it works as you want it to, copy the command to a file with an extension of .ps1, for example DNSCustom.ps1.
Script #2: Automatically get DNS setting from DHCP server
This script will set the DNS setting to automatic for the network adapter:
Set-DnsClientServerAddress -InterfaceAlias wi-fi -ResetServerAddresses
After running the command, run Get-DnsClientServerAddress to confirm the change to the DNS servers. When the DNS setting is set to automatic, the ServerAddress column is blank for the adapter.
After you have the syntax of the command, and it works as you want it to, copy the command to a file with an extension of .ps1, for example DNSDefault.ps1.
Allow Windows PowerShell scripts to run
To run Windows PowerShell scripts, you need to change the script execution policy.
For more information about the Windows PowerShell script execution policy, see:
To see the current policy, run the Get-ExecutionPolicy cmdlet.
Create shortcuts to each file
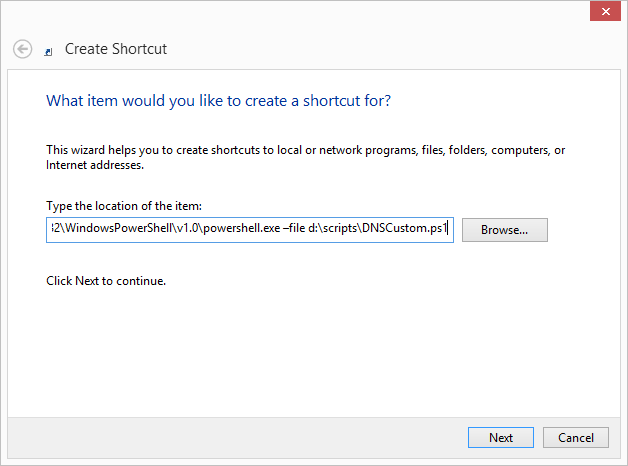
To run each script file (.ps1) that you created, you can create a shortcut with the following command:
%systemroot%\System32\WindowsPowerShell\v1.0\powershell.exe –file “path to the script file”
For example, if I saved my scripts to D:\scripts, I would create two shortcuts—one for each script file with the following locations:
- %systemroot%\System32\WindowsPowerShell\v1.0\powershell.exe –file d:\scripts\DNSCustom.ps1
- %systemroot%\System32\WindowsPowerShell\v1.0\powershell.exe –file d:\scripts\DNSDefault.ps1
Note If you have spaces in the path to the file, enclose the path in quotation marks.
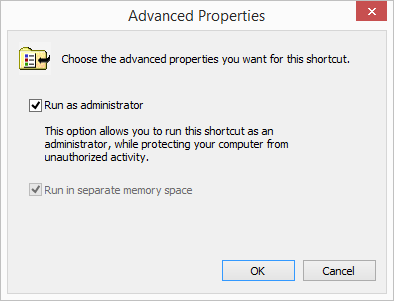
The last step is to set the shortcuts to Run as administrator:
- Right-click the shortcut, and select Properties.
- On the Shortcut tab, click Advanced.
- On the Advanced Properties page, select Run as administrator.
Thank you, Gershon, for sharing your time and knowledge.
I invite you to follow me on Twitter and Facebook. If you have any questions, send email to me at scripter@microsoft.com, or post your questions on the Official Scripting Guys Forum. See you tomorrow. Until then, peace.
Ed Wilson, Microsoft Scripting Guy


I have set up 5 users on my Windows 10 computer. I now want to use a Powershell script to locate the currently logged in user. The DNS server has to be set differently for a certain user. How can I do this with Powershell?