Summary: Learn how to decipher Windows PowerShell shorthand notation in this guest post written by Tim Warner.
Microsoft Scripting Guy, Ed Wilson, is here. Welcome a new guest blogger today, Timothy Warner. Tim is an author and evangelist for Pluralsight, a premier online IT pro and development training company. Tim is the author of Sams Teach Yourself Windows PowerShell in 24 Hours, a contributor at PowerShell.org, and a member of the Nashville PowerShell User Group.
Hi everyone.
When I attended the Microsoft Ignite Conference in Chicago last week, I was somewhat surprised by the amount of Windows PowerShell shorthand I saw during product and technology demonstrations.
After all, doesn't The Community Book of PowerShell Practices tell us to confine our alias and positional parameter use to our ad-hoc console code? When we're sharing scripts with others, we should use formal cmdlet names and named parameters.
As a technical trainer, I was especially sensitive to the baffled faces I saw in those Ignite session audiences. Admittedly, these IT professionals in all likelihood have yet to board the Windows PowerShell train. In this blog post, I'll share three simple ways to translate terse Windows PowerShell code into a more formal, shareable format. Let's get started!
Method #1: Use Get-Alias
As our case study example, consider the following Windows PowerShell pipeline:
ps | ? { $_.CPU -gt 100 } | select ProcessName, CPU | sort CPU -des | ft -a
Sure, if you're already comfortable with Windows PowerShell and/or you have familiarity with Linux, you understand what's going on here. But put yourself in the shoes of the newcomer for a minute. What the heck does all that gobbledygook mean?
Note This pipeline shows all processes that have used over 100 seconds of processor time. We pare down our output
by selecting only the ProcessName and CPU properties, sorting by CPU in descending order, and showing a data table
with automatically sized column widths.
Enter the Get-Alias core cmdlet. If you haven't already done so, fire up an elevated Windows PowerShell console session and inspect the command Help:
Get-Help -Name Get-Alias -ShowWindow
Pay attention to two parameters in particular. The -Name parameter specifies the name of the alias, and the -Definition parameter maps to the associated Windows PowerShell command. Thus, we can do the following to resolve ps to its associated cmdlet:
Get-Alias -Name ps
Note You may run into problems if you're researching a custom alias that others defined on their computers. We're
concerned only with default, built-in aliases.
Did you try it? The output tells you that ps is an alias that maps to Get-Process. This is logical for *NIX users who are accustomed to using ps to view running processes on their systems.
Let's use the same Get-Alias method to resolve the other aliases in our example pipeline:
Get-Alias -Name ?
Get-Alias -Name select
Get-Alias -Name sort
Get-Alias -Name ft
Do you know what -gt means? That is simply a comparison operator for "greater than." Please read the conceptual Help, about_comparison_operators, for more information.
Besides the abundance of aliases, the other "sticky wicket" in our sample pipeline is its liberal use of positional parameters. For instance, take a look at this pipeline section:
select processname, CPU
The previous statement works because if you look at the Select-Object Help, you'll learn that the position 1 parameter is -Property:
PS C:\> Get-Help -Name Select-Object -Parameter Property
-Property <Object[]>
Specifies the properties to select. Wildcards are permitted.
The value of the Property parameter can be a new calculated property. To
create a calculated, property, use a hash table. Valid keys are:
— Name (or Label) <string>
— Expression <string> or <script block>
Required? false
Position? 1
Default value
Accept pipeline input? false
Accept wildcard characters? true
Please be courteous to your audience and always use named parameters in your shareable Windows PowerShell code! For instance, I would refactor this Select-Object statement in the following way:
Select-Object -Property ProcessName, CPU
Method #2: Use the Script Analyzer
If you're using Windows PowerShell 5.0 Preview, we can use the built-in PowerShell Script Analyzer module to help us resolve those pesky aliases.
The Script Analyzer is a flexible platform for static code analysis. The module's default ruleset was created by the PowerShell.org community as the result of a heated brainstorming session regarding Windows PowerShell best practices.
For grins, I added our case study pipeline to a script named testscript.ps1 stored in the root of my D: drive. Let's point the Script Analyzer at the one-line script and see what happens:
Invoke-ScriptAnalyzer -Path 'D:\TestScript.ps1'
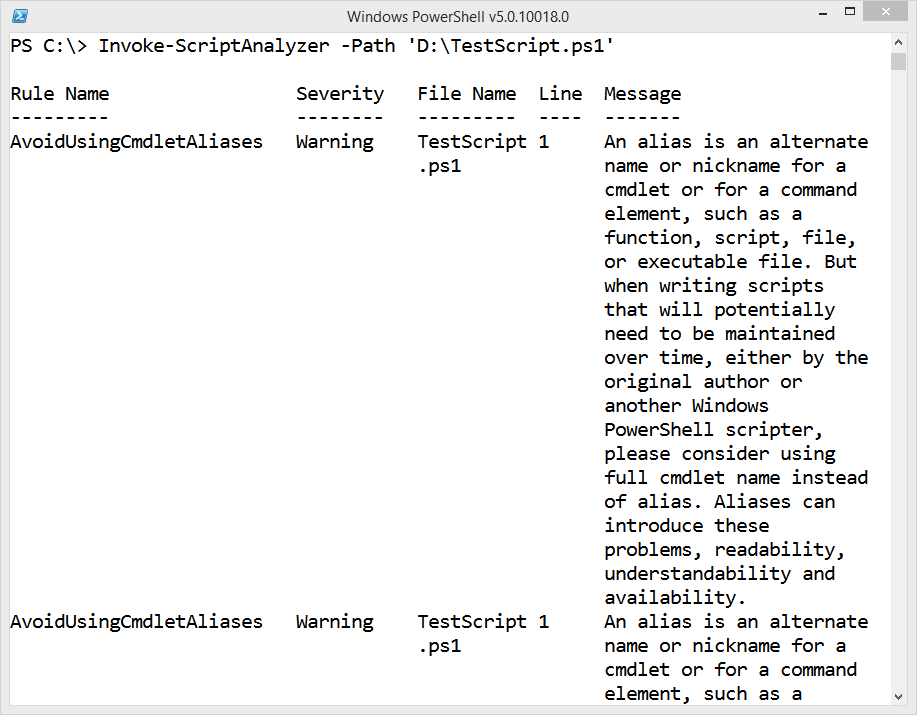
The following image shows a bit of my output:
As you can see, the Script Analyzer output flags the use of aliases and the use of positional parameters, among many other code aspects. The output also notifies you which lines in your script contain rule violations.
Method #3: Use ISESteroids
Dr. Tobias Weltner gave us ISESteroids as a way to inject Windows PowerShell best practices "automagically" into our scripts by means of refactoring logic. ISESteroids (as you may already know) is a commercial add-on to the good ol' Windows PowerShell Integrated Scripting Environment (ISE).
We'll begin by downloading and updating the add-on in Windows PowerShell 5.0 Preview:
Install-Module -Name ISESteroids -Force
Update-Module -Name ISESteroids -Force
Now open an administrative Windows PowerShell ISE session and load the add-in from the ISE console:
Start-Steroids
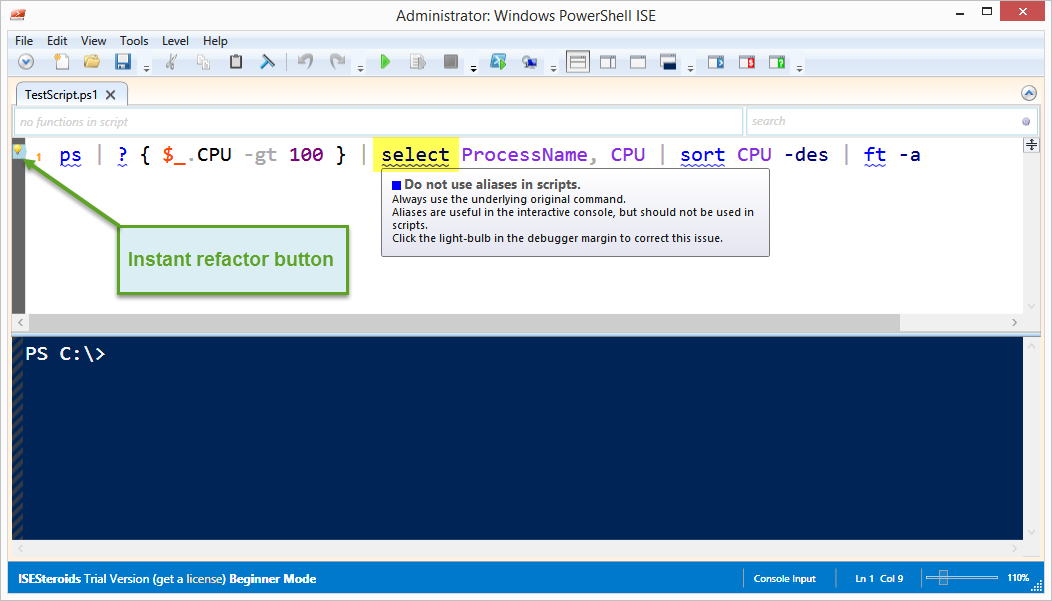
This tool is awesome! Take a look at the following image, in which you can see the ToolTip Help in addition to an instant refactor button that will instantly convert your aliases to full cmdlet names:
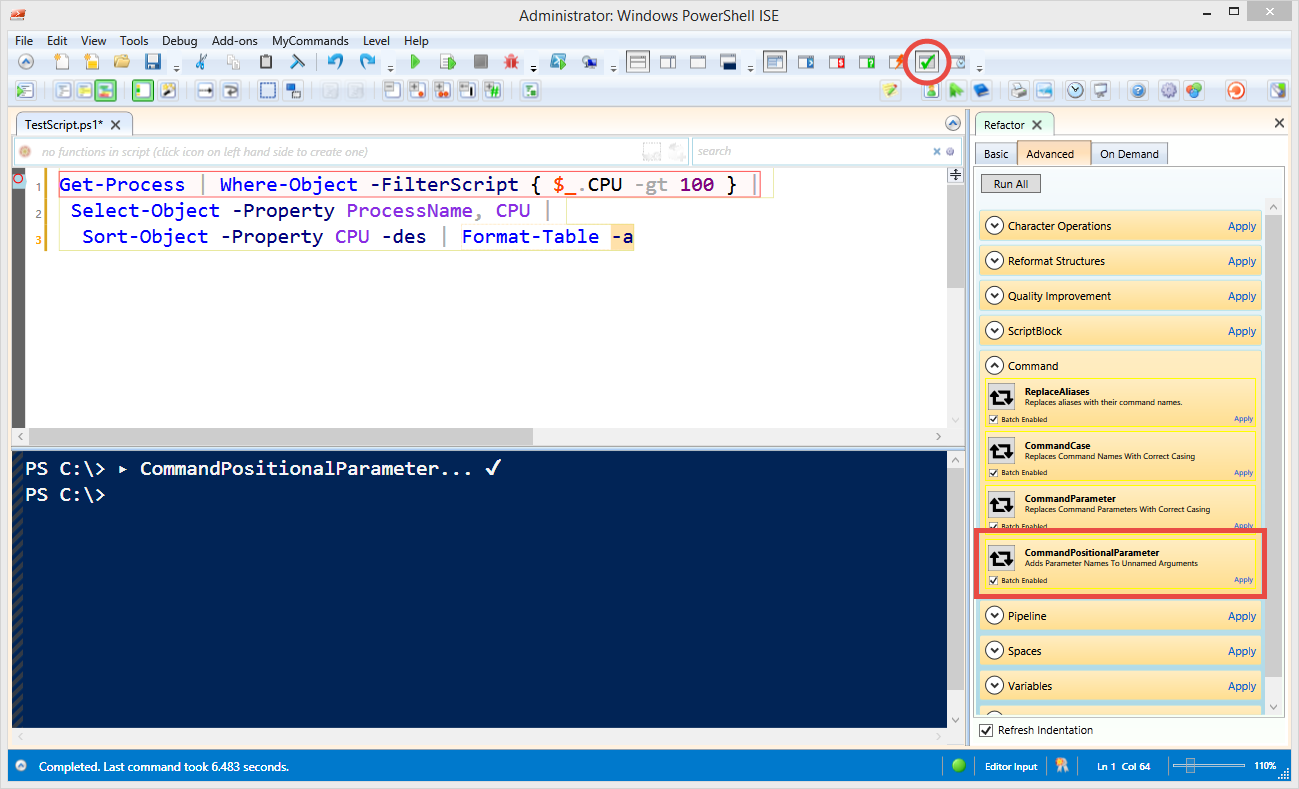
To address positional parameters, click the refactor button, navigate to the Advanced pane in the Add-in window, expand the Command section, find CommandPositionalParameter, and click Apply.
Boom! All your parameters are named now. I show you all this in the following image:
To sweep up the shavings…
Remember that you need to provide only enough characters for Windows PowerShell to identify a switch parameter. Thus, in our sample code, you could expand -des to -Descending and -a to -AutoSize if you want to.
Of course, we also have Tab completion! If you've never used it, try typing format-t, pressing Tab, and typing -a followed by another Tab.
I hope you found this post helpful. At the very least, I hope I reminded you of the critical importance of "spelling out" every last bit of our Windows PowerShell code if it's intended for public consumption. Take care, and "Happy PowerShelling"!
~Tim
Thanks, Tim!
I invite you to follow me on Twitter and Facebook. If you have any questions, send email to me at scripter@microsoft.com, or post your questions on the Official Scripting Guys Forum. See you tomorrow. Until then, peace.
Ed Wilson, Microsoft Scripting Guy


0 comments