Summary: Two Microsoft PFEs talk about a Windows PowerShell script to remove old ADM files from Active Directory Domain Services (AD DS) after converting to a central store.
Microsoft Scripting Guy, Ed Wilson, is here. Today is the first of a three-part series written by two Microsoft PFEs Mark Morowczynski and Tom Moser. First a little bit about Mark and Tom.
Mark Morowczynski (@markmorow) and Tom Moser (@milt0r) are Premier Field Engineers (PFEs) out of Chicago and Metro Detroit, respectively. They, with a group of contributing platform PFEs, write on the AskPFEPlat blog, covering a wide range of operating system, Active Directory, and other platform-related topics. Tom is a Red Wings fan. Mark is a Hawks fan. To date, no physical altercations have occurred due to this work conflict.
Take it away, Mark and Tom.
Scripting ADM removal
While working with our customers performing AD Risk Assessments (formerly known as ADRAP, now known as RaaS), we noticed that many customers were keeping their old ADM files around after implementing the Group Policy Central Store. For details on why we wrote the script, see our original posts here and here. The purpose of our guest post here on the Hey, Scripting Guy! Blog isn’t to cover why we wrote the script, but how the script works and some of our design ideas behind it.
When we started writing our ADM removal script, we knew that there were a few key concerns that customers had when cleaning up legacy ADMs. First, we knew that, while we said over and over again that nothing really bad would happen if somebody made a mistake, people wanted a way to quickly recover and restore the ADM templates. Second, we knew that people would want a way to see what would happen before actually doing anything. Finally, we found that people wanted a way to log the process. In addition to these requirements, we had to make the script work with DCs running both Windows Server 2003 and Windows Server 2008 R2, as well as be able to point to domains outside the user’s domain.
At this point, you may want to head over to the Script Center and download a copy of the script so you can follow along. Make sure you use the Windows PowerShell ISE or some other utility that shows line numbers.
The script takes a few parameters. Briefly, the following table defines each parameter.
|
Switch/Parameter |
Purpose |
|
-BackupPath <Directory Path> |
The path where we place the backed up ADM files. |
|
-LogPath <File Path> |
The path where we place the script log file in CSV format. |
|
-WhatIf |
Same as the Windows PowerShell –WhatIf switch. Shows what would have happened, but takes no action. |
|
-Restore |
Used with the LogPath and BackupPath switches to restore removed ADMs. |
|
-DomainDN <Domain DN> |
Used to specify the DomainDN if Active Directory Web Services (ADWS) is not available. Also used to specify an alternate domain. |
|
-NoDateCheck |
Skips the date-checking safety features. This prevents modified out-of-box ADMs from being removed. |
|
-NoCentralStore |
Skips checking the PolicyDefinitions folder on SYSVOL and checks the machine local PolicyDefinitions. |
Finding the domain
The first thing we do in the script is try to find the domain. There are two ways it does this. First, as mentioned above, the user can specify the domain distinguished name (DN). We check for that in the line below.
if($domainDN -eq [string]::Empty)
If the domain DN is empty, we assume the user wants to use their own domain and that the user is going to use the Active Directory PowerShell module to do the work. This requires that the module is installed locally and there are DCs running either Windows Server 2008/R2 (Active Directory Web Services) or the Active Directory Management Gateway (for more, read Ashley’s blog here).
Inside of the if block we opened above, there’s a try/catch block.
try
{
#AD Module magic
import-module activedirectory
$DomainInfo = Get-ADDomain
$DomainFQDN = $DomainInfo.dnsroot
$PDCEmulator = $DomainInfo.PDCEmulator
write-host -fore ‘green’ “Successfully imported AD Module”
}
First, we attempt to import the Active Directory PowerShell module. The reason we wrap this in a try/catch block is to catch the failure to import the AD module. This could happen for two reasons. First, the AD module isn’t installed on the local machine. This is done via Server Manager on Windows Server 2008 and later, or via RSAT on Windows 7. The other reason it might fail is that the domain isn’t available or the module was unable to locate a DC running ADWS.
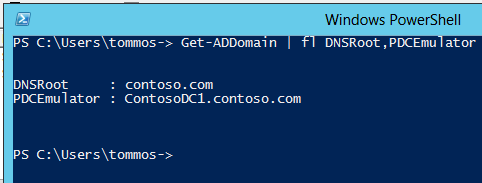
Assuming these two things are in place, we next want to use Get-ADDomain and store the result in a variable called $DomainInfo. By using this new object, we get the fully qualified domain name (FQDN) and we find the PDC emulator (PDCe). We look for the PDCe as it is the default administration point for Group Policy. We could bind to another DC, but for consistency, we choose the PDC. The AD module makes getting this information very easy, with no parsing or string manipulation required, as shown in the following image.
If exceptions are encountered during the try block, we’ll jump to the catch block. In the catch block, we notify the user that the AD module encountered an error connecting to the domain. Instead of completely exiting out, the user is prompted to enter the domain DN (DC=contoso,DC=com, for example).
catch
{
#The domain DN wasn’t specified at start, but loading the AD module failed. Prompt user for the DN and proceed.
write-host -fore ‘red’ “Encountered an error using the AD module. Verify that RSAT is installed with the AD `
PowerShell module and that you have ADWS or ADMGW running on your DC.”
$continue = read-host “Would you like to enter the domain DN manually? Y or N: “
if($continue.tolower() -eq “y”)
{
$domainDN = read-host “Please enter the domain DN in the proper format (ie, dc=corp,dc=microsoft,dc=com): “
$confirm = Read-Host “Is this correct? Y or N: $($domainDN)”
if($confirm.tolower() -ne “y”)
{
write-host “Exiting.”
exit
}
}
else
{
return
}
}
After telling the user that something failed, we ask if they’d like to continue. If the user opts to continue, they are prompted for the domain DN. We used the Read-Host cmdlet to store the result of the user prompts and then use if statements to decide whether to continue. If the user doesn’t answer y to either question, the script exits.
Following the closing of the catch block, and then the closing of the previous if, we have another if statement. This statement checks to see if $domainDN is not empty. To make the comparison, we use the static property Empty in the string class.
if($domainDN -ne [string]::empty)
If it is empty, we skip the block and move in to function declaration. If $domainDN has a value, we then attempt to use old school Active Directory Service Interface, or ADSI, to bind to the directory. $domainDN will be set for one of a few reasons. Either the AD module import failed and the user was prompted for the DN (the user knew that they didn’t have the ability to use the AD module and specified the DN), or the user is running the script against an alternate domain. Next, we have this archaic-looking line.
$ad = [adsi]”LDAP://$($domainDN)”
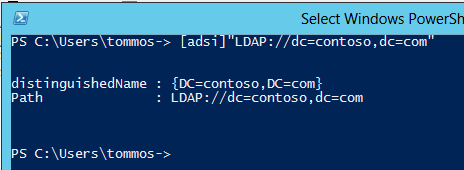
Instead of using the (much more elegant) Active Directory PowerShell Module and ADWS, we rely on ADSI. First, we use the domain DN to create an object called $ad. To create this object, we use the ADSI LDAP provider, specifying the domain name as an LDAP string, LDAP://DC=corp,DC=contoso,DC=com. This returns an object that looks a little different than what we received from Get-ADDomain.
This requires a little more work to extract the information we need, namely PDCe and the domain FQDN. To obtain the PDCe role owner for the domain, we need to look at the fSMORoleOwner attribute on the domain partition.
$PDCcn = ($ad.psbase.properties.fsmoroleowner).tostring().split(‘,’)[1]
This returns an NTDS setting object that corresponds to the PDCe. It looks something like this.
This won’t work for our script, since we just want a DNS name. The end part converts this to a string (not needed, but safer), and uses the string string.Split() .NET Framework method to break the NTDS DN down into an array of strings. Since we already know the domain DN, all we need from this string is the common name (CN) of the DC, so we look at index 1 of the array (remember, it starts at zero). We store the result in $PDCcn and move on.
$PDCEmulator = $PDCcn.split(‘=’)[1]
$DomainFQDN = $domainDN.tolower().replace(“dc=”,””)
$DomainFQDN = $DomainFQDN.replace(‘,’,’.’)
$PDCEmulator += “.$DomainFQDN”
In the lines above, we again use the Split() method to split “CN=PDCName” to extract only the host name. We store this in $PDCEmulator. Following that, we take our DN-formatted domain name and use the String.Replace() method to clean up all of the domain component (DC=) parts of the DN. After we replace the commas in the DN with periods on the third line, we’re left with the domain DN. At the very end of the block, we append the PDC host name to the domain DN and voilá! We have an FQDN for the PDCe.
The section mentioned above, where the ADSI action happens, is also wrapped in a try/catch. Any exceptions thrown by the try block will result in an error message being output to the user and the script will exit.
catch
{
write-host -fore ‘red’ “Error gathering domain information via ADSI. Please double check your DN formatting.”
return
}
It’s pretty easy to see how the Active Directory PowerShell module makes life that much better. At this point in the script, we should have successfully queried the domain for all of the info we need.
Join us tomorrow for part 2.
~Tom and Mark
Thanks, Tom and Mark. I am looking forward to the next installment tomorrow.
I invite you to follow me on Twitter and Facebook. If you have any questions, send email to me at scripter@microsoft.com, or post your questions on the Official Scripting Guys Forum. See you tomorrow. Until then, peace.
Ed Wilson, Microsoft Scripting Guy


0 comments