Summary: Learn how to use Windows PowerShell to create deployment shares for for Microsoft Deployment Toolkit 2010 Update 1.
Microsoft Scripting Guy, Ed Wilson, is here. Windows PowerShell MVP, Sean Kearney, is back with us this week to talk about the Microsoft Deployment Toolkit (MDT).
Like many new technologies from Microsoft, Windows PowerShell is a key core management piece. There are very few modern systems from Microsoft that are not enabled with Windows PowerShell. For that matter, there are very few legacy-based systems that cannot be extended and improved with Windows PowerShell.
So today, we’ll look at MDT.
For those of you who have been living on the Planet Zackarus VII in the Platarchian Sector, I’m talking about Microsoft Deployment Toolkit 2010 Update 1. MDT is sitting right up there with WinRE and Windows PowerShell as my favorite free tools from Microsoft (and if I listed all of the available free tools from Microsoft, that would be a massive blog post unto itself).
MDT can take any of the Microsoft operating systems—from Windows XP SP3 all the way to Windows Server 2008 R2 DataCenter edition—and automate it’s installation, including roles, features, settings and application installations. By default, MDT without any extra effort will create what a Light Touch Installation (LTI), and with some additional configuration, you can create a One Touch Installation (OTI).
However, today we are going to go to learn about how you leverage Windows PowerShell with MDT. We are going to presume that you have at least installed MDT on a computer and you are staring at it, wondering where to start.
Stage one: Create a Deployment Share
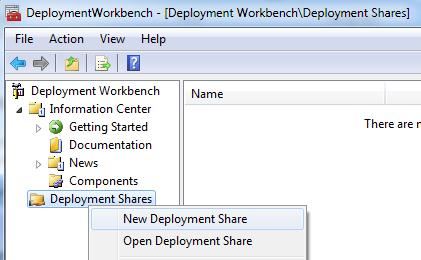
The first thing you want to do is create a Deployment Share, which is exactly what you think it is. A share on the computer that will contain what you need to deploy systems. Within the MDT console, go to Deployment Shares.
Click New Deployment Share to create a share and follow those lovely step-by-step instructions—you know, the obvious stuff that bothers us all. Should I capture an image? Ask the user to set a local administrator password? Ask the user for a product key?
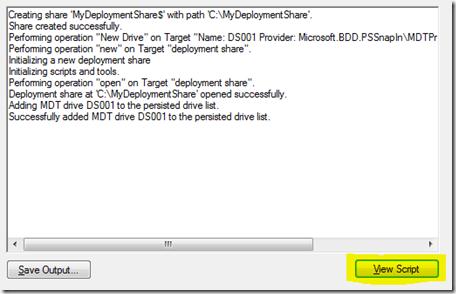
Let us skip the debate over the follies and foolishness of giving users product keys, setting local administrative passwords, and perhaps letting them cook dinner. Today we are using the Windows PowerShell cmdlets in MDT 2010. Therefore, when you have completed the previous task in MDT 2010, you will see a traditional View Script button.
A typical sample script from MDT is just a basic two liner. One line adds the snap-in to allow use of the MDT cmdlets, and the next line is your actual cmdlet that does all the real work.
Add-PSSnapIn Microsoft.BDD.PSSnapIn
new-PSDrive -Name “DS002” -PSProvider “MDTProvider” -Root “C:\MyDeploymentShare” -Description “My Deployment Share” -NetworkPath \\MyComputer\MyDeploymentShare -Verbose | add-MDTPersistentDrive –Verbose
Now, all of the cmdlets that I have used in MDT work fine except for (ironically) the first one I encountered. For whatever reason, it misses some steps when you run it—primarily, creating the new folder, enabling the share, and setting the variables in CustomSettings.ini.
I will state this again…MDT is free. Somebody made an honest mistake in a free product, so rather than be an irritant and yell and whine, I thought I would do something productive and build on what I have. So we’ll build a script to meet that need.
Our first task: Make a folder.
NEW-ITEM –type Directory –path C:\FolderNew
Then of course, share that folder. A standard MDT share allows Full control to everyone, but that is not needed. For deployment to work, you only need ReadOnly access. Therefore, we will share our new folder the “old school” way:
([wmiclass]”win32_share”).Create(“C:\FolderNew”,”ShareNew”,0)
Now, if we edit the sample script in Windows PowerShell to match this and execute it, we have the following:
Add-PSSnapIn Microsoft.BDD.PSSnapIn
NEW-ITEM –type Directory –path C:\FolderNew
([wmiclass]”win32_share”).Create(“C:\FolderNew”,”ShareNew”,0)
new-PSDrive -Name “DS003” -PSProvider “MDTProvider” –Root “C:\FolderNew” -Description “New Share” -NetworkPath \\MyComputer\MyDeploymentShare -Verbose | add-MDTPersistentDrive –Verbose
It would now echo (for the most part) the creation of a Deployment Share. To make this actually useful, we can use Windows PowerShell variables instead so that we can switch this into useful script later on. To get really creative, let’s have Windows PowerShell tell us the computername and populate the UNC pathname properly. This is one of those times we are going to steal from Console land with the use of $ENV because it already has a variable with the name of the computer.
Also in MDT, you’ll see a reference to a name like DS002. This is the unique name for each Deployment Share in MDT. I could do something really cool like figure out the last one in sequence, but I found that it can be any random name. Therefore, we can GET a RANDOM number and use that with DS in the name…provided it has not been used before.
$DSNAME=”DS”+((GET-RANDOM 999999999).tostring().trim())
If we run the cmdlet Get-MDTPersistentDrive, we can get a list of all the Deployment folders that are currently attached to MDT and their names and locations.
$ListofShares=(GET-MDTPersistentDrive)
I can then use Select-String to compare their output and continue randomly building Deployment Share reference names until I find one that is not taken.
Do {
$DSNAME=”DS”+((GET-RANDOM 999999999).tostring().trim())
} Until ( ! ( $ListOfShares | Select-string -Pattern $DSNAME))
Therefore, our modified script using variables will look like this:
Add-PSSnapIn Microsoft.BDD.PSSnapIn
$Folder=’C:\FolderNew’
$Share=’ShareNew’
$Description=’New Share’
$ComputerName=$ENV:Computername
$UNCShare=”\\$Computername\$Share”
$ListofShares=(GET-MDTPersistentDrive)
Do {
$DSNAME=”DS”+((GET-RANDOM 999999999).tostring().trim())
} Until ( ! ( $ListOfShares | Select-string -Pattern $DSNAME))
NEW-ITEM –type Directory –path $Folder
([wmiclass]”win32_share”).Create($Folder,$Share,0)
new-PSDrive –Name $ -PSProvider “MDTProvider” –Root $Folder –Description $Description –NetworkPath $UNCShare -Verbose | add-MDTPersistentDrive –Verbose
Now I said “for the most part” because there are some values that are created for the automation of the operating system within CustomSettings.ini that are prompted for, but not echoed, by the sample script. I am, of course, referring to the three prompts: Prompt User for Administrator Password, Prompt User for Product Key, and Capture Image.
Nevertheless, for now we have the rudimentary structure of a simple script to automate the ability to build a New Deployment Share in MDT without touching the…*shudder*…GUI.
Tomorrow we will discuss a simple idea for editing CustomSettings.ini without using Notepad (or Edlin for you tough guys), and then we will build all of this into a new cmdlet.
Cheers and remember, the Power of Shell is in YOU.
~Sean, the Energized Tech
Thank you, Sean.
Be sure to come back tomorrow for Part 2.
I invite you to follow me on Twitter and Facebook. If you have any questions, send email to me at scripter@microsoft.com, or post your questions on the Official Scripting Guys Forum. See you tomorrow. Until then, peace.
Ed Wilson, Microsoft Scripting Guy


0 comments