Summary: Learn how to use Windows PowerShell to create an HTML report of Exchange 2010 databases by using conditional formatting and thresholds.
![]()
Hey, Scripting Guy! I need to learn how to produce reports on my Exchange 2010 databases. Is this something that I can do by using Windows PowerShell?
—TH
![]() Hello TH,
Hello TH,
Microsoft Scripting Guy, Ed Wilson, here. It is time for a Guest Blogger Week. You will love the lineup we have this week. Today our guest is Thiyagu.
Here is what Thiyagu has to say about himself:
I work for a large investment bank as an Exchange administrator. I have been scripting for more than seven years. I am good at VBScript, but when I first laid my eyes on Windows PowerShell, I realized this is the coolest thing ever in scripting. I automate nearly all of my Exchange and Active Directory tasks. I am also good at WMI, ADSI, and generating reports. I write a blog at www.myExchangeWorld.com. I have developed custom apps in C# for automation. I love to automate things. Scripting and Exchange Server are really my passions.
Today I want to show you how to get a colorful report for your daily export jobs or any important reports that you might be running.
Who likes raw data such as the output seen in the following image? OK, maybe administrators (like me) like it, but this is not something that you can give to your boss.
Yeah, it looks nice if you play around with it; but when you want to produce a nice report, it does not work very well. That’s what I want to show you today—how to produce a better report.
Displaying output is one of the skills in the 2011 Scripting Games. Thiyagu’s information will be useful study material for those who are contemplating entering this year’s event. Other areas of concentration are detailed in the 2011 Scripting Games Study Guide.
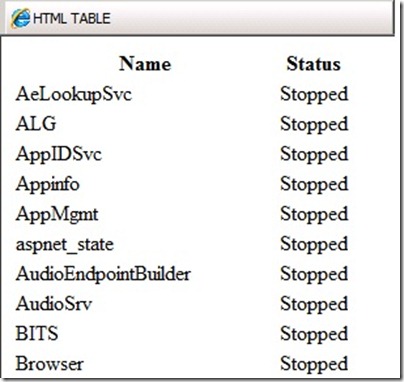
Most you might already be thinking, “Well, there is my little friend called “Convertto-HTML,” and then I have my nice little HTML report (see the following image).” To be honest, I don’t like “Convertto-HTML” that much.
I don’t like the Times New Roman font J…maybe it’s just me (sorry if I offended any Times New Roman font lovers). Refer to this PowerShell Tip of the Week for discussion about customizing the Convertto-Html cmdlet. Keep in mind that in Windows PowerShell 2.0, the power of the cmdlet has expanded significantly.
I like to have more control over those HTML tags, and I want to customize them per our needs.
What I am planning to do is to write a script that will generate an HTML report about your Exchange databases and run through the following preconfigured thresholds:
· Database Size
· Mailbox Count
· Top Mailbox Size
· Backup Days
If any of these thresholds is exceeded, it will be marked with red in your HTML report.
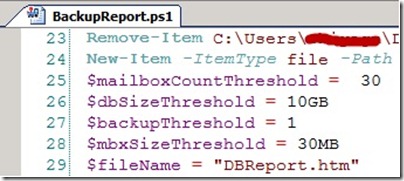
This way, just by glancing at your report, you will know where your problems are. You can see the different thresholds that I setup here.
You can tweak them to suit the needs of your environment.
After this, what I have to do is to create a file, and then add an HTML header with head, body, and style tags.
It might look scary, but it is not—please don’t lose heart J because you don’t really have to fully understand this. This is just information that you need in the HTML file for the colors and fonts. I welcome anyone who want to learn it to give it a try…it is really easy.
Function writeHtmlHeader
{
param($fileName)
$date = ( Get-Date ).ToString(‘yyyy/MM/dd’)
Add-Content $fileName “<html>”
Add-Content $fileName “<head>”
Add-Content $fileName “<meta http-equiv=’Content-Type’ content=’text/html; charset=iso-8859-1′>”
Add-Content $fileName ‘<title>myExchangeWorld.COM Database Report</title>’
Add-Content $fileName ‘<STYLE TYPE=”text/css”>’
Add-Content $fileName “<!–“
Add-Content $fileName “td {“
Add-Content $fileName “font-family: Tahoma;”
Add-Content $fileName “font-size: 11px;”
Add-Content $fileName “border-top: 1px solid #999999;”
Add-Content $fileName “border-right: 1px solid #999999;”
Add-Content $fileName “border-bottom: 1px solid #999999;”
Add-Content $fileName “border-left: 1px solid #999999;”
Add-Content $fileName “padding-top: 0px;”
Add-Content $fileName “padding-right: 0px;”
Add-Content $fileName “padding-bottom: 0px;”
Add-Content $fileName “padding-left: 0px;”
Add-Content $fileName “}”
Add-Content $fileName “body {“
Add-Content $fileName “margin-left: 5px;”
Add-Content $fileName “margin-top: 5px;”
Add-Content $fileName “margin-right: 0px;”
Add-Content $fileName “margin-bottom: 10px;”
Add-Content $fileName “”
Add-Content $fileName “table {“
Add-Content $fileName “border: thin solid #000000;”
Add-Content $fileName “}”
Add-Content $fileName “–>”
Add-Content $fileName “</style>”
Add-Content $fileName “</head>”
Add-Content $fileName “<body>”
Add-Content $fileName “<table width=’100%’>”
Add-Content $fileName “<tr bgcolor=’#CCCCCC’>”
Add-Content $fileName “<td colspan=’7′ height=’25’ align=’center’>”
Add-Content $fileName “<font face=’tahoma’ color=’#003399′ size=’4′><strong>myExchangeWorld.COM Database Report – $date</strong></font>”
Add-Content $fileName “</td>”
Add-Content $fileName “</tr>”
Add-Content $fileName “</table>”
}
I put in some normal HTML headers, and then I created a style with all the custom table properties like color, font, and size.
When that is done, we simply create a new table structure and put in all the table headers, like the database name and size.
Function writeTableHeader
{
param($fileName)
Add-Content $fileName “<table width=’100%’><tbody>”
Add-Content $fileName “<tr bgcolor=#CCCCCC>”
Add-Content $fileName “<td width=’10%’ align=’center’>Database Name</td>”
Add-Content $fileName “<td width=’10%’ align=’center’>Server</td>”
Add-Content $fileName “<td width=’15%’ align=’center’>Database File</td>”
Add-Content $fileName “<td width=’10%’ align=’center’>Database Size(MB)</td>”
Add-Content $fileName “<td width=’7%’ align=’center’># of Mailboxes</td>”
Add-Content $fileName “<td width=’10%’ align=’center’>WhiteSpace(MB)</td>”
Add-Content $fileName “<td width=’10%’ align=’center’>Top Mailbox</td>”
Add-Content $fileName “<td width=’10%’ align=’center’>Top Mailbox Size</td>”
Add-Content $fileName “<td width=’10%’ align=’center’>Last Full Backup</td>”
Add-Content $fileName “<td width=’15%’ align=’center’>No Backup Since?</td>”
Add-Content $fileName “</tr>”
}
Quick tip: <TR> tags mean table row, and <TD> is table data or the actual cell.
Let’s analyze one line from the previous code.
“<td width=’10%’ align=’center’>Database Name</td>”
What that exactly translates to is: Make this cell width 10%, center align the text, and the text inside the cell is Database Name.
After we have written all the table headers, we can get the actual data from the servers, then build HTML tags and add them to the HTML file.
Following is the function that calculates all the required data and then sends the information for HTML processing.
Function get-DBInfo
{
$dbs = Get-MailboxDatabase -Status
foreach($db in $dbs)
{
$name = $db.name
$svr = $db.servername
$edb = $db.edbfilepath
$edbSize = $db.DatabaseSize.Tobytes()
$whiteSpace = $db.AvailableNewMailboxSpace.Tobytes()/1mb
$mbxCount = (Get-Mailbox -Database $db).count
$topMailbox = Get-Mailbox -Database $db | Get-MailboxStatistics | Sort-Object TotalItemSize -Descending |Select-Object DisplayName -First 1 | Format-Table Displayname -HideTableHeaders | Out-String
$topMailboxSize = Get-Mailbox -Database $db| Get-MailboxStatistics | Sort-Object TotalItemSize -Descending | Select-Object totalitemsize -First 1
$topMailboxSize = $topMailboxSize.TotalItemSize.Value.ToBytes()
$lastBackup = $db.LastFullBackup; $currentDate = Get-Date
if ($lastBackup -eq $null)
{
$howOldBkp = $null
}
else
{
$howOldBkp = $currentDate – $lastBackup
$howOldBkp = $howOldBkp.days
}
writedata $name $svr $edb $edbSize $whiteSpace $mbxCount $topMailbox $topMailboxSize $lastBackup $howOldBkp
}
}
The previous function is self-explanatory—I loop through all databases and calculate the required information. Then in the last line, I send the values to another function called writeData as shown here.
Function WriteData
{
param($name,$svr,$edb,$edbSize,$whiteSpace,$mbxCount,$topMailbox,$topMailboxSize,$lastBackup,$howOldBkp)
$tableEntry = “<tr><td>$name</td><td>$svr</td><td>$edb</td>”
#Checking if EDB size is greater than the set Threshold
#If it is greater than the table cell will be marked red, else green.
if ($edbSize -gt $dbSizeThreshold)
{
$edbSize = $edbSize/1mb
$tableEntry += “<td bgcolor=’#FF0000′ align=center>$edbSize</td>”
}
else
{
$edbSize = $edbSize/1mb
$tableEntry += “<td bgcolor=’#387C44′ align=center>$edbSize</td>”
}
Add-Content $fileName $tableEntry
Write-Host $tableEntry
}
Actually, I could add more to that function; I limited the information to show one item where I perform a comparison. If you notice, this comparison is for checking edbSize. I am using a simple condition to check if the size is greater than a particular threshold.
If the value is greater, the bgcolor property of the tag changes to red; otherwise, it is going to be green.
I guess you are now getting the gist of it.
After all the conditions are checked, all those HTML tags are stored in the variable $tableEntry and then written to the HTML file.
Finally, I use a simple sendEmail function to email the report.
Note: I set the Bodyhtml property to true in the code.
Function sendEmail
{ param($from,$to,$subject,$smtphost,$htmlFileName)
$body = Get-Content $htmlFileName
$smtp= New-Object System.Net.Mail.SmtpClient $smtphost
$msg = New-Object System.Net.Mail.MailMessage $from, $to, $subject, $body
$msg.isBodyhtml = $true
$smtp.send($msg)
}
Here is an image of the report the way I like to see it in my environment—all green!
In the following image, you can see where some of the thresholds have been crossed, and therefore the field changes to red.
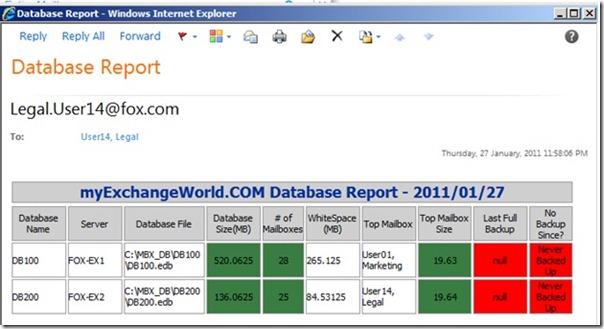
Because the report is HTML, I do not need to save the report to a file and then open it in Internet Explorer. I can read it directly in the email. The report as it appears in my Inbox is shown here.
The complete script is located in the Scripting Guys Script Repository.
TH, that is all there is to use Windows PowerShell to generate Exchange database reports. Thank you, Thiyagu, for taking the time to share your knowledge and your script with us. Guest Blogger Week will continue tomorrow when Microsoft MVP, Shay Levy, will be our guest.
I invite you to follow me on Twitter and Facebook. If you have any questions, send email to me at scripter@microsoft.com, or post your questions on the Official Scripting Guys Forum. See you tomorrow. Until then, peace.
Ed Wilson, Microsoft Scripting Guy


0 comments