Use PowerShell NetPoint cmdlets to Ease Network Management
Summary: Learn how to use the NetPoint cmdlets with Windows PowerShell to simplify network management.
![]() Hey, Scripting Guy! What can you tell me about how to automate network management while using Windows PowerShell?
Hey, Scripting Guy! What can you tell me about how to automate network management while using Windows PowerShell?
— MS
![]() Hello MS, Microsoft Scripting Guy Ed Wilson here. We will wrap up guest blogger week with this contribution from Shannon Ma.
Hello MS, Microsoft Scripting Guy Ed Wilson here. We will wrap up guest blogger week with this contribution from Shannon Ma.

Hi, this is Shannon. I’m a software engineer based in San Francisco with over seven years of IT experience. During the day, I work on the iOS team at Apple and in my spare time, I run every aspect of Neutex, a micro-ISV that develops a network inventory application known as NetPoint that saves IT Pros time and gray hair. When I’m not creating software I enjoy reading about businesses and investing, exploring new eats in the city, and surfing. You can follow me on Twitter here.
Tapping into your network inventory with Windows PowerShell
I’m pretty passionate when it comes to technology, but when it comes to IT there’s nothing that bores me more than slaving over those repetitive tasks we all need to do. You know, things like: patching systems, tracking licenses, and figuring out which systems are due for an upgrade. I’d much rather spend my time on the fun big picture stuff like piloting that snazzy virtualization app I’ve been hearing about or heck, how about automating all this stuff!
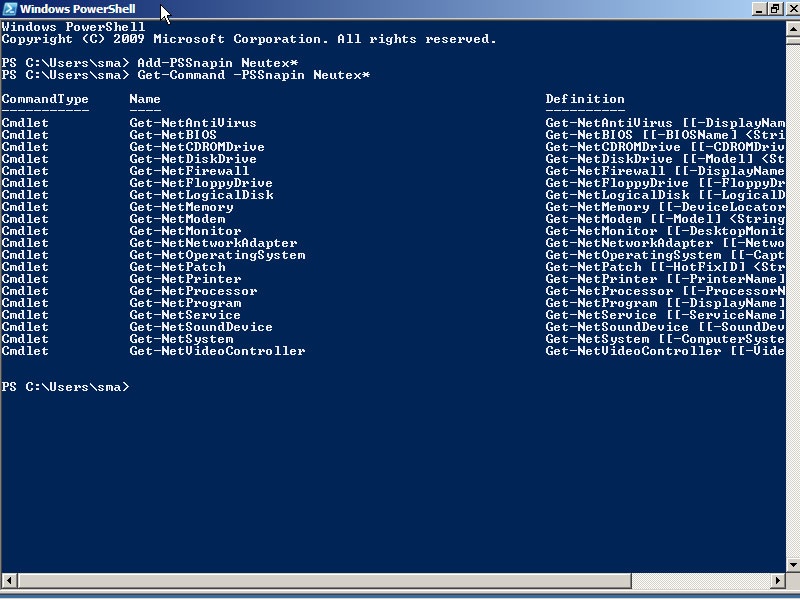
So I’ve created a set of Windows PowerShell Commands that have helped me with this and I’d like to share them with you. They are part of NetPoint, a product I have created in my spare time that inventories your network. You can use these commands to discover what is running on your network right from Windows PowerShell and best of all, there is one command for just about every type of hardware and software out there.
The following figure shows what they look like:

Now let us actually use this to do something useful. Imagine it is 5 PM on Friday and you just wrapped up a long day of rolling out some brand new Dell XPS systems to Sales except as you are heading out the door the Sales Manager needs Adobe Reader on them pronto! Ouch, you are probably not going to make it to happy hour.
Well wait, let us first figure out the systems that need Adobe Reader. They happen to be the only Dell XPS systems on the network:
> $i = Get-NetSystem –Manufacturer “Dell*” –Model “XPS*”
> $i | Measure-Object
Count : 22
Average :
Sum :
Maximum :
Minimum :
Property :
There are 22 systems that need to be updated, so let us see what one of these looks like:
> $i[0]
AdminPasswordStatus : Not Implemented
AutomaticResetBootOption : True
AutomaticResetCapability : True
BootROMSupported : True
BootupState : Normal boot
ComputerSystemID : 2
ComputerSystemName : Shannon-Desktop
CurrentTimeZone : -480
DaylightInEffect : False
Description : Shannon's Dell
Domain : neutex.net
DomainRole : Member Workstation
EnableDaylightSavingsTime : True
FrontPanelResetStatus : Unknown
InfraredSupported : False
InstallDate : 11/14/2010 8:56:45 PM
LastUpdate : 12/5/2010 8:56:47 PM
Location :
Manufacturer : Dell Inc
ManufacturerDescription : AT/AT COMPATIBLE
Model : XPS 630i
NetworkServerModeEnabled : True
Notes :
NumberOfProcessors : 1
PartOfDomain : True
PauseAfterReset : -1
PowerManagementSupported :
PowerState : Unknown
PowerSupplyState : Unknown
PrimaryOwnerName : Shannon
ProcurementDate :
PurchaseOrder :
ResetCount : -1
ResetLimit : -1
Status : OK
SystemStartupDelay :
SystemStartupSetting :
SystemType : x64-based PC
ThermalState : Unknown
TotalPhysicalMemory : 4093
UserName :
WarrantyExpirationDate :
Workgroup :
Notice that we could have searched for computers by any of these properties (and even more with the other cmdlets), but let us move onto installing Adobe Reader. You can walk around and do this manually to all 22 systems, but we want to get out of here at a decent hour so let us automate it!
> $i | % { (Get-WMIObject -ComputerName $_.ComputerSystemName -List -Authority ("kerberos:" + $_.Domain + "\" + $_.ComputerSystemName) -Impersonation Delegate | Where-Object -FilterScript {$_.Name -eq "Win32_Product"}).Install("\\unagi.neutex.net\Software\AdbeRdr940_en_US.msi") }
At first glance, it might look like a mad scientist wrote this, but as you’ll soon discover it’s just like Easy-Bake. We first pipe our Dell XPS systems into WMI’s cmdlet for each system, we’re going to get the WMI object responsible for MSI installs (a.k.a., Win32_Product) by passing in the machine’s ComputerSystemName. We also need to make sure WMI will delegate our user credentials since we’re going to be performing a double-hop to install the MSI from unagi.neutex.net… and we’ll do that with the –Authority and –Impersonation parameters (see Connecting to a 3rd Computer-Delegation for more info on delegation). Once that’s all setup, we can just call the Install function on the WMI object.
So that’s it, in just a few lines of Windows PowerShell you installed Adobe Reader on all 22 systems. Now let’s say we’re picky and want to free up some clutter on the Start Menu of these systems by removing the Adobe Reader shortcut. Well the good news is, you can run command-line tools just like we install apps:
> $i | % { (Get-WMIObject -ComputerName $_.ComputerSystemName –List | Where-Object -FilterScript {$_.Name -eq "Win32_Process"}).Create("cmd /c del `”C:\ProgramData\Microsoft\Windows\Start Menu\Programs\Adobe Reader 9.lnk`”") }
But what if you need to remove Adobe Reader because a few weeks down the road a security exploit is discovered and there’s no patch for it? Well, that’s easy, too:
> $i | % { (Get-WmiObject Win32_Product -ComputerName $_.ComputerSystemName -Filter "Name LIKE 'Adobe Reader%'").Uninstall() }
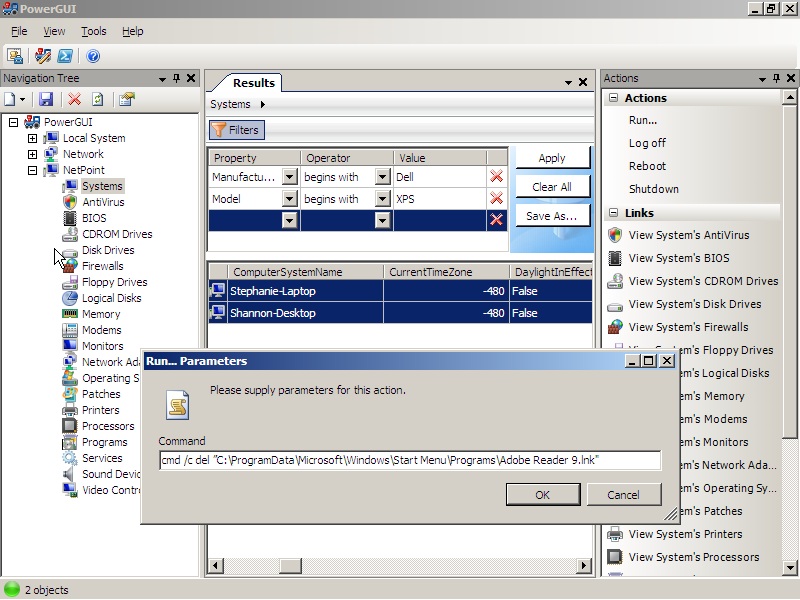
Oh and I almost forgot, you can use the optional PowerGUI PowerPack in NetPoint to visually search your network inventory and perform many of these bulk administrative tasks. The PowerPack is built on the Windows PowerShell commands you saw today and it’s editable so you can add your own tasks to it. See the following figure for a screenshot of how we could have deleted the Adobe Reader shortcuts in a couple clicks:

What a great way to start off the weekend. Not only are we better equipped to automate those routine system management tasks but we’ll make it to happy hour! If you’re interested in checking out these Windows PowerShell Commands, go ahead and download NetPoint from www.neutex.net. Feel free to drop me a line at support@neutex.net if you have any questions.
MS, that is all there is to using Windows PowerShell and the NetPoint cmdlets. This concludes another guest blogger week. Thank you Shannon for taking time to share with us.
I invite you to follow me on Twitter or Facebook. If you have any questions, send email to me at scripter@microsoft.com or post them on the Official Scripting Guys Forum. See you tomorrow. Until then, peace.
Ed Wilson, Microsoft Scripting Guy

 Light
Light Dark
Dark
0 comments