Summary: Microsoft Scripting Guy, Ed Wilson, shows how to use Windows PowerShell 3.0 in Windows 8 to rename network adapters.
Microsoft Scripting Guy, Ed Wilson, is here. I received an exciting email yesterday from Lido Paglia. As you may recall, Lido was a winner of the 2012 Scripting Games. I think it is so cool that he is now going to start a Windows PowerShell User Group in Philadelphia, and their first meeting is on October 4, 2012.
The Charlotte Windows PowerShell User Group is sponsoring PowerShell Saturday on September 15, 2012 at the Microsoft office. There are still a few tickets left, but they are selling quickly. If you want to attend, please do not wait until the last minute, because it may be too late. The PowerShell Saturday in Columbus, Ohio sold out, and there was a long waiting list for tickets that never became available. Go ahead and register now. With three tracks and 15 presentations, it will be a tremendous learning event for a nominal cost. We have some major sponsors who have stepped up to defray most of the expensed for this event. We even have PowerShell Saturday T-shirts (the T-shirt is worth more than the registration fee). It will be a really cool event.
Renaming network adapters
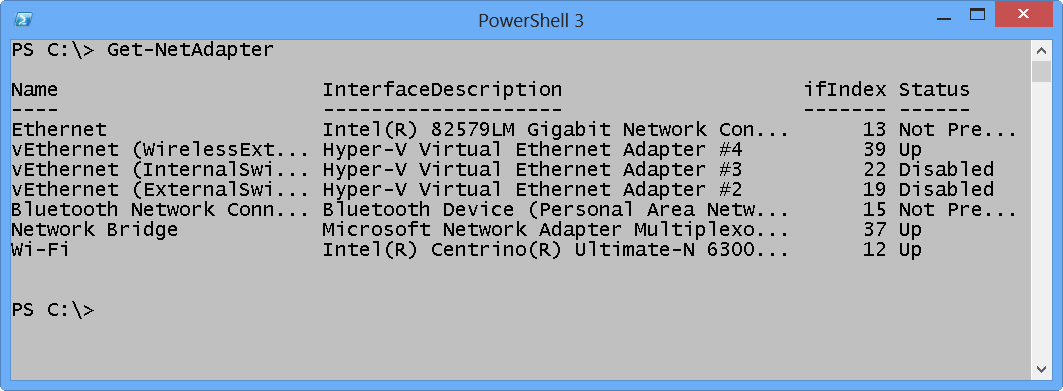
One of the things that quickly becomes confusing, especially if you are using Hyper-V, is the way the numbers of network adapters seem to proliferate. I mean, it is like one day all I have is a wired Ethernet adapter and a wireless network adapter—and the next day, I have twelve other adapters, and I have no idea what they do, where they came from, or even which ones I can disable and still remain connected to my local network and the Internet. The following image shows the results of using the Get-NetAdapter Windows PowerShell cmdlet from Windows 8 and Windows PowerShell 3.0.
After I figure out what a network adapter does, and to which network it connects, I like to rename the adapter. I developed this habit when I was a consultant, and it is something I continue to this day. The difference is that now I use the Rename-Adapter Windows PowerShell cmdlet to do the heavy work.
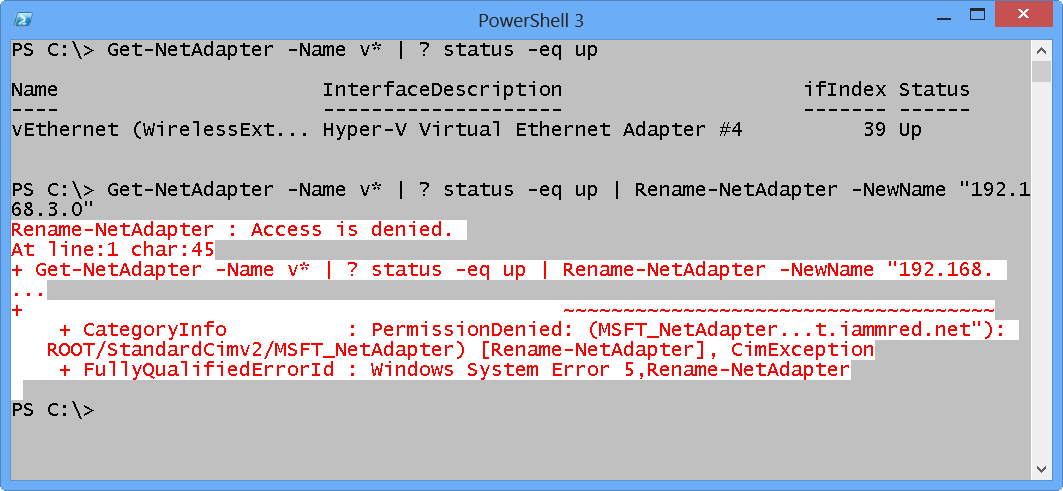
Renaming a network adapter via Windows PowerShell requires admin rights. Unfortunately, the Help does not mention this. You just have to sort of know this. Luckily, an error occurs if you attempt to run the command without admin rights. The error is instructive, and it informs you that access is denied. The error is shown here.
The good thing is that the access denied error appears. Some cmdlets do not display output and do not let you know that you need admin rights to obtain the information. The Get-VM cmdlet is one of those. It returns no virtual machine information, but it does not generate an error either. This situation is also true with the Start-VM cmdlet. It does not do anything, but does not generate an error if you do not have admin rights.
So I close the Windows PowerShell console, right-click the Windows PowerShell console icon that I created on my task bar, and run Windows PowerShell as Administrator. I now run the command to rename my network adapter with the whatif parameter to ensure it accomplishes what I want. Here is the command I use:
PS C:\> Get-NetAdapter -Name v* | ? status -eq up | Rename-NetAdapter -NewName “192.1
68.3.0″ -whatif
What if: Rename-NetAdapter -Name ‘vEthernet (WirelessExternal)’ -NewName ‘192.168.3.0
Groovy. That is exactly what I want to happen. I now use the Up arrow and remove the whatif. Here is the command. (No output returns from this command.)
Get-NetAdapter -Name v* | ? status -eq up | Rename-NetAdapter -NewName “192.168.3.0”
That is all there is to renaming network adapters. Join me tomorrow when I will talk about more way cool Windows PowerShell stuff.
I invite you to follow me on Twitter and Facebook. If you have any questions, send email to me at scripter@microsoft.com, or post your questions on the Official Scripting Guys Forum. See you tomorrow. Until then, peace.
Ed Wilson, Microsoft Scripting Guy


0 comments