Summary: Learn how to query WMI classes using Windows PowerShell and wildcard character patterns by using a free Scripting Guy module.
Microsoft Scripting Guy Ed Wilson here. Well, the Scripting Wife and I are finally settling down to a normal routine here in Charlotte, North Carolina, in the United States. Of course, that settling down will not last too long because next week we head out to California. I am speaking at a Microsoft internal conference for the premier field engineers (PFE) at a conference called Geek Week (Geek Ready). I am making two presentations to each of the three sessions, as well as sitting on a panel discussion. In addition, for session 1 I am having a special side meeting with the PFE Windows PowerShell special interest group. It will be lots of fun. Following that week, we head up to Orange County, California, where I will be conducting a special five day Windows PowerShell workshop for Microsoft Premier customers. So we will spend two weeks in sunny Southern California. Ah, the life of someone who knows Windows PowerShell.
Anyway, I do need to mention something that happened to me on Monday. I changed the BIOS settings on my new laptop, and when I saved the changes, BitLocker Recovery Password Viewer for Active Directory Users and Computers. A quick call to the help desk, and I was back up and running. It was cool!
I am continuing to work on my HSGWMIModule and today I am up to version 5.
Note This is part five of a multipart article on developing a WMI helper module. On Monday, I created the base WMI module, and included a couple of really great functions that query the WMI schema and return WMI class methods and properties. On Tuesday, I added a function that returns the key property of a WMI class. This is useful when working with WMI instance methods. On Wednesday, I created a function that will return the values of those key properties. Yesterday, I added a HasWMIValue filter to the module. Today, I add two functions. The first is a function that will query WMI classes using a wildcard character pattern. The second function is an Out-TempFile function that accepts piped input and displays results in a temporary text file in Notepad.
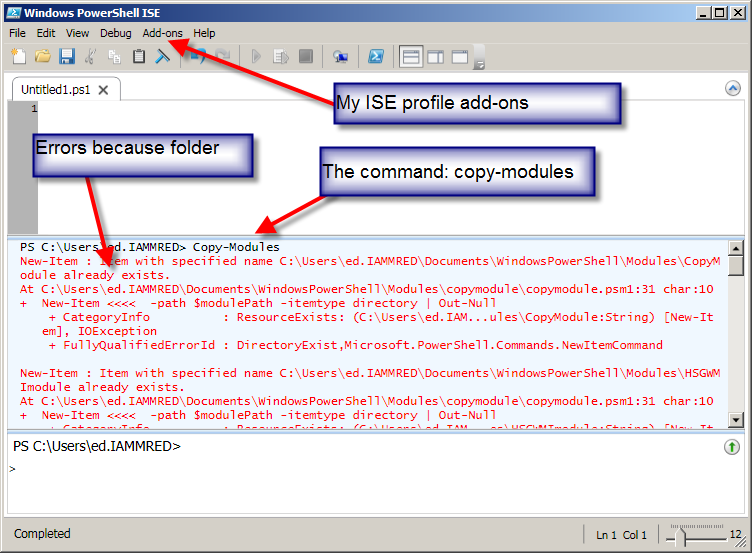
Anoter Note The module for today’s blog post is on the Copy-Modules function from my Windows PowerShell ISE module. Using this technique, all you need to do is go to the Scripting Guys Script Repository, copy the module to the Clipboard, save it in your scratch directory, and use the Copy-Modules function to copy it to your modules folder. If your scratch directory is c:\fso, it is completely automatic. If it is not, I recommend you edit the Copy-Modules function to use your scratch directory, which makes it really easy to use. The command and associated output are shown in the following figure.
When the HSGWMIModuleV5 is installed, all of the functions and filters contained within the module become available when I import the module. I can do this in either the Windows PowerShell console or the Windows PowerShell ISE. I am going to use the Windows PowerShell console for now. I do not need to type the entire module name because the Import-Module cmdlet accepts wildcard characters. After I import the module for the first time, I like to see which commands the module supports, so I use the Get-Command cmdlet to display the commands. The two commands are shown here:
Import-Module hsg*5
Get-Command -Module hsg*5
The two commands and their associated output are shown in the following figure.
The Get-WmiClassesAndQuery function accepts wildcard characters for the WMI class name. It then searches for WMI classes that match the pattern. Upon finding the classes, it determines which WMI classes are not abstract and it queries them. The portion of the function that returns a list of WMI classes that match a wildcard character pattern is shown here (supply the wildcard character pattern to the $class variable):
Get-WmiObject -List $class -Namespace $namespace -ComputerName $computer
I use the same logic to determine dynamic classes I used in other functions in the HSGWMIModule*. I examine the class qualifiers to find the abstract qualifier. If the abstract qualifier appears, I skip the class. Here is that portion of the logic:
ForEach-Object {
$abstract = $false
[wmiclass]$class = “\\{0}\{1}:{2}” -f $computer,$namespace,$_.name
Foreach($q in $_.Qualifiers)
{ if ($q.name -eq ‘Abstract’) {$abstract = $true} }
If(!$abstract)
After all that work, it is a straightforward WMI query using the Get-WMIObject cmdlet. I used parameter decorations to make the class parameter mandatory in the first position, and accept pipeline input. Here is that parameter attribute:
[Parameter(Mandatory=$true,Position=0,valueFromPipeline=$true)]
I can use the function by directly passing a wildcard character to it, or I can use the parameters. These techniques are shown here:
Get-WmiClassesAndQuery *disk*
Get-WmiClassesAndQuery -class *disk* -namespace root\wmi
To run a query remotely you must have administrator rights. If you run the command with alternate credentials, you will need to supply the path to the module when you import it because the Copy-Modules function installs into the current user profile location. Of course, if you run the Windows PowerShell ISE with alternate credentials when you use the Copy-Modules function to perform the installation, you will already have the module in your alternate profile. The workaround is to manually install the module in the all users/all hosts profile location.
The Get-WmiClassesAndQuery function really shines when combined with the HasWmiValue filter and the Out-TempFile function. The command is shown here:
Get-WmiClassesAndQuery *adapter* | HasWmiValue | Out-TempFile
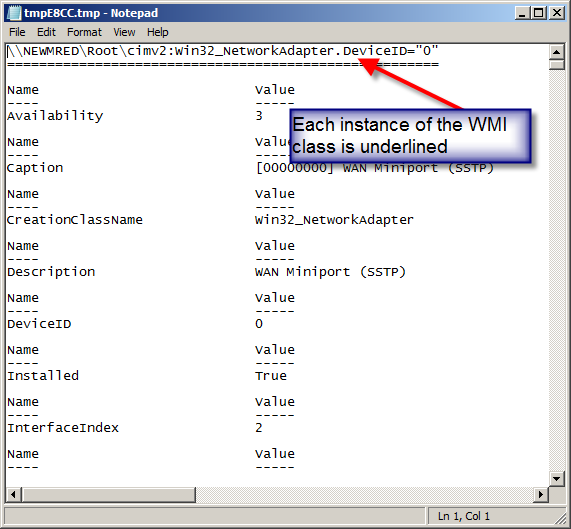
The previous command queries every dynamic WMI class that contains the pattern adapter in the name. This includes Win32_NetworkAdapter and Win32_NetworkAdapterConfiguration as well as an associative class. The HasWmiValue greatly reduces the amount of information that is displayed by removing empty properties, and the Out-TempFile function makes it easy to peruse the returned data. The temp file is shown in the following figure.
That is all there is to using the HSGWmiModuleV5. WMI Week will continue tomorrow when I will add some aliases and other things to the HSGWmiModule. Until tomorrow!
I invite you to follow me on Facebook. If you have any questions, send email to me at Official Scripting Guys Forum. See you tomorrow. Until then, peace.
Ed Wilson, Microsoft Scripting Guy


0 comments