
Summary: Thomas Rayner, Microsoft Cloud & Datacenter Management MVP, shows how to start the migration of a Windows certification authority from CSP to KSP and from SHA-1 to SHA-256.
Hello! I’m Thomas Rayner, a proud Cloud & Datacenter Management Microsoft MVP, filling in for The Scripting Guy this week. You can find me on Twitter (@MrThomasRayner) or on my blog, Working Sysadmin: Figuring stuff out at work.
I recently had the chance to work with Microsoft PFE, Mike MacGillivray, on an upgrade of some Windows certification authorities, and I want to share some information about it with you. This script has only been tested on Windows Server 2012 and later.
Note This is a five-part series that includes the following posts:
- Migrate Windows CA from CSP to KSP and from SHA-1 to SHA-256: Part 1 Explore why you may need to perform this work, configure logging, and set up variables.
- Migrate Windows CA from CSP to KSP and from SHA-1 to SHA-256: Part 2 Back up your certification authority (CA) and test the script.
- Migrate Windows CA from CSP to KSP and from SHA-1 to SHA-256: Part 3 Delete the certificate and crypto provider so they can be rebuilt as a KSP and SHA-256 solution.
- Migrate Windows CA from CSP to KSP and from SHA-1 to SHA-256: Part 4 Import keys and certificate into a KSP.
- Migrate Windows CA from CSP to KSP and from SHA-1 to SHA-256: Part 5 Modify the registry for SHA-256.
Do I need to do this?
First things first. You need to know if this series of posts is for you. Presumably, you are running a Windows certification authority (CA) and want to upgrade from SHA-1 to SHA-256. With SHA-1 on its way to deprecation, this is an important piece of work that you should perform sooner rather than later. These posts assume you have a base-level knowledge of Windows CAs and how the public key infrastructure (PKI) works. The SHA-1 to SHA-256 upgrade isn’t very difficult—but that’s a conditional statement.
Open your CA MMC, right-click the name of your CA, and click Properties. If it looks exactly like the following image, give yourself a pat on the back because you’re already done.
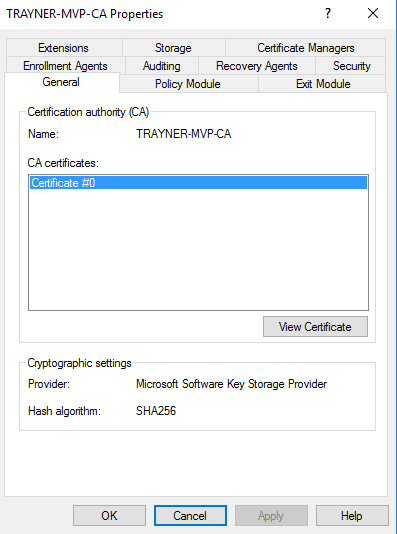
What you’re looking for is that the Provider is Microsoft Storage Key Service Provider and that the Hash algorithm is SHA256.
If the Provider is Microsoft Storage Key Service Provider but the Hash algorithm is SHA1, you’re not in very bad shape. Launch an elevated Command Prompt and simply run this command, then you’re done.
certutil -setreg ca\csp\CNGHashAlgorithm SHA256
There’s another way this screen could look, though, and it’s the situation we’re focusing on this week.
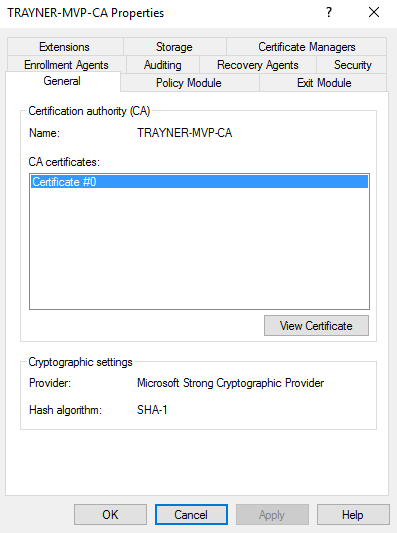
Not only is the Hash algorithm SHA-1, but the Provider is Microsoft Strong Cryptographic Provider. Not good! This scenario doesn’t support simply moving from SHA-1 to SHA-256. Upgrading to a Key Storage Provider (KSP) from a Cryptographic Service Provider (CSP) is a bit more involved. Luckily, you can follow along with me this week to see how it’s done.
Let’s get set up
Today, we’re going to set up some logging and variables to get our environment ready for the rest of the script. First things first…
This script is needs to be run as an administrator and it needs Windows PowerShell 2.0 or later. I can ensure both by using #requires statements.
#requires -Version 2
#requires -RunAsAdministrator
I also want to make sure the ErrorActionPreference is Stop. If I run into problems, I want the script to die instead of keep fumbling through.
$OldEAP = $ErrorActionPreference
$ErrorActionPreference = ‘stop’
I’m storing the current ErrorActionPreference in $OldEAP so I can set it back at the end of the script. Now, I want to configure some logging. There are billions of ways to do this, but here’s one function I like (because I wrote it):
Function Add-LogEntry
{
[CmdletBinding()]
Param(
[Parameter(Position = 0,
Mandatory = $True,
ValueFromPipeline = $True)]
[string]$LogLocation,
[Parameter(Position = 1,
Mandatory = $True,
ValueFromPipeline = $True)]
[string]$LogMessage
)
$LogThis = “$(Get-Date -Format ‘MM/dd/yyyy hh:mm:ss’): $LogMessage”
Out-File -InputObject $LogThis -FilePath $LogLocation -Append
write-output $LogThis
}
There’s nothing crazy going on here. The Add-LogEntry function takes two parameters, the location of the log file and the message to log. It prepends the time and date, and writes the log message to the log file, and then out to the screen. You could use Tee-Object here in Windows PowerShell 5.0 but I’m creating some backwards compatibility. You use the function like this:
Add-LogEntry ‘C:\temp\log.txt’ ‘This message will be logged’
Now, why don’t we set up some variables before we wrap up today’s post? Thinking about this in no particular order, I’m going to need:
- A place to put log files
- A place to put a backup of my CA (stay tuned for tomorrow’s post)
- The name of the CA I’m working on
- A password to use for the CA backup
Let’s do the password first. I’m not storing it in this script as a secure string because using it later in the script gets complicated. You probably should store it more securely, but I’m being a cowboy. The password doesn’t have any complexity requirements.
$Password = Read-Host -Prompt ‘Set password for key backup (not stored in script as securestring)’
How about a drive letter and folder for where the backup is going to go?
$Drivename = Read-Host -Prompt ‘Set drive letter including colon [C:]’
if ([string]::IsNullOrWhiteSpace($Drivename))
{
$Drivename = ‘C:’
}
$Foldername = Read-Host -Prompt “Set folder name [CA-KSPMigration_$($env:computername)]”
if ([string]::IsNullOrWhiteSpace($Foldername))
{
$Foldername = “CA-KSPMigration_$($env:computername)”
}
if (Test-Path -Path “$Drivename\$Foldername”)
{
Remove-Item -Path “$Drivename\$Foldername” -Recurse -Force
}
New-Item -ItemType Directory -Path “$Drivename\$Foldername”
This one’s longer. I’m prompting you for a drive letter first and informing you that the default value is C: by putting it in square brackets. You can either type the drive letter, or press ENTER to accept the default. If you accept the default, I’m detecting if your input is empty and setting the $Drivename variable. I’m doing the same thing with the folder part of the name. I’m suggesting “CA-KSPMigration_NameOfComputer.”
If that folder exists already, I’m deleting it and then creating a new folder for it.
How about we get the name of the CA now?
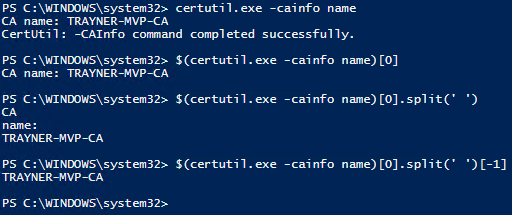
$CAName = cmd.exe /c ‘certutil.exe -cainfo name’
$CAName = $CAName[0].split(‘ ‘)[-1]
The syntax “cmd.exe /c <command>” isn’t explicitly required, but I prefer it. I find it makes life easier when dealing with PowerShell variables as part of a cmd.exe command. If you look at the output of certutil.exe –cainfo name, you’ll see that it’s pretty easy to strip out everything except the CA name.
This should be pretty foolproof. You may have to tweak this part if you’ve got some strange business going on with special characters. My tests with names including parentheses have been fine, though.
Finally, let’s set up the location for our log file.
$Logpath = Read-Host -Prompt “Set log path [$($Drivename)\$($Foldername)\log.txt]”
if ([string]::IsNullOrWhiteSpace($Logpath))
{
$Logpath = “$($Drivename)\$($Foldername)\log.txt”
}
Like the drive name and folder name, I’m suggesting a location for the log file. I’m going to log the settings for all the variables, and that’ll be it for the environment preparation!
Add-LogEntry $Logpath ‘Variables configured’
Add-LogEntry $Logpath “Password: $($Password)”
Add-LogEntry $Logpath “Drivename: $($Drivename)”
Add-LogEntry $Logpath “Foldername: $($Foldername)”
Add-LogEntry $Logpath “CAName: $($CAName)”
Add-LogEntry $Logpath “Logpath: $($Logpath)”
Now, we’re ready to get on with the dirty work of upgrading from CSP to KSP and SHA-1 to SHA-256. Join me tomorrow when I’ll cover backing up the existing CA.
If you are in a big hurry and want the full script, you can find it on my blog: Upgrade Windows Certification Authority from CSP to KSP and from SHA-1 to SHA-256. I’d sincerely recommend reading all of the posts in this series first, though, so you understand what it is you’re running.
~Thomas
I invite you to follow me on Twitter and Facebook. If you have any questions, send email to me at scripter@microsoft.com, or post your questions on the Official Scripting Guys Forum. Also check out my Microsoft Operations Management Suite Blog. See you tomorrow. Until then, peace.
Ed Wilson, Microsoft Scripting Guy
I have attempted doing the bump to SHA256/KSP using a variety of document methods online, but to no avail. I had skepticism about your PowerShell script, but gave it a shot and to my absolute delight it worked! After I regenerated the root certificate it’s showing SHA256. Thanks for taking the time not only to compose this PowerShell script, but the time to explain the inner workings.