Summary: Guest blogger, Boe Prox, shows how to use Windows PowerShell to install WSUS and configure clients for updates.
Microsoft Scripting Guy, Ed Wilson, is here. You are in for a treat this week. Boe Prox has written a week’s worth of goodies, and we will share them here.
Boe Prox is currently a senior systems administrator with BAE Systems. He has been in the IT industry since 2003, and he has been working with Windows PowerShell since 2009. Boe looks to script whatever he can, whenever he can. He is also a moderator on the Hey, Scripting Guy! Forum. Check out his current projects published on CodePlex: PoshWSUS and PoshPAIG.
Boe’s blog: Learn PowerShell | Achieve More
Now, without further ado, here is Boe!
For those of you who are unfamiliar with Windows Software Update Services (WSUS), I am going to start with a brief description of what WSUS is and how it is used to manage patching in an environment. Then I will dive into installing the server by using Windows PowerShell, configuring clients via GPO or the registry to report to the WSUS server and to receive the updates from the server. Lastly, I will discuss how to use Windows PowerShell with the associated assemblies for the WSUS Administrator Console to connect to the WSUS Server.
What is WSUS?
Windows Software Update Services (WSUS) is used by system administrators to manage the distribution of updates and hotfixes that are released by Microsoft for an environment. Currently, the most recent version is WSUS 3.0 with Service Pack 2, and it is available to download. This installation allows you to install the full server installation option or only the console installation (which can be installed on any client or server). It also has the assemblies required to use Windows PowerShell to manage the WSUS server. To determine the version of WSUS, refer to Appendix G: Detect the Version of WSUS on Microsoft TechNet.
Installing a WSUS Server
Before you begin the installation of WSUS, make sure you install the following on the selected server:
- Internet Information Services (IIS)
- At a minimum, .NET Framework 2.0
You could install WSUS 3.0 with SP2 on your server by using the file specified in the previous download link and running through the UI installation. But c’mon, this is a scripting blog, so surely we can script something out…right? Right!
Because there are several switches available with the executable file, we can easily script an unattended installation of the WSUS server along with specific configurations that meet our requirements. For more information about those switches, see Appendix A: Unattended Installations. The script I wrote that will allow a local or remote installation of a WSUS server or to install only the WSUS Administration Console is called Install-WSUSServer.ps1.
Note: I chose to require a dependency for PSExec.exe to complete the remote installation requirements. There were a number of reasons why I chose to do this, but the main reason is that I wanted to make sure that if an issue occurs that cancels the installation, an error would returned in the script that lets you know something happened.
You can run this script against only one computer at a time. This is because only one SUSDB database can be used for each SQL Server instance (unless you are setting up a WSUS server as a front-end server). You can specify whether to install a console or a server core installation, and it allows for using the internal database installation or a local/remote SQL Server instance to write data to. Lastly, if the required installation file (WSUS30-KB972455-x86.exe or WSUS30-KB972455-x64.exe) is not in the same directory as the script, you will be given a prompt to download the required file to use for installation. I also wrote an Uninstall-WSUSServer.ps1 script that performs exactly like the Install-WSUSServer.ps1 script.
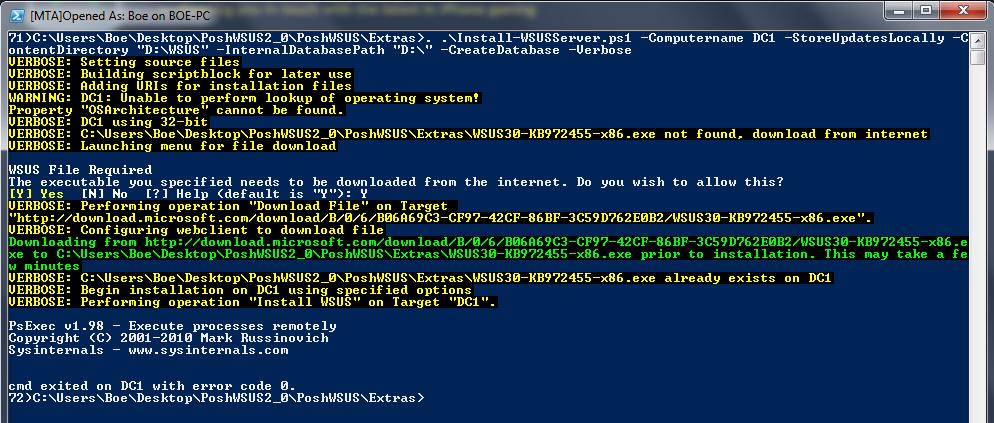
So enough talking about this script and let’s see it in action. First, let’s install our WSUS server and make sure that we save the content locally and save that content on the D drive. I am also going to make sure that I do not have the updates made available so it asks me to download the update prior to the installation.
. .\Install-WSUSServer.ps1 -Computername DC1 -StoreUpdatesLocally -ContentDirectory “D:\WSUS” -InternalDatabasePath “D:\” –CreateDatabase –Verbose
The command and the associated output are shown in the following image.
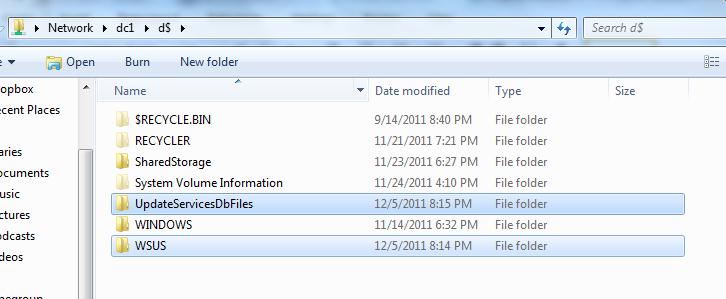
The following image shows the newly created folders.
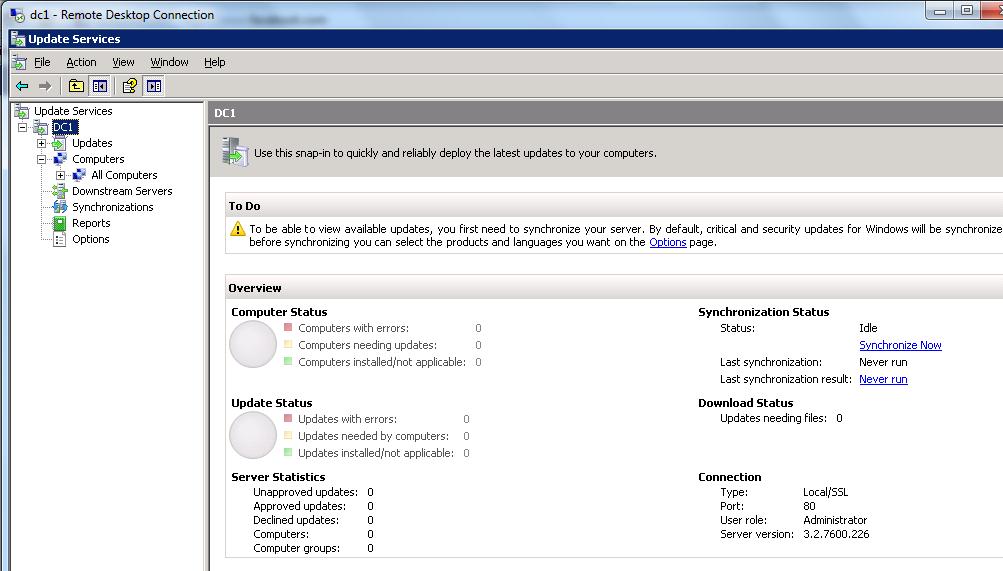
Now let’s fire up the console. To do this, I make an RDP connection to my DC1 server as shown in the following image.
Yep, it’s all there! OK, now let’s install the Administration Console on my laptop so I can make use of the assemblies for Windows PowerShell integration. Here is the command line that I use to install only the console.
. .\Install-WSUSServer.ps1 –ConsoleOnly -verbose
The following image shows the command that I use to install the console, and the output from the Install-WSUSServer.ps1 script.
This was a little simpler because I already had the installation file that I needed to complete the Administration Console installation.
Configure clients to use WSUS
OK, we have our WSUS server installed and running, and we have our Administration Console installed on the laptop. The next step is to configure my laptop and the server to communicate to the WSUS application so we can image the patches that are required for each client. There are a couple of ways to accomplish this task. If the client is in an Active Directory environment, all you have to is use Group Policy to make the configuration changes.
Note: For non-domain systems, you can make this change by using gpedit.msc.
For the sake of simplicity, I am just going to configure the GPO to point my client to the WSUS server (Specify intranet Microsoft update service location), set the update client to only download (Configure Automatic Updates) the approved updates, and change the detection to every four hours (Automatic Updates detection frequency). The changes are reflected in the following image.
Another way is to do some registry hacking to make the changes, which leads me to my next set of Windows PowerShell scripts that accomplish this task. The first script allows you to view the settings in the registry and the other script allows you to change the registry settings to configure the client. You can find these scripts in the Script Center Repository:
- To view the registry settings: Get-WSUSClientSetting
- To set the registry settings: Set-ClientWSUSSetting
For more information about the registry information that I used in these scripts, see Configure Automatic Updates in a Non–Active Directory Environment.
First, let’s see the settings that we will be changing to talk to our WSUS server on DC1. To do this, I use the Get-ClientWSUSSetting command as shown here.
Get-ClientWSUSSetting | Select WUServer,WUStatusServer,DetectionFrequency,AUOptions
The following image shows the output from this command.
Now let’s change these to reflect the same GPO we configured for the domain. Here is the command that does that.
Set-ClientWSUSSetting -Options DownloadOnly -DetectionFrequency 4 -UpdateServer ‘http://DC1’ -Verbose
The image shown here illustrates the output from the command.
Now, I use the Get-ClientWSUSSetting command to verify that the changes worked properly. As shown in the following image, it worked just fine.
Perfect. Now our clients are talking to the WSUS server, and they will begin reporting what patches are needed to be compliant.
WSUS and Windows PowerShell
Now we are at the point where we can begin working with the assemblies by using Windows PowerShell, and make our initial connection to the WSUS server. We want to use the Microsoft.UpdateServices.Administration assembly. Here is the command that I use to load that assembly.
[reflection.assembly]::LoadWithPartialName(“Microsoft.UpdateServices.Administration”) | Out-Null
Now it is time to make the initial WSUS connection by using the .NET accelerator [Microsoft.UpdateServices.Administration.AdminProxy] and the static method getUpdateServer(), which requires two values: the WSUS server name and a Boolean value for a secure connection. Because I am not using a secure connection for the WSUS server, we will set it for False. Here is the command.
$wsus = [Microsoft.UpdateServices.Administration.AdminProxy]::getUpdateServer(‘DC1’,$False)
$wsus
The output from the command is shown in the following image.
Here you can see some information regarding the remote WSUS server, such as the port number that is being used and the version of the WSUS server.
That is all for today with WSUS. I have shown the beginnings of using Windows PowerShell to make the initial connection to the WSUS server. Tomorrow I will expand on this by showing how you can use Windows PowerShell to perform some basic administration for your WSUS server.
~Boe
Thanks Boe, that is a great introduction to WSUS. WSUS Week will continue tomorrow.
I invite you to follow me on Twitter and Facebook. If you have any questions, send email to me at scripter@microsoft.com, or post your questions on the Official Scripting Guys Forum. See you tomorrow. Until then, peace.
Ed Wilson, Microsoft Scripting Guy


0 comments