Create a Simple Graphical Interface for a PowerShell Script
Summary: Learn how to create a simple graphical interface for a Windows PowerShell script.
Weekend Scripter: Extending PowerShell to the GUI with Sapien Tools
Microsoft Scripting Guy Ed Wilson here. Sean Kearney joins us again today as our guest blogger. Read more about Sean and his previous blog posts.
Here is Sean!
While playing with Sapien Primal Forms, I was thinking, “If you never used this, how could you figure out how to make it work with Windows PowerShell?” Stop falling down on your faces. I don’t hate the GUI. Windows PowerShell is not about shutting down one interface for another. It’s about enabling the tools you have for the best purpose to meet your job.
Think about it. There is absolutely nothing wrong with Active Directory Users and Computers. It works. It’s a great generic interface that applies to multiple needs and works well across a variety of platforms. But it isn’t necessarily the best interface for a specific job. But each one of us has a need that it may be too much for. A simple example is the person that works the Help Desk and just unlocks user accounts. (It’s not the only thing they do of course, but just an example.) In Active Directory they would have to find the account, pull up the properties of the account, reset the unlock field, and maybe reset the password.
You get the idea. When really all I want to do is type in the name and have the job done. The computer should ask me want I need to do. The workflow for unlocking an account would typically be this:
WHO do you want to Unlock?
Unlock the Account
OR
WHO do want to Reset?
WHAT will their new password be?
Unlock the Account
So in Windows PowerShell, I might do something like this for an unlock user script:
$USERFIRSTNAME=READ-HOST ‘First Name’
$USERLASTNAME=READ-HOST ‘Last Name’
GET-QADUSER –FirstName $USERFIRSTNAME –LastName $USERLASTNAME | UNLOCK-QADUSER
Or if I knew the structure of the SAM account, I could just key this in:
UNLOCK-QADUSER ‘SAMAccountName’
This is obviously far more efficient that searching Active Directory, finding the darn button, clicking it, and so on. With little difficulty, I could pipe in a list of users and unlock them.
So great, the administrator is happy. So how does this help our your local Help Desk?
With Sapien Primal Forms Community Edition, you can create a basic GUI to extend that Windows Powershell script into a GUI interface for that Help Desk so that you don’t need to retrain them. You can provision an interface to meet their job needs without incurring heavy development costs.
Here’s a bonus too you may not realize: the generated Windows PowerShell script from Sapien is a stand-alone script. All it does when you’re done is generate the needed code within a Windows PowerShell script to call up forms in Windows. All features of those forms are fully supported because they are features of the GUI.
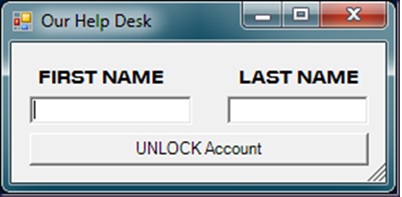
So here’s a simple form.
The Windows PowerShell script generated by Sapien to do this is shown here.
————————————–HELPDESK.PS1———————————————–
#Generated Form Function
function GenerateForm {
########################################################################
# Code Generated By: SAPIEN Technologies PrimalForms (Community Edition) v1.0.8.0
# Generated On: 7/3/2011 11:35 AM
# Generated By: sean.kearney
########################################################################
#region Import the Assemblies
[reflection.assembly]::loadwithpartialname(“System.Windows.Forms”) | Out-Null
[reflection.assembly]::loadwithpartialname(“System.Drawing”) | Out-Null
#endregion
#region Generated Form Objects
$HelpDeskForm = New-Object System.Windows.Forms.Form
$UnlockAccountButton = New-Object System.Windows.Forms.Button
$InitialFormWindowState = New-Object System.Windows.Forms.FormWindowState
#endregion Generated Form Objects
#———————————————-
#Generated Event Script Blocks
#———————————————-
#Provide Custom Code for events specified in PrimalForms.
$handler_UnlockAccountButton_Click=
{
#TODO: Place custom script here
}
$OnLoadForm_StateCorrection=
{#Correct the initial state of the form to prevent the .Net maximized form issue
$HelpDeskForm.WindowState = $InitialFormWindowState
}
#———————————————-
#region Generated Form Code
$HelpDeskForm.Text = “Our Help Desk”
$HelpDeskForm.Name = “HelpDeskForm”
$HelpDeskForm.DataBindings.DefaultDataSourceUpdateMode = 0
$System_Drawing_Size = New-Object System.Drawing.Size
$System_Drawing_Size.Width = 265
$System_Drawing_Size.Height = 55
$HelpDeskForm.ClientSize = $System_Drawing_Size
$UnlockAccountButton.TabIndex = 0
$UnlockAccountButton.Name = “UnlockAccountButton”
$System_Drawing_Size = New-Object System.Drawing.Size
$System_Drawing_Size.Width = 240
$System_Drawing_Size.Height = 23
$UnlockAccountButton.Size = $System_Drawing_Size
$UnlockAccountButton.UseVisualStyleBackColor = $True
$UnlockAccountButton.Text = “UNLOCK Account”
$System_Drawing_Point = New-Object System.Drawing.Point
$System_Drawing_Point.X = 13
$System_Drawing_Point.Y = 13
$UnlockAccountButton.Location = $System_Drawing_Point
$UnlockAccountButton.DataBindings.DefaultDataSourceUpdateMode = 0
$UnlockAccountButton.add_Click($handler_UnlockAccountButton_Click)
$HelpDeskForm.Controls.Add($UnlockAccountButton)
#endregion Generated Form Code
#Save the initial state of the form
$InitialFormWindowState = $HelpDeskForm.WindowState
#Init the OnLoad event to correct the initial state of the form
$HelpDeskForm.add_Load($OnLoadForm_StateCorrection)
#Show the Form
$HelpDeskForm.ShowDialog()| Out-Null
} #End Function
#Call the Function
GenerateForm
————————————–HELPDESK.PS1———————————————–
The first time I looked at one of these, I almost fell down! So much code! But most of it is actually comments and object generation. Just look for the spot near the top where it states:
#TODO: Place custom script here.
If you look above, you’ll see it says:
$handler_UnlockAccountButton_Click=
This is the portion generated for WPF that says “When I click this, the code gets run”. You could happily click it, and it would do nothing, because there is no code attached to the button. But we can easily create some new code that does an account unlock. We can take this same block from before and attach it to the button:
$handler_UnlockAccountButton_Click=
{
#TODO: Place custom script here
$USERFIRSTNAME=READ-HOST ‘First Name’
$USERLASTNAME=READ-HOST ‘Last Name’
GET-QADUSER –FirstName $FIRSTNAME –LastName $LASTNAME | UNLOCK-QADUSER
}
Now this will try to work but can’t from a form as it will try to get in the console. What we’ll have to do is create another form or maybe add some input fields to this one. With Primal Tools, I’ve added two parts to the form: two text boxes and two labels. I’ve tried to give them some meaningful descriptive names such as FirstNameLabel.
I could reproduce the code but the important stuff is near the top where you see the objects defined as variables:
#region Generated Form Objects
$HelpDeskForm = New-Object System.Windows.Forms.Form
$LastnameLabel = New-Object System.Windows.Forms.Label
$FirstNameLabel = New-Object System.Windows.Forms.Label
$LASTNAME = New-Object System.Windows.Forms.TextBox
$FIRSTNAME = New-Object System.Windows.Forms.TextBox
$UnlockAccountButton = New-Object System.Windows.Forms.Button
$InitialFormWindowState = New-Object System.Windows.Forms.FormWindowState
#endregion Generated Form Objects
The rest of it is the form calling up and adding the objects to the form. Now look at the bottom of your script where it says GenerateForm. Everything up to but not including that is a function being defined. This is important to know because if I change the function so that it’s seen in the global context and don’t run it from the script, I can now just call it from the command line.
Knowing this is important. If you put it in the global context and switch your variables to global (for testing purposes), you can easily pull up the properties of those variables to see how your data is stored.
So to figure out where the information could be accessed on the $FIRSTNAME text box, I switched both the defined function at the top called GenerateForm and my $FIRSTNAME variable to global. I then removed the GenerateForm from the bottom of the script:
function global:GenerateForm {.
#region Generated Form Objects
$HelpDeskForm = New-Object System.Windows.Forms.Form
$LastnameLabel = New-Object System.Windows.Forms.Label
$FirstNameLabel = New-Object System.Windows.Forms.Label
$LASTNAME = New-Object System.Windows.Forms.TextBox
$GLOBAL:FIRSTNAME = New-Object System.Windows.Forms.TextBox
$UnlockAccountButton = New-Object System.Windows.Forms.Button
$InitialFormWindowState = New-Object System.Windows.Forms.FormWindowState
#endregion Generated Form Objects
With this done, I just run…
GENERATEFORM
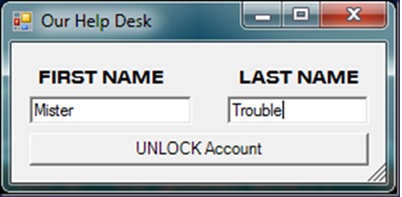
…from the Windows PowerShell console and key in some stuff such as is shown in the following figure.
And then afterward, I close the form.
To reveal all the properties and their values, I can now type:
$FIRSTNAME | Format-List
I can now see there is a field called Text, which has the value I entered in for $FIRSTNAME.
With this knowledge I can now extend the values I entered there into my Unlock Account button by changing the Read-Host to simply point to the values in $FIRSTNAME.TEXT and $LASTNAME.TEXT:
$handler_UnlockAccountButton_Click=
{
#TODO: Place custom script here
$USERFIRSTNAME=$FIRSTNAME.TEXT
$USERLASTNAME=$LASTNAME.TEXT
GET-QADUSER –FirstName $USERFIRSTNAME –LastName $USERLASTNAME | UNLOCK-QADUSER
}
We now remove GLOBAL: before GenerateForm and $FIRSTNAME, and resave the script.
Now running the GenerateForm will produce our new UNLOCK USER piece for the Help Desk and allow them to just type in the first and last name to unlock a user.
We can of course go much further with this such as setting up some confirmations, maybe closing the Window, verifying we found the proper user account. But the point of all this is to give you some baby steps and with that maybe you can build something a lot more powerful.
Thanks Sean. That wraps up another weekend.
I invite you to follow me on Twitter and Facebook. If you have any questions, send email to me at scripter@microsoft.com, or post your questions on the Official Scripting Guys Forum. See you tomorrow. Until then, peace.
Ed Wilson, Microsoft Scripting Guy


 Light
Light Dark
Dark
0 comments