Back to the Basics Part 2: Learn about the Pipeline and “Getters”
Summary: Microsoft PFE, Gary Siepser, talks about the basics of using the Windows PowerShell pipeline and “getters.”
Microsoft Scripting Guy, Ed Wilson, is here. This week, Gary Siepser, a Microsoft PFE is our guest blogger. Yesterday, we posted the first part of his series: Back to the Basics Part 1: Learn About the PowerShell Pipeline.
In in first post of this series, we looked at what the pipeline is and why you want to use it. We also outlined the common parts of the pipeline by introducing the “getters, doing something with your data, and outputting your data somewhere. In this post, we’ll focus on the first common portion of the pipeline, the “getters.”
Pipelines have to start somewhere. Like sending liquid down a real pipeline, we start the trip by putting something into the pipe. We need some data. In Windows PowerShell, this data is actually structured data in objects. Right now the objects aren’t that important for starting a pipe, but the sooner you start thinking “objects,” the more power you’ll put into the shell. The first part of the pipeline is going to be some kind of command that outputs the data you want to work with.
In Part 1, we investigated using the Show-Command pane in the ISE to find commands. Using that technique, you can find potentially thousands of sources of your data. Most of the time, the command you will use starts with the verb Get-. This is not surprising because this is the very reason the verb exists. In the Windows PowerShell SDK, the exact description is “Specifies an action that retrieves a resource.” For more information about verb choices, see Approved Verbs for Windows PowerShell Commands.
The following list is completely overwhelming and long, but take a look and appreciate how many Get- commands I see on my laptop (which is still a mere subset of what is possible on a Windows Server operating system with lots of roles and features).
If you made it this far, you deserve to know that there are 342 commands in this listed. I know that was a lot to look at, but I can’t stress enough how much coverage there is now with Windows PowerShell and how many things you can work with by using these commands.
Although this post is about the “getters,” and a majority of the time you are going to start your pipeline with one of these commands, there are also other great ways to start the pipeline.
Pipelines can start with external DOS commands, imports from other file formats (such as CSV and XML), or a variable. The bottom line is that we need some data—some objects from somewhere. Depending on which method you choose can greatly affect how you continue with the pipeline later. Let’s take a look at each of these techniques.
DOS commands
Trusty old external DOS commands seem like they will never die (until they are literally removed from the operating sysem, I suppose). I always think to the common staples like ping.exe or ipconfig.exe. Now we have native Windows PowerShell cmdlets for both of those, but there are still some oldies-but-goodies out there. Think of aging stuff like nbtstat.exe (that is “NetBIOS over TCP statistics” for the old-timers).
When you run these external commands, you get back text. Although technically these lines of text are string objects in Windows PowerShell, they are in fact pretty simple objects that are unstructured. Working with this data in Windows PowerShell is not very easy. Parsing text often follows external commands. Even with the challenges, you can get done what you need to. Native Windows PowerShell commands are nearly always more desirable than external commands, especially when getting data.
Other file formats
Importing data from other file formats is also a neat way to start the pipeline. It’s very common as an IT admin to move data around between systems, and common formats (like CSV) are a great medium to do so.
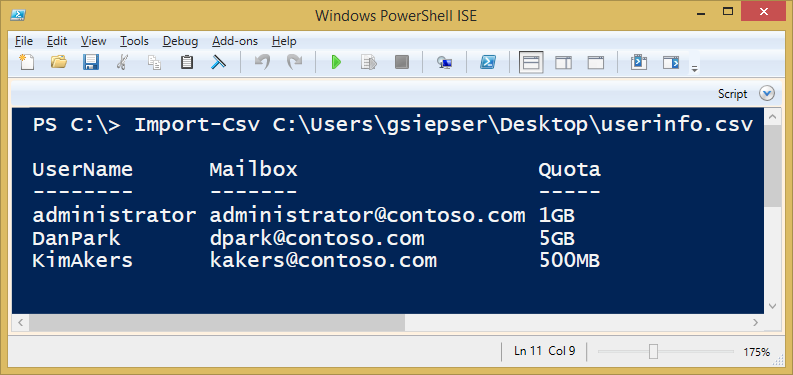
Import-CSV is a cmdlet in Windows PowerShell that does a fantastic job. It’s smart enough to look at the header row to determine what properties each object will get, and then turn each data row into one of those objects. The best part is that those objects (structured data), will travel down the pipeline and be usable for all the manipulation and outputting we want to do later in the pipeline. We’ll cover that in the next two posts in this series.
Import-CSV is shockingly easy to use. Take a look at the data in the following CSV file:
Now take a look at how nicely Import-CSV brings in that data:
It’s that simple. In the next post when we talk about doing things with your data, you’ll see how to sort it. For now, here is an early peek:
You can see how easy it is. For more information, check out the Help file for Import-CSV. CSV is certainly not the only format you can import from, but it’s a good start. Look for other cmdlets that can import data from other formats.
Variables
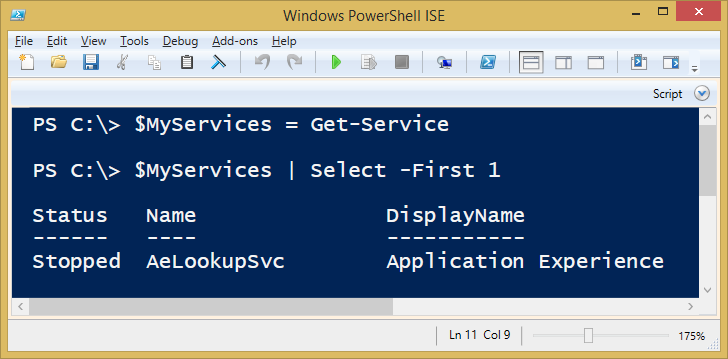
You can also start a pipeline with data you have already stored in a variable. A variable is simply a place to store your stuff. You’ll recognize variables because their name is usually proceeded by a dollar sign (for example, $Services). I don’t want to get deeply into variables, but here is a quick look at a basic way to save something into a variable that you can use to start your pipeline:
In this example, you can see that we stored the results of the Get-Service command into a variable called $MyServices. On the next line, we used this variable to start the pipeline. This really doesn’t end up being any different than using Get-Service to start the pipeline. Where using a variable is great is if I want to use this stored data more than once. I don’t need to get it all again. Why duplicate the effort when I can get it once and use the results over and over again.
By looking at these three techniques, you can see that starting a pipeline is really flexible. Always remember about searching for commands by using the Show-Command pane in the ISE and reading the Help to understand how to use them. In the next two posts, we will look at manipulating your data in the pipeline.
~Gary
Thanks Gary. Join us tomorrow for Part 3 of our Back to the Basics series.
I invite you to follow me on Twitter and Facebook. If you have any questions, send email to me at scripter@microsoft.com, or post your questions on the Official Scripting Guys Forum. See you tomorrow. Until then, peace.
Ed Wilson, Microsoft Scripting Guy


 Light
Light Dark
Dark
0 comments