Summary: In this guest blog post, you will learn how to create a Windows PowerShell parser to parse the XML file generated using ExBPAcmd.exe.
Microsoft Scripting Guy Ed Wilson here. I want to welcome our Guest Blogger Thiyagu again today. Here is a little about Thiyagu:
I am the founder of the Singapore PowerShell User Group. I am an Exchange administrator, and I have been scripting for more than seven years now. Before Windows PowerShell, I did most of my scripting in VBScript. With Windows PowerShell, I automate Exchange/Active Directory tasks, and I am also good at WMI, ADSI, and generating custom reports. I have developed custom applications in C# for automation. I love to automate things! Y
What Is the Best Practices Analyzer?
The Best Practices Analyzer (BPA) is a server management tool that is available in Windows Server 2008 R2. BPA can help administrators reduce best practices violations by scanning one or more roles that are installed on Windows Server 2008 R2, and reporting best practices violations to the administrator. Administrators can filter or exclude results from BPA reports that they don’t need to see. Administrators can also perform BPA tasks by using either the Server Manager GUI, or Windows PowerShell cmdlets.
BPA is part of the Windows Server 2008 R2, and you can run it on most of the roles installed on the server.
The following list includes some of the roles against which you can run BPA:
- Active Directory Domain Services
- Active Directory Certificate Services
- Domain Name System (DNS) Server
- Remote Desktop Services
- Web Server (IIS)
- Active Directory Rights Management Services (AD RMS)
- Application Server
- DHCP
- File Services
- Hyper-V
- Network Policy Server (NPS)
- Windows Server Update Services (WSUS)
You can use the following Windows PowerShell cmdlets to work with the various Best Practices Analyzers:
- Get-BPAModel
- Get-BPAResult
- Invoke-BPAModel
- Set-BPAResult
Read more about BPA cmdlets.
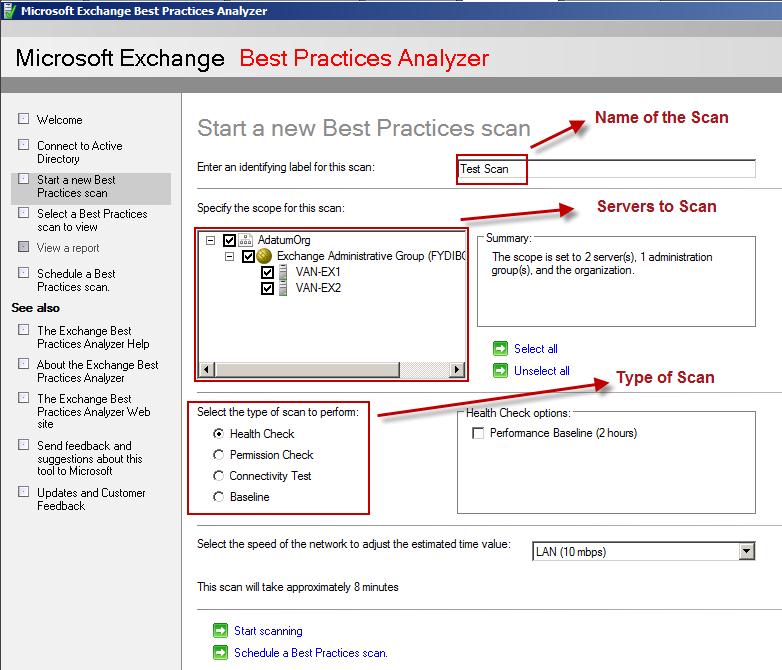
But today’s topic is about the Exchange BPA, and we cannot run those cmdlets against Exchange. Instead, Exchange 2010 has its own ExBPA installed with it. I will explain how you can use Windows PowerShell to automate this. Here is how the GUI looks.
You can use the GUI to scan a given set of servers and specify the type of scan, and this will do all the work for you. But as an Exchange Administrator, you should be doing this on a weekly or monthly basis. So here is how you can do this in an automated way.
In the build, there is an executable that comes with ExBPA called ExBPACmd.exe, which is kind of the command line version of the GUI. Here are some of the important parameters for the ExBPACmd.exe:
-dat   Write the output data to .  The default is
             output.<label>.<timestamp>.xml in the exbpa output directory.

-d   Access the directory using the global catalog server .
             If not given, it will bind to the nearest one.

-r[=][,...]
             Restrict the collection/analysis to include the specified
             restriction. The default is "Health Check".
Here are the valid restriction options:
Scope: Server,AdminGroup,Organization,Domain,ADC Server Role: Mailbox,Gateway,Bridgehead,ClientAccess,UnifiedMessaging,Global,AdminTools,LanguagePacks,UmLanguagePack Task: Health,Perf,Permissions,UserPermissions,ConnectivityTask,BaselineTask,PrecheckInstall,PrecheckUninstall,PrecheckUpgrade,PrecheckDR,Postcheck Level: 1,2,3,4,5 Category: General,Performance,Security,EndUserPermissions,Connectivity,Baseline, CustomBaseline,Prereqs
Here is a sample command:
ExBPACmd.exe -dat test.xml -r “Health,5,Server=Van-EX1”
The preceding command will start an ExBPA scan type of health and level 5 and on server “Van-Ex1”; it will output the data to test.xml. You can put this command in your little script and call the program from within Windows PowerShell. You should then finally end up having the XML file. Now the fun stuff starts.
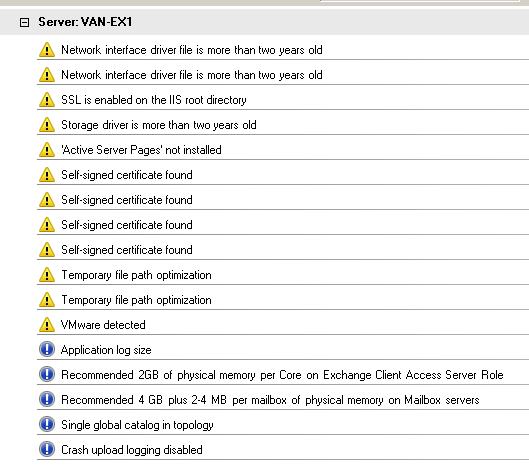
Here is what the XML looks like when you view it using ExBPA.
Each of these entries is present in the XML file and we have to get them out. Here is a sample of one of those items from the XML piece:
<Message Name="fDiskDriverAgeWarning"
Query="get-days(date-difference($dCurrentDateTime/Result, (date-parse(substring(($_/../Value | $_/../Instance),1,8), 'yyyyMMdd')))) >730"
Error="Warning"
Title="Storage driver is more than two years old"
Text="Storage driver file '{5}' for '{1}' on server {2} is more than two years old. Check with your vendor to find out if a newer version is available. Installed driver details: {6} - {8}"
P1="LSI Adapter, SAS 3000 series, 8-port with 1068"
P2="VAN-EX1.Adatum.com"
P5="c:\windows\system32\drivers\lsi_sas.sys"
P6="1.28.3.52" P8="20090714094804.350065+480"
EventID="2408" Pass="True">
Storage driver file 'c:\windows\system32\drivers\lsi_sas.sys' for 'LSI Adapter, SAS 3000 series, 8-port with 1068' on server VAN-EX1.Adatum.com is more than two years old. Check with your vendor to find out if a newer version is available. Installed driver details: 1.28.3.52 - 20090714094804.350065+480
</Message>
I just formatted the XML code so that it is more readable. Notice that there are different attributes for the Message node. Here are the ones on which we will focus:
- Error
- Title
- Text
- P2
- P3
- InnerText
It is so easy to parse XML with Windows PowerShell, and within two lines, you can get what you need:
$xmlFile = [xml](Get-Content test.xml) $parseddata = $xmlFile.SelectNodes(“ObjectCollector/Message”)
The first line gets the content of the test.xml file and turns it into XML. You can see this with Get-Member.
On the next line, I use a method of the System.Xml.XmlDocument called SelectNodes. You can read more about this method. The idea is that you can pass an XPath Expression, which is a way of narrowing down what you want out of the XML file. In this case, I am passing the string, ObjectCollector//Message. The first two lines of the XML are shown in the following figure.
The root node is called ObjectCollector, so the first of the string is saying start the search from the root. The // means give me all the nodes from ObjectCollector onward, which are called Message. What we get out of the next line of code is a collection of XML elements. See the image below for details of the XMLElement object.
Each of the elements has an attribute called Error, and they have six possible options:
- Error
- Warning
- None (which means Information)
- NonDefault
- Baseline
- BestPractice
You can pipe the data to Where-Object and filter on the desired output. The following command returns only warning messages:
$parseddata | Where-Object {$_.Error -eq “Warning”}
With this in mind, I created an advanced function that accepts two input parameters: InputFileName and InformationType. The function returns the matching XML element objects out to the pipeline. You pipe the output from the advanced function to the ConvertTo-HTML cmdlet and then use the Send-Mailmessage cmdlet has a report sent to your mailbox.
Add a scheduled task to do this periodically and you are good to go. No need to manually run the GUI again for this:
.\Parse-XML.ps1 -InputFileName .\ExBPA.xml | ConvertTo-Html | Out-File “ExBPAReport.HTML”
Download the complete script from the Script Center Script Repository.
Thank you, Thiyagu, for once again sharing your knowledge. I love the way that you wrap up with your function and suggestion for creating a scheduled task to generate a report. Cool.
See you tomorrow. Until then, peace.
Ed Wilson, Microsoft Scripting Guy


0 comments