Summary: Microsoft Scripting Guy, Ed Wilson, shows how to use Windows PowerShell 3.0 to find enabled Windows 8 features.
Microsoft Scripting Guy, Ed Wilson, is here. One of the neat things about Windows (does not matter the version) is how I can customize the installation or deployment. In fact, nearly every version of Windows I have ever worked with has had very sophisticated deployment tools. For the majority of my needs, they are a bit too sophisticated.
All I would like to do is add or remove features from a client operating system in an easy-to-use manner. In the past, I used a tool called sysocmgr. I wrote a number of rather complicated VBScript scripts to automate the use of sysocmgr. It worked, and it was the tool that I had to use to get the job done. A few years ago, Microsoft introduced DISM. This powerful tool permits easy manipulation of images. Cool.
Use the DISM cmdlets to determine enabled features
In Windows 8 with Windows PowerShell 3.0, there are a number of cmdlets supplied as part of the DISM module. These cmdlets are listed in the following table along with a synopsis of their functionality.
|
Name |
Function |
|
Add-AppxProvisionedPackage |
Adds an AppX package that will install for each new user to a Windows image. |
|
Use-WindowsUnattend |
Applies an unattended answer file to a Windows image. |
|
Get-AppxProvisionedPackage |
Gets information about AppX packages in an image that will be installed for each new user. |
|
Remove-AppxProvisionedPackage |
Removes an AppX packages from a Windows image. |
|
Add-AppxProvisionedPackage |
Adds an AppX package that will install for each new user to a Windows image. |
|
Add-WindowsDriver |
Adds a driver to an offline Windows image. |
|
Add-WindowsPackage |
Adds a single .cab or .msu file to a Windows image. |
|
Clear-WindowsCorruptMountPoint |
Deletes all of the resources associated with a mounted image that has been corrupted. |
|
Disable-WindowsOptionalFeature |
Disables a feature in a Windows image. |
|
Dismount-WindowsImage |
Dismounts a Windows image from the directory it is mapped to. |
|
Enable-WindowsOptionalFeature |
Enables a feature in a Windows image. |
|
Get-AppxProvisionedPackage |
Gets information about AppX packages in an image that will be installed for each new user. |
|
Get-WindowsDriver |
Displays information about drivers in a Windows image. |
|
Get-WindowsEdition |
Gets edition information about a Windows image. |
|
Get-WindowsImage |
Gets information about a Windows image in a .wim or .vhd file. |
|
Get-WindowsOptionalFeature |
Gets information about optional features in a Windows image. |
|
Get-WindowsPackage |
Gets information about packages in a Windows image. |
|
Mount-WindowsImage |
Mounts a Windows image in a .wim or .vhd file to a directory on the local computer. |
|
Remove-AppxProvisionedPackage |
Removes an AppX packages from a Windows image. |
|
Remove-WindowsDriver |
Removes a driver from an offline Windows image. |
|
Remove-WindowsPackage |
Removes a package from a Windows image. |
|
Repair-WindowsImage |
Repairs a Windows image in a .wim or .vhd file. |
|
Save-WindowsImage |
Applies changes made to a mounted image to its .wim or .vhd file. |
|
Set-WindowsEdition |
Changes a Windows image to a higher edition. |
|
Set-WindowsProductKey |
Sets the product key for the Windows image. |
|
Use-WindowsUnattend |
Applies an unattended answer file to a Windows image. |
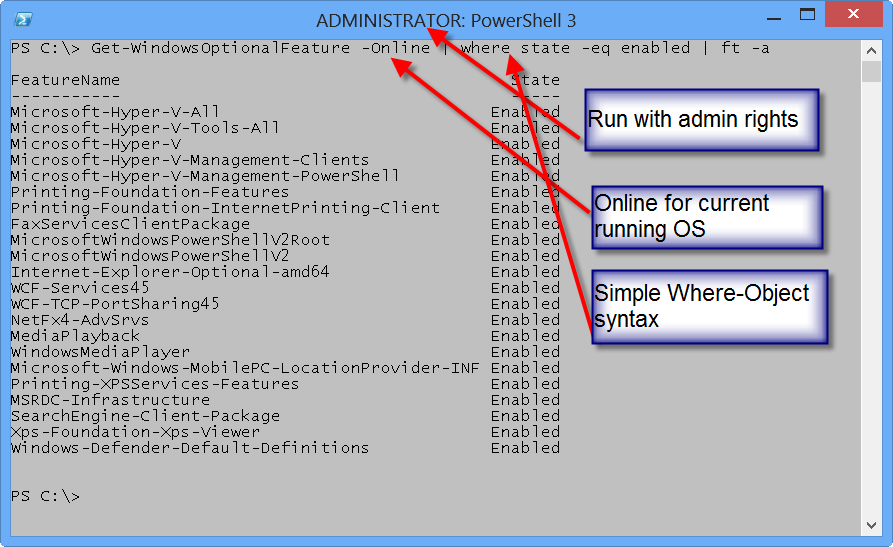
Note The Get-WindowsOptionalFeature cmdlet must run with elevated rights. Right-click the Windows PowerShell 3.0 console while holding the CTRL key, and select Run As Administrator from the action menu.
The Get-WindowsOptionalFeature cmdlet reveals information about the status of the optional Windows features. The trick, unless you really are manipulating a Windows image, is to use the online switch. When used, the online switch tells the Get-WindowsOptionalFeature cmdlet to return the status of the current installation. The syntax for this command is shown here.
Get-WindowsOptionalFeature –Online
By default, the Get-WindowsOptionalFeature returns about all information about all features—enabled, disabled, or otherwise. To return only enabled features, use the Where-Object to filter on the state property. The default display of information is a list that makes the information cumbersome to read. I like to pipe results to Format-Table and use the autosize parameter to create a nice, tight display. This technique is shown here (ft is an alias for Format-Table and –a is the partial parameter for autosize).
Get-WindowsOptionalFeature -Online | where state -eq enabled | ft –a
The command and output associated with the command are shown in the image that follows.
The command works against remote computers in addition to local ones by using Windows PowerShell remoting. I use the same technique that I have used in the past.
First, I import the Active Directory module. (This module does not exist unless the RSAT tools are installed on the local computer, or unless you use implicit remoting to bring them from a remote server.) Next, I use the Get-ADComputer cmdlet to find all of the Windows 8 computers, and then I use the Invoke-Command cmdlet to use the Get-WindowsOptionalFeature cmdlet to find the enabled optional features. This bit of code is shown here.
Get-EnabledWindowsOptionalFeatures.ps1
Import-Module activedirectory
$c = Get-ADComputer -Filter * -Properties operatingsystem |
where operatingsystem -match 8
Invoke-Command -cn $c.name -SCRIPT {
Get-WindowsOptionalFeature -Online |
Where-Object state -eq enabled
}
Join me tomorrow when I will talk about more cool things you can do with Windows PowerShell.
I invite you to follow me on Twitter and Facebook. If you have any questions, send email to me at scripter@microsoft.com, or post your questions on the Official Scripting Guys Forum. See you tomorrow. Until then, peace.
Ed Wilson, Microsoft Scripting Guy


0 comments