Summary: Microsoft Scripting Guy Ed Wilson shows how to use Windows PowerShell to translate a user’s SID to an Active Directory Domain Services account name.
![]() Hey, Scripting Guy! It seems that whenever I search for Windows PowerShell scripts to translate a user name into a SID, all I can find is a script that uses WMI. WMI is too slow for our network. Is there a better way to do this?
Hey, Scripting Guy! It seems that whenever I search for Windows PowerShell scripts to translate a user name into a SID, all I can find is a script that uses WMI. WMI is too slow for our network. Is there a better way to do this?
— KW
![]() Hello KW,
Hello KW,
Microsoft Scripting Guy Ed Wilson here. You can easily use the .NET Framework classes in a Windows PowerShell script to translate a user name to a security identifier (SID). In addition, you can use a .NET Framework class to translate a SID to a user name, or you can simply take the SID and use LDAP to retrieve the user name. I will talk about all these techniques in today’s article. I created the UserToSid-SidToUser.ps1 script to illustrate these techniques. The complete script is shown here.
UserToSid-SidToUser.ps1
<#
.Synopsis
Translates a user name to a SID or a SID to a user name.
.Description
This script translates a user name to a SID or a SID to a user name.
Note: To translate the user name to the SID, you must
use the logon name (SAMAccountName), and not the full user name.
.Example
UserToSid.ps1 -user “mytestuser”
Displays SID of mytestuser in current domain
.Example
UserToSid.ps1 -sid “S-1-5-21-1877799863-120120469-1066862428-500”
Displays user with SID of “S-1-5-21-1877799863-120120469-1066862428-500”
.Inputs
[string]
.OutPuts
[string]
.Notes
NAME: UserToSid-SidToUser.ps1
AUTHOR: Ed Wilson
LASTEDIT: 10/05/2010
VERSION: 2.0
KEYWORDS: Active Directory, user accounts, Security.Principal.SecurityIdentifier
.Link
Http://www.ScriptingGuys.com
#Requires -Version 2.0
#>
param(
[string]
$domain = $env:USERDOMAIN,
[string]
$user,
[string]
$sid
) #end param# Begin Functions
function New-Underline
{
<#
.Synopsis
Creates an underline the length of the input string
.Example
New-Underline -strIN “Hello world”
.Example
New-Underline -strIn “Morgen welt” -char “-” -sColor “blue” -uColor “yellow”
.Example
“this is a string” | New-Underline
.Notes
NAME:
AUTHOR: Ed Wilson
LASTEDIT: 5/20/2009
VERSION: 2.0
KEYWORDS: scripting techniques, string manipulation
.Link
Http://www.ScriptingGuys.com
#>
[CmdletBinding()]
param(
[Parameter(Mandatory = $true,Position = 0,valueFromPipeline=$true)]
[string]
$strIN,
[string]
$char = “=”,
[string]
$sColor = “Green”,
[string]
$uColor = “darkGreen”,
[switch]
$pipe
) #end param
$strLine= $char * $strIn.length
if(-not $pipe)
{
Write-Host -ForegroundColor $sColor $strIN
Write-Host -ForegroundColor $uColor $strLine
}
Else
{
$strIn
$strLine
}
} #end New-Underline functionFunction Get-UserToSid()
{
$ntAccount = new-object System.Security.Principal.NTAccount($domain, $user)
$sid = $ntAccount.Translate([System.Security.Principal.SecurityIdentifier])
New-UnderLine(“$domain/$user sid is:”)
($local:sid).value
exit
} #end UserToSidFunction Get-SidToUser()
{
New-Underline(“Obtaining SID translation … this might take a bit of time …”)
New-UnderLine(“Sid: $sid is:”)
[adsi]”LDAP://<SID=$sid>”
exit
} #end sidToUser# *** Entry point to script ***
if($sid) { Get-SidToUser }
if($user) { Get-UserToSid }
The UserToSid-SidToUser.ps1 script begins with a comment block. This block uses comment-based help to provide two things to our script. It contains the normal header we would put in a comment block at the top of our script. This includes the author of the script, the name of the script, when the script was written, notes about any special features, what the script uses, and special requirements. These are the sort of things you would want to include for any script you wrote, whether the language is batch, VBScript, Perl, Rexx, Jscript, or Windows PowerShell. In Windows PowerShell 1.0, if you wanted to make a multiline comment, you had to place a number character (#) at the beginning of each line. I still do this when I want my comments to stand out. A better way to do this, however, in Windows PowerShell 2.0 is to use the multiline comment characters.
I talked about adding help to a Windows PowerShell script the week of January 4, 2010:
- How Can I Add Help to a Windows PowerShell Script?
- How Can I Add Multiline Comments to My Windows PowerShell Scripts?
- What Should I Include in the Windows PowerShell Script Help?
- How Do I Add Help Information for Windows PowerShell Parameters?
I added the comment block at the beginning of this script by using the technique outlined in the Weekend Scripter article, Automatically Add Comment-Based Help to Your PowerShell Scripts.
The header portion of our script is, therefore, contained in a multiline comment block. This comment block is shown here:
<#
.Synopsis
Translates a user name to a SID or a SID to a user name.
.Description
This script translates a user name to a SID or a SID to a user name.
Note: To translate the user name to the SID, you must
use the logon name (SAMAccountName), and not the full user name.
.Example
UserToSid.ps1 -user “mytestuser”
Displays SID of mytestuser in current domain
.Example
UserToSid.ps1 -sid “S-1-5-21-1877799863-120120469-1066862428-500”
Displays user with SID of “S-1-5-21-1877799863-120120469-1066862428-500”
.Inputs
[string]
.OutPuts
[string]
.Notes
NAME: UserToSid-SidToUser.ps1
AUTHOR: Ed Wilson
LASTEDIT: 10/05/2010
VERSION: 2.0
KEYWORDS: Active Directory, user accounts, Security.Principal.SecurityIdentifier
.Link
Http://www.ScriptingGuys.com
#Requires -Version 2.0
#>
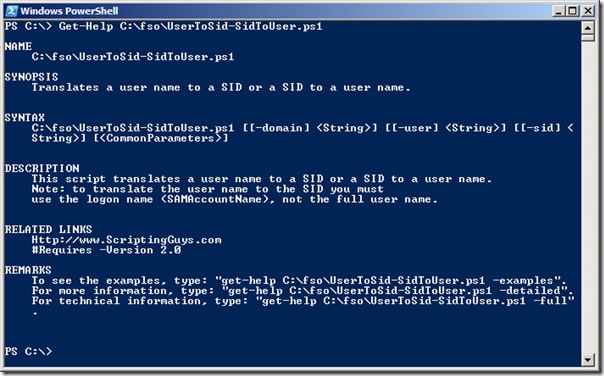
Because I followed the rules for adding comment-based help, the header serves two purposes: It documents the script, and allows me to get help directly from the command line. This means I do not have to open the script in the Windows PowerShell ISE or some other script editor just to see what the script does. This is shown in the following image.
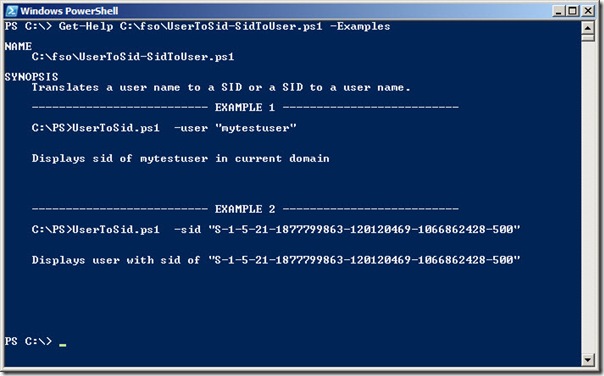
The cool thing is that when using comment-based help, it completely integrates with the Windows PowerShell help system via the Get-Help cmdlet. This means that if I only want to see a sample of the syntax, I use Get-Help c:\fso\UserToSid-SidToUser.ps1 –Examples. This is shown in the following image.
Please do not think that a command such as Get-Help c:\fso\UserToSid-SidToUser.ps1 –Examples is too much typing. I use tab completion to type those type of things. Here is what I actually typed (keep in mind that <tab> is pressing the tab key, not actually typing left angle bracket t a b and right angle bracket).
get-h <tab> c:\f <tab> usert <tab> -e <tab>
When typing a command from the Windows PowerShell command line, all you have to type is enough of the command to distinguish it from other commands. If you are not sure how much that is, and you type a command and press Tab, and if the command that appears is not what you want, press Tab again. It means that there were several commands that would match. For example, if you were to type only the letter g and press Tab, eventually you would get to the command you want to run. The advantage of this is that most Windows PowerShell commands are readable. If you find yourself typing a command over and over, and the use of Tab completion is still too much for you, you can create an alias to the command. The cool thing is that you can also create functions, and then create an alias for your functions.
By creating custom functions and custom aliases, and perhaps storing your aliases in your Windows PowerShell profile, you can make Windows PowerShell work the way you want it to. I have written more than a dozen Hey, Scripting Guy! Blog posts that talk about working with the Windows PowerShell profile. You can use this search string to get started reviewing my articles about using the Windows PowerShell profile. In How Can I Create a Custom Function?, I talk about modifying the behavior of an existing Windows PowerShell cmdlet and then creating a custom alias for it.
The script creates three parameters. One parameter, $domain, pulls the user’s domain information from the environment variables. If you wish to query a different domain, you will need to supply a different value when calling the script. The other two parameters, $sid and $user, take effect only when they are present:
param(
[string]
$domain = $env:USERDOMAIN,
[string]
$user,
[string]
$sid
) #end param
This script does not accept an array of users for input, and it will generate the error seen here if you attempt to supply an array of users to it:
PS C:\> $a = “ed”,”teresa”
PS C:\> C:\fso\UserToSid-SidToUser.ps1 -user $a
Exception calling “Translate” with “1” argument(s): “Some or all identity references
could not be translated.”
At C:\fso\UserToSid-SidToUser.ps1:89 char:30
+ $sid = $ntAccount.Translate <<<< ([System.Security.Principal.SecurityIdentifier]
)
+ CategoryInfo : NotSpecified: (:) [], MethodInvocationException
+ FullyQualifiedErrorId : DotNetMethodException
On the other hand, if you use the pipeline and the ForEach-Object cmdlet (with the alias, %), you can easily work around this limitation. This is illustrated here:
PS C:\> $a = “ed”,”teresa”
PS C:\> $a | % { C:\fso\UserToSid-SidToUser.ps1 -user $_ }
NWTRADERS/ed sid is:
====================
S-1-5-21-3746122405-834892460-3960030898-1115
NWTRADERS/teresa sid is:
========================
S-1-5-21-3746122405-834892460-3960030898-1207
PS C:\>
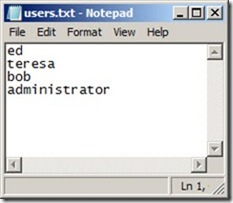
Because you can supply an array of user names via the pipeline, it means that the Get-Content cmdlet can be used to read a text file, such as the users.txt file shown in the following image.
PS C:\> $a = Get-Content C:\fso\users.txt
PS C:\> $a | % { C:\fso\UserToSid-SidToUser.ps1 -user $_ }
NWTRADERS/ed SID is:
====================
S-1-5-21-3746122405-834892460-3960030898-1115
NWTRADERS/teresa SID is:
========================
S-1-5-21-3746122405-834892460-3960030898-1207
NWTRADERS/bob SID is:
=====================
S-1-5-21-3746122405-834892460-3960030898-3601
NWTRADERS/administrator SID is:
===============================
S-1-5-21-3746122405-834892460-3960030898-500
PS C:\>
I use the System.Security.Principal.NTAccount .NET Framework class to perform the translation to SID. The NTAccount class resides in the System.Security.Principal .NET Framework namespace. When calling the translate method from the NTAccount class,I tell it that I want to translate the account name to a security identifier by specifying the System.Security.Principal.SecurityIdentifier class as type to translate. This is shown here:
Function Get-UserToSid()
{
$ntAccount = new-object System.Security.Principal.NTAccount($domain, $user)
$sid = $ntAccount.Translate([System.Security.Principal.SecurityIdentifier])
New-UnderLine(“$domain/$user sid is:”)
($local:sid).value
exit
} #end UserToSid
I could use the SecurityIdentifier .NET Framework class to translate from SID to user name. If I did, the code would look something like the following:
Function Sid-toUser
{
$sidString = “S-1-5-21-3746122405-834892460-3960030898-500”
$sid = new-object System.Security.Principal.SecurityIdentifier($sidString)
$user = $sid.Translate([System.Security.Principal.NTAccount])
$user.value
}
I decided to not do this, but rather to perform a direct LDAP call instead. The advantage of this is that it returns a DirectoryEntry class that can be easily used to perform user manipulation. The SidtoUser function shown above (in addition to not possessing a proper Windows PowerShell function name) only returns a string, and would therefore require additional processing to return a DirectoryEntry object.
The Get-SidToUser function, shown here, relies on the fact that the LDAP can return an object based upon its SID. This technique could be used via VBScript as well, because it is basic LDAP stuff. The Get-SidToUser function is shown here:
Function Get-SidToUser()
{
New-Underline(“Obtaining SID translation … this might take a bit of time …”)
New-UnderLine(“Sid: $sid is:”)
[adsi]”LDAP://<SID=$sid>”
exit
} #end get-sidToUser
KW, that is all there is to translating a user account name to a SID, and converting a SID back to a user account name. Active Directory Week will continue tomorrow.
We invite you to follow us on Twitter and Facebook. If you have any questions, send email to us at scripter@microsoft.com, or post your questions on the Official Scripting Guys Forum. See you tomorrow. Until then, peace.
Ed Wilson and Craig Liebendorfer, Scripting Guys


0 comments