Summary: Use Windows PowerShell to document your Exchange Server 2003 environment before you upgrade to a newer version of Exchange Server.
![]() Hey, Scripting Guy! How can I use Windows PowerShell to help me prepare for a Microsoft Exchange Server migration?
Hey, Scripting Guy! How can I use Windows PowerShell to help me prepare for a Microsoft Exchange Server migration?
—BN
![]() Hello BN, Microsoft Scripting Guy, Ed Wilson, here.
Hello BN, Microsoft Scripting Guy, Ed Wilson, here.
Today we will take a break from WMI, and answer your question. In addition, we will invite a guest blogger to answer you.
Nicolas Blank is our guest blogger today. Nicolas has over 14 years working on various versions of Exchange Server. He is a messaging architect, and he specializes in consulting and building on premise- and cloud-based Exchange Server messaging systems and the interoperations with various vendor ecosystems. Nicolas currently holds the status of Microsoft Certified Master (MCM) for Exchange Server 2010, and he has been a Microsoft Most Valuable Professional (MVP) for Exchange Server since March 2007. Nicolas writes regularly about Exchange Server and messaging topics, and he maintains a technology-based blog at blankmanblog.com. He also provides content for the IT Pro Africa itproafrica.com project, which is a project to assist in uplifting African-based IT Pros. With that, we will turn the keyboard over to Nicolas…
Understanding your environment before a migration is critical, three of the factors that can dramatically affect the speed and complexity of moving mailboxes are the location, size, and the number of items in the mailbox.
Exchange Server 2007 gave us an incredibly luxurious reporting environment, starting with Get-ExchangeServer, Get-Mailbox, and Get-MailBoxStatistics. In my mind, these are the basic tenants of understanding a mailbox environment.
Let’s move back to Exchange Server 2003 or even Exchange Server 2000—yup! Exchange Server 2000. Both had rich Exchange reporting information built in; however, this information did not surface as easily as the access that we have to report data in Windows PowerShell today. So let’s go back in time to Exchange Server 2000 and see what options are available…
WMI was one of the information providers for instrumentation information for Exchange Server 2000 and Exchange Server 2003. However, it was clunky, exacting, and difficult to use for the basic VBScript scripter. When Windows PowerShell came along, the use of the Get-WMIObject cmdlet made life much easier because it silently absorbed most of the error handling, authentication, and reporting parts of WMI. Let’s have a look at how we can use the Get-WMIObject cmdlet to browse the Exchange Server 2000 WMI stack, and get an idea of what is available. The following command will show us the WMI objects that are available to interrogate.
Get-WMIObject -list -Namespace “root\cimv2\applications\exchange” –Computername red-mbx-2003
There’s no typo in the command line. I’m running this command against an Exchange Server 2003 server, which shipped with the same Exchange Server 2000 WMI namespace provider. Note that if I need to authenticate, I can do so by using the Credential parameter.
The output of this command quickly scrolls off our screens; however, the juicy bits we’re looking for are at the bottom as shown here.
If only there was a way to understand the objects that are contained in this WMI object. Funny you should ask that, because Windows PowerShell has another built-in method to do exactly that: Get-Member.
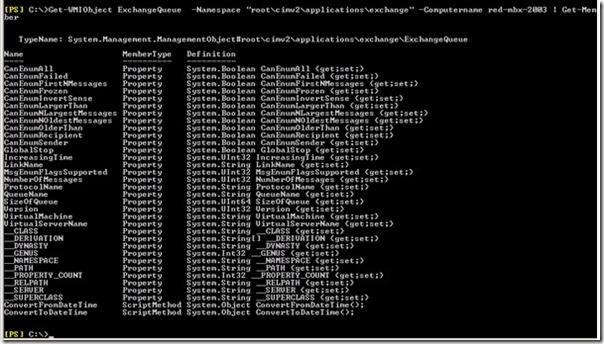
With the following code, we are going choose one of the WMIObjects, specifically the ExchangeQueue object, and append Get-Member to our slightly modified previous command via a pipe.
Get-WMIObject ExchangeQueue -Namespace “root\cimv2\applications\exchange” –Computername red-mbx-2003 | Get-Member
The output from this command is shown here.
We can see a number of interesting properties for this object, which will give us a decent idea about what is contained in the Exchange Server 2000 queue engine.
Windows PowerShell is able to convert content on the fly to a required type. The next command will extract a number of useful properties and display them in a nicely formatted table.
Get-WMIObject –Class ExchangeQueue -Namespace “root\cimv2\applications\exchange” | Format-Table VirtualMachine, LinkName, QueueName, NumberofMessages
Notice that the Class parameter is a positional parameter—the first parameter in the list. This means that I can rewrite the previous command and skip the Class parameter. The revised command is shown here.
Get-WMIObject ExchangeQueue -Namespace “root\cimv2\applications\exchange” –ComputerName red-mbx-2003| Format-Table VirtualMachine, LinkName, QueueName, NumberofMessages
The output from this command is shown here.
The original aim of this article was to show how Windows PowerShell allows us to understand our legacy Exchange Server environment. So far, we have been able to browse the Exchange Server 2000 WMI name space, which is handy. Some objects, such as ExchangeQueue and ExchangeServerState, are quite interesting, but neither of them nor any of the other included objects yield any usable mailbox information.
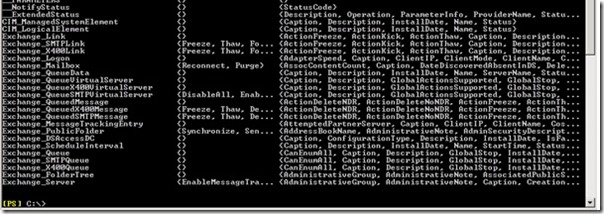
Exchange Server 2003 shipped with an upgraded WMI provider. You may have guessed its name: Version 2. Once again, we are going to start by listing the available objects in the namespace with the command shown here.
Get-WMIObject -list -Namespace “root\microsoftexchangev2” –ComputerName Red-MBX-2003
Again, you will notice that the interesting bits are toward the bottom of our output, as seen in the following image.
If you are trying the commands as you read along with this blog, you may have noticed that the WMI provider returns every Exchange Server, irrespective of the version. In my environment, I have 2003, 2007, and 2010 servers. The following command returns the Exchange_Server object information for every server in the organization.
Get-WMIObject Exchange_Server -Namespace “root\microsoftexchangev2” –ComputerName Red-MBX-2003
I can write this same command in a number of different ways—but first I need to figure out what the object contains. The easiest way to do that is to run the command and look at the returned results, or to pipe it to the Get-Member cmdlet. If I pipe it to the Get-Member cmdlet, the object returns without returning any data.
Because I have run this command previously, I decide to filter the result of the query by name. This technique is shown here.
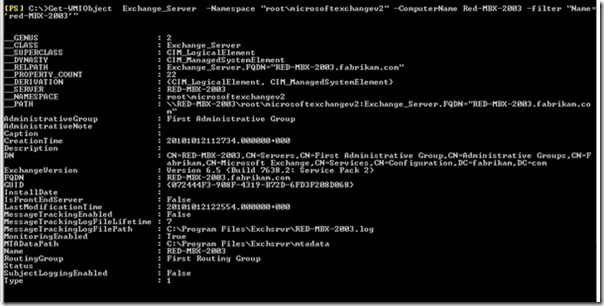
Get-WMIObject Exchange_Server -Namespace “root\microsoftexchangev2” -ComputerName Red-MBX-2003 -Filter “Name=’red-MBX-2003′”
I can accomplish the same task by using the WMI Query Language (WQL) syntax as shown here.
Get-WMIObject -Query “Select * from Exchange_Server where Name=’red-MBX-2003’” -Namespace “root\microsoftexchangev2” -ComputerName Red-MBX-2003
Either of these approaches gives us the same result, but it also demonstrates that if you have invested time in writing WQL queries, you can reuse them easily. (See the Scripting Guys blog How do I Migrate My VBScript WMI Queries to Windows PowerShell for more details about this technique.) The results from the previous query are shown in the following image.
Again, we get a fair amount of data back, and you will notice that one of the returned attributes is ExchangeVersion, so I will rewrite the query to return only Exchange Server 2003 SP2 servers. The revised code is shown here.
Get-WMIObject Exchange_Server -Namespace “root\microsoftexchangev2” -ComputerName Red-MBX-2003 -filter “ExchangeVersion=’Version 6.5 (Build 7638.2: Service Pack 2)'”
Notice that one of the fields that returns tells us if this is an Exchange Server 2003 front-end or back-end server. To me, this is one of the critical fields, just like the name, administration, and routing groups. Let us construct a command to output this information into a table. This command is shown here.
Get-WMIObject Exchange_Server -Namespace “root\microsoftexchangev2” -ComputerName Red-MBX-2003 | Select Name, AdministrativeGroup, RoutingGroup, ExchangeVersion, IsFrontEndServer| Format-Table -AutoSize
The output of the previous command looks rather useful, and I may want to filter the result in Excel as opposed to filtering it in a WMI Query. To do this, I export the report to a CSV file. I use the following command to accomplish this task.
Get-WMIObject Exchange_Server -Namespace “root\microsoftexchangev2” -ComputerName Red-MBX-2003 | Select Name, AdministrativeGroup, RoutingGroup, ExchangeVersion, IsFrontEndServer| Export-Csv C:\Reports\All_Servers.csv
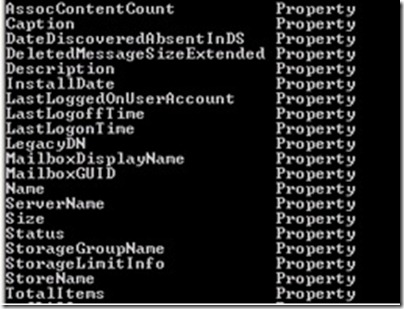
Let us apply the same principles to the Exchange_Mailbox object and expose the object attributes by using the following command.
Get-WMIObject Exchange_Mailbox -Namespace “root\microsoftexchangev2” –Computername red-mbx-2003 | Get-Member
The output allows us to choose what fields are valuable to our report. This is shown in the following image.
By using the same principles as in the Exchange_Server object, we’re able to construct our command as follows.
Get-WMIObject Exchange_Mailbox -Namespace “root\microsoftexchangev2” –Computername red-mbx-2003 | Select MailboxDisplayName, ServerName, Size, TotalItems, StorageGroupName, StoreName, LastLoggedOnUserAccount, LastLogoffTime, LastLogonTime | Export-CSV C:\Reports\All_Mailboxes.csv
For performance reasons, you may want to run this query close to the server in question in network terms. In this case, you would add a filter to make sure that no mailboxes on other servers are reported. This is shown in the following command.
Get-WMIObject Exchange_Mailbox -Namespace “root\microsoftexchangev2” –Computername red-mbx-2003 -Filter “ServerName=’red-MBX-2003′” | Select MailboxDisplayName, ServerName, Size, TotalItems, StorageGroupName, StoreName, LastLoggedOnUserAccount, LastLogoffTime, LastLogonTime | Export-CSV C:\Reports\All_Mailboxes.csv
The output from this command appears in the following image.
You may have noticed that the filter parameter changed from Name to ServerName from one object to the next. How could you possibly know this? Interrogating the object by using Get-Member is the quickest method. However, if you would like to know what every data type is, what it does, and how to interpret it, you may want to look at the MSDN site, Exchange_Mailbox Class.
Mailboxes and item counts are not the only useful objects in the microsoftexchangev2 namespace. You’ll be able to document most, if not all of your migration requirements with the following objects:
• Exchange_Link
• Exchange_SMTPLink
• Exchange_Logon
• Exchange_Mailbox
• Exchange_PublicFolder
• Exchange_Server
Remember to run each of these objects through the Get-Member cmdlet, or examine the data that is returned through the command to get an idea about what each object returns and what filters you may want to use to build customized script solutions for your own environment.
BN, that is all there is to using Windows PowerShell and WMI to return configuration information prior to a Microsoft Exchange Server migration. Thank you, Nicolas. Join us tomorrow when we will have guest blogger, Glenn Sizemore, with his answer to a regular expressions question.
I invite you to follow me on Twitter and Facebook. If you have any questions, send email to me at scripter@microsoft.com, or post your questions on the Official Scripting Guys Forum. See you tomorrow. Until then, peace.
Ed Wilson, Microsoft Scripting Guy


0 comments