Summary: In this guest blog article written by Microsoft MVP, Jan Egil Ring, you will learn how to use Exchange Web Services (EWS) with Windows PowerShell.
Microsoft Scripting Guy, Ed Wilson, is here. Today, we begin Guest Blogger Weekend. We are really fortunate today to have a great blog post by Microsoft Windows PowerShell MVP, Jan Egil Ring. Here is what Jan says about himself.
Jan Egil Ring works as a Senior Consultant on the Infrastructure Team at Crayon, Norway. He mainly works with Microsoft server-products, and has a strong passion for Windows PowerShell. In addition to being a consultant, he is a Microsoft Certified Trainer. He has obtained several certifications such as MCITP: Enterprise Administrator and MCITP: Enterprise Messaging Administrator. In January 2011, he was awarded the Microsoft Most Valuable Professional Award for his contributions in the Windows PowerShell technical community.
Contact information:
Website: blog.powerhell.no
Twitter: https://twitter.com/janegilring
LinkedIn: Jan Egil Ring
Without further ado, take it away Jan…
With the release of Microsoft Exchange Server 2007, we were introduced to Exchange Web Services (EWS), which is continued and further improved in Exchange Server 2010. EWS provides the functionality to enable client applications to communicate with the Exchange Server. It provides access to much of the same data that is made available through Microsoft Office Outlook. EWS clients can integrate Outlook data into line-of-business applications.
Exchange Web Services provides the following types of operations:
- Availability
- Bulk Transfer (new in Exchange 2010)
- Conversations (new in Exchange 2010)
- Delegate Management
- Exchange Store Search
- Exchange Search (new in Exchange 2010)
- Federated Sharing (new in Exchange 2010)
- Folder
- Inbox Rules (new in Exchange 2010)
- Item
- Mail Tips (new in Exchange 2010)
- Messaging Records Management
- Message Tracking (new in Exchange 2010)
- Notification
- Service Configuration (new in Exchange 2010)
- Synchronization
- Unified Messaging (new in Exchange 2010)
- User Configuration (new in Exchange 2010)
- Utility
For more information about these features, see Exchange Web Services on MSDN.
Exchange Web Services and Windows PowerShell
As stated earlier, EWS can integrate into line-of-business applications, which typically means that working with EWS is a developer task. However, Exchange administrators without any developer background can also leverage EWS by using Windows PowerShell.
The following example demonstrates how I needed to leverage EWS to perform a specific task.
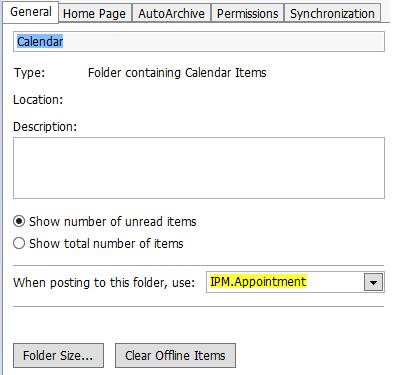
A customer that was migrating from Exchange Server 2003 to Exchange Server 2010 had previously used a non-Microsoft application for room bookings in Exchange. This application required them to change the default IPM.Appointment form in all mailboxes. In practice, this means that the option in the calendar folders was changed from IPM.Appointment to the name of the non-Microsoft application in the field shown here:
The functionality that was provided by the non-Microsoft application was now integrated into Exchange Server 2010 and Outlook 2010, so they decided to remove the non-Microsoft application. The problem is that the custom form wasn`t automatically removed from the mailboxes, and there isn’t any way to change this option by using the standard Exchange management tools.
However, the property that we need to change can be changed by using EWS. The first thing to do before leveraging EWS from Windows PowerShell is to download and install the Exchange Web Services Managed API. Then the DLL that is available after the Exchange Web Services Managed API is installed can be imported into Windows PowerShell 2.0 by using Import-Module, as shown here:
Import-Module -Name “C:\Program Files\Microsoft\Exchange\Web Services\1.1\Microsoft.Exchange.WebServices.dll”
When the DLL is loaded, we have access to the Microsoft.Exchange.WebServices.Data.ExchangeService namespace, which we can use to create an ExchangeService object to connect to EWS. We use New-Object to set up an instance (object) in the namespace. We then specify the credentials to use. In the following example, we use the credentials of the currently logged on Windows user. We could also use alternate credentials, which is demonstrated in the full example at the end of this post. Finally, we set the Autodiscover URL that the service will use to locate the EWS endpoints that are configured in Exchange. This is shown here:
$exchService = New-Object Microsoft.Exchange.WebServices.Data.ExchangeService
$exchService.UseDefaultCredentials = $true
$exchService.AutodiscoverUrl(user01@domain.com)
Note that the EWS Managed API 1.1 defaults to Exchange2010_SP1 as the Exchange version that it is connecting to. If you are running another version of Exchange or another service pack, you must specify the correct version by passing the ArgumentList parameter to New-Object.
Next, we use the Folder.Bind method of the Microsoft.Exchange.WebServices.Data namespace. We specify the ExchangeService object that we created earlier as the first argument, and then we add an instance of the Microsoft.Exchange.WebServices.Data.WellKnownFolderName namespace that points to the calendar folder as the second argument. To see the details of what arguments the Folder.Bind method accepts, we can use the Get-Member cmdlet in Windows PowerShell, or we can look at the MSDN documentation for this specific class.
$Calendar = [Microsoft.Exchange.WebServices.Data.Folder]::Bind($exchservice,[Microsoft.Exchange.WebServices.Data.WellKnownFolderName]::Calendar)
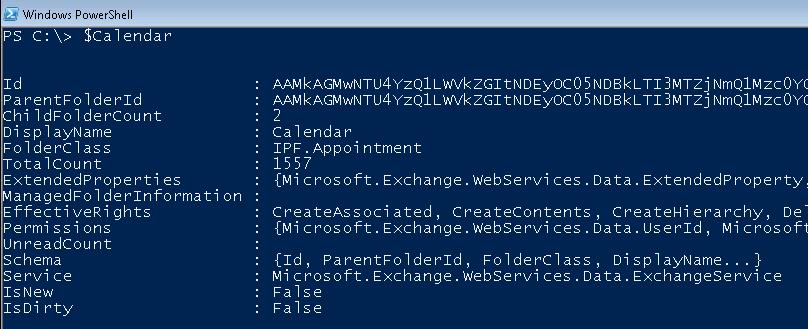
Here we can see how the Calendar object looks in Windows PowerShell:
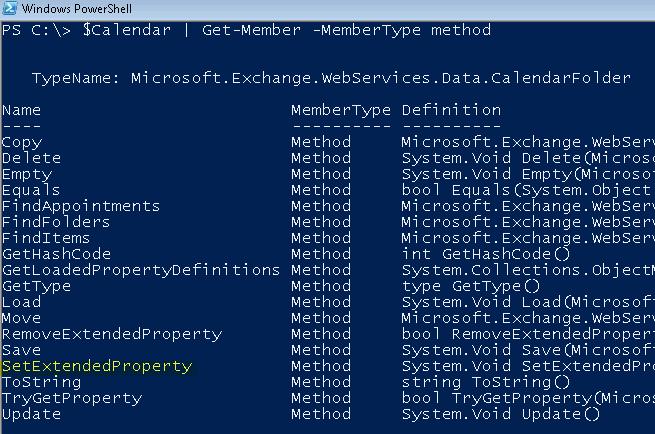
The property that we want to set is an extended property, which isn`t available by default. For the specific task, I`m not interested in viewing the existing property value, so I`ll use the SetExtendedProperty method on the Calendar object, which we can see on MSDN or by using the Get-Member cmdlet as shown here:
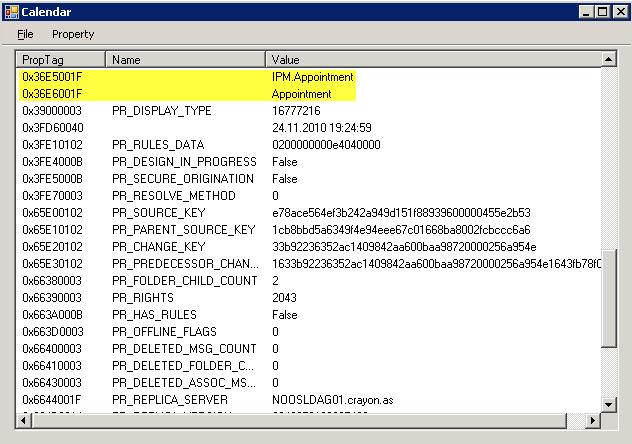
Before we can use the SetExtendedProperty method, we need to determine which argument to pass to it. These are the properties we want to change. The way I found the property names was by looking up the property pages for a calendar folder by using Exchange 2010 SP 1ExFolders:
What we need is the MAPI Property Tags, which we can see in the PropTag column above. As we can see from the following MSDN documentation, the first part is the property identifier. This is the value we need when we create ExtendedPropertyDefintion objects. For the two properties that we want to change, the values would be 0x36E5 and 0X36E6.
Now that we know the MAPI Property identifiers, we can define the properties to be changed as Microsoft.Exchange.WebServices.Data.ExtendedPropertyDefinition objects, as shown here:
$PR_DEF_POST_MSGCLASS_W = new-object Microsoft.Exchange.WebServices.Data.ExtendedPropertyDefinition(0x36E5,[Microsoft.Exchange.WebServices.Data.MapiPropertyType]::String)
$PR_DEF_POST_DISPLAYNAME_W = new-object Microsoft.Exchange.WebServices.Data.ExtendedPropertyDefinition(0x36E6,[Microsoft.Exchange.WebServices.Data.MapiPropertyType]::String)
We`re now ready to use the SetExtendedProperty method, which takes two arguments according to the MSDN documention. The first one is the ExtendedPropertyDefintion, which we defined in the previous step, and the second argument is the value that we want to set. In this case, there are two properties that we need to change; thus, we need to call the SetExtendedProperty method twice:
$calendar.SetExtendedProperty($PR_DEF_POST_DISPLAYNAME_W,”Appointment” )
$calendar.SetExtendedProperty($PR_DEF_POST_MSGCLASS_W,”IPM.Appointment”)
At last, we need to call the Update method to perform the actual update of the Calendar object:
$calendar.Update()
To perform this operation on all the mailboxes, you would first need to configure Exchange Impersonation (which is very easy to do in Exchange Server 2010) for the user name that will be used to run the script. Then you need to retrieve all mailboxes and perform a foreach loop.
Of course, you will also want to add error handling and logging when you run this in production, but here is an example to get you started:
Import-Module -Name “C:\Program Files\Microsoft\Exchange\Web Services\1.1\Microsoft.Exchange.WebServices.dll”
$Credentials = New-Object Microsoft.Exchange.WebServices.Data.WebCredentials(“username”,”password”,”domain”)
$exchService = New-Object Microsoft.Exchange.WebServices.Data.ExchangeService
$exchService.Credentials = $Credentials
$mailboxes = Get-Mailbox
foreach ($mailbox in $mailboxes) {
$exchService.AutodiscoverUrl($mailbox.PrimarySmtpAddress)
$Calendar = [Microsoft.Exchange.WebServices.Data.Folder]::Bind($exchservice,[Microsoft.Exchange.WebServices.Data.WellKnownFolderName]::Calendar)
$PR_DEF_POST_MSGCLASS_W = new-object Microsoft.Exchange.WebServices.Data.ExtendedPropertyDefinition(0x36E5,[Microsoft.Exchange.WebServices.Data.MapiPropertyType]::String)
$PR_DEF_POST_DISPLAYNAME_W = new-object Microsoft.Exchange.WebServices.Data.ExtendedPropertyDefinition(0x36E6,[Microsoft.Exchange.WebServices.Data.MapiPropertyType]::String)
$calendar.SetExtendedProperty($PR_DEF_POST_DISPLAYNAME_W,”Appointment” )
$calendar.SetExtendedProperty($PR_DEF_POST_MSGCLASS_W,”IPM.Appointment”)
$calendar.Update()
}
When you start to explore EWS, there is a tool called EWS Editor that is available on CodePlex, which can help you familiarize yourself in depth with items, folders, and their properties. If you need any assistance related to working with Exchange Web Services, I would recommend that you to use the Exchange Server Development Forum on the Exchange Server TechCenter. I would like to thank Glen Scales for his assistance in regards to working with extended properties in EWS.
Additional resources
Introduction to Exchange Web Services
Using Exchange Web Services Managed API 1.0 from PowerShell 2.0
EWS Editor
Send Email from Exchange Online by Using PowerShell
Glen’s Exchange Dev Blog
Mike Pfeiffer`s EWS blog posts
Thank you, Jan. This is really some good stuff. Guest Blogger Weekend will continue tomorrow when Eric Wright will talk about how to use Windows PowerShell to move Active Directory computers, based on IP address.
I invite you to follow me on Twitter and Facebook. If you have any questions, send email to me at scripter@microsoft.com, or post your questions on the Official Scripting Guys Forum. See you tomorrow. Until then, peace.
Ed Wilson, Microsoft Scripting Guy


I am working on a task where it picks emails based upon subject line.
I unable to set a parameter that it searches emails which have been received within 24 hrs only. Below is my code. Please help.
$inbox1 = [Microsoft.Exchange.WebServices.Data.Folder]::Bind($s1,[Microsoft.Exchange.WebServices.Data.WellKnownFolderName]::Inbox) $iv1 = new-object Microsoft.Exchange.WebServices.Data.ItemView(40) $inboxfilter1 = new-object Microsoft.Exchange.WebServices.Data.SearchFilter+SearchFilterCollection([Microsoft.Exchange.WebServices.Data.LogicalOperator]::And) $ifisread1 = new-object Microsoft.Exchange.WebServices.Data.SearchFilter+IsEqualTo([Microsoft.Exchange.WebServices.Data.EmailMessageSchema]::IsRead,$false) $ifsub1 = new-object Microsoft.Exchange.WebServices.Data.SearchFilter+ContainsSubstring([Microsoft.Exchange.WebServices.Data.EmailMessageSchema]::Subject,"Networker Failure")