
Build your own Q# simulator – Part 3: A circuit-diagram builder with ⟨q|pic⟩
In this blog post, we implement a custom simulator that generates a quantum circuit diagram in the ⟨q|pic⟩ format from Q# program execution traces. We show how the simulator can be integrated into a Q# test project to selectively create circuit diagrams for some operations.
Overall flow
Assume we wish to create a circuit diagram for the following Q# operation, which implements T-state injection, using a custom simulator.
internal operation TInject(a : Qubit, b : Qubit) : Unit {
    H(a);
    T(a);
    Barrier();
    CNOT(b, a);

    ApplyIfOne(MResetZ(a), (S, b));
}
While running the Q# program, the simulator picks up every operation in the execution trace and writes a line into a file following the ⟨q|pic⟩ file format to describe circuit diagrams:
q0 W
q1 W
q0 H
q0 G {$T$}
BARRIER
q1 +q0
q0 M
q1 G {$S$} q0
q0 X
q0 OUT {}
This file can then be converted into a PNG picture (or alternatively TeX code, or a PDF):
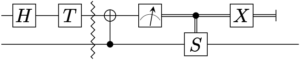
Note that the S operation on the second qubit is conditionally applied based on the measurement outcome of the first qubit.
In order to generate the file and specify the filename we make use of Q#’s testing framework, in which the custom simulator can be explicitly specified (this makes Q# test projects a convenient place to draw circuit diagrams):
@Test("Microsoft.Quantum.Samples.QpicSimulator")
operation PrintTInject() : Unit {
    within { SavePicture("t-injection.qpic"); }
    apply {
        using ((a, b) = (Qubit(), Qubit())) {
            TInject(a, b);
        }
    }
}
The operation Barrier in the TInject operation and the operation SavePicture in the test operation are not part of the Q# libraries and are custom operations that we provide with the custom simulator. Their Q# implementation is empty, so it’s safe to use them with other simulators, e.g., the default full-state simulator.
namespace Microsoft.Quantum.Samples {
    operation SavePicture(filename : String) : Unit is Adj {}
    operation Barrier() : Unit {}
}
We will override their behavior when they are used with the custom QpicSimulator. This blog post focuses on their implementation. The accompanying sample also illustrates how to handle the ApplyIfOne operation using the IQuantumProcessor interface.
The general structure of the processor class
As seen in the previous posts (part 1 and part 2), we implement the custom simulator using two classes, QpicProcessor based on QuantumProcessorBase and QpicSimulator based on QuantumProcessorDispatcher. The processor class keeps track of open picture scopes using a C# dictionary, called Pictures, which maps filenames to StringBuilder objects. These objects are initially empty. Executing intrinsic operations will add text to all open StringBuilder objects using the public AddCommand method:
namespace Microsoft.Quantum.Samples {
    class QpicSimulatorProcessor : QuantumProcessorBase {
        public Dictionary<String, StringBuilder> Pictures { get; } = new Dictionary<String, StringBuilder>();

        public void AddCommand(string format, params object[] args) {
            foreach (var builder in Pictures.Values) {
                builder.AppendFormat(QpicFormatter.Instance, format, args);
                builder.AppendLine();
            }
        }

        public override void OnAllocateQubits(IQArray<Qubit> qubits) {
            foreach (var qubit in qubits) {
                AddCommand("{0} W", qubit);
            }
        }

        public override void X(Qubit qubit) {
            AddCommand("{0} X", qubit);
        }

        public override void H(Qubit qubit) {
            AddCommand("{0} H", qubit);
        }

        public override void S(Qubit qubit) {
            AddCommand("{0} G {{$S$}}", qubit);
        }

        // more operations...
    }
}
The AppendFormat call inside AddCommand makes use of a custom formatter QpicFormatter, which has custom formatting instructions for Qubit and Pauli objects and therefore allows us to pass qubit objects directly as formatting arguments. We next discuss how to implement the SavePicture operation for the simulator to insert and remove items into the Pictures dictionary.
Implementing the SavePicture and Barrier operation
As can you see in the example, the custom simulator makes use of the operation SavePicture to dump the executed operations into a file. We use the default behavior of SavePicture to start tracking operations and its Adjoint functor to stop tracking:
SavePicture("filename.qpic");
// operations to be tracked
Adjoint SavePicture("filename.qpic");
Because of this structure we can make use of the apply / within conjugation
statement, which further only requires to specify the filename once:
within { SavePicture("filename.qpic"); }
apply {
    // operations to be tracked
}
The simulator class QpicSimulator is initialized with a new QpicProcessor instance. Simulator-specific implementations of operations are implemented as part of the simulator class using nested classes.
namespace Microsoft.Quantum.Samples {
    public class QpicSimulator : QuantumProcessorDispatcher {
        public QpicSimulator() : base(new QpicProcessor()) {}

        // simulator-specific implementation of SavePicture
        public class SavePictureImpl : SavePicture {
            // ...
        }

        // simulator-specific implementation of Barrier
        public class BarrierImpl : Barrier {
            // ...
        }
    }
}
We first discuss the implementation of SavePicture.
// custom implementation for:
//
//               Name         In-type       Out-type
//           ┌────┴────┐┌────────┴────────┐   ┌┴─┐
// operation SavePicture(filename : String) : Unit {}
//
public class SavePictureImpl : SavePicture {
//                             └────┬────┘
//                                 Name
    private QpicProcessor processor;

    public SavePictureImpl(QpicSimulator m) : base(m) {
        processor = (QpicProcessor)m.QuantumProcessor;
    }

    // Getter property for Q# operation body
    //
    //                  In-type Out-type
    //                   ┌─┴──┐  ┌─┴─┐
    public override Func<String, QVoid> Body =>
    //  Arguments
    //  ┌──┴───┐
        filename => {                                               // ┐
            processor.Pictures.Add(filename, new StringBuilder());  // ├ Lambda of type Func<String, QVoid>
            return QVoid.Instance;                                  // │
        };                                                          // ┘

    // Getter property for Q# operation adjoint body
    public override Func<String, QVoid> AdjointBody => filename => {
        System.IO.File.WriteAllText(filename, processor.Pictures[filename].ToString());
        processor.Pictures.Remove(filename);
        return QVoid.Instance;
    };
}
The comments should help to understand how the name, input type, and output type of the Q# operation are used in the implementation as C# class. The Q# String type corresponds to the C# String type, and the Q# Unit type corresponds to the C# QVoid type, which is contained in the Microsoft.Quantum.Simulation.Core namespace. The class must have a constructor that takes as input a QpicSimulator object. We make use of the constructor to obtain a reference to the QpicProcessor instance through which we can access the Pictures dictionary and the AddCommand method (used in the implementation for Barrier). Each specialization, in this case body and adjoint body, are represented in terms of a getter property in the class, which return a Func<InType, OutType> object corresponding to the operation signature in Q#. If the Q# operation has no arguments, InType is QVoid, and if the Q# operation has more than one argument, InType is a value tuple type over all input types in the Q# operation. We construct the Func<String, QVoid> object using a lambda expression. For the Body, a new empty StringBuilder object is inserted into the document having the filename as its key. For the AdjointBody, the StringBuilder object is looked up in the dictionary, and its collected text is written to the corresponding filename. Afterwards, the entry is removed from the dictionary.
The implementation of the Barrier is class is much simpler, as it merely adds one ⟨q|pic⟩ command:
public class BarrierImpl : Barrier {
    private QpicProcessor processor;

    public BarrierImpl(QpicSimulator m) : base(m) {
        processor = (QpicProcessor)m.QuantumProcessor;
    }

    public override Func<QVoid, QVoid> Body => _ => {
        processor.AddCommand("BARRIER");
        return QVoid.Instance;
    };
}
The underscore _ is used as argument name for the input argument, which is of type QVoid, since the Q# Barrier operation has no input arguments.
Conclusion
We hope that this blog post helped highlight some alternative applications for custom simulators and how to implement them using custom simulator-based intrinsic operations. We are eager to hear your questions or suggestions, and hope to address all of them in upcoming posts in this series!
 Light
Light Dark
Dark
0 comments