
Application Development Manager Mike Lapierre explores moving backend services using Windows authentication to Azure App Service.
In my previous blog post, I covered how to move legacy two-tier applications using Windows Authentication to Azure App Service. Let’s now talk about moving legacy backend services that use Windows authentication over to an Azure App Service.
Web Service Stacks
Most legacy apps will use either the older web services stack (ASMX) or Windows Communication Foundation (WCF). Newer apps could also be using the ASP.NET Web API stack. Let’s break them down.
Web Services (ASMX)
Introduced with .NET 1.0 (2002), the web services stack, located in the System.Web.Services namespace, is a basic SOAP implementation over HTTP/S. It’s a good fit for App Service, and should be easy to move with the techniques I’ll describe later on.
Windows Communication Foundation (WCF)
Introduced with .NET 3.0 (2006), Windows Communication Foundation, found in the System.ServiceModel namespace, is a broader stack that can be used with several different communication protocols. Unfortunately, App Service is a HTTP-only service, so non-HTTP bindings like NetTcp cannot be used. In some cases, it may be simple to move to HTTP since WCF does a good job of abstracting the underlying communication protocols. In other cases, it may be more difficult, for example when using Duplex protocols. You’ll also have to make sure your bindings use HTTPS, but once that’s done you’ll be able to use the techniques described later.
ASP.NET Web API
Introduced with .NET 4.5 (2012), the ASP.NET Web API stack, located in the System.Web.Http namespace, adopted the REST architectural style over HTTP/S. Since it’s HTTP-based and very close to the web stack, it’s probably the best fit for App Service.
Authentication & Authorization Models
Now that we’ve looked at the different stacks, let’s discuss the different authentication & authorization models used for web services. The two most common ones are Trusted subsystem and Delegation; let’s cover them both.
Trusted subsystem model
With the trusted subsystem model, the user is authenticated and authorized on the frontend only. When the frontend application calls the backend services, it is authenticated and authorized using its own identity. In the ASP.NET world, the Application Pool identity is used for this purpose. Unfortunately, the Application Pool identity is not usable in App Service.
A client ID and secret are needed to authenticate as a client (Client Credentials flow) using OAuth (shown below). The downside of this approach is additional work to protect and change the secret on a regular basis. It also surfaces in plain text in the code, which can present a security risk.
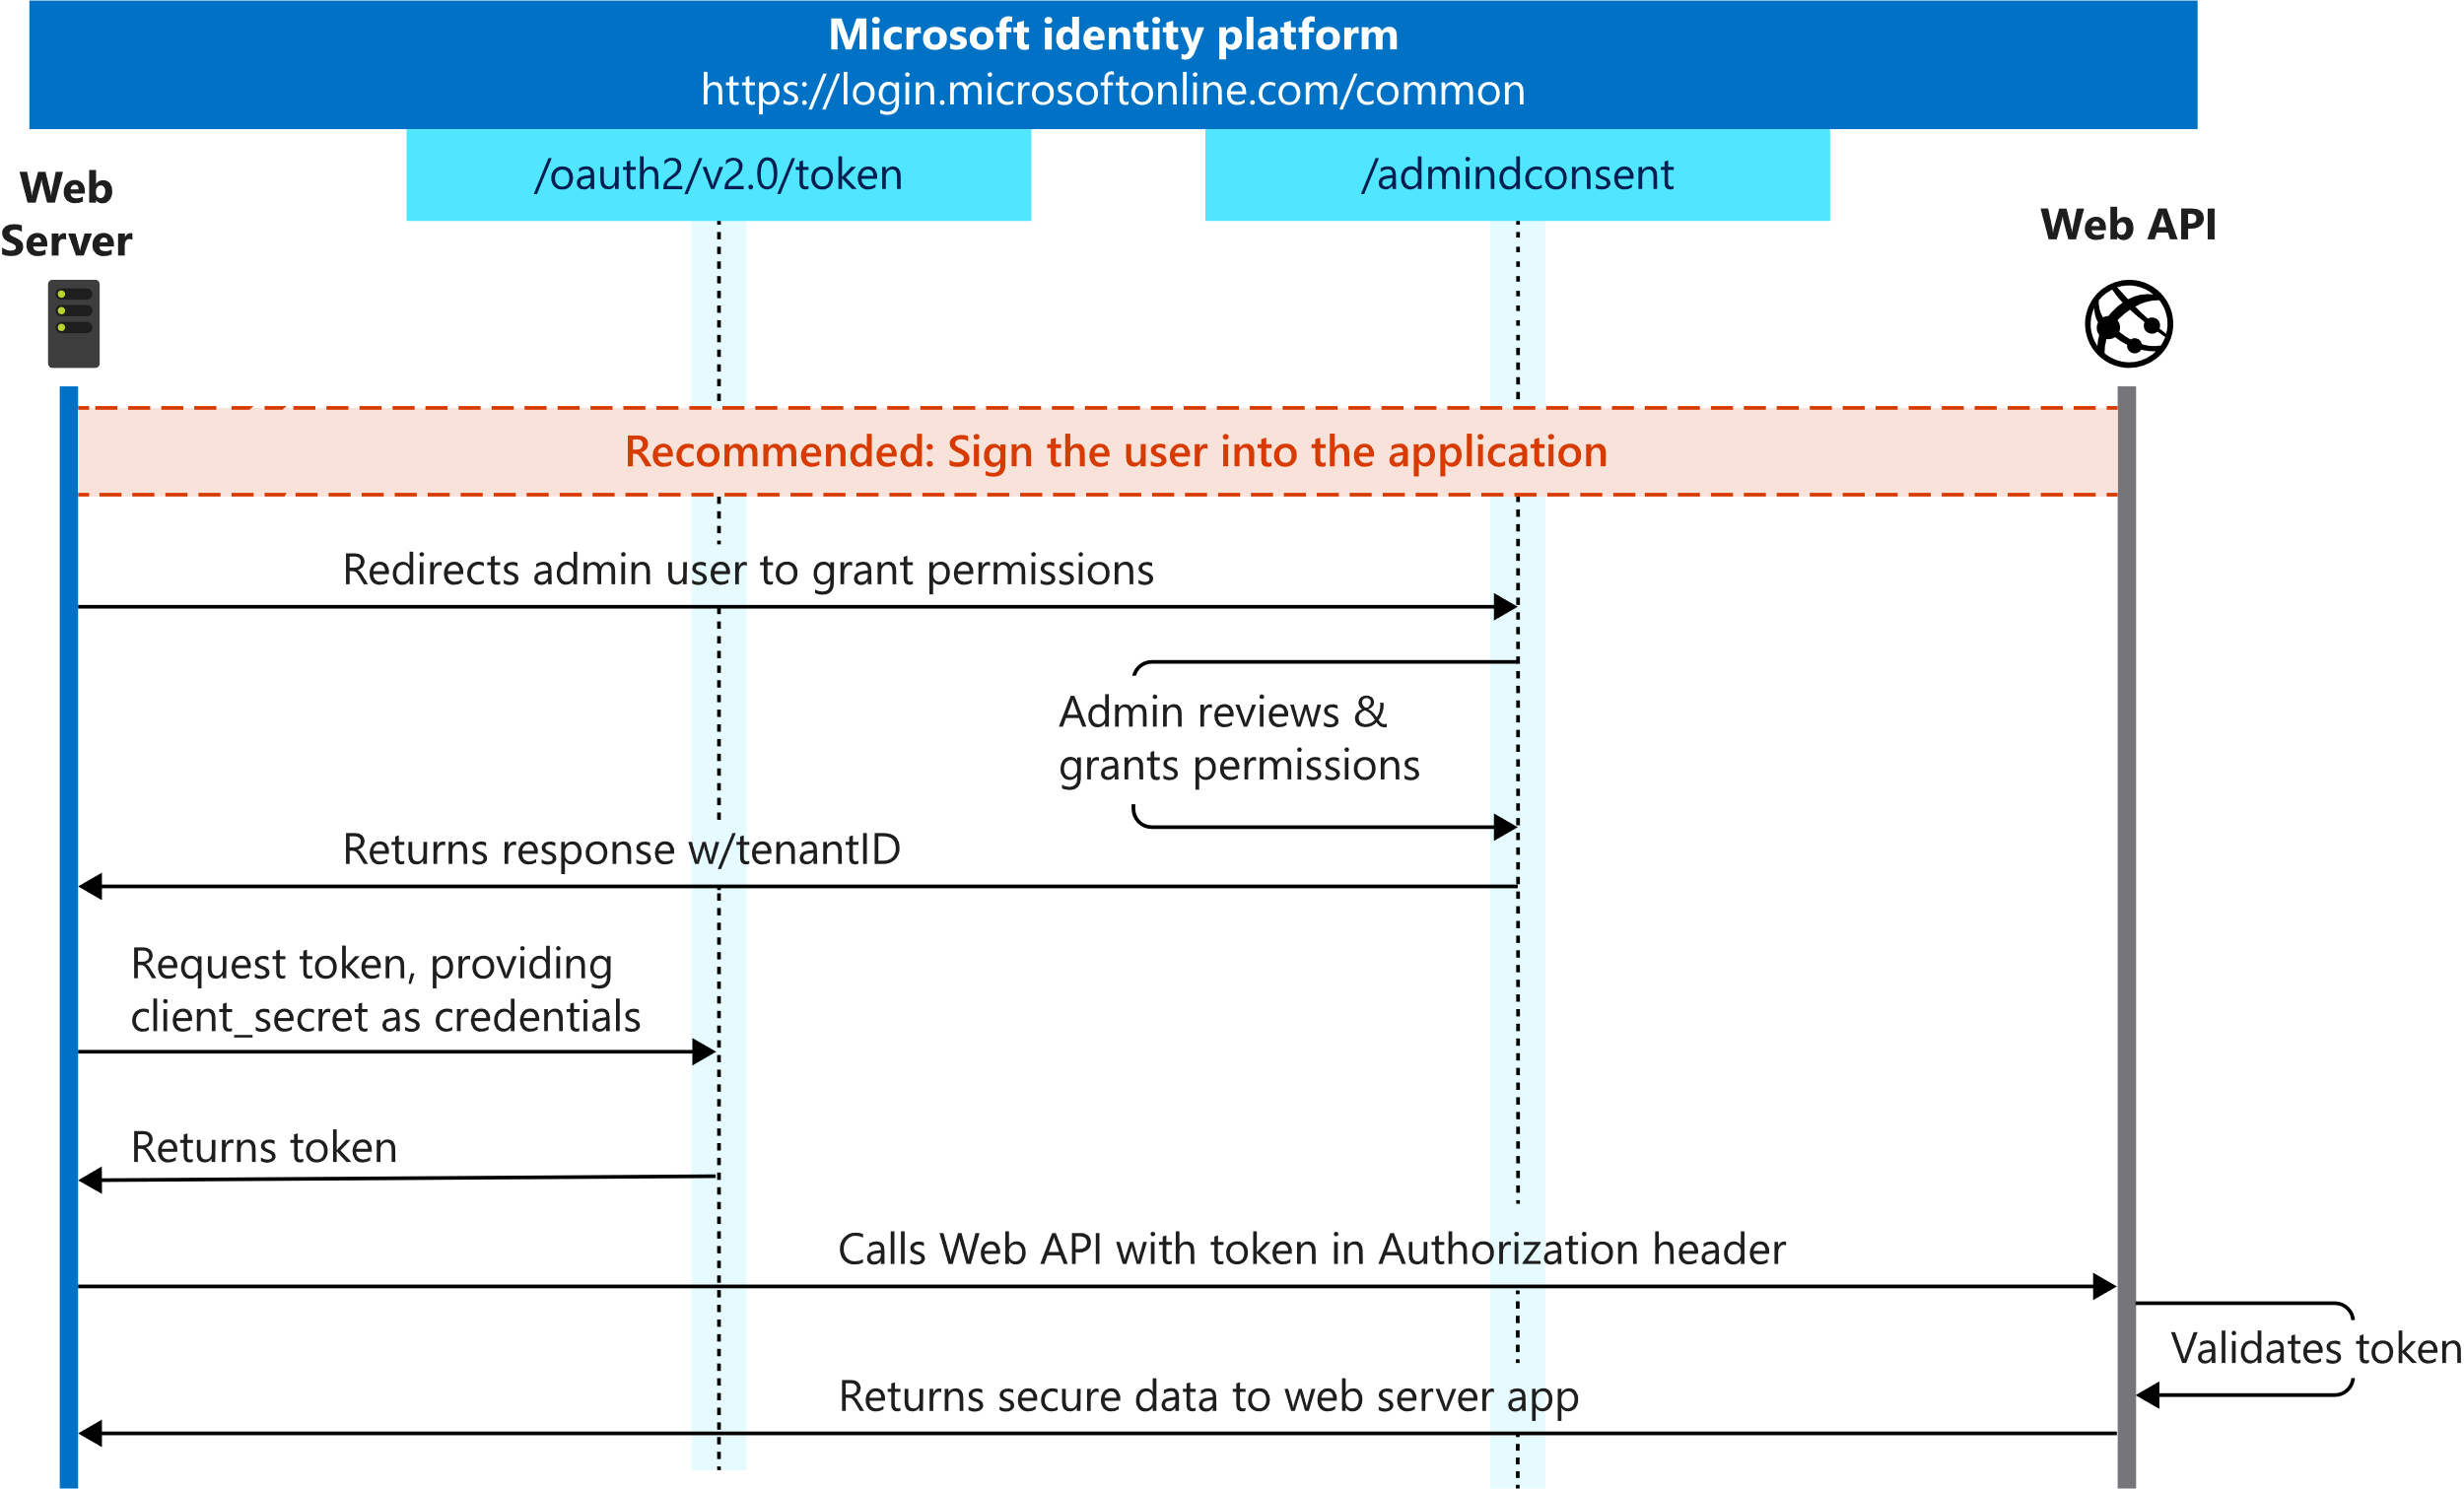
https://docs.microsoft.com/en-us/azure/active-directory/develop/v2-oauth2-client-creds-grant-flow
Fortunately, there’s a concept in Azure called a managed identity that can be used to authenticate the service without requiring the use of a client secret. Let’s see how it works.
The first step is to create a managed identity for the frontend App Service. You can choose between a system assigned (auto-generated) or user assigned identity. A managed identity creates a service principal for your application, which acts like a service account.
The next step is to enable App Service Authentication for the backend App Service, just like we did in Part 1 of this series. The operation will create an Azure AD application we can now use for the backend service. Although the express creation mode will create both for you, we’ll be making use of the Application ID URI instead of the Redirect URL in this case.
Let’s now look at the frontend code to call the backend service. I’ve created a GitHub repo with different sample applications based on three technology stacks (ASMX, WCF and Web API). I’ve grouped the relevant caller code in the AuthHelper class. The GetAccessTokenMI method uses the Microsoft.Azure.Services.AppAuthentication library to acquire an access token using the managed identity. I’ve also included the GetAccessToken method, which uses a client secret, for completeness.
The returned access token is a regular bearer token that must be sent through the authorization header to the backend service. The code for this will vary by client technology stack, but it’s easy to implement since it’s just a regular HTTP header. Take a look at the at the different pages (ASMX, WCF and Web API) for examples.
In a trusted subsystem model, the user authorization is delegated to the frontend. Authorization on the backend service is usually handled just by validating the caller’s identity. A simple claim lookup, based on the appid claim (corresponding to the client id) should do the trick.
Delegation model
With the delegation model, user authentication and authorization is handled both at the frontend and backend services. In the ASP.NET world, this is usually done using impersonation or delegation. Since we cannot use Windows authentication or Kerberos delegation in App Service, we must look elsewhere. OAuth has an On-Behalf-Of (OBO) flow (shown below) that allows a client application to request a ticket on-behalf of a user, achieving the delegation model. You can also do multiple hops, just like Kerberos delegation. Let’s see how it works.
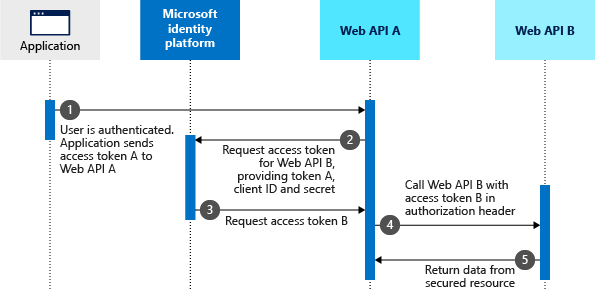
https://docs.microsoft.com/en-us/azure/active-directory/develop/v2-oauth2-on-behalf-of-flow
In this flow, the frontend service sends both its client secret and the user’s token (called an assertion). This authenticates the service using the client secret and confirms successful user authentication, assuming the user’s id token is still valid. If the user has not previously connected to the backend service, then their consent is also needed.
User consent management is beyond the scope of this article. Since we’re covering legacy applications that never used consent anyway, the easiest way to handle this is with the Authorized client applications feature in Azure AD that indicates that the API trusts the calling application (frontend) and no consent is required.
Keep in mind this scenario is more complex because, in addition to consent management, it also requires handing the user’s token expiration by using refresh tokens. App Service offers an authentication refresh endpoint (.auth/refresh), which can be called when necessary to ensure the frontend always has a valid ID Token. A valid ID Token is a requirement for the OBO flow.
Now let’s talk about the code for this scenario. I recommend using the Microsoft Authentication Library for .NET (MSAL.NET) to request tokens on the client side. It makes handling things like caching easier. Again, you can refer to the AuthHelper class, but this time focus on the GetAccessTokenOBO method.
Note that a client secret is required for this flow. Unfortunately, we cannot use managed identity in this case since it doesn’t support the OBO flow at this time. You can put your client secret in Azure Key Vault and then use a managed identity to query the Key Vault, making the implementation more secure.
For authorization, you can use the same techniques described in Part 1 of this series, since we’re authorizing the end user and all their claims will be available in the Bearer access token received by the backend service.
Hands On
If you wish to play with this yourself, I encourage you to clone my GitHub repo that includes sample applications and scripts to deploy them to your own Azure subscription. The scripts handle the creation of the different resources and required settings, all in a free Azure App Service plan. Just follow the instructions in the Readme and have fun!
0 comments