
Reed Robison extends a simple JavaScript Single-Page Application (SPA) to integrate with Teams using Microsoft Graph API.
In my last post, I covered a basic introduction to Graph API using Graph Explorer and a developer tenant. This is the easiest way to get started with Graph API. In this post, I’ll look at how to setup an app registration and move some of these concepts into a custom application that uses Graph API. We’ll build on an existing Graph Tutorial, review some concepts, and add support for sending a chat message in Teams.
Before you go through this, be sure you have a developer tenant setup and verify that you can successful sign in.
Building the Graph Tutorial Sample App
There are several different samples you could build on found in Microsoft Graph Tutorials. Let’s start with this very basic JavaScript sample that uses a single-page app and Node to spin up a HTTP server to host it. There are a LOT of tutorial samples out there that use different languages, dev environments, tools, etc. The code may look different, but the concepts are all similar. Once you get the concepts down, it’s easy to adapt them in whatever language and environment you prefer.
The existing MS graph tutorial for Create a JavaScript single-page app tutorial has you copy and paste to create six files (index.html, style.css, auth.js, graph.js, ui.js, and config.js) that make up the code. You can use any editor you like. I used VS Code but there are no dependencies on the tool you use. Just create the files in the same directory you started your web server using npx.
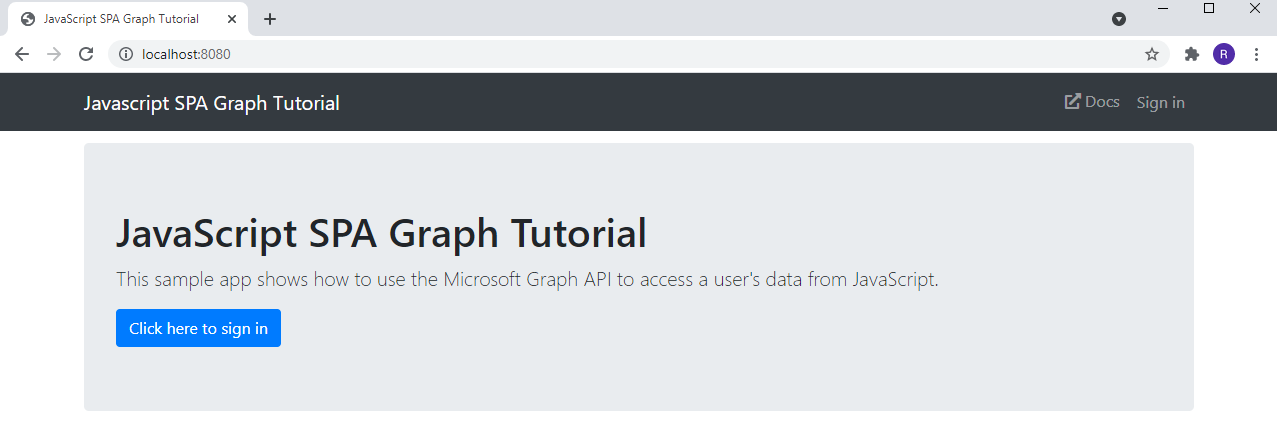
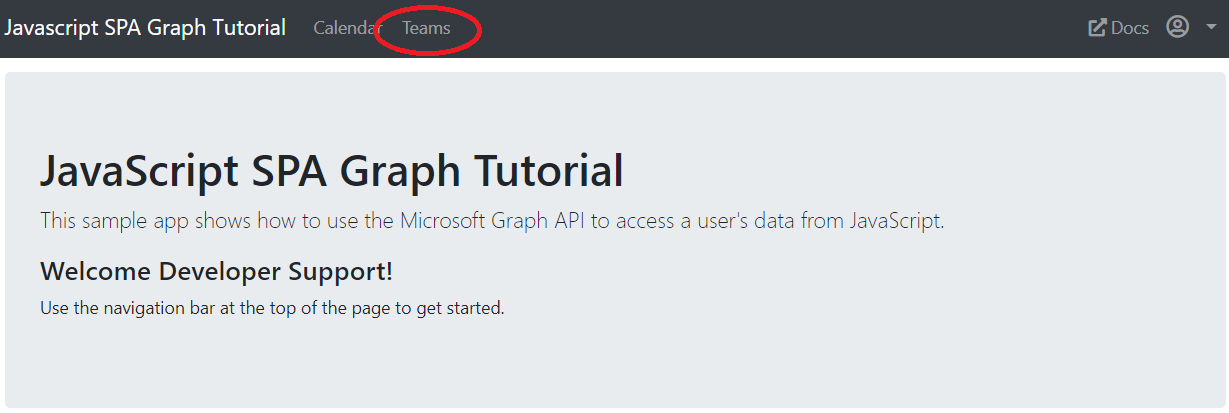
Step #1 is to Create the JavaScript Single-page app.
When you complete this step, browse to http://localhost:8080 and if all goes well, you should see the app load in your browser:
Before this app is functional, we need to configure the app registration and auth library before the sign-in will work. We’ll do that in the next steps 2 and 3.
An important note before you continue. Online samples are great– when they work. Technology is always moving forward and that means things change constantly. Azure AD and MS Graph are no exception, so you may find many of the online samples need some tweaking to make them work if things have changed since they were created. If you find that something has changed and the info below no longer works for any reason, leave a comment and I’ll update my post.
I picked the Create a JavaScript single-page app because there are almost no dependencies to break or SDKs to install, but there are still a few config changes I needed to make:
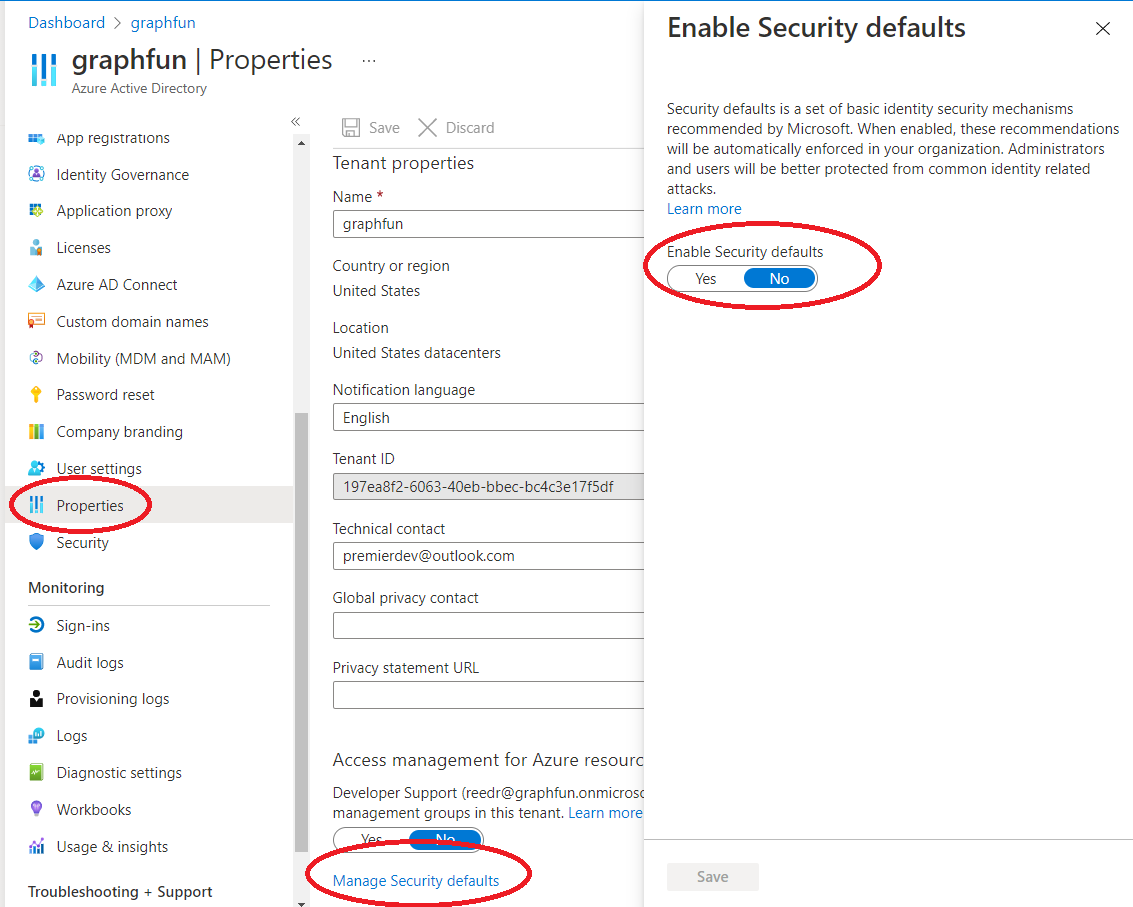
1) Azure AD recently started to enforce “Security Defaults” which will try to require Multi-Factor authentication. That’s a good practice, but for the sake of this demo and getting started– we don’t want to dive too deep yet and I don’t to get into MFA yet. You will need to turn off security defaults to start with (or else you need to work through setting up MFA)
2) Also, when you setup the App Registration, AAD will default the client type to Web. Make sure you follow the tutorial and change this to Single-Page Application (SPA) or auth will not work from the JavaScript test app.
3) Use a Private or Incognito browsing session when you test to ensure you get to pick the credentials that get passed during development.
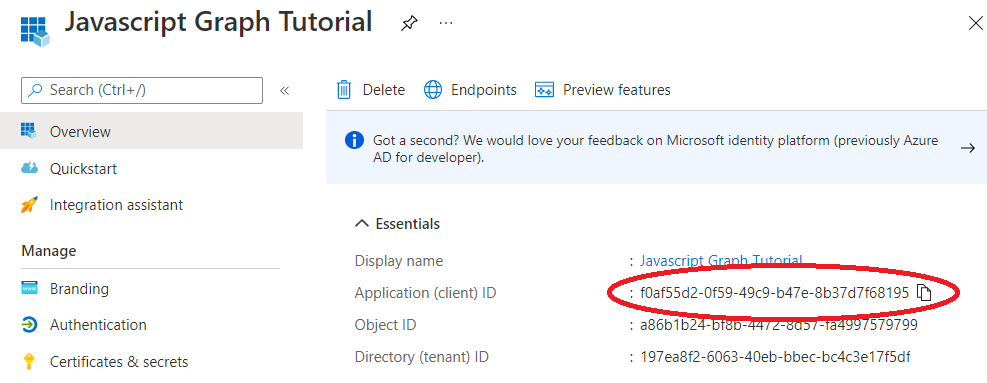
Step #2 is to register the sample app in the portal
As you work through Step 2, you will sign in to Azure Active Directory using the developer account and tenant you setup earlier.
Make sure you copy the App ID when you are done (you’ll need this ID to update your code). Your ID will be different than the screen shot below as these are uniquely generated every time you register an application.
Step #3 is to Add Azure AD Authentication to the app
Step 3 modifies config.js to wire up the authentication and fully implements auth.js for MSAL. You should have filled in your config.js with your ClientId from your app registration.
I don’t want to re-create all the tutorial instructions here (you can follow the 3 Steps in the base tutorial), but for the sake of understanding the concepts of what you did, let’s review:
- You launched a local web server to host the app using Node (npx http-server -c -1)
- You created a simple web app using JavaScript consisting of index.html, style.css, auth.js, graph.js, ui.js, and config.js in the directory where you launched the web server.
- Of those files, auth.js and graph.js handle the authentication using MSAL. Config.js is the configuration passed into MSAL which contains your App ID and the scopes needed to complete the calls the Graph API.
- You created an App Registration in AAD for the JavaScript Single-Page Application.
- You updated the authentication code in the app with your newly registered App ID, local URI, and configured the MSAL code to handle the tokens returned from AAD.
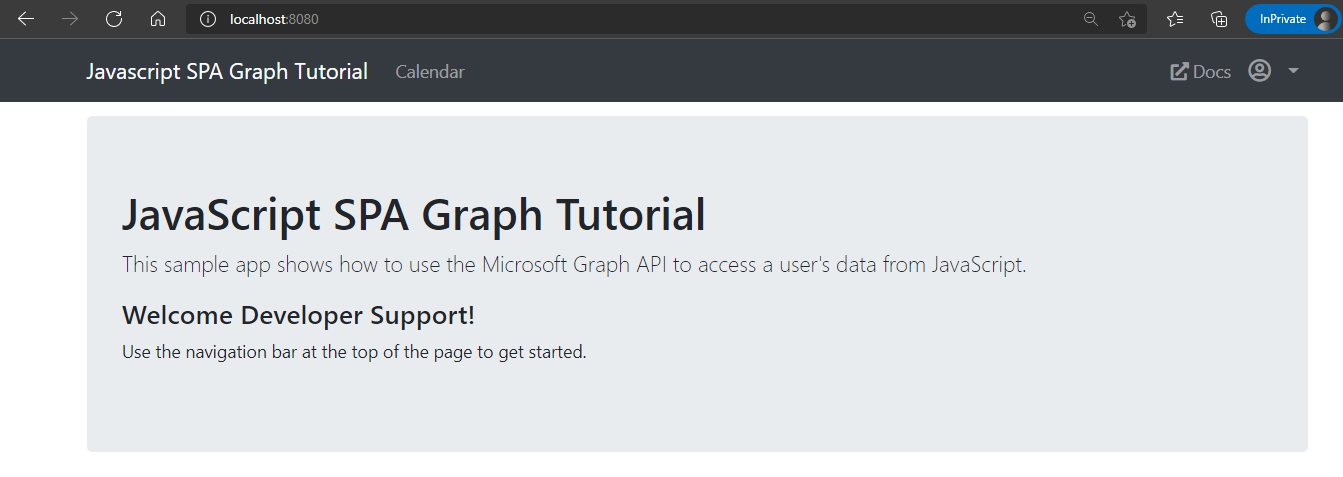
Once all this is done, you should be able to browse to http://localhost:8080 and successfully sign-in.
*Tip – Use Private or Incognito browsing sessions when using dev/test tenants and alternate accounts. This will avoid the browser trying to use cached or active credentials that can complicate auth scenarios where you want to use an alternate account.
This sample authenticates your app to AAD using MSAL and pulls some basic profile info to display on the home page.
Troubleshooting
- Make sure you can load the basic web page you created. If it’s not loading at all, make sure your local web server is running, check the ports, etc.
- If the sign-in fails, use dev tools like F12 to set some breakpoints and see where it is failing. Make sure you copied the code verbatim from the tutorial and updated the right App ID in the config.js file.
- Check your app registration to make sure it’s configured for a Single-Page Application (SPA) and the redirect URI is properly set to your local web server on port 8080.
At this point, you should be able to run the tutorial app and sign-in. If that’s working, we can move on to something new. If that’s not working, review the Troubleshooting section above or debug to understand steps you might have missed in the tutorial.
The standard tutorial continues to add support for Calendar queries and event creation. You can walk through that, but I’m going to stop short of Step 4. I want to explore what it might look like to integrate some entirely new APIs you could choose off MS Graph, like Teams.
Adding Microsoft Graph Calls to integrate with Teams
Teams is exposed through Microsoft Graph API, and to send a message via Teams, it basically follows this pattern:
- Build and register a sample application.
- Acquire a token to call MSGraph within the application.
- Get the User ID of each person you want to include in the chat (API)
- Create a new Chat (must include the ID of all the users to do this) which returns a chat ID (API)
- Send a Message using the Chat ID (using a simple message or some type of card message) (API)
To send a chat message, you need two user accounts to create the conversation. In this example, I’m using my default dev tenant account (reedr@graphfun.onmicrosoft.com) and janedoe@graphfun.onmicrosoft.com (which I created in the first post in this series). You can use any two accounts you want for testing purposes, but keep in mind that to send a chat message, the signed-in (authenticated) user needs to be one of those accounts. I recommend you sign in with your dev tenant account and use that in additional to one other account that you create for testing purposes. If you didn’t walk through my first post on Graph Explorer, you can manually create a second user in your tenant to test with.
Add a Teams Menu to the App
To modify this sample to send a Teams chat message, we need to add a UI handler to kick off the code. To do this, we simply add two things to ui.js.
- Add a fourth item to the View constant:
const Views = { error: 1, home: 2, calendar: 3, teams: 4 }; - Add a teamsNav element to the ShowAuthenticatedNav routine so it shows on the menu after a user has signed-in:
function showAuthenticatedNav(user, view) {
  authenticatedNav.innerHTML = '';

  if (user) {
    // Add Calendar link
    var calendarNav = createElement('li', 'nav-item');

    var calendarLink = createElement('button',
      `btn btn-link nav-link${view === Views.calendar ? ' active' : '' }`,
      'Calendar');
      calendarLink.setAttribute('onclick', 'getEvents();');
      calendarNav.appendChild(calendarLink);
      authenticatedNav.appendChild(calendarNav);

    var teamsNav = createElement('li', 'nav-item');
      var teamsLink = createElement('button',
      `btn btn-link nav-link${view === Views.teams ? ' active' : '' }`,
      'Teams');
      teamsLink.setAttribute('onclick', 'createChat();');
      teamsNav.appendChild(teamsLink);
      authenticatedNav.appendChild(teamsNav);

  }
}
This simply adds “Teams” to the UI that calls createChat() when we click on it.
Add the code to Send a Chat
Let’s add the code for createChat into graph.js and then we’ll walk through what it takes to make it work and how we arrived at the code below.
// Example of how to look up user by principal name to get their ID
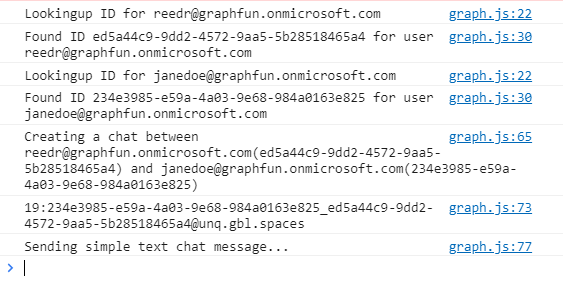
async function getUserByName(name) {
console.log('Lookingup ID for '+name)
return await graphClient
.api('/users/'+name)
// Only get the fields used by the app
.select('id,displayName,mail,userPrincipalName')
.get()
.then((response) =>
{
console.log('Found ID '+response.id+' for user '+name);
return response.id;
}
);
}
// Example of how to create a chat and send a message
async function createChat() {
var user1name = "reedr@graphfun.onmicrosoft.com";
var user2name = "janedoe@graphfun.onmicrosoft.com";
var user1 = await getUserByName(user1name);
var user2 = await getUserByName(user2name);
var conversation = 'undefined';
var chat = {
chatType: 'oneOnOne',
members: [
{
'@odata.type': '#microsoft.graph.aadUserConversationMember',
roles: ['owner'],
'user@odata.bind': 'https://graph.microsoft.com/v1.0/users(\''+user1+'\')'
},
{
'@odata.type': '#microsoft.graph.aadUserConversationMember',
roles: ['owner'],
'user@odata.bind': 'https://graph.microsoft.com/v1.0/users(\''+user2+'\')'
}
]
};
console.log('Creating a chat between '+user1name+'('+user1+')'+' and '+user2name+'('+user2+')');
// Create the chat
await graphClient
.api('/chats')
.header("content-type", "application/json")
.post(chat)
.then((odata) => {
conversation = odata.id;
console.log(odata.id);
});
// Send a simple text chat
console.log('Sending simple text chat message...');
if (conversation !== "undefined" )
{
const chatMessage = {
body: {
content: 'Message sent from my application'
}
};
await graphClient.api('/chats/'+conversation+'/messages')
.post(chatMessage);
}
}
If you copy and past this code, you’ll need to update the user1 and user2 respectively with your tenant accounts.
The final piece of this is to expand the scopes of our MSAL request in config.js to include the permissions we need to make these calls:
const msalRequest = {
    scopes: [
        'Chat.Create',
        'Chat.ReadWrite',
        'ChatMessage.Send',
        'Chat.ReadWrite',
        'User.ReadBasic.All',
        'Directory.Read.All',
        'Directory.AccessAsUser.All',
    ]
  }
How did we arrive at the code above?
Let’s talk about how we arrived at the code for createChat().
To call Graph API, we built an application and registered it with AAD (using the tutorial sample). This sample uses MSAL to provide the sign-in code and acquire tokens. We tested that with some simple calls to get the signed-in user information and verified that works. From there, we wanted to call Teams APIs.
If you look at the Teams APIs and what’s involved to send a Chat Message, it consists of users, a conversation, and the message itself. I need to get the IDs of the people that are part of the message and I need to setup a new chat between those users to get a chat ID. Once I have all that, I can send a message in the chat.
I created getUserByName() to look up the ID for each user I want to add to my chat. That simply makes a Graph API call for users as defined here.
Once I have the IDs of the users, I create a chat between those users as defined here and implemented in the first part of my createChat() routine. I’m simply telling Teams to create a new chat using those IDs.
Once a chat is successful created, I can send a message between users using the chat ID. The basics of this call are defined here.
Permissions
You can do all this with just a few REST calls to Graph API, but you also need to think through permissions. How do I know which permission I need in my scope or consent?
The documentation for every Graph API will include a section on Permissions. For example, the “Get a user” includes details on the following permissions:
One of the following permissions is required to call this API. To learn more, including how to choose permissions, see Permissions.
| Permission type | Permissions (from least to most privileged) |
|---|---|
| Delegated (work or school account) | User.Read, User.ReadWrite, User.ReadBasic.All, User.Read.All, User.ReadWrite.All, Directory.Read.All, Directory.ReadWrite.All, Directory.AccessAsUser.All |
| Delegated (personal Microsoft account) | User.Read, User.ReadWrite |
| Application | User.Read.All, User.ReadWrite.All, Directory.Read.All, Directory.ReadWrite.All |
Calling the /me endpoint requires a signed-in user and therefore a delegated permission. Application permissions are not supported when using the /me endpoint.
Working through all the individual Graph APIs I’m calling for Teams, I arrived at the list added to config.js. You can do the same thing for any Graph API by examining the APIs you plan to call and adding those required permissions into your scope.
Testing the Teams APIs
If you have added the code to enable sending a Teams Chat and want to test this, refresh the app and click on Teams once you sign-in. If you open a debug window (F12 in Edge) you can also see the call details occurring.
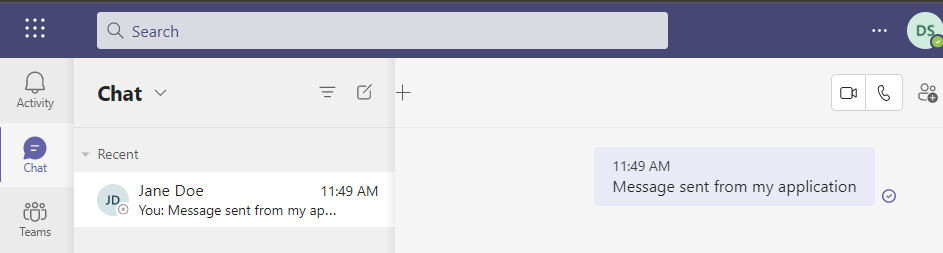
Open another tab and log into the Teams Web client to see the message was sent.
Graph API exposes a convenient and simple REST API to integrate with a wide range of Microsoft Products and Services. Once you familiarize yourself with the basics of App Registrations, API permissions, and working with an authentication library, it’s easy to apply common patterns and simplify development with services exposed by Microsoft Graph.
0 comments