

App Dev Manager Chris Tjoumas walks through how to setup continuous deployment of a blog using Ghost, Azure Functions, and Azure App Services.
*There is an update to this post as of 4/18/20 with additional details for 64 bit support.
Have you ever wanted to run your own blogging website but not sure if you want to build your own site or purchase an existing service? I had the same question myself and when I was studying for an Azure certification, I came across a demo of using this Ghost platform and the Azure Container Registry (ACR). It turns out this is fully open source and they provide both images and source code. I started to play around with setting up the ACR, but of course if you have content and you push an updated Ghost image to your registry, it will wipe out any information you have and I didn’t want to spend more time figuring out a way to keep the database it uses persistent. I then started looking at using the open source nodejs-based software and saw that Scott Hanselman had written about this – twice. First he showed how to modify the source code to get this to run on Azure, then posted an updated blog showing how this was updated to allow for a single click to deploy to Azure. This would take various parameters for your resource group, location, subscription, web app name, Sku, etc and deploy Ghost as an App Service to your subscription. When Ghost upgraded to version 1.x (current version is now 2.25.4 as of 7/1/2019), this deployment stopped working. Luckily for us, Radoslav Gatev fixed this with a Ghost-Azure project.
In this post, I’m going to be starting from another GitHub repo which branched off of Radoslav’s, as updates were no longer being made there. Since I wanted to ensure I had the latest working version, I started using Yannick Reekmans’ project. You can probably use either one, but I’ve done all of my testing with the latter and started my repo from there.
What I would like to do is setup two apps – one for staging and one for production. Radoslav wrote a nice Azure function which will check the official Ghost GitHub repo for an updated release and merge it into a repo of your choice. I would like to be able to use my staging app to get the release updates so I can test them and then decide if/when I want to merge that into my production app. So, let’s start by creating your own GitHub repo and get your staging and production ghost apps up and running:
- Fork the repo from here: https://github.com/YannickRe/Ghost-Azure
- Notice you will have an azure and azure-prod repo. What we want to do is use the azure branch as our staging branch and the production as, well, our production branch
- We are now going to create two Ghost app services – one for staging and one for production
- Create the staging app
- In your GitHub account/repo, make sure you are on the “azure” branch and click the “Deploy to Azure” button to get the ghost blog installed.
- Choose the free app service and fill the form out and click deploy
- Once the deployment is successful, after a few minutes, your self-hosted Ghost blog is up and running in Azure
- Create your production app
- In your GitHub account/repo, switch to the “azure-prod” branch and click the “Deploy to Azure” button to get the ghost blog installed.
- This time, choose at least Basic so you can setup a custom domain and fill the form out and deploy again
- You now have your production app service up and running
Note: If you end up setting up a custom domain, you will need to add that domain to your App Service Application Settings. In here, you create a new setting named “url” and the value will be your domain.
Automatic Updates of Ghost software
What we want to do now is to setup continuous deployment with our staging and production apps so that when we make a change to our staging ghost blog app source in GitHub, the app will pull these changes and deploy this new build. This way, we can run our staging app and verify everything works as expected. We then want to setup the same continuous deployment for our production app so a new production build will kick off when an update to the production branch is detected. For our production app, we won’t be making changes to the code though, we will simply be merging our staging repo into our production repo.
Finally, instead of relying on ourselves to make updates to the ghost blog (which you can certainly do!), I’d rather pull in updates from the official Ghost blog repo. So, we’ll use an Azure Function which will monitor the official repo for changes and, once detected, merge them into our staging branch. We’ll want to also get notified when an update is made, which I’ll show later, so we can go and check out our staging app before merging our staging to our production. Note: This is very important! The official Ghost repo pushes new releases often and there is a possibility that an update may break your app. As a matter of fact, on 6/25/19 when release 2.25.2 was released, I received a notification e-mail that my staging app build failed. While my prod app remained on build 2.25.1 and worked fine, I had the option of fixing my dev app or waiting. I began working on fixing the issue, figuring it was more to do with our app being tweaked to work on Azure. Just as I was about to test the changes, the Ghost team had a fix for it in release 2.25.3; less than a day later. I guess sometimes it just pays to wait 🙂
On to setting up our continuous deployment…
- There really isn’t anything you need to do here other than to ensure automatic deployment is setup through Deployment Center, which it should be once you perform the deploy to Azure. But, let’s check it here and become familiar with Deployment Center. For now, we will leave the default to Kudu since we just have a simple deployment need. But, as we want to do automated testing, gate checks, etc, you can use Azure Pipelines.
- Navigate to your App Service in the Azure Portal and click on Deployment Center
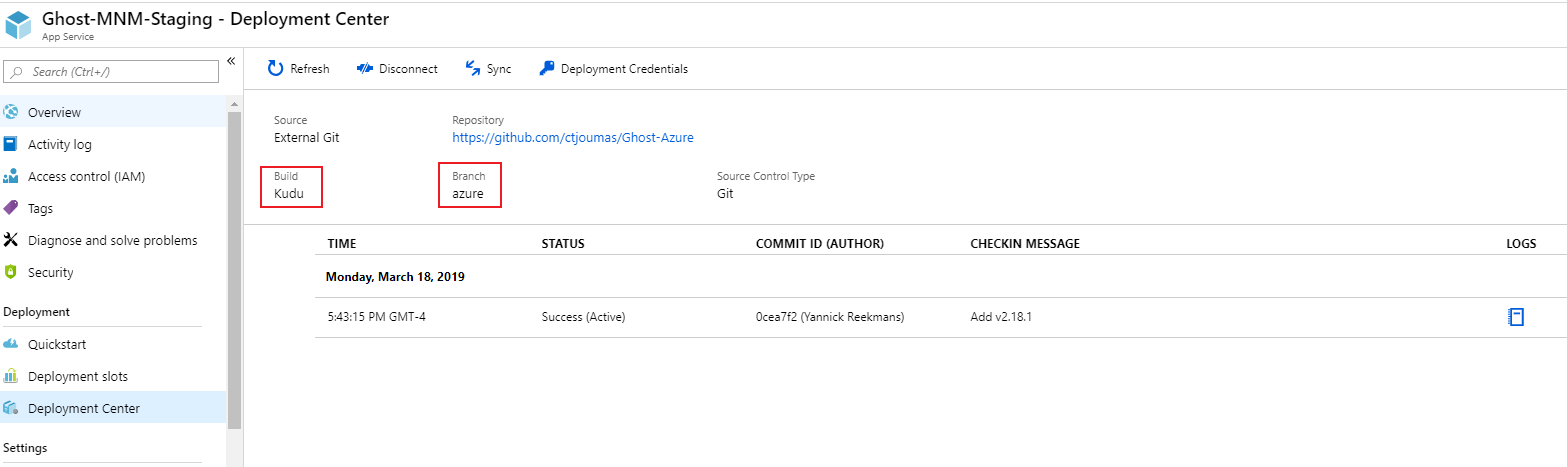 Notice the Build is set to Kudu and the Branch is set to “azure”, which we said is our staging branch. What this does is, behind the scenes, creates a WebHook so that any change made to this branch will be detected and a new build will kick off.
- We’ll want to setup an alert so that once we create our Azure Function to automatically merge updates from the official Ghost repo, we know when our staging app had a new release deployed so we can test it and then merge that into our own production branch. To do this, we’ll create an Azure Function and use SendGrid to send an e-mail when a deployment (success or failure) is performed
-
-
-
- First, let’s create the SendGrid service. In the Azure portal, click Create a resource and search for SendGrid
- Click Create
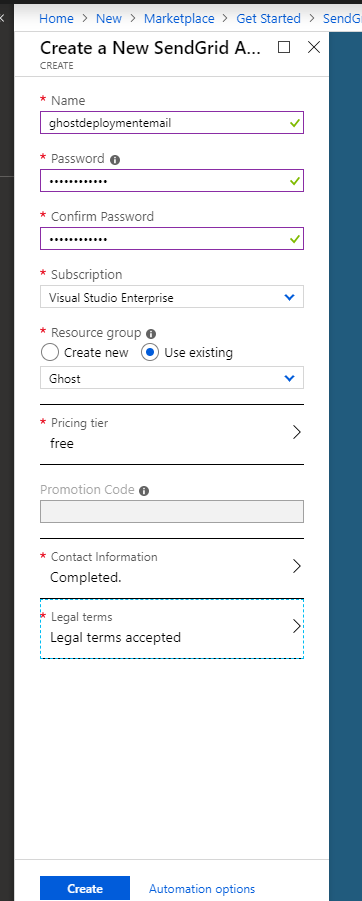
- In the new Create a New SendGrid Account blade, fill out the required fields. For the subscription, a Free Trial should be more than sufficient as it allows for 25,000 emails per month and I don’t plan on having that many updates!
- Once you click Create to create your SendGrid account, your account will be created after a few moments. Either by searching in the Azure portal for your SendGrid account, or clicking the resource in the notification once it’s deployed, go to your SendGrid account.
- Navigate to Configurations and copy the username and the SMTP server so you can generate the SendGrid API key. In order to use the SendGrid account by Azure Functions, we need to provide this SendGrid API as input to the Azure Function.
- To generate a SendGrid API Key, go to the SendGrid portal by going back to the main SendGrid blade in the Azure portal and clicking Manage. This will open a new browser window showing the SendGrid portal.
- In the portal, expand the Settings section on the left and click on API Keys
- Click on Create API Key.
- In the Create API Key window, enter an API Key Name and select the API access. I’ll leave mine as Full Access and click the Create & View button.
- Once the API key is created, click on the key to copy it to the clipboard.
- We’ll now need to configure the Azure Function with the SendGrid API Key. Back in the Azure portal, click +Create a resource and type in Function App and click Create. Give it a name, select your subscription, select the resource group your ghost blog resources are, and leave the Runtime stack as .NET. Navigate to your Azure Function and click on + New function and select In-portal and click Continue. Select Webhook + API and click Create. Select the name of your Azure function (the top-level of the function app tree) and click Platform features at the top and select the Configuration link. Here we want to add an Application setting. For this setting, the name will be the SendGrid API Key name (from step ix above) and the value is your SendGrid API key you copied from step x. Click Update and then Save.
- Back on your Azure Function, click the Integrate button under your function and under Outputs, click the + New Output option
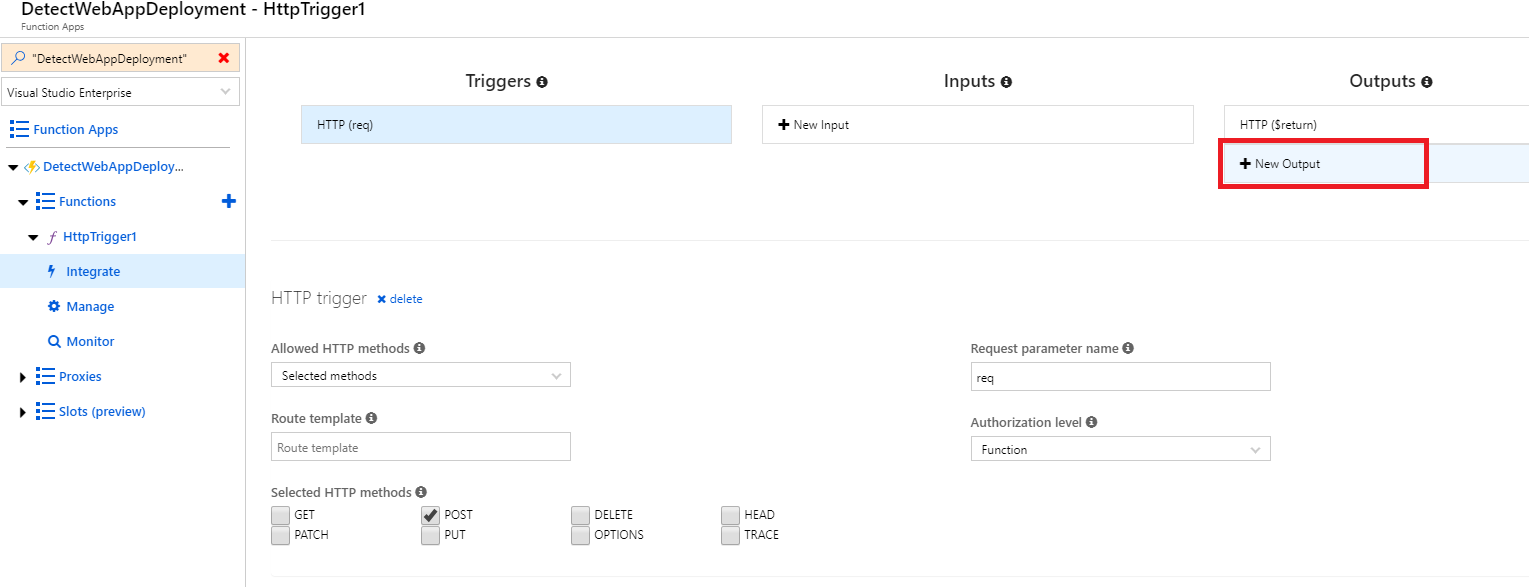
- Select the SendGrid binding and click the Select button to add the binding.
- Now you can fill out the necessary information for the output:
- Message parameter name: leave this as the default “message”
- To address: enter the e-mail you’d like to receive notifications
- Message subject: keep this blank so we can update this programmatically in our function
- SendGrid API Key App Setting: When you click on this field, you’ll see the app setting we added to the Azure Function which holds the SendGrid API.
- From address: the address sending this e-mail
- Message Text: Again, keep this blank so we can update programmatically in our function
- Click Save
- What we’d like to do is know if the deployment was a success or not. So, our Azure function is going to find this in the json that the Azure App Service post deployment webhook delivers via Kudu. What I’m interested in is the status of the deployment so we know if it was successful or not. The JSON from an Azure Web app deployment will look like:
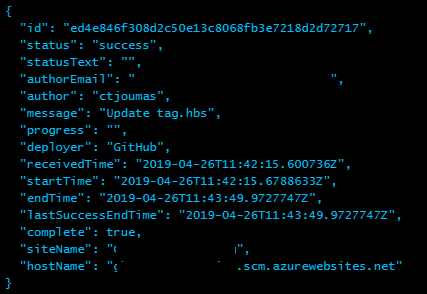 What we want to pull out is the “status” field. But, before we leave this page, we can go ahead and hook this deployment event up to our function app. Back in your function app, select the trigger and at the top, click the </> Get function URL link. Hop back over to your ghost staging app’s kudu page and select Tools–>Web hooks. In the Add Subscriber Url section, paste in your function URL, leaving the dropdown set as “PostDeployment” and click Add Url. Now, once any deployment completes to your staging app, it will trigger your function app, so let’s go ahead and write that to grab the status and send the email using SendGrid.You may also want to know the version which is being deployed. This will be stored in the “message” field so I’ve also added logic to pull that out and put into the e-mail.
 - Navigate back to your Function app and select your HttpTrigger. At the top, add a new reference to SendGrid:
#r "SendGrid"
- Also, add this using statement:
using SendGrid.Helpers.Mail;
- Then, add a new parameter of type mail to the end of the Run function and remove the async keyword as you cannot use the out parameter needed for SendMail with an async function. Your signature now looks like:
public static void Run(HttpRequest req, ILogger log, out SendGridMessage message)
- You’ll also need to modify the requestBody assignment for a non-async function and put a bit of logic in to pull out the status and do something with it. This is fairly self-explanatory, including creation of usage of the SendGridMessage object, as you can see in my function below in its entirety:
#r "Newtonsoft.Json" #r "SendGrid" using System.Net; using SendGrid.Helpers.Mail; using Microsoft.AspNetCore.Mvc; using Microsoft.Extensions.Primitives; using Newtonsoft.Json; public static void Run(HttpRequest req, ILogger log, out SendGridMessage message) { log.LogInformation("C# HTTP trigger function processed a request."); string requestBody = new StreamReader(req.Body).ReadToEnd(); dynamic data = JsonConvert.DeserializeObject(requestBody); string status = data.status; string release = data.message; int startIndex = release.IndexOf("v"); int endIndex = release.Length - startIndex; release = release.Substring(startIndex, endIndex); //log.LogInformation("Status: " + status); string content, subject; if ( status.Equals("success") ) { subject = "Ghost Blog - New Deployment for Staging App - Success"; content = "A new deployment (release " + release.Trim() + ") was successfully completed!"; } else { subject = "Ghost Blog - New Deployment for Staging App - Failed"; content = "A new deployment (release " + release.Trim() + ") was triggered but failed!"; } log.LogInformation(content); message = new SendGridMessage(); message.AddContent("text/plain", content); message.Subject = subject; }- We aren’t quite done yet though. With Azure Functions 2, you will need to add the Storage extensions to the app. To do so, follow these steps:
- In the Overview tab of your function, select Stop, if you’ve tested it and have it running. This will unlock files in your app so that changes can be made.
- Choose the Platform features tab under the Development tools and select Advanced Tools (Kudu). This will open the Kudu endpoint of your app in a new window.
- In the Kudu window, select Debug console > CMD
- In the command window, navigate to D:\home\site\wwwroot and choose the delete icon next to bin to delete the folder.
- Choose the edit icon next to the extensions.csproj file to open the online editor.
- Inside the <ItemGroup> element, add the following: <PackageReference Include=”Microsoft.Azure.WebJobs.Extensions.Storage” Version=”3.0.0″ /> and click Save.
- Back in the console at the wwwroot folder, run the following command to rebuild the referenced assemblies in the bin folder: dotnet build extensions.csproj -o bin –no-incremental –packages D:\home\.nuget
- Back in the Overview tab in the portal, click Start to restart the function app.
-
-
- To put this all in practice, as mentioned earlier, we want to detect when the official Ghost repository is updated and automatically merge that into our ghost staging app. Luckily, an Azure Function was already created to do this which we will use. Thanks to the work we did above, once the function detects a new release in the official repo and it merges that into our staging app, we’ll get an e-mail letting us know there has been an update so we can go test it, then perform a merge from our staging app repo to our production app repo which will automatically deploy the latest release to our production app. So, let’s go ahead and create the new function app:
- First, let’s fork over the function app from here: https://github.com/YannickRe/Ghost-Release-Uploader
- Once it’s forked over, we’ll create our function app and use our newly forked github repo, with a few application setting updates in order to hook everything up correctly.
- Once your function app is created, click the + icon next to Functions and set up your project
- Select Visual Studio
- Use Deployment Center in order to have a continuous deployment pipeline
- Use the Finish and go to Deployment Center button below to navigate to Deployment Center and finish setting up your app. This will take you through a new wizard to configure a variety of deployment options, which we will be using GitHub. I’m going to keep it simple and use Kudu. Select your Ghost-Release-Uploader repo and click Finish
- Update the app settings per the README in GitHub.
- Also, this function app targets Azure Functions runtime 1 so you will need to go to your function app settings and switch to runtime version to 1. Once this is done, restart your function app and go to the deployment center to ensure everything runs correctly.
- One thing to note, you may not have an actual release for the function app to compare against. To test this, go to https://api.github.com/repos/<username>/<your ghost repo, which should be Ghost-Azure>/releases/latest. If you get a “Not Found” message returned, you need to create a release in your repo. Once that is done, re-run the API call to check the latest release and ensure you are getting a response. Also, for your git password, you’ll need to create and use a token here. Finally, make sure the release name is valid as the function will compare the release number in your repo against the official Ghost repo.
That’s it! You have successfully created your staging and production Ghost blog web apps, setup an Azure function to poll the official Ghost GitHub repo for a new release and merge an update into your staging repo, and created an Azure function to use send you an e-mail when a successful (or unsuccessful) release was pushed to your staging app. Now the only thing left to do is start working on your blog!
Hey there…
I am trying to use it.
It goes well until the part “updating Website Config…”
I get this error.. after waiting for while.
‘Failed to acquire content from your repository. “.
Would you be able to tell me if I am doing something wrong?
Appreciate it
Hi Chris
How would you set up emails for Ghost? The last thing you want is to push email credentials to Ghost-Azure public repo’s configuration file.
Hi Chris, I got problem with the web hook. I followed your steps and created a Function App to include your sample code, and configured the Webhook from the Ghost Kudu, but the Kudu says ServiceUnavailable, and Function returns ” Status: 500 Internal Server Error”, log output as:
2020-02-28T12:17:56.551 [Error] Executed ‘Functions.HttpTrigger1’ (Failed, Id=668dc65f-b684-4f55-ae30-3a418254ec02)
Object reference not set to an instance of an object.
Would you kindly have a check on this? Thanks.
Hi Joshua -
I believe from your comment the error is somewhere in your Azure Function. If you haven't already, try debugging your Azure Function through the portal with test input. To do this, go to your Azure Function and click on HttpTrigger1, which will show your Azure Function code. On the right hand side, click "Test". Here, put in the JSON I put as an example in this post which we are parsing as output from our web app deployment. Once you have this, click the Run button at the bottom and this will test your function with this...
Step 2 – I don’t see the two repos Azure and Azure production after forking. Am I supposed to fork twice or am I missing something obvious?
Hi Joshua,
I just checked on this and no, you're not missing anything; it looks like Yannick updated his repo branches and now has "master" and "2x". I would assume these are the same as "azure-prod" and "azure", respectively. However, I have not tested with this since he made the update so you can play with that and see if that works as expected or you can try the same with the originator's (Radoslav) at https://github.com/RadoslavGatev/Ghost-Azure, or you can fork mine which should match this article: https://github.com/ctjoumas/Ghost-Azure. Also, if you want the updated Release Uploader Azure Function, I don't know if...
The deploy is failing for me. Here is the output from the failure:Read more
Command: deploy.cmd
Handling node.js deployment.
Creating app_offline.htm
KuduSync.NET from: 'D:\home\site\repository' to: 'D:\home\site\wwwroot'
Deleting file: 'hostingstart.html'
Copying file: '.gitignore'
Copying file: 'azuredeploy.json'
Copying file: 'config.development.json'
Copying file: 'config.production.json'
Copying file: 'db.js'
Copying file: 'entry.js'
Copying file: 'Gruntfile.js'
Copying file: 'iisnode.yml'
Copying file: 'index.js'
Copying file: 'LICENSE'
Copying file: 'MigratorConfig.js'
Copying file: 'package.json'
Copying file: 'PRIVACY.md'
Copying file: 'README.md'
Copying file: 'renovate.json'
Copying file: 'yarn.lock'
Copying file: 'content\adapters\README.md'
Copying file: 'content\data\README.md'
Copying file: 'content\images\README.md'
Copying file: 'content\logs\README.md'
Copying file: 'content\settings\README.md'
Copying file: 'content\themes\casper\author.hbs'
Copying file: 'content\themes\casper\default.hbs'
Copying file: 'content\themes\casper\error-404.hbs'
Hi Josh,
The error you are seeing is actually different than what I'm seeing. With the latest 2.28.0 release, there is a permissions issue with nql-map-key-values. When these issues arise, the Ghost team is pretty quick in fixing them so generally a new release will address it. In looking at the repo for changes, there is a change for this: https://github.com/TryGhost/Ghost/commit/24c8da58e44f93901ed9a8e9732b01a6fa9b2401#diff-b9cfc7f2cdf78a7f4b91a753d10865a2. My guess is that the next release will address the issue I'm seeing. If you cloned the repo in the last 3 days, you would be pulling the 2.28.0 release, so once the next release is out, you should...
Hi Josh,The repo is actually highly active and there are times when something will break since Azure is a slightly different deployment method than what the Ghost team is targeting. I checked and am seeing the same issue so I’ll investigate this and get back to you.Chris