
App Dev Managers Matt Hyon and Bernard Apolinario explore custom AI Models using Azure Machine Learning Studio and ML.NET.
One of the strengths of Microsoft’s AI platform is the breadth of services and tools available that allow a broad audience of information and technology professionals to take advantage of AI and machine learning in the way that is most accessible and productive for them. From the ready-to-consume set of Azure Cognitive Services to the comprehensive set of tools for data scientists available in Azure Machine Learning Service, there are many ways to apply AI into your products and services. The spectrum of AI offerings can be visualized as in Figure 1 – AI, ML and Deep Learning Technologies.
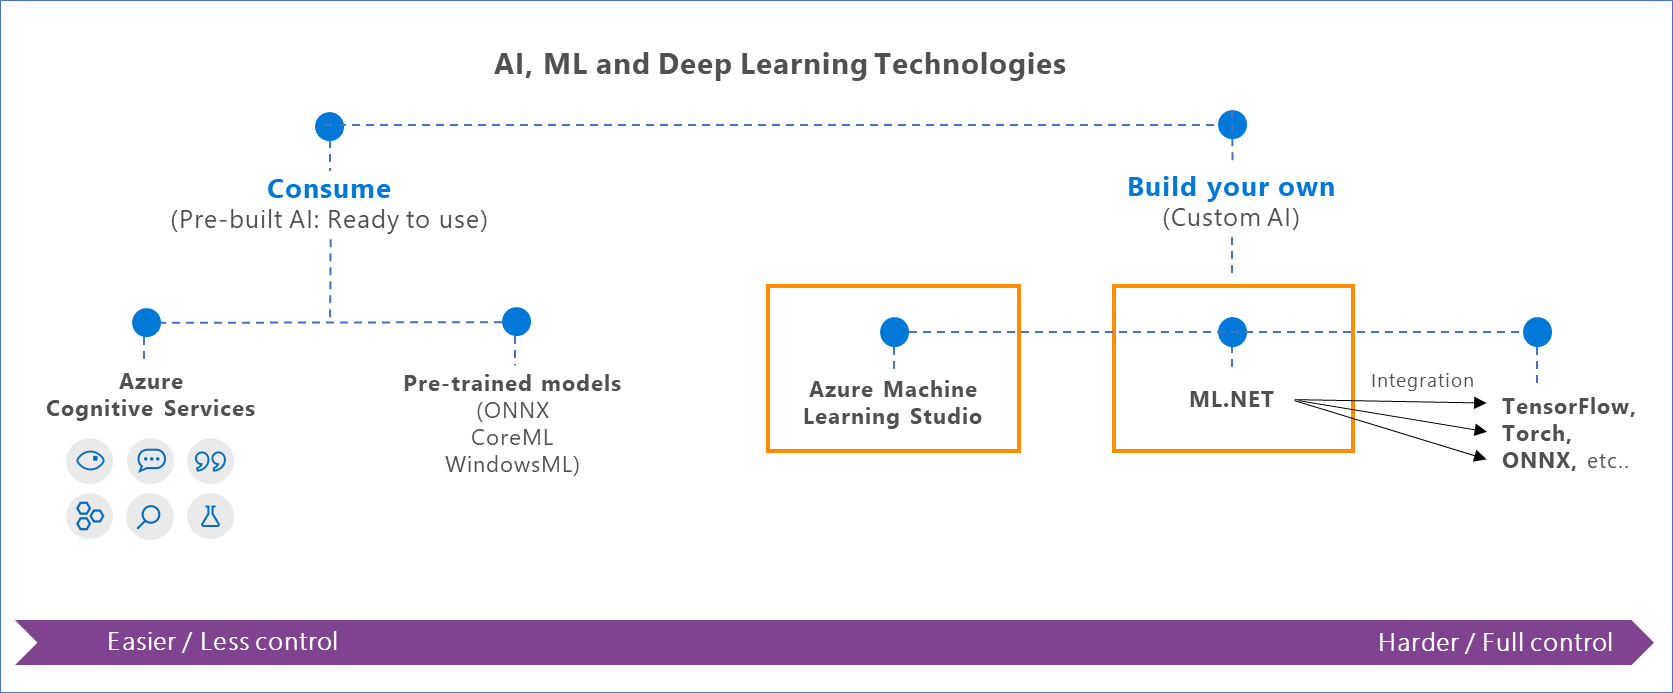 Figure 1 – AI, ML and Deep Learning Technologies
In this post, we will take a closer look at building a custom AI model with Azure Machine Learning Studio and ML.NET to detect a time-series anomaly and along the way, gain an understanding of how these offerings differ and the audience they each target.
Azure Machine Learning Studio
Azure Machine Learning Studio approaches custom model building through a drag-and-drop graphical user interface. Models are built as “Experiments” using data that you upload to your workspace, where you apply analysis modules to train and evaluate the model. The palette of modules includes data transformation tools, a wide variety of machine learning models, as well as the ability to execute your own Python or R scripts. The finished model can then be deployed as a web service by simply clicking on “Set up web service”.
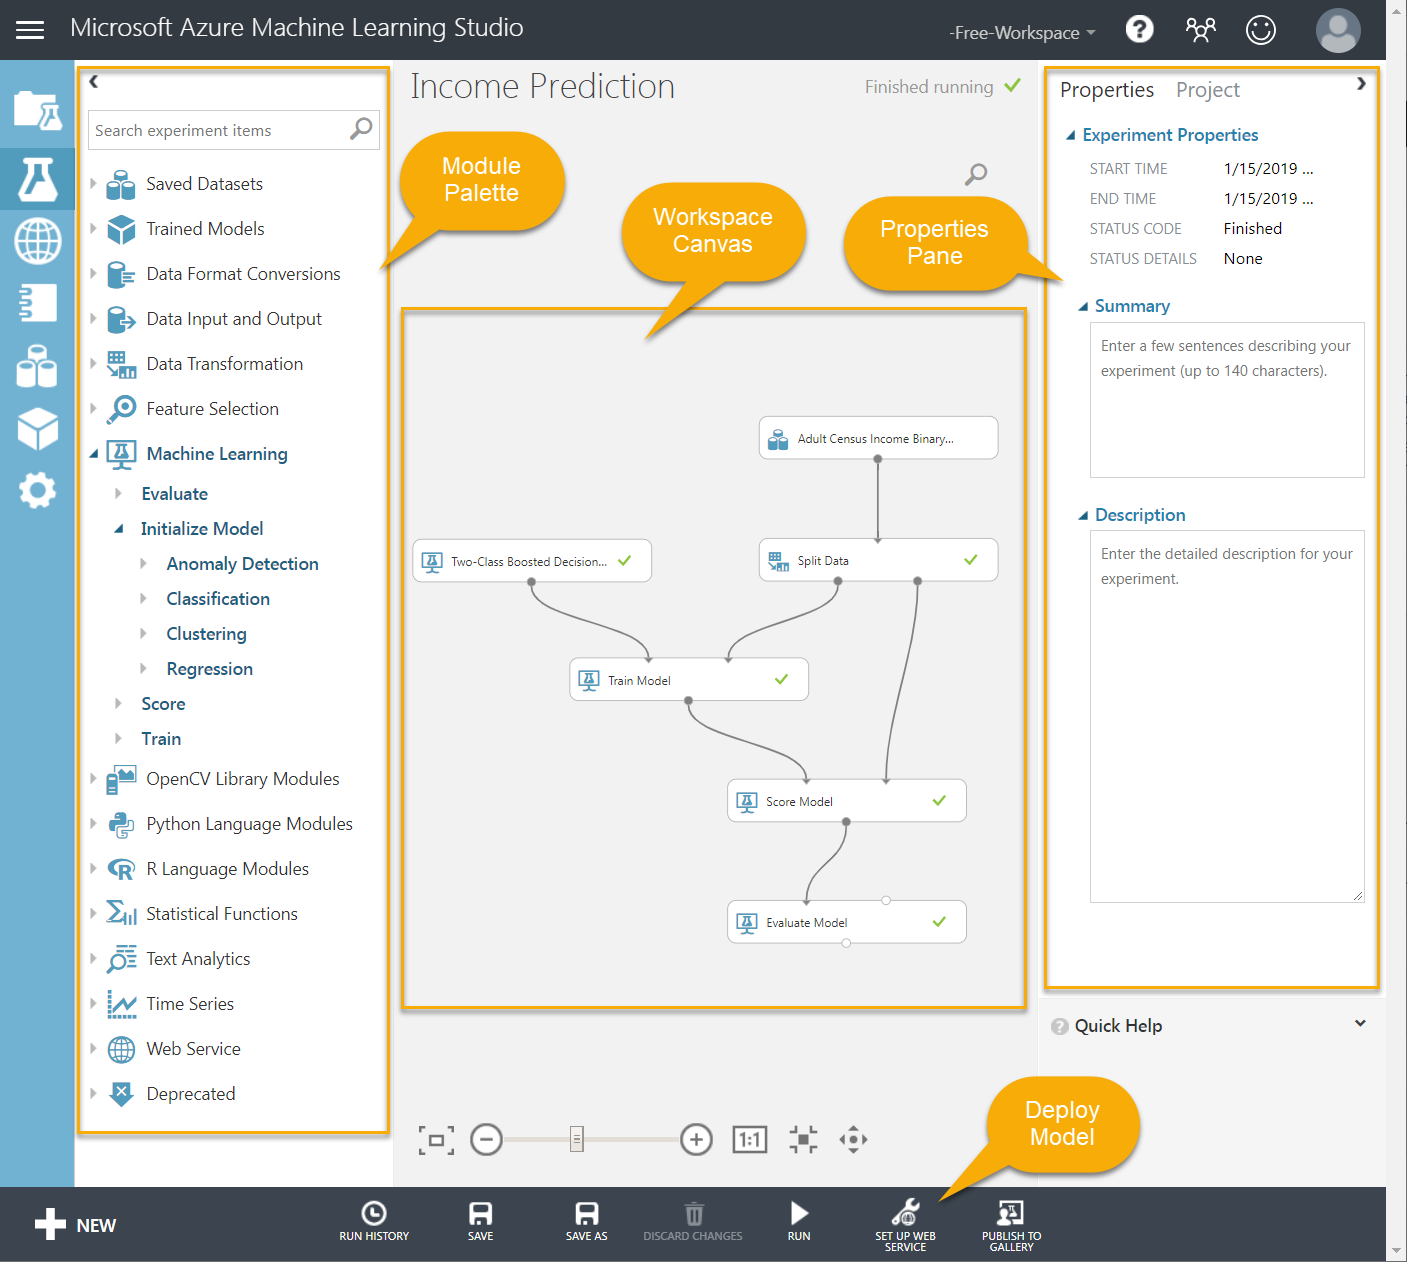 Figure 2 – Studio Workspace
The workspace supports collaboration with colleagues by defining users who are allowed to access the workspace in the Settings area. A great way to get started with Studio is to take a look at the variety of examples that are published in the Azure AI Gallery. Import a sample into your workspace and click on the modules to get a feel for how you might design your own model.
In our example, we will use time-series data collected from a smart electric meter to detect anomalies in power consumption. In the data sample below, the daily power meter reading is shown in green and the derivative of the reading in yellow. The goal is to find anomalies like the spike in usage on 12/23.
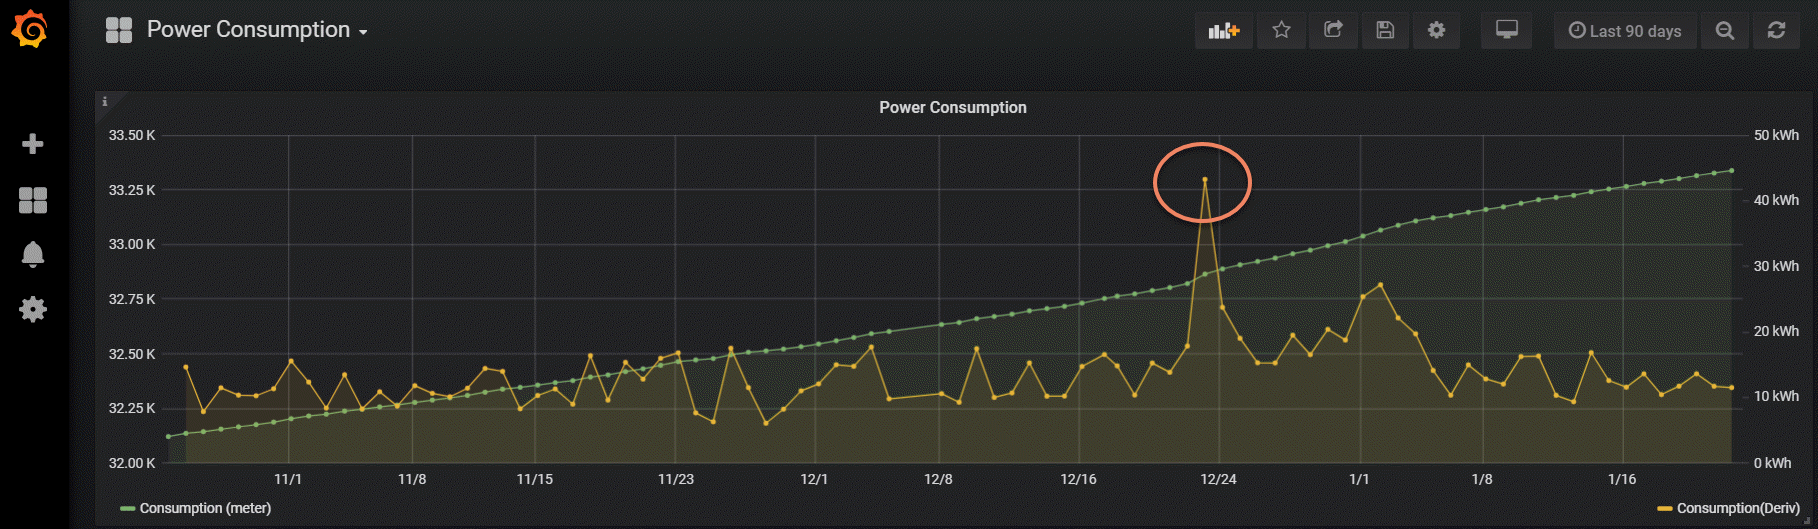 Figure 3 – Smart Meter Data
In Studio, the sample data CSV is uploaded as a dataset, “power-export.csv” and added to the workspace canvas. The “Time Series Anomaly Detection” module was added to the canvas and linked to the power-export dataset. The modules added to the canvas offer the user the ability to customize its behavior through property settings. For the Time Series Anomaly Detection module, the following configuration settings are provided to tune the model.
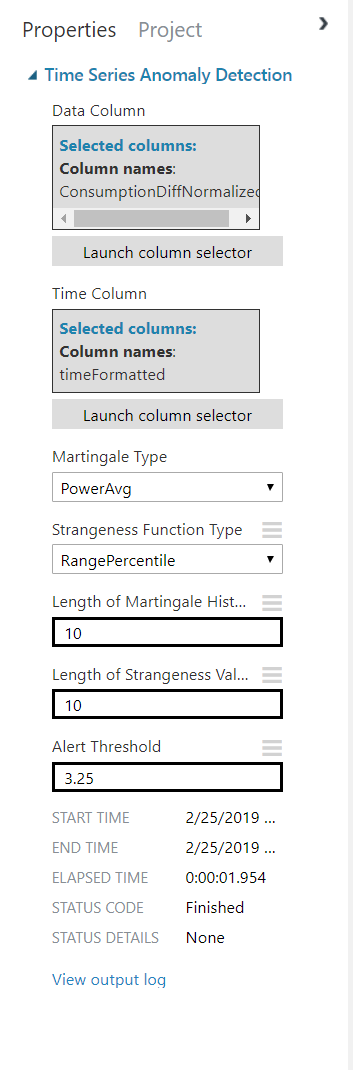 Figure 4 – Time Series Anomaly Detection Property Settings
This module detects the columns that are present in the dataset to allow the user to select the time and data columns. Additional settings are exposed to allow the user to fine tune the model.
The “Convert to CSV” module was then added to the canvas to store the output of the results. The finished model is shown in Figure 5.
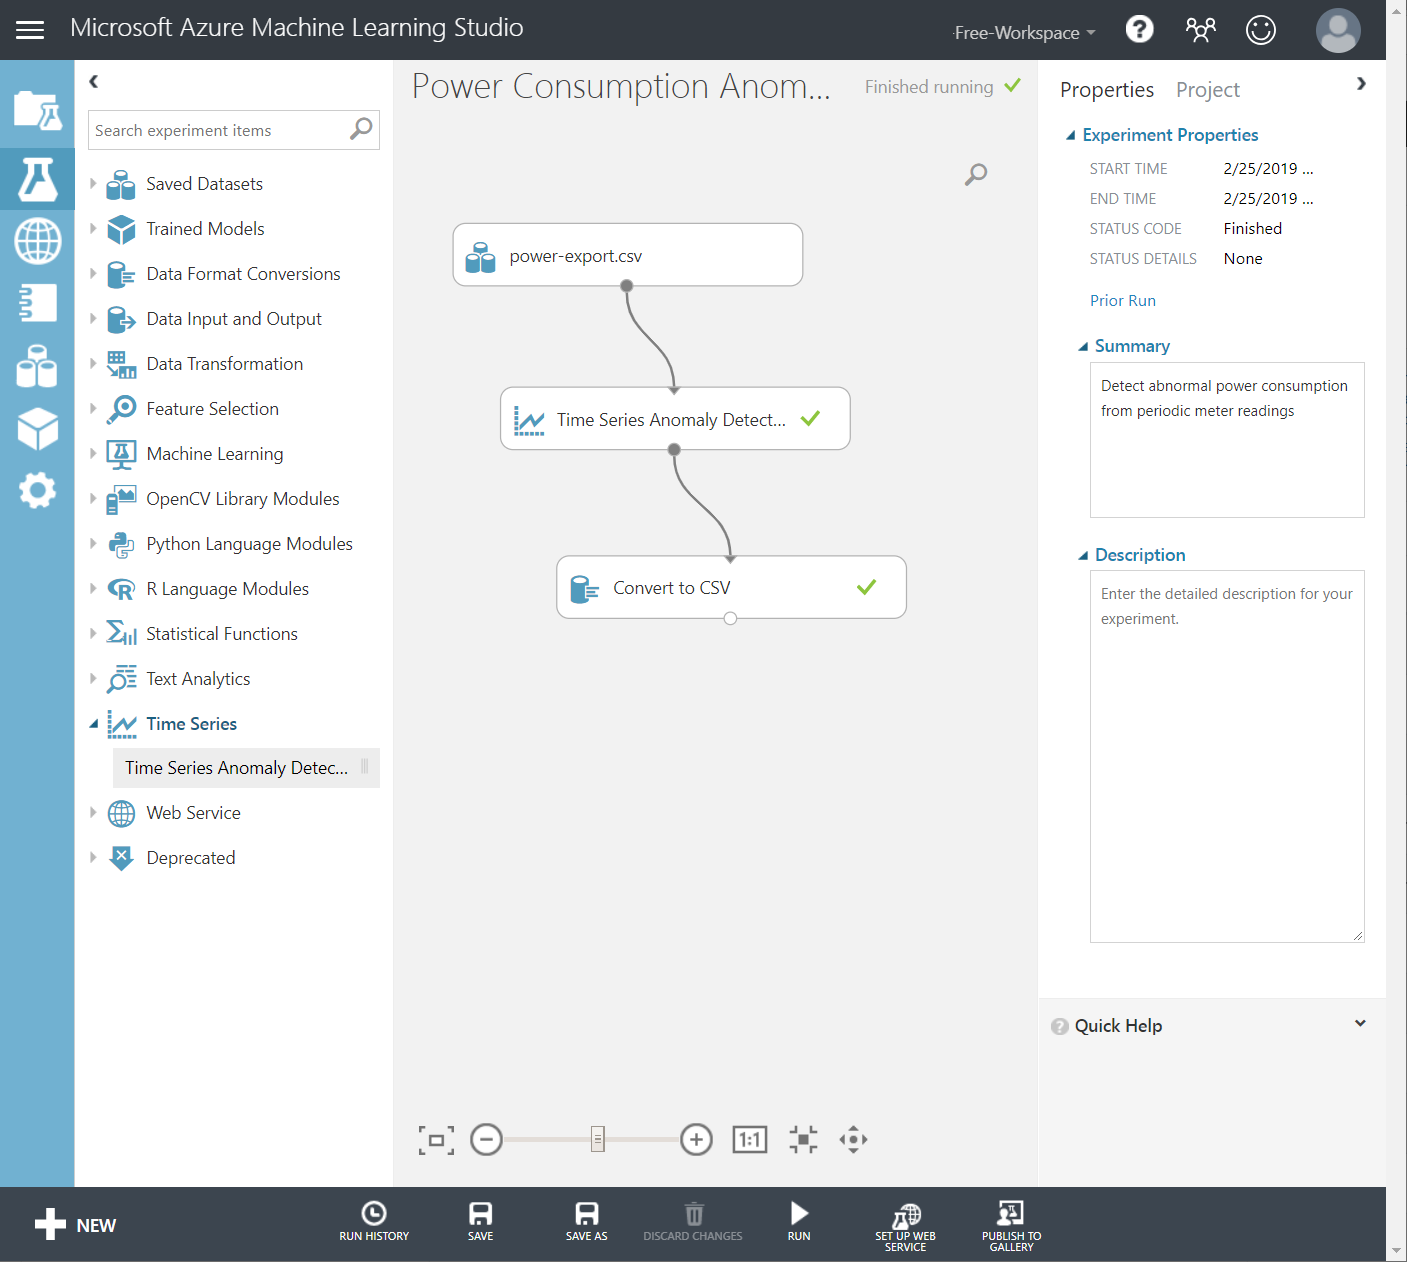 Figure 5 – Time Series Anomaly Detection Model
Once assembled, the model can be executed by clicking “Run”. Green checkmarks appear on each module as each step in the canvas is evaluated. By right-clicking the output node of the Time Series Anomaly Detection module and clicking “Visualize”, a quick view of the results can be displayed as shown in Figure 6.
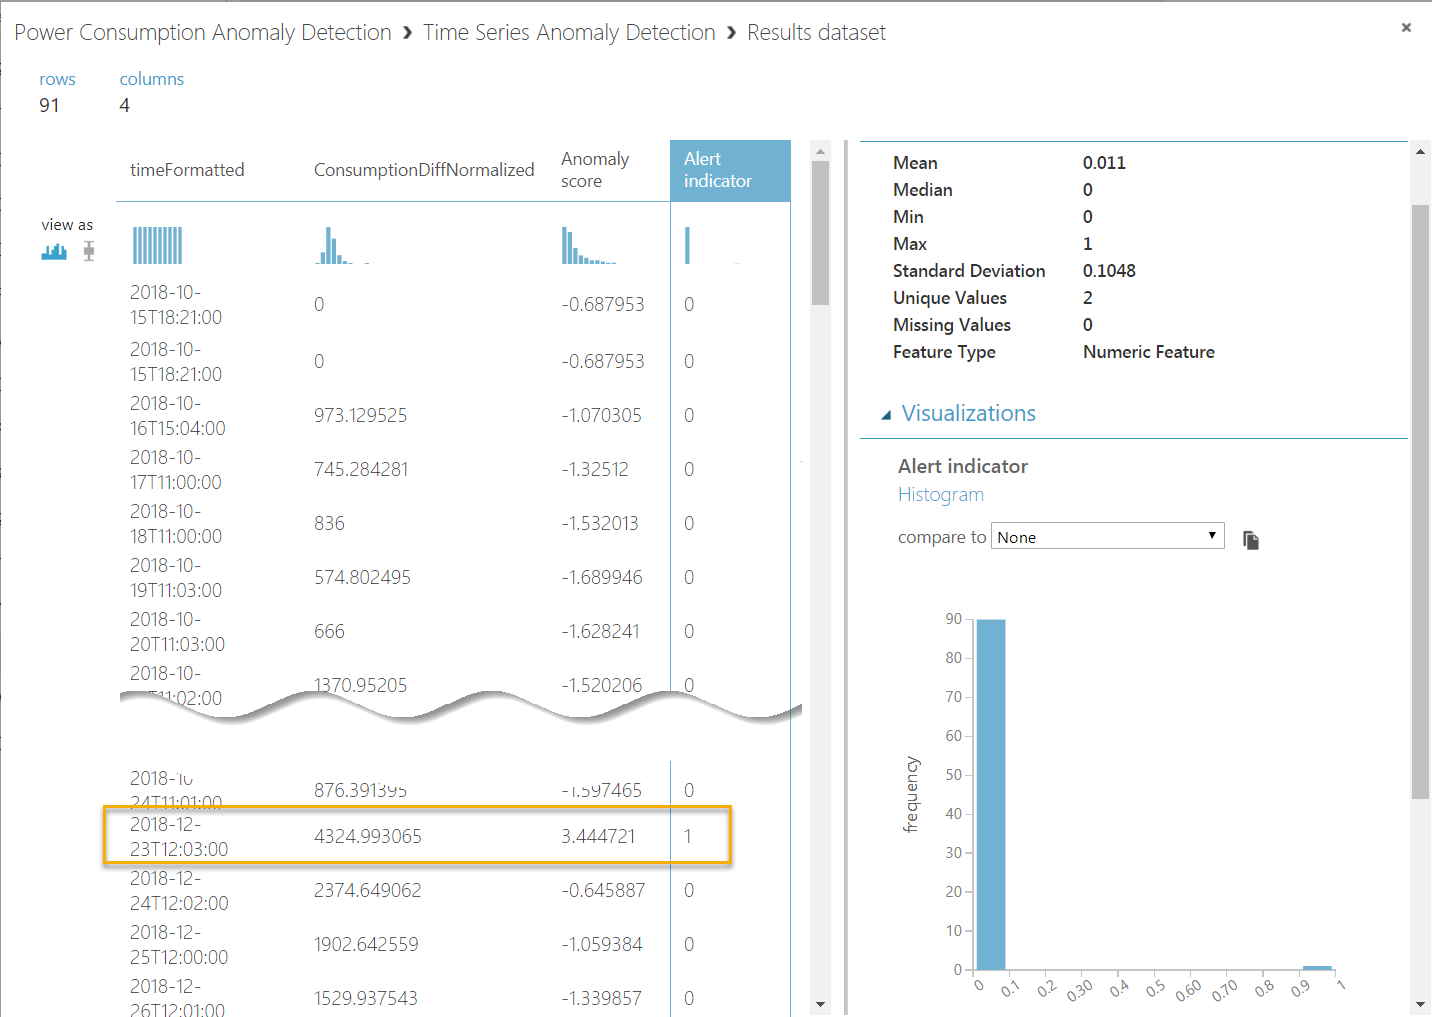 Figure 6 – Anomaly Detection Results
The results show an anomaly (Alert indicator = 1) for the meter reading on 12/23 that we noticed in the power meter reading chart. The model can now be deployed as a web service to detect anomalies in future readings. With little to no coding, we were able to create an anomaly detection model with our custom data set. However, the ease of use comes with limitations in the ways you can customize your model since you are limited to the configuration settings exposed in each module.
ML.NET
ML.NET is a machine learning framework for .NET developers. What was once limited primarily to data scientists with the Python/SciKit-Learn environment, ML.NET now enables all .NET developers to harness machine learning capabilities natively with C# and F# and integrate them into web, mobile, desktop, gaming, and IoT solutions.
Although ML.NET was announced at Build in 2018, the underlying machine learning libraries have been used for over a decade by Microsoft products such as Bing Ads (ad predictions), Excel (chart recommendations), PowerPoint (design ideas) and Windows Defender to name a few. ML.NET is an extensible framework that allows .NET developers to leverage other popular libraries such as TensorFlow.
ML.NET is open source and backed by the .NET Foundation. ML.NET is currently in preview but 1.0 is expected to be released in Q2 2019. You can find the ML.NET project on GitHub and participate in the ML.NET community on Gitter.
Workflow
ML.NET simplifies the implementation of the model definition by combining data loading, transformations, and model training into a single pipeline (chain of estimators). An estimator is the definition/promise of a transformer. The model building process simplifies the familiar Prepare, Train, Deploy steps.
Prepare Data
ML.NET allows you to ingest multiple types of data, including Text (CSV, TSV), Parquet, binary, IEnumerable<T>, and File sets. After the data loader is defined, the learning pipeline is defined with the necessary transforms to prepare your data into the format and type you need for processing. Support is provided for text transforms, changing data schema, handling missing data values, categorical variable encoding, normalization, selecting relevant training features, and NGram featurization.
Build and Train Model
The learning pipeline is then appended with your choice of training algorithm. A wide selection of algorithms are available in the Microsoft.ML.Trainers namespace, such as the KMeansPlusPlusTrainer to train your model. The model is created when the pipeline is “fit” to the training data.
Deploy
At this point, you have a model that can be integrated into any of your .NET applications by saving the model as a .zip file and loading it in your target application.
Time Series Anomaly Detection Example
Let’s use ML.NET to detect the power consumption anomaly that was found using Azure Machine Learning Studio.
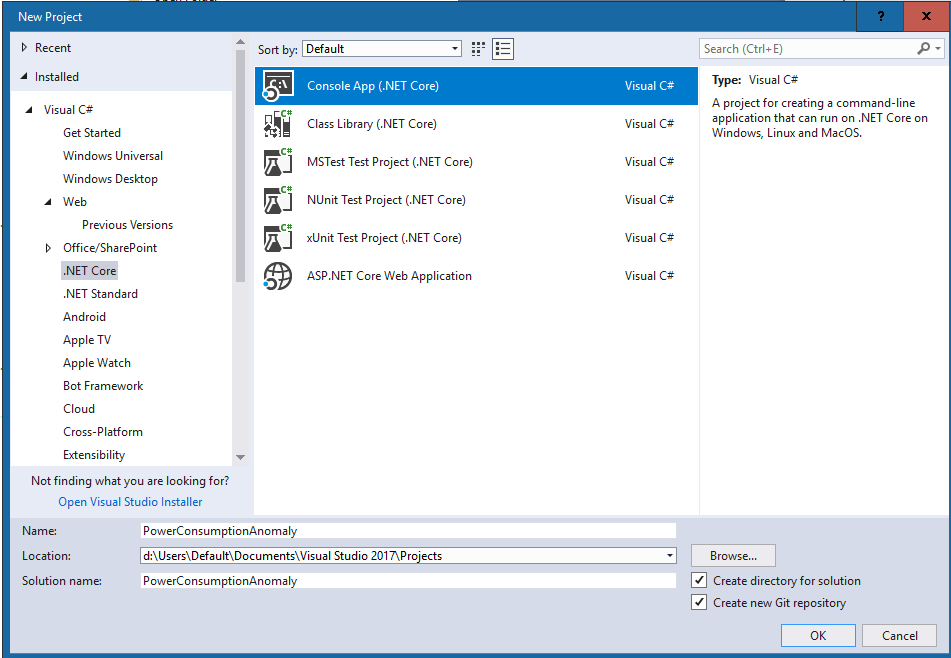
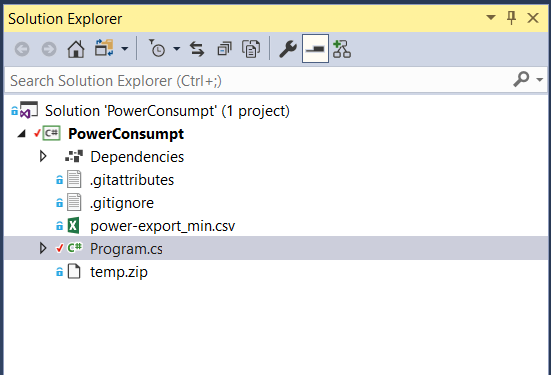
Step 1: Create a new .NET Core project
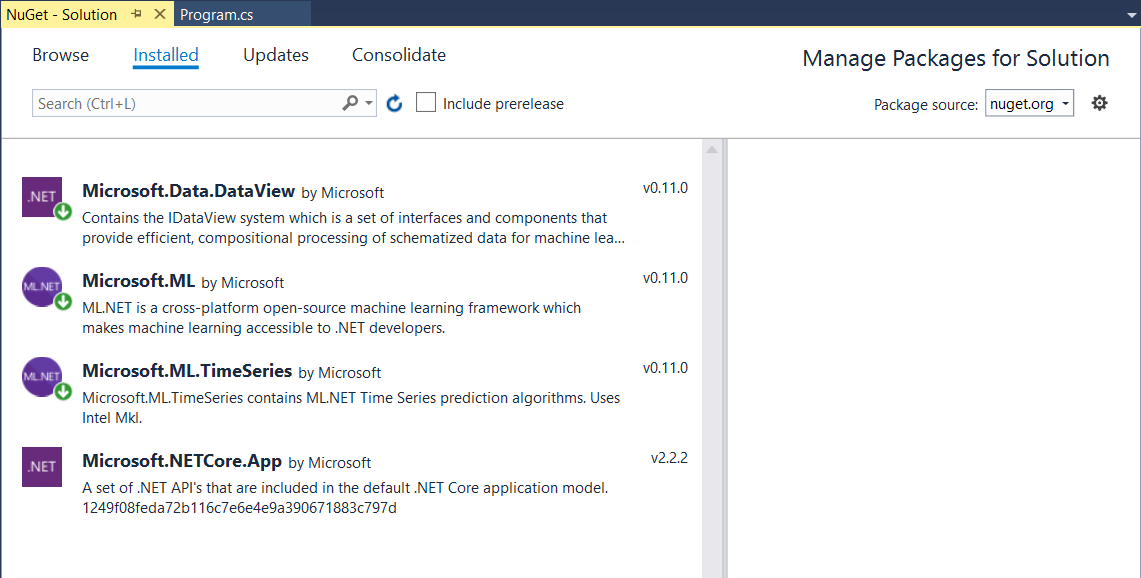
Step 2: Add the Microsoft ML package to the project
- Microsoft.Data.DataView (v0.11.0) – Contains the IDataView system which is a set of interfaces and components that provide efficient, compositional processing of schematized data for machine learning and advanced analytics applications.
- Microsoft.ML (v0.11.0) – ML.NET is a cross-platform open-source machine learning framework which makes machine learning accessible to .NET developers.
- Microsoft.ML.TimeSeries (v0.11.0) – Microsoft.ML.TimeSeries contains ML.NET Time Series prediction algorithms. Uses Intel Math Kernel Library (Mkl).
Step 3: Edit the code in Program.cs file
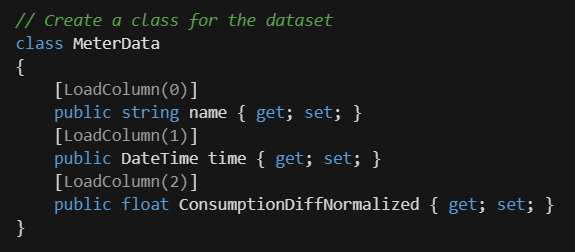
Step 4: Define the MeterData class
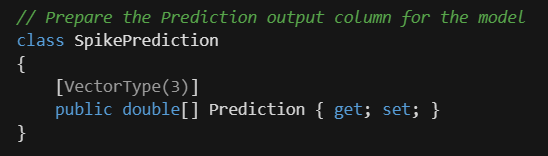
Step 5: Define the SpikePrediction class
Step 6: Replace the code in the Main method with the following:
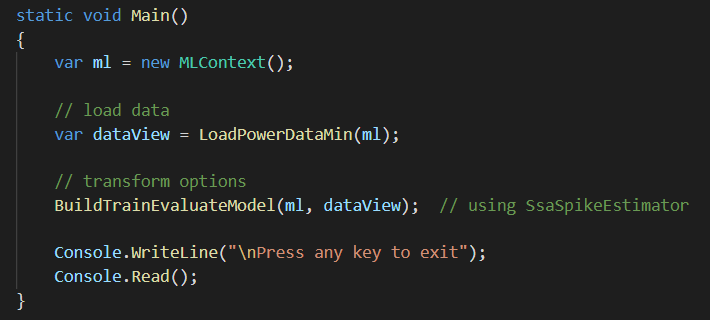
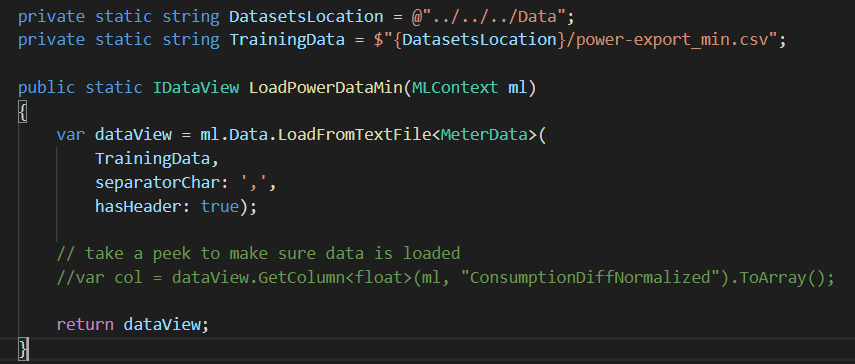
Step 7: Create the LoadPowerDataMin method
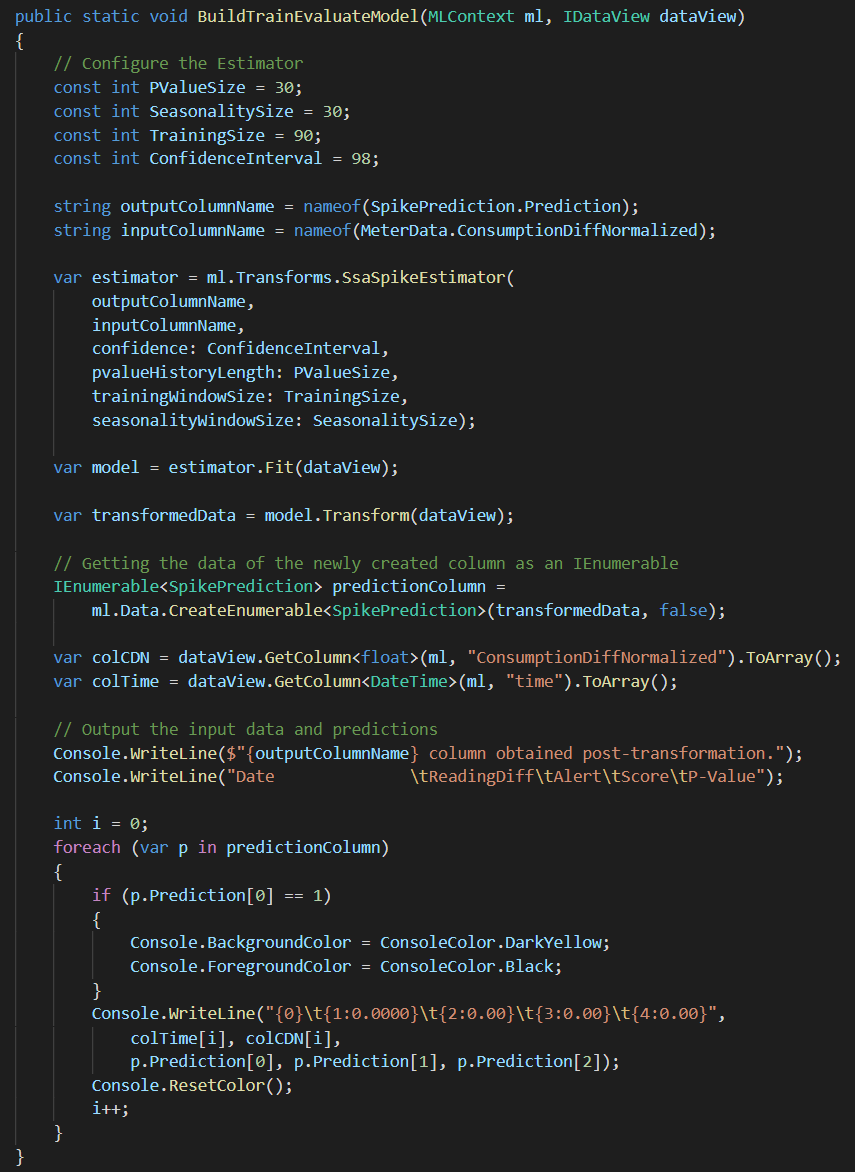
Step 8: Create BuildTrainEvaluateModel to train the model and output the prediction column.
Step 9: Start the application (F5)
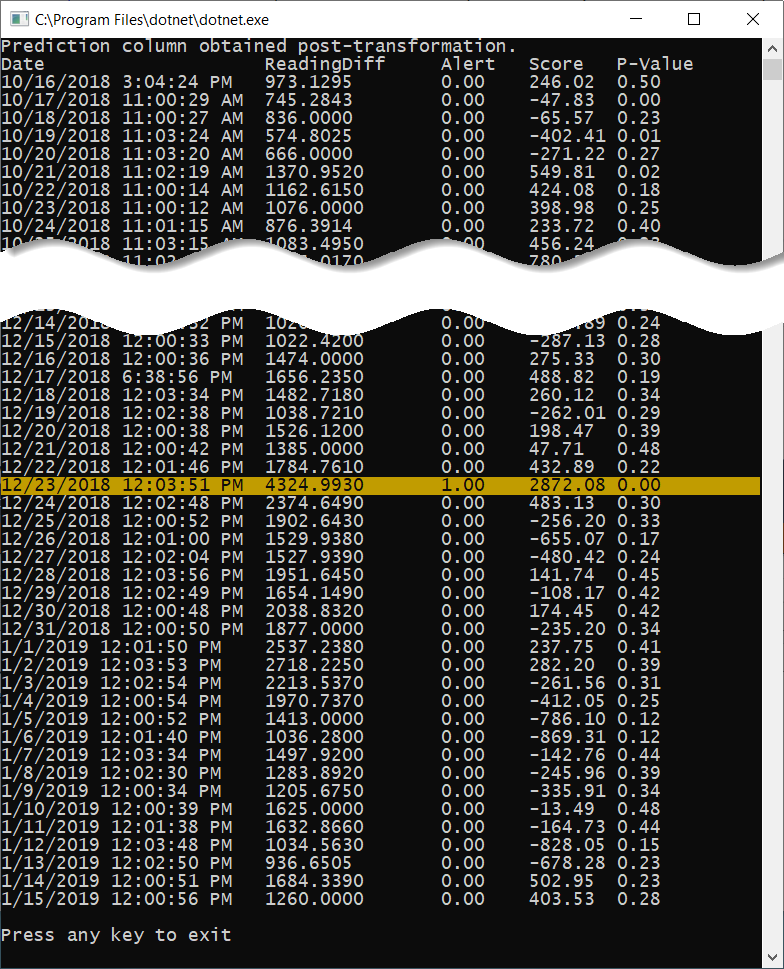
The application will display the transformed power meter data values with the following columns – Alert, Score, and P-Value.
As you can see the same anomaly or spike detected by the Azure Machine Learning Studio experiment is also identified using ML.NET.
One convenient aspect of building models in this way is that you can swap algorithms in your pipeline fairly easily to experiment with other algorithms available in the API. For instance, in our example, it would be a minor adjustment to try the IidSpikeEstimator or another algorithm and evaluate if that would be the more appropriate algorithm for the model.
Closing Thoughts
Azure Machine Learning Studio and ML.NET are both capable offerings to help you create custom AI models. When you glance through the comparison table below, you begin to see the platforms are designed with different audiences in mind.
| Machine Learning Studio | ML.NET | |
| Platform |
|
|
| Ease of Use | Experiments are easy to create and deploy | Requires .NET development skills |
| Flexibility | Limited to the library of algorithms available for the platform | Extensive set of built-in and custom-developed algorithms |
| Operational Environment | Only available in Azure | Can run when .NET Core is supported (Windows, Linux, Mac) |
Azure Machine Learning Studio allows you to be productive quickly with little to no code and allows you to easily operationalize your model as a web service. However, the models are created within the cloud tool and must run in the cloud environment. If you are looking for a platform to quickly build and evaluate a model, and you are more comfortable with Python or R scripting when necessary, Azure Machine Learning Studio may be a great fit. For the .NET developer that prefers working with code, ML.NET provides a flexible platform to build custom models and integrate them into .NET applications of any type. It also allows you to maintain your productivity by staying in the Visual Studio development environment to leverage all the familiar tools like IntelliSense.
Special thanks to Cesar de la Torre (@cesardelatorre), Principal Program Manager of the .NET and ML.NET Product Group for the ML.NET overview and content review, Shahab Moradi, Sr. Data Scientist and Prathyusha Korrapati, VS/.NET PM for help with the APIs.
You can find this sample as well as others at http://aka.ms/mlnetsamples
Thanks for the article. Can you please provide the power-export.csv dataset?
Hello Patricio,
You can use the data file used in the ML.NET sample. That sample can be found here – https://github.com/dotnet/machinelearning-samples/tree/master/samples/csharp/getting-started/TimeSeries_PowerAnomalyDetection/PowerAnomalyDetection/Data