We’re thrilled to unveil the public preview of AI Shell! AI Shell enhances your shell with AI capabilities to facilitate your interactions with the command line. AI Shell create an interactive shell that can interact with various large language model and provides a framework that you can use to build a custom system that meet your needs. Users can interact with the AI agents in a conversational manner.
The AI Shell project includes:
- The command-line shell (
aish) interface - A framework for creating AI agents and other assistance providers
- A PowerShell module for deeper integration with PowerShell.
- Built in AI agents to get you started assistance immediately
Each AI assistant is known as an agent. The initial release of AI Shell includes two agents:
- Azure OpenAI Agent: Powering general-purpose assistance, the Azure OpenAI agent can use any of the AI models provided by Azure open AI to handle broad queries, natural language interpretations or code generation. You can connect it to your deployed Azure OpenAI models if you are looking for more privacy, management of the model settings, or have a model trained with your data. Additionally, you can also utilize OpenAI’s models.
- Copilot in Azure: This agent brings the power of Copilot in Azure directly to your CLI. It specializes in delivering cloud-centric assistance, providing Azure CLI and Azure PowerShell commands and helping you automate your Azure-specific tasks.To get started with the Copilot in Azure agent you need sign in to Azure with Azure CLI with an account that has the IAM role for accessing Copilot in Azure.
NOTE
The Azure OpenAI agent needs additional configuration to connect to your Azure OpenAI instance. To get started, follow the instructions provided when you start start the agent.Recognizing that you may have different CLI command needs, AI Shell provides a framework for creating your own agents. For more information, see Creating an Agent.
Using and Installing AI Shell
We know every CLI user has their own preferences, so AI Shell offers two flexible modes to fit your workflow:
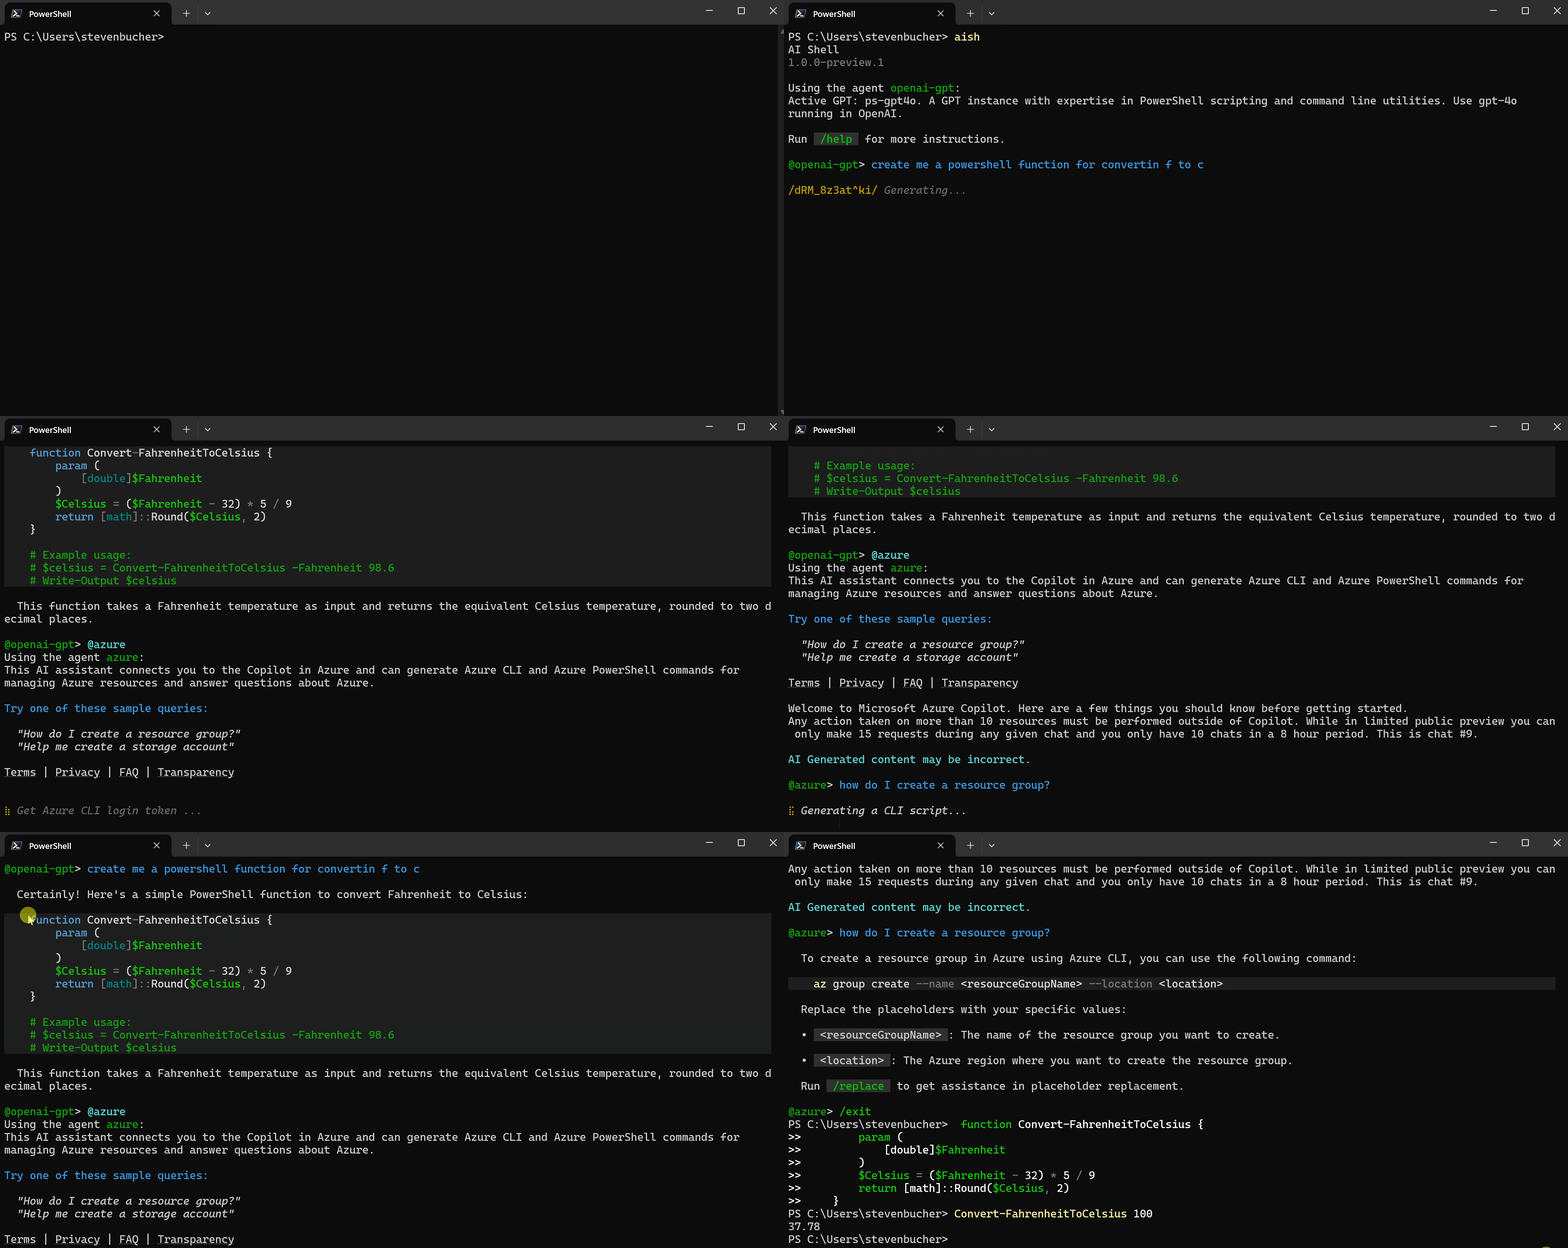
Standalone Executable
You can use AI Shell as a self-contained executable, allowing it to run independently from any shell. This setup is perfect if you’re looking for a dedicated, streamlined experience that’s easily accessible without dependencies.
Side-by-Side Integration with PowerShell 7
This is the recommended method for using AI Shell because it enables an uninterrupted work flow. The
AIShell module connects the aish tool to your PowerShell 7 session for deeply integrated user
experience. AI Shell opens in a side pane right next to your PowerShell 7 session that enables a
rich communication between panes, results from the chat can be carried seamlessly to your PowerShell
session for easy execution and the AI agent can be used to provide assistance to resolve a
PowerShell error.
Installation and Getting Started
Some system requirements are needed to run AI Shell.
AI Shell (aish) and the AIShell module are separate downloads. For your convenience, we
created a script to download and install them for you.
Windows
Some prerequisites are needed to run AI Shell on Windows.
- Windows 10 or higher
- PowerShell 7.4.6 or higher
- Windows Terminal
The following install script will:
- Installs
aish.exeto$env:LOCALAPPDATA\Programs\AIShelland adds it to your PATH - Installs the AIShell module to your module path location
MacOS
Some prerequisites are needed to run AI Shell on MacOS.
- macOS v13 Ventura or higher
- PowerShell 7.4.6 or higher
-
iTerm2 terminal app
On MacOS, this script:
- Installs the
aishexecutable to/usr/local/AIShelland creates a symbolic link at/usr/local/bin/aish - Due to some limitations, the AIShell module is not installed
NOTE
This script only works on Windows and Mac systems. Linux users need to follow the manual installation instructions.To install AI Shell, run the following command in your PowerShell session:
Invoke-Expression "& { $(Invoke-RestMethod 'https://aka.ms/install-aishell.ps1') }"To find details on manual installation please see, Installing AI Shell manually.
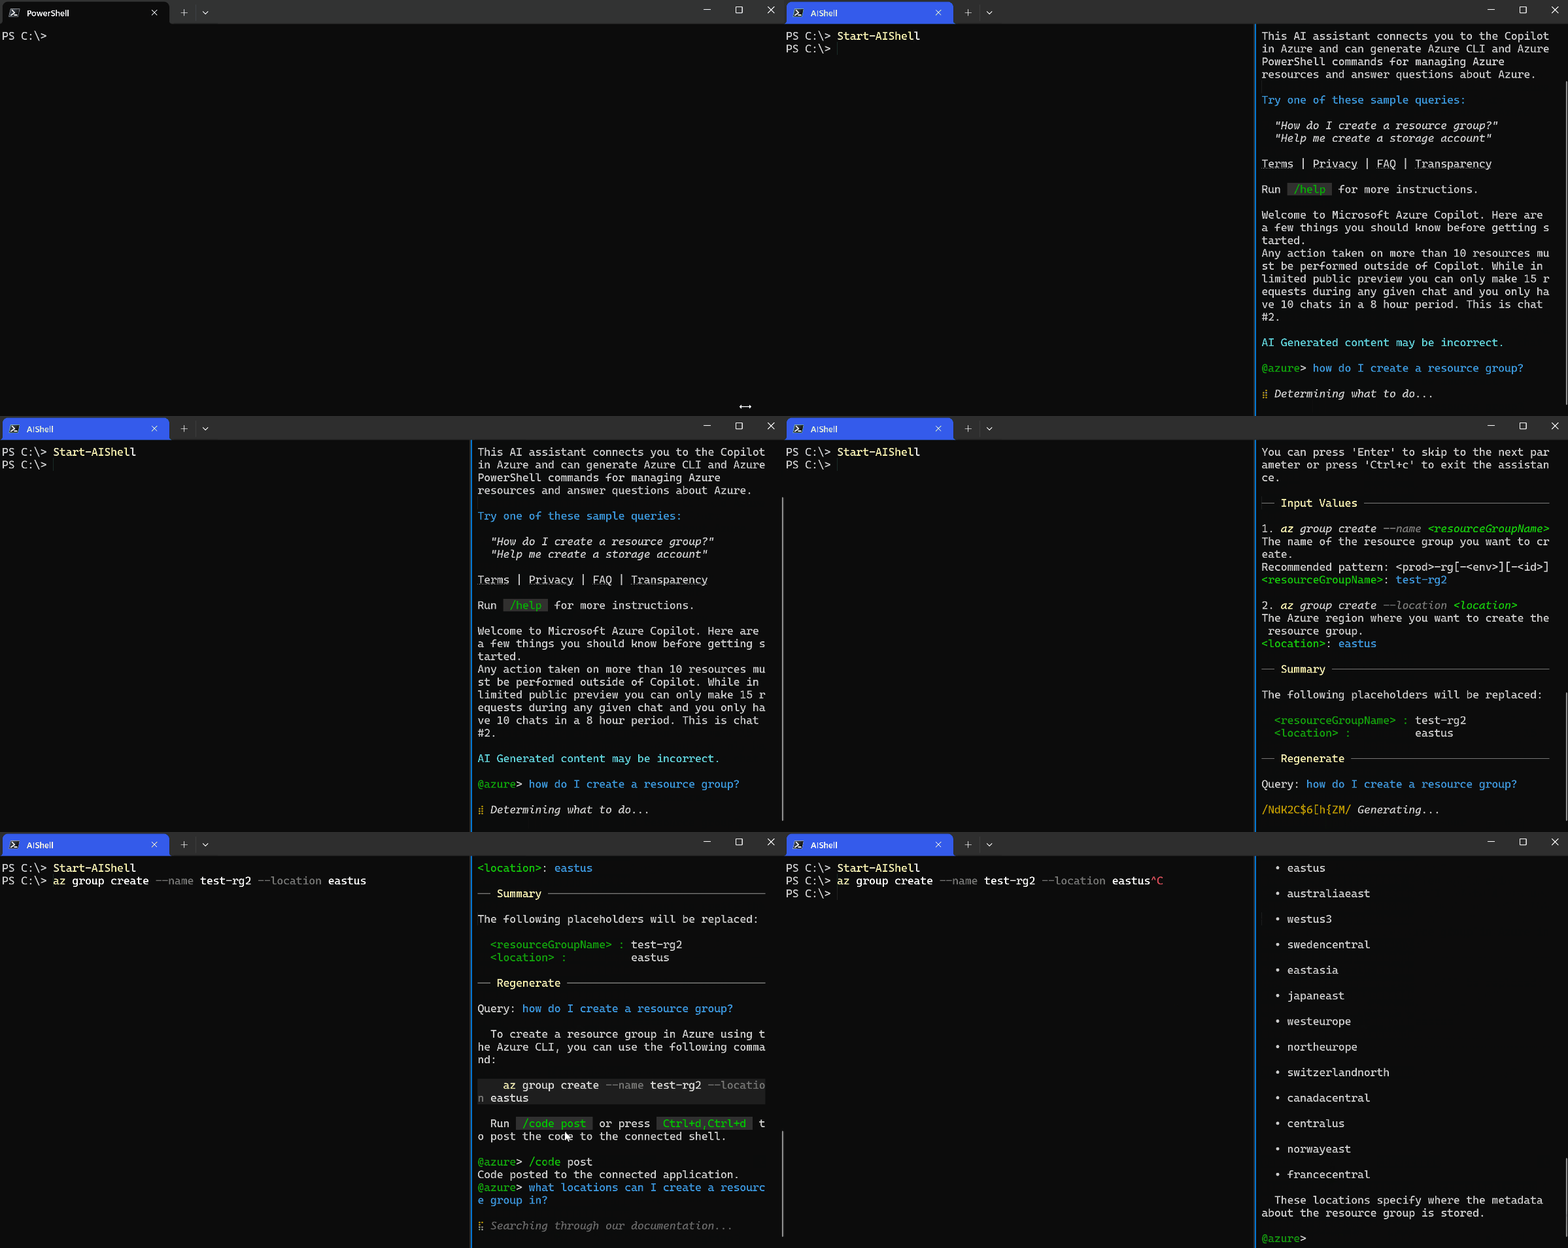
After running the install script, you can run Start-AIShell to begin using AI Shell.
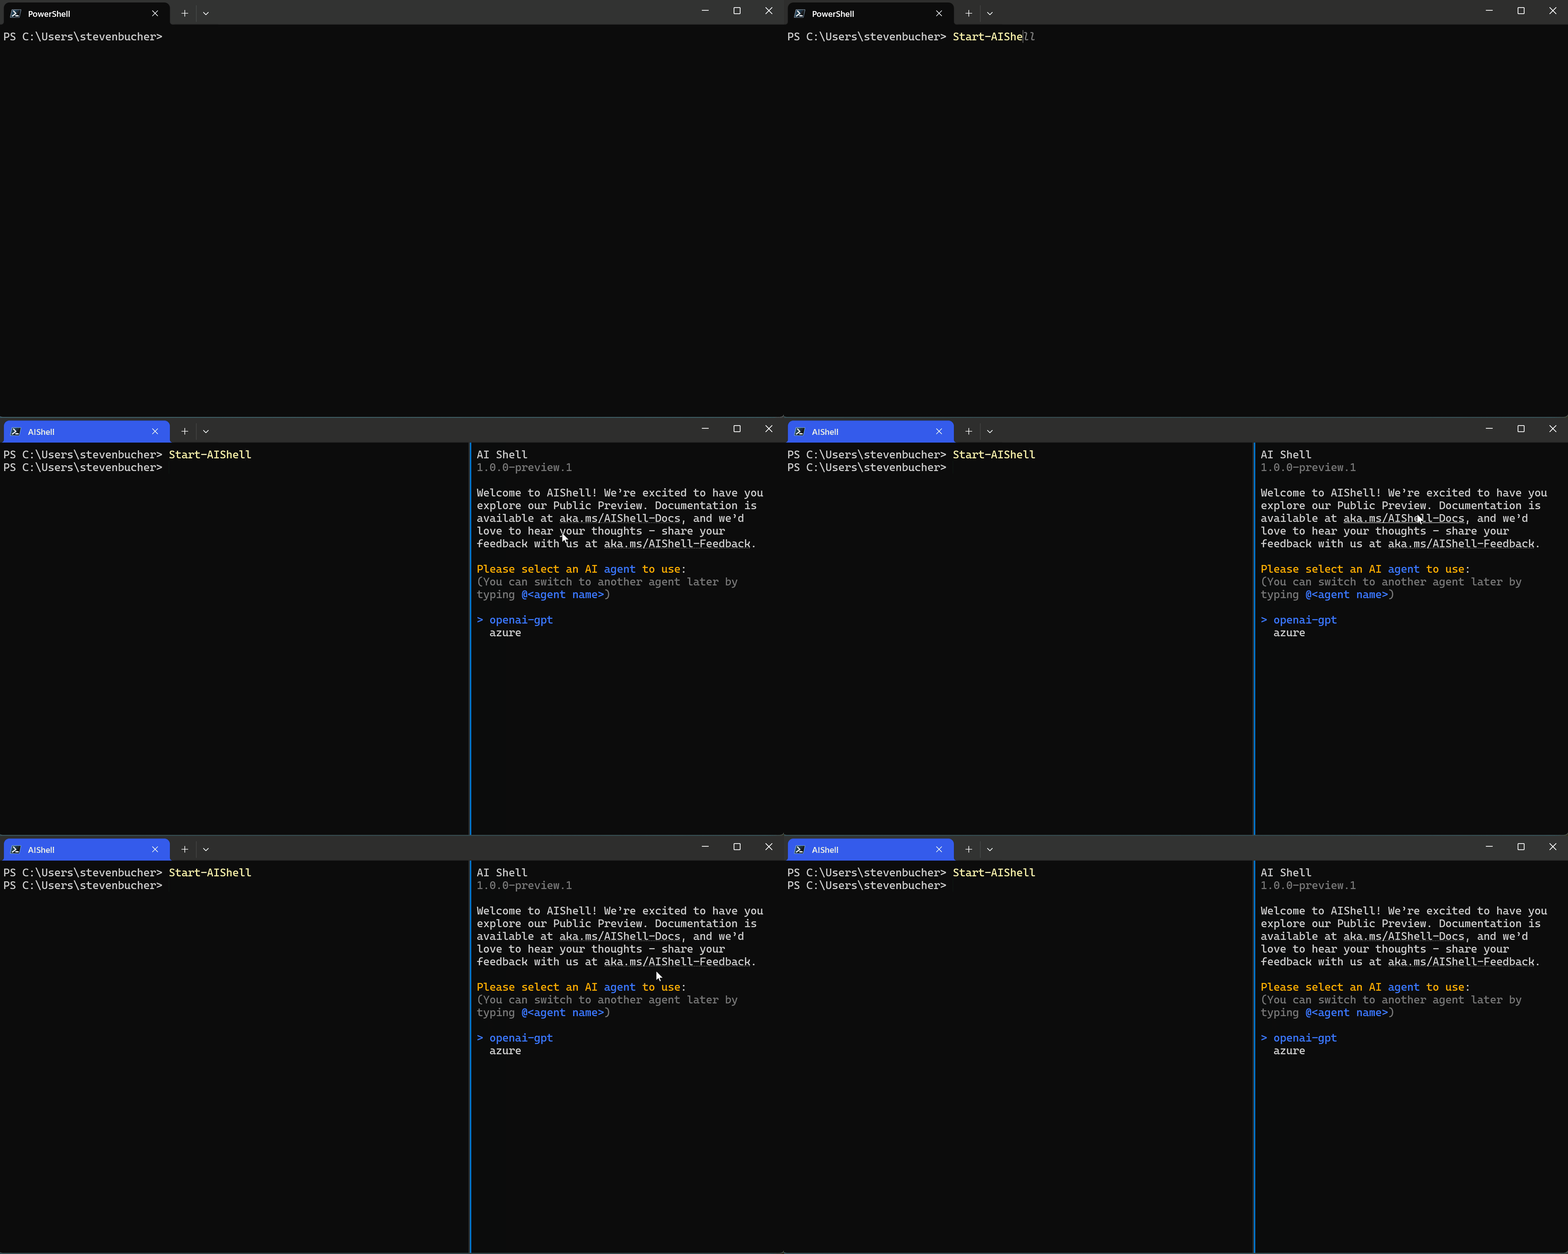
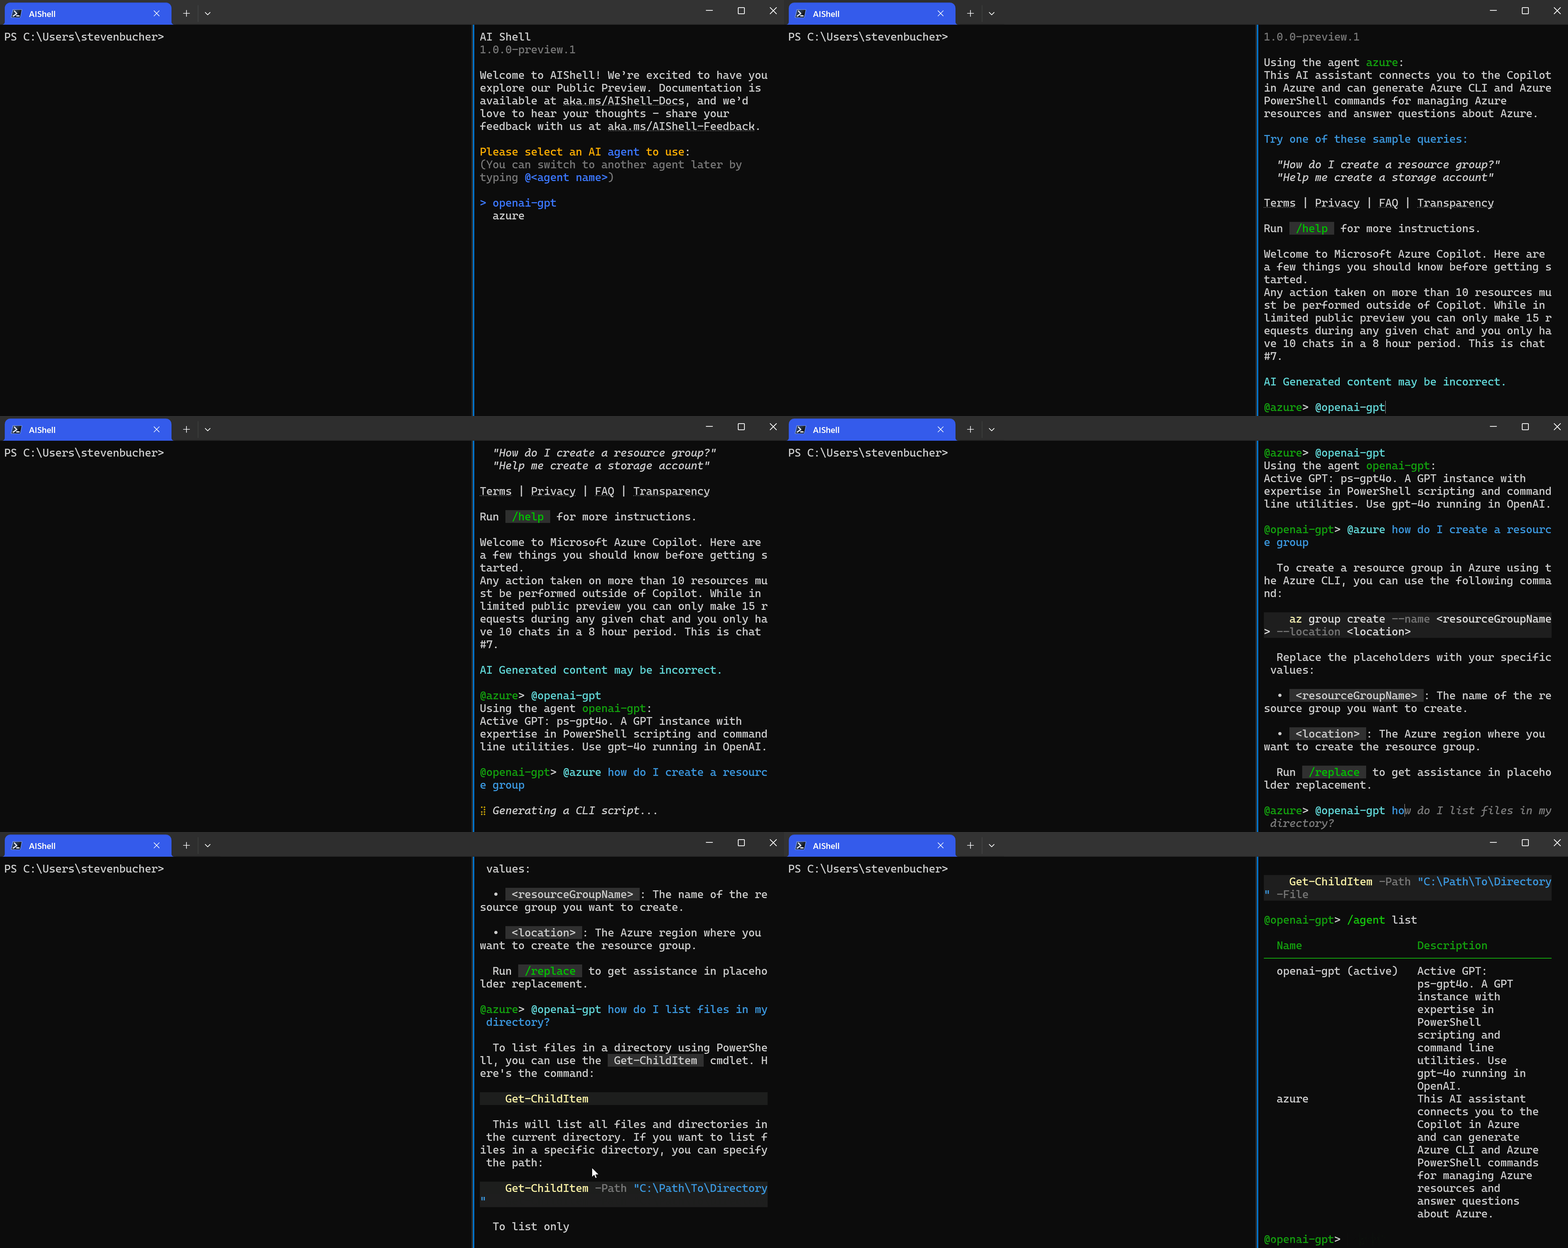
AI Shell starts in the side by side experience. You can switch between the agents by using the
@<agent name> command. For example, to switch to the Azure OpenAI agent you would use the
@openai-gpt command. Additionally you can do @<agent name> <question> to send a question to the
agent immediately.
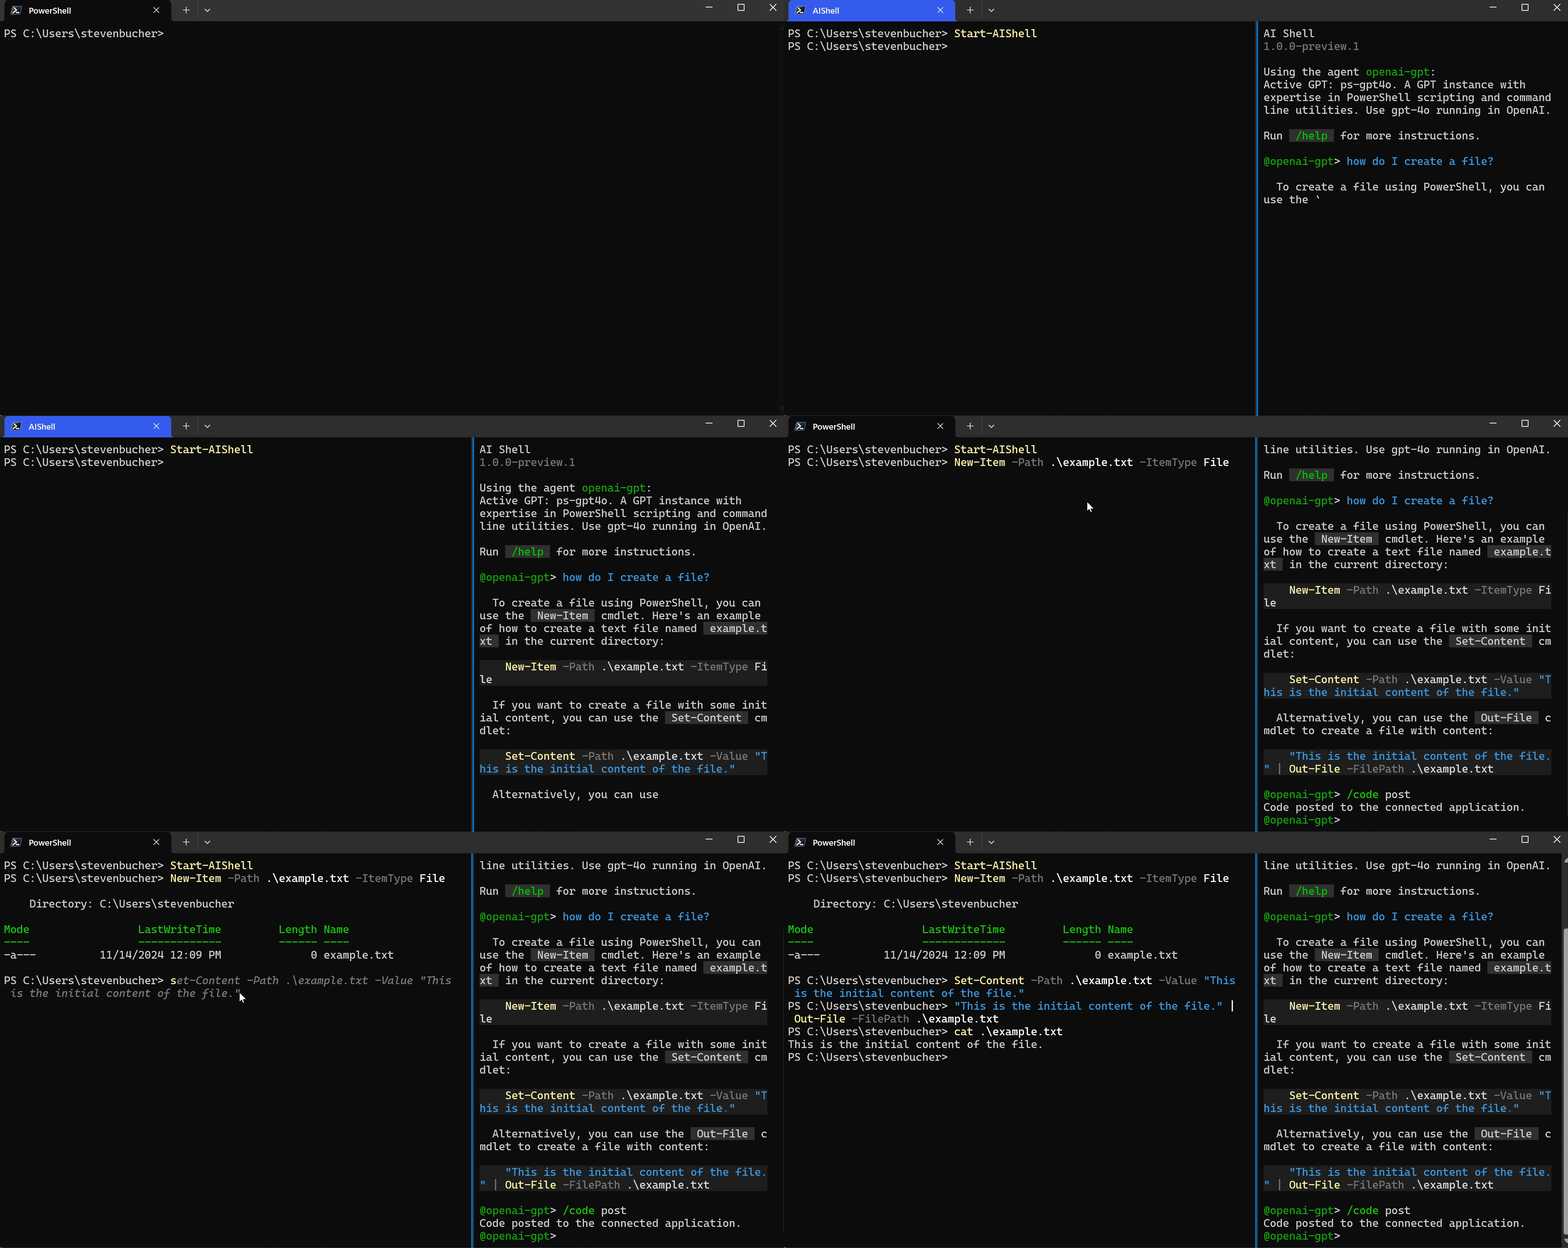
Inserting code into the PowerShell 7 session
Copying and pasting a lot of code can be annoying. AI Shell makes it easy to insert the AI generated
code directly into your PowerShell 7 session with the /code post command. In your AI Shell, run
/code post or use the Ctrl+d,Ctrl+d keyboard shortcut
to copy the code into your PowerShell session.

If you are familiar with PowerShell 7 you may be familiar with Predictive Intellisense. When you get multi-step commands in your AI Shell response, you can easily get each subsequent step in your Predictive Intellisense buffer.
Resolving errors quicker
If you encounter an error in your working terminal, you can use the Resolve-Error cmdlet to send
that error to the open AI Shell window for resolution. This command asks the AI model to help you
resolve the error.
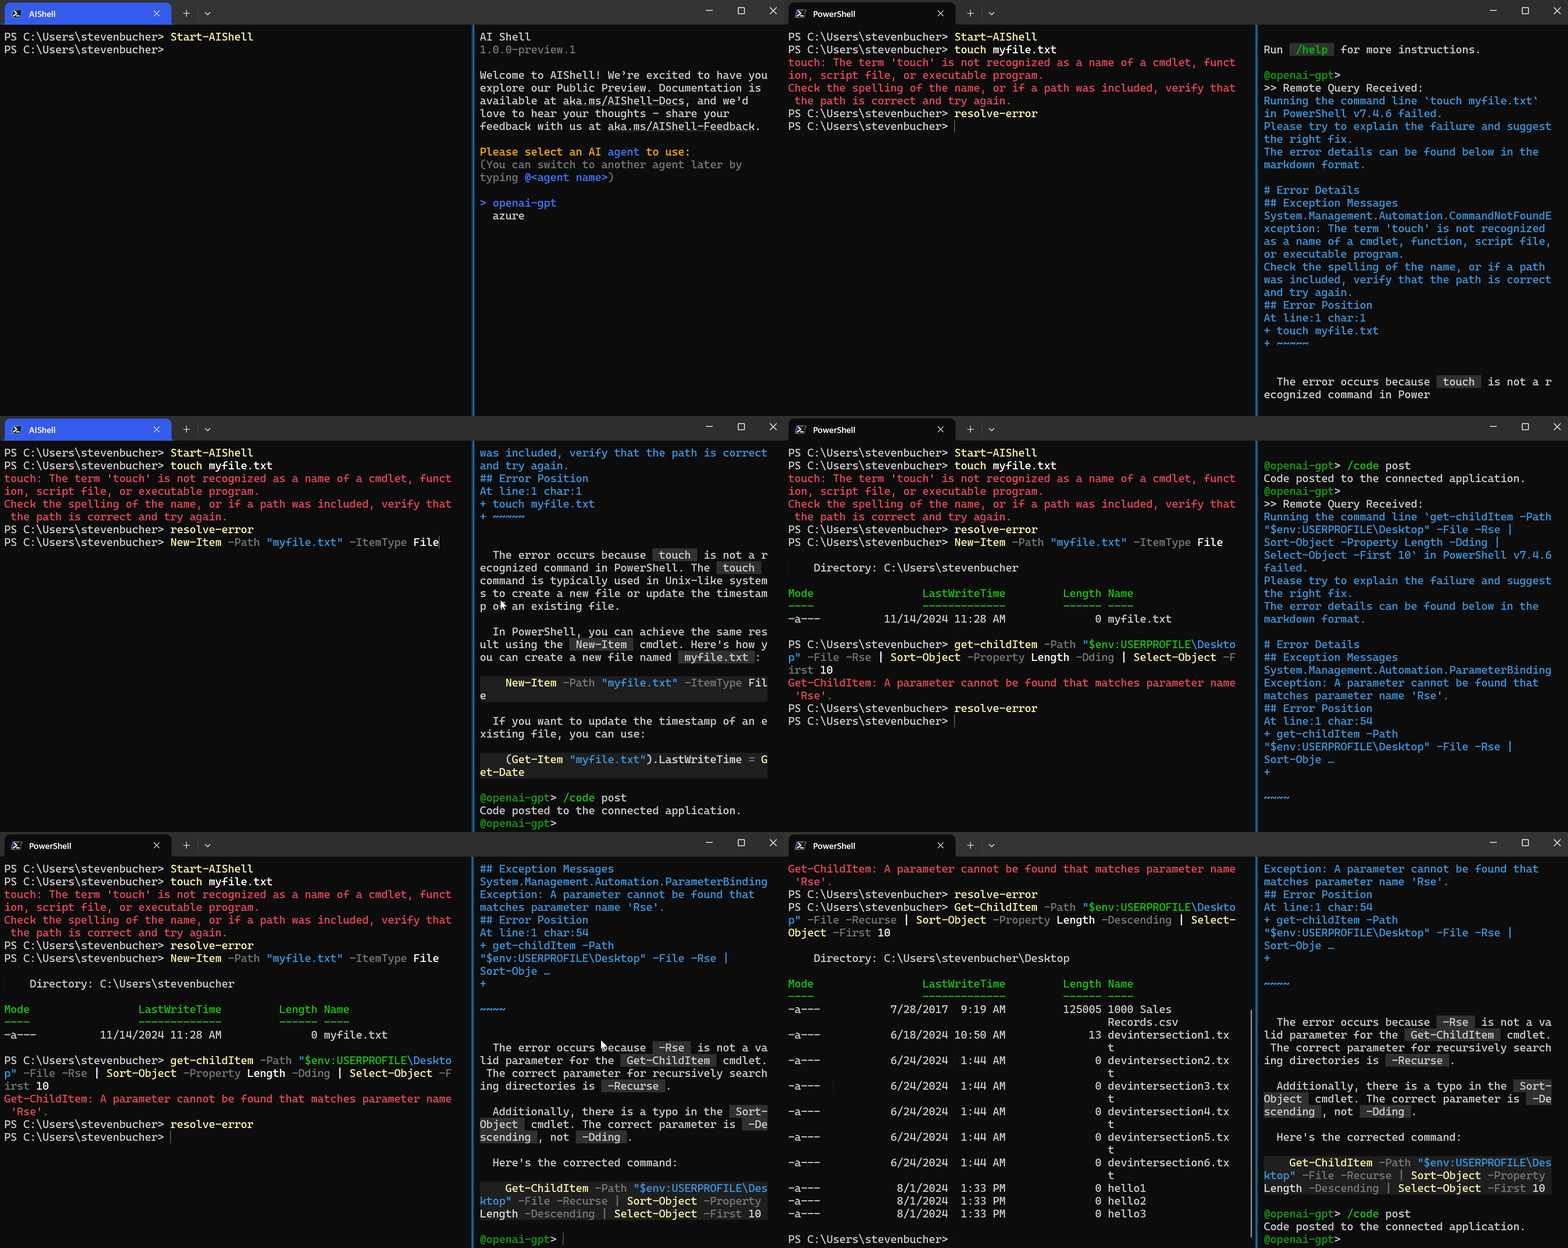
Invoking AIShell from PowerShell 7
One key scenario we wanted to support is being able to pipe output of one command into the AI Shell
to get more information or ask a follow up question on the data given. With the Invoke-AIShell
command you can easily do this.
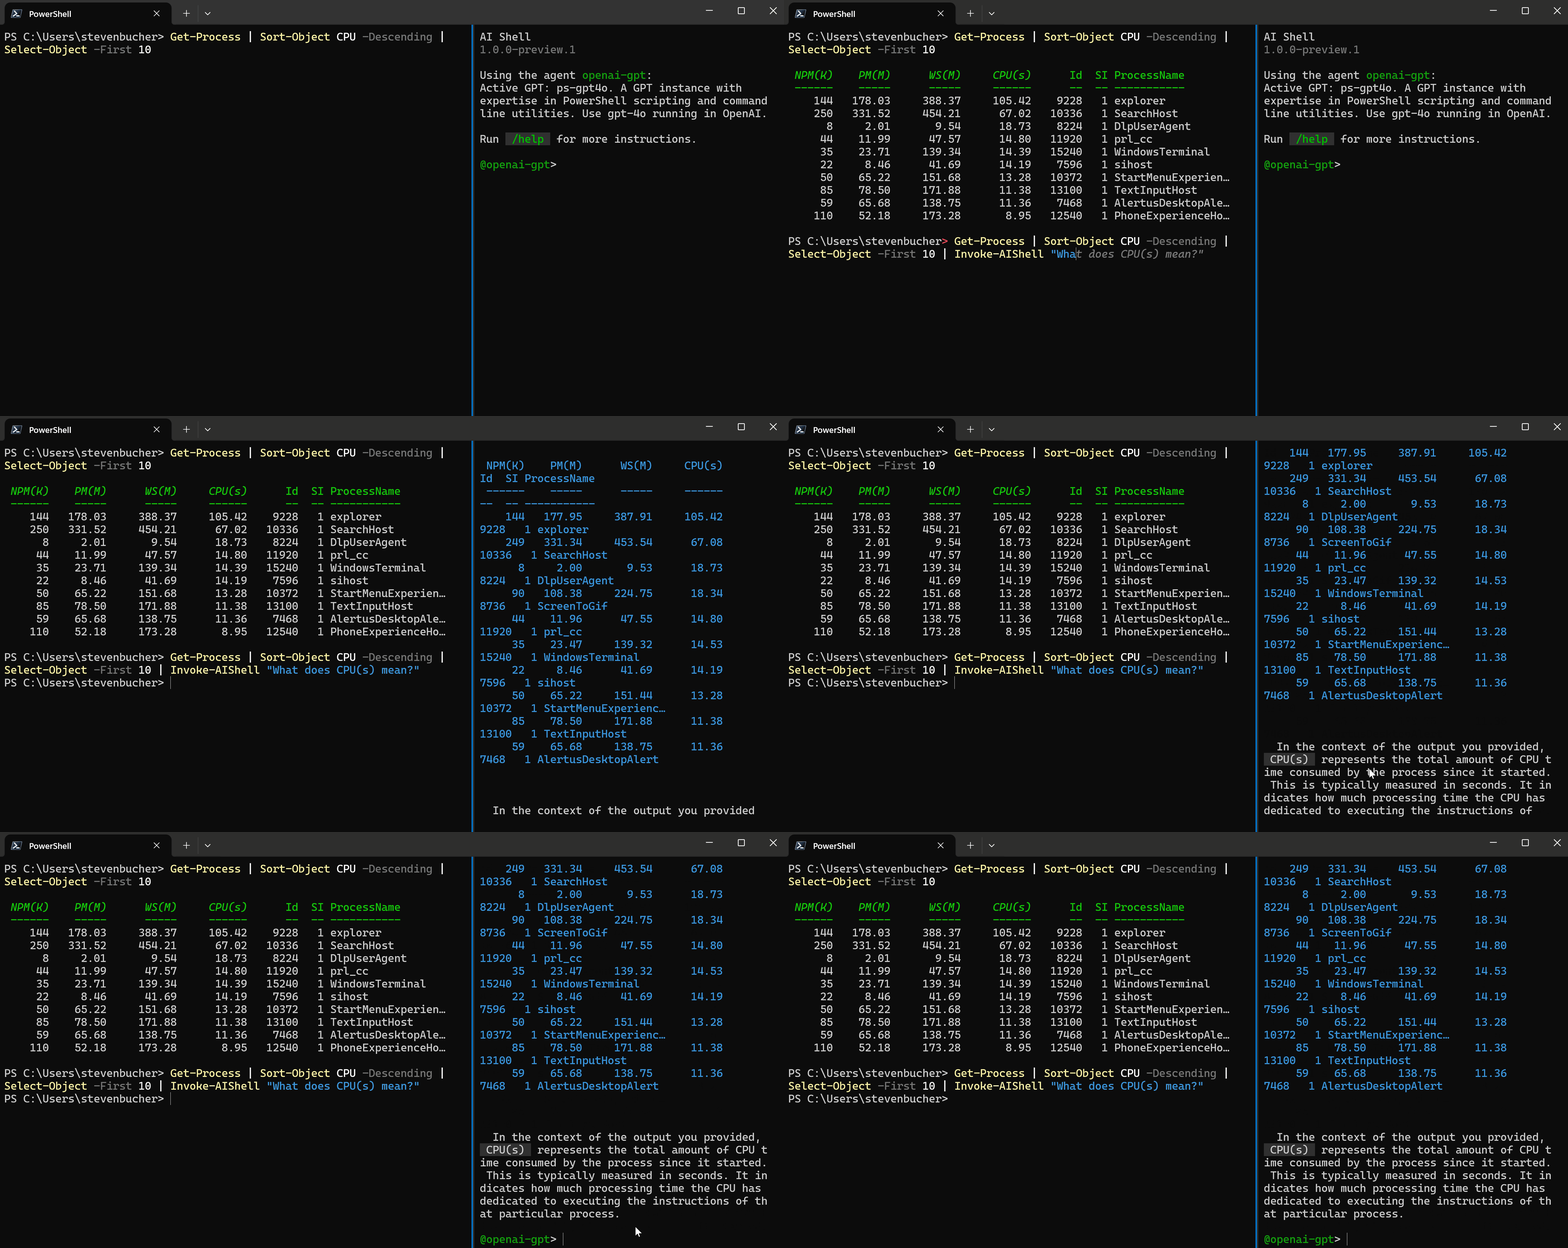
Invoke-AIShell can take input from the pipeline but also can just be used to call the AI agent
selected in AI Shell without having to switch back and forth.
Some additional tips using AI Shell
There are other chat commands and hot-keys that make using AI Shell easier. For a full list of the chat commands, see the AI Shell reference.
| Key bindings | Command | Functionality |
|---|---|---|
| Ctrl+d, Ctrl+c | /code copy |
Copy all the generated code snippets to clipboard |
| Ctrl+<n> | /code copy <n> |
Copy the n-th generated code snippet to clipboard |
| Ctrl+d, Ctrl+d | /code post |
Post all the generated code snippets to the connected application |
| Ctrl+d,<n> | /code post <n> |
Post the n-th generated code snippet to the connected application |
Additionally, you can switch between the panes easier using the following keyboard shortcuts.
| Key bindings | Functionality |
|---|---|
| Alt+RightArrow | Moves your cursor to the right AI Shell pane |
| Alt+LeftArrow | Moves your cursor to the left PowerShell pane |
Why Try AI Shell?
AI Shell was built for those who seek intelligence and adaptability from their command-line. With multi-agent support, AI Shell aims to be the assistant for any CLI tool. You’ll benefit from advanced AI capabilities, deeper integration with your PowerShell session, and an extensibility model to get the assistance you need.
Call to Action!
This public preview is just the beginning. We’d love to hear your feedback and insights as we refine AI Shell to better serve the CLI and PowerShell community. Download it today in PowerShell with
Invoke-Expression "& { $(Invoke-RestMethod 'https://aka.ms/install-aishell.ps1') }"
Be sure to explore the capabilities of the Copilot in Azure and Azure OpenAI agents, and take command-line productivity to the next level! Feel free to give us feedback on the current tool and sign up for early access to future features at aka.ms/AIShell-Feedback.
Thank you so much!
Steven Bucher
Product Manager on the PowerShell/CLI Team


How does this compare to Terminal Chat?
https://learn.microsoft.com/en-us/windows/terminal/terminal-chat
It would be nice to also have support for GitHub Copilot service. Since I subscribed to this service, all AI capabilities come for free to me.
All other (Azure OpenAI, Azure Copilot) services are paid and cost money per request, while GitHub Copilot does not if you have subscription.
Only the first 2 video parts in the article work for me. When I press play on the others, the video doesn’t play.
Should be fixed now! Thanks for point it out!
Invoke-Expression “& { $(Invoke-RestMethod ‘https://aka.ms/install-aishell.ps1’) }”
why my computer ( Windows 11 Pro for Workstations )cannot use AI-Shell?
Feel free to sbumit an issue to our GitHub repo with more details and we can help debug! https://github.com/PowerShell/AIShell/issues