
The 2505.09 release of PIX on Windows introduces the concept of Budget Profiles in Timing captures. A Budget Profile is a grouping of budgets defined for their respective metrics. A common use of Budget Profiles is to define the performance targets, or profiles, for different hardware specifications. For example, your studio likely has different performance targets for min-spec, mid-range and high end PCs.
Budget Profiles are defined and managed using a new Budgets layout. Click the New Profile button on the Budgets layout to create a new profile.

A dialog will appear, prompting you to name your new profile.

After clicking ok to create the budget profile, the metrics selection panel will be displayed on the left hand side of the view. Select a metric to create a budget to add to the profile. Doing so displays a dialog on which you can specify an initial budget for the metric. In this example, a budget for the Working Set Size metric has been set.

Budget profiles typically consist of numerous budgets. The main view in the Budgets layout displays the budgets and their metrics. Use the buttons on each lane to either graph the metrics in the Metrics layout, or to open the Comparison layout.
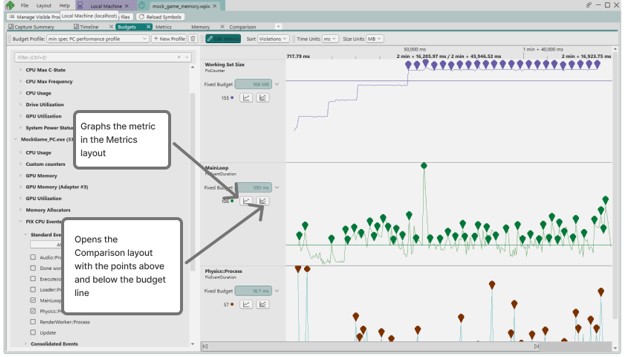
When the Comparison layout is opened, the points above the budget are contained in the left hand graph, while the points below the budget are contained in the right hand graph.

Use the dropdown next to the budget value on the Budgets layout to edit or delete the budget.

Multiple budget profiles are typically defined. Switch between them using the Budget Profile dropdown.

The currently selected budget profile determines the budget values that are used when viewing budgets in either the Metrics layout or the Comparison layout. For example, the min spec PC performance profile specifies a budget of 108 for Working Set Size.
When min spec PC performance profile is selected in the Budgets view, the graph of the Working Set Size metric in the Metrics view will use the budget of 108. Switching to a different budget profile will change the budget values that are used.

Similarly, a budget of 108 will be used in the Comparison layout when comparing points above and below the budget line.
In previous versions of PIX on Windows, budgets could be set using the Budget tab of the Metric Details panel on the Metrics layout. Budgets can still be set on the Metrics layout. This is now done using the context menu on the graph. Right clicking a point on the graph and selecting Set budget for <metric> creates a budget with the value of the selected point. Setting a budget in this way will add the budget to the currently active budget profile.

As always, keep the feature requests and bug reports coming using the PIX Feedback button in the upper right corner of the UI.
Steven.
0 comments