Getting started with Kaizala APIs
In case you are new to Kaizala, you can read Introduction to Kaizala Extensibility blog. In this post, we will get on boarded to Kaizala APIs and send a message on a group using API. Briefly, we will see how to:
- Get the Kaizala Postman API collection
- Understanding of Kaizala connectors and creating them
- Authenticating to Kaizala
- Creating a group and sending a message on Kaizala
Get the Kaizala Postman API collection
Kaizala has the APIs documented as a Postman collection that is available at https://docs.microsoft.com/en-us/kaizala/connectors/api. You will need the Postman REST client to use this. In case you don’t have Postman, you can download it from http://www.getpostman.com. Under the “Postman Collection” section, click on the “Run in Postman” button. This will download the Postman collection locally and will be seen under Collections.

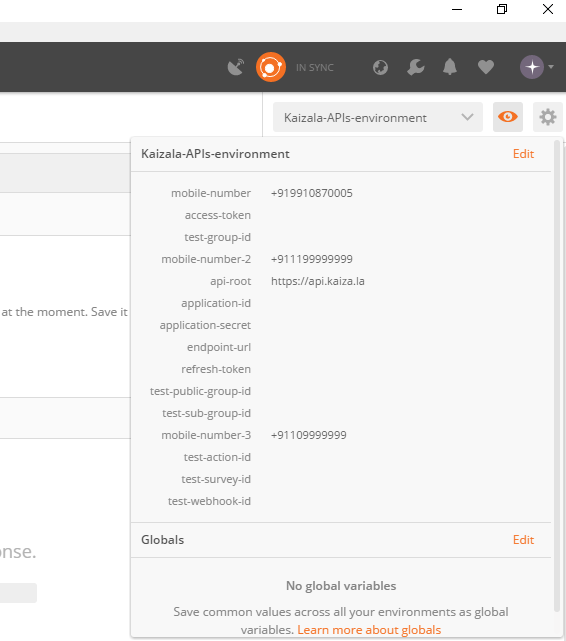
The collection uses Environment Variables, which can be seen by clicking on the ![]() icon.
icon.

Click on Edit and set the below environment variables to follow this article:
| mobile-number | Starts with + followed by country code and the mobile number. For e.g. for a sample Indian mobile number it would be +919885098850 |
| application-id | <<after following step-1 below update this with the Connector ID>> |
| application-secret | <<after following step-1 below update this with the Connector Secret>> |
Connector
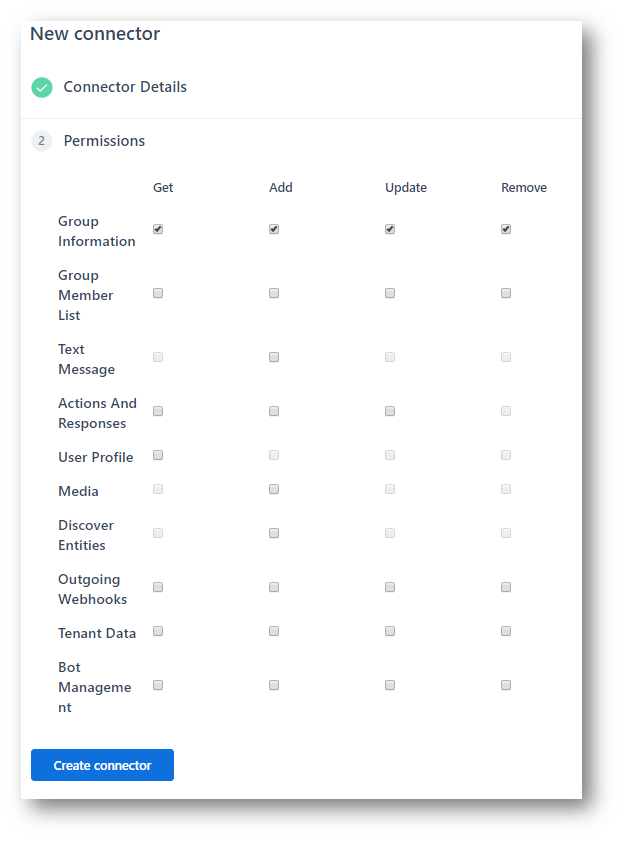
To work with Kaizala APIs, you will need a connector. Kaizala Connectors enable 3rd party developers to integrate Kaizala into their business processes by providing the ability to perform a curated set of actions in Kaizala using REST based API calls. Connector is also called as Application and are used interchangeably in Kaizala. You can read more about connectors here. While configuring the connector you will also need to give a set of permissions that you would like the connector to have.
Authentication Tokens
Kaizala APIs use token based authentication and to access any API endpoint, you need to have an access token. An access token is generated using a refresh token. The validity of access token is 24 hours and that of refresh token is 365 days. Below is the list of different types of refresh tokens available today:
- Group level refresh token
- User refresh token
- Tenant admin refresh token
- OAuth refresh token
For this post, we will use #2 above – User refresh token. For details around different types of tokens available refer the documentation here.
Creating and sending a message on a group
In order to use the API, you will need to create a connector and use the connector details in the API for authenticating to Kaizala. Below are the set of steps that will take you through the process of creating the connector, authenticating to Kaizala, creating a group and sending a message on the group:
- Register a connector to get the application id and application secret
- Generate PIN for the mobile number (to authenticate as the user belonging to the mobile number)
- Use the PIN and Application Id to generate the refresh token
- Use the refresh token, application id, application secret to generate the access token
- Create a group
- Send message on the group
[Note: application and connector are used interchangeably, so application id / connector id is the same and so is application secret / connector secret]
Step 1 – Register a connector to get the application id and application secret
- Go to https://manage.kaiza.la/Connectors/Connectors and click on “Add connector” button
- Fill in the connector details such as connector name, connector description, upload a connector image and hit Continue. (Ignore the Redirect URL and Redirection proxy for now.)

- Give the permissions you want to grant and hit “Create connector”

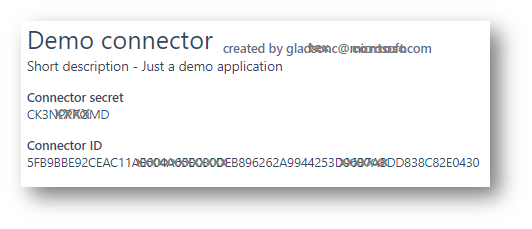
- Go to https://manage.kaiza.la/Connectors/Connectors page and select the connector you just created
- Keep the Connector secret and Connector ID handy

Update the Postman environment variables to update application-id and application-secret
| application-id | <<after following step-1 below update this with the Connector ID>> |
| application-secret | <<after following step-1 below update this with the Connector Secret>> |
Step 2 – Generate PIN for the mobile number
In the postman collection, click on [1.0] Authentication folder and click on Step1 – Generate Pin, and hit Send. This will send a PIN to the mobile number that you had set in the Environment Variables

Step 3 – Use the PIN and Application Id to generate the refresh token
In the postman collection, click on [1.0] Authentication folder and click on Step2 – Login with pin and applicationId to get refreshToken. In the Body section, update the pin (8876 in the below image) with the pin you received on your mobile and hit Send. This will generate the refreshToken (and also set that in the environment variable “refresh-token” for future use).

Step 4 – Use the refresh token, application id, application secret to generate the access token
In the postman collection, click on [1.0] Authentication folder and click on Step3 – Retrieve the access token and click on Send. It will pick the applicationId, applicationSecret and refreshToken from the respective environment variables and fetch the accessToken (and also set that in the environment variable “access-token” for future use). Now that you have the access token, you have the required authentication token to invoke any of the Kaizala APIs.

Step 5 – Create a group
In the postman collection, click on [2.0] Group management folder and click on Step1 – Create a group. In the Body tab, you can add the mobile numbers you want to be added as members to the group. For this example, I am not adding any members (removed members:[“{{mobile-number-2}}”], from the default body). Click on Send. You should be able to see the newly created group on Kaizala on your mobile.

Step 6 – Send a message on the group
In the postman collection, click on [3.0] Content Creation APIs folder and click on Send message on a group. In the Body tab, you can edit the message if you want and click on Send button. You should receive the message on the group you created in Step 5.

Conclusion
Congratulations on sending your first message on Kaizala using APIs. You can go ahead and explore the various other API endpoints / support that Kaizala has by exploring the “Kaizala Server APIs” Postman collection. You could now call these APIs programmatically to integrate Kaizala with your system. For a C# code sample on getting started, you could refer this document. Thank you for reading, stay tuned!

 Light
Light Dark
Dark