

In a recent project, we needed to synchronize multiple remote Git repositories. We were maintaining an open-source project on GitHub, and a private downstream mirror on Azure Repos. It was important for the project to have a safe and reliable process that would allow us to keep the two repositories in sync.
In our specific case, this would be a one-way synchronization from GitHub to Azure Repos. It was not possible to synchronize in the other direction, as the Azure Repos repository would contain organization-specific implementations that could not be shared publicly.
We made the conscious decision to keep the synchronization manual. The project maintainers wanted control over the process. They wanted to review, and approve, any changes that were being moved downstream. This would also give the team an opportunity to resolve any conflicts that may arise.
During the project, we discovered different ways to approach this problem. In the end we settled on a process that was simple, and easy to follow – with minimal knowledge of Git required. This post will outline the process we followed, and the steps we took to synchronize changes between remote repositories.
Repository Setup
Before starting the synchronization process, we needed to set up the mirror on Azure Repos. This was a one-time operation, and was done using the Azure Repos web interface. This is a simple process, nicely documented here.
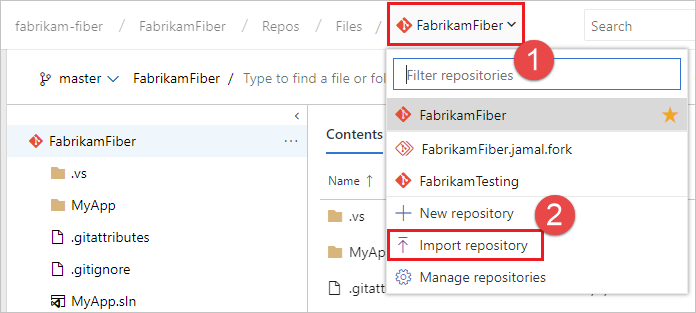
[Source: Microsoft Learn]
Once the repository was imported, we could setup our local repository to have two remotes. origin pointing to Azure Repos, and upstream pointing to GitHub.
$ git clone <azure-devops-url> my-repo
$ cd my-repo
$ git remote -v
origin      <azure-devops-url> (fetch)
origin      <azure-devops-url> (push)
$ git remote add upstream <github-url>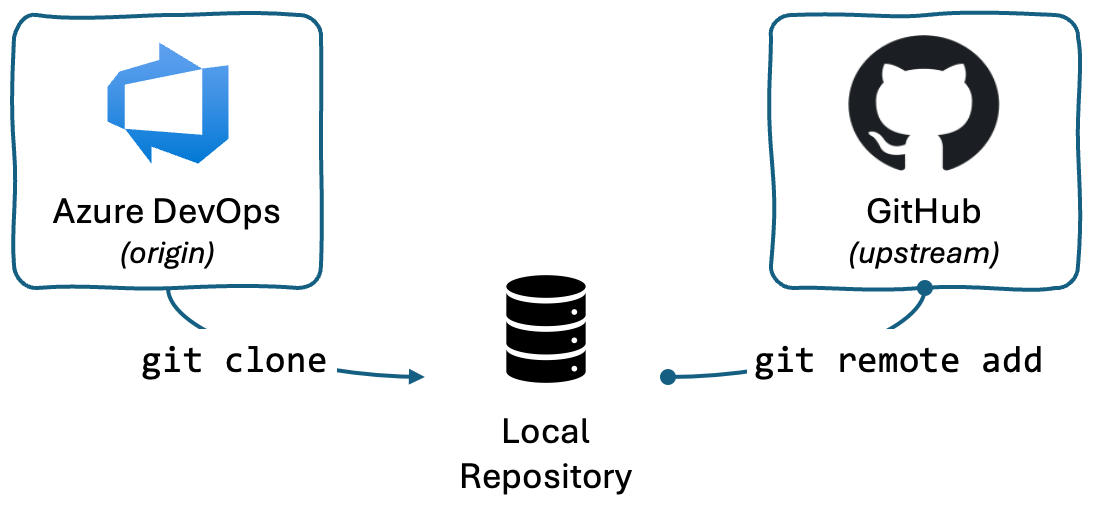
At this point, our local repository was set up to push and pull changes from both origin and upstream. We could confirm this by running git remote -v:
$ git remote -v
origin      <azure-devops-url> (fetch)
origin      <azure-devops-url> (push)
upstream    <github-url> (fetch)
upstream    <github-url> (push)
(Optional) Manually import a repo using git CLI
We were fortunate to be able to use the web interface to import the initial repository. However, if you need to import a repository using the git CLI, you can follow these steps:
-
Clone the source repo to a temporary folder on your computer using the
--bareoption:git clone --bare <github-url> bare-repo cd bare-repoNote: The
--bareoption creates a bare repository, which does not have a working directory. This is useful when you want to import a repository into another repository. -
Create a new empty repository on Azure Repos.
-
Push the source repository to the new Azure Repos repository:
git push --mirror <azure-devops-url>Note: The
--mirroroption pushes all branches, tags, and commits from the source repository to the target repository.
Synchronizing Changes
The synchronization process itself was straightforward. We would fetch changes from GitHub, create a new local branch, and push it to Azure Repos. This would allow us to create a Pull Request to review the changes, and merge them into the main branch.
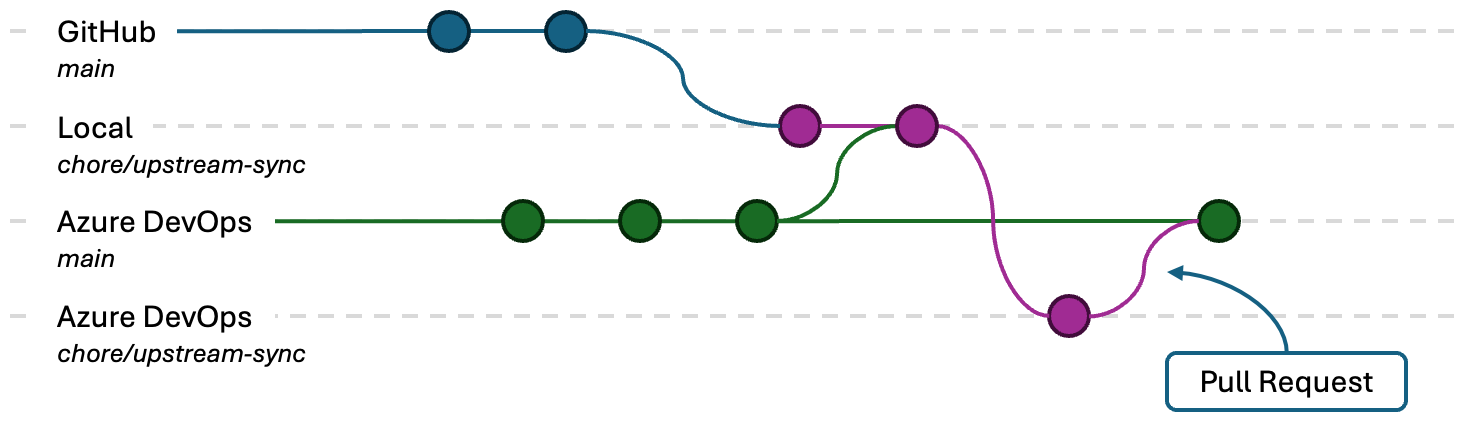
Let’s assume we had some updates from upstream we wanted to synchronize. This is the process we would follow:
-
Fetch changes from GitHub (
upstream):git fetch upstream -
Checkout a new local branch, based on GitHub’s
mainbranch:git checkout --no-track -b chore/upstream-sync upstream/mainNote: The
--no-trackflag is used to create a new branch that is not tracking any remote branch. -
Merge the latest changes from Azure Repos (
origin) intochore/upstream-sync:git fetch origin git merge origin/main # resolve conflicts, if anyNote: At this stage, if you receive an error message “fatal: refusing to merge unrelated histories”, it’s likely that
origindid not originate fromupstream. Ensure that the repository was imported correctly. -
Publish the new local branch to Azure Repos:
git push -u origin chore/upstream-sync -
Create a pull request in Azure Repos to merge the
chore/upstream-syncbranch into themainbranch.
-
After the PR meets all branch policies and has all required approvals, you can complete the PR.

“Patch-test” from upstream
During the project, we discovered a scenario where we needed to test changes in the downstream environment before merging them into GitHub’s main branch. To achieve this, we needed to patch the changes from GitHub into a temporary branch on Azure Repos. This would allow us to run organization-specific tests, and deployment pipelines.
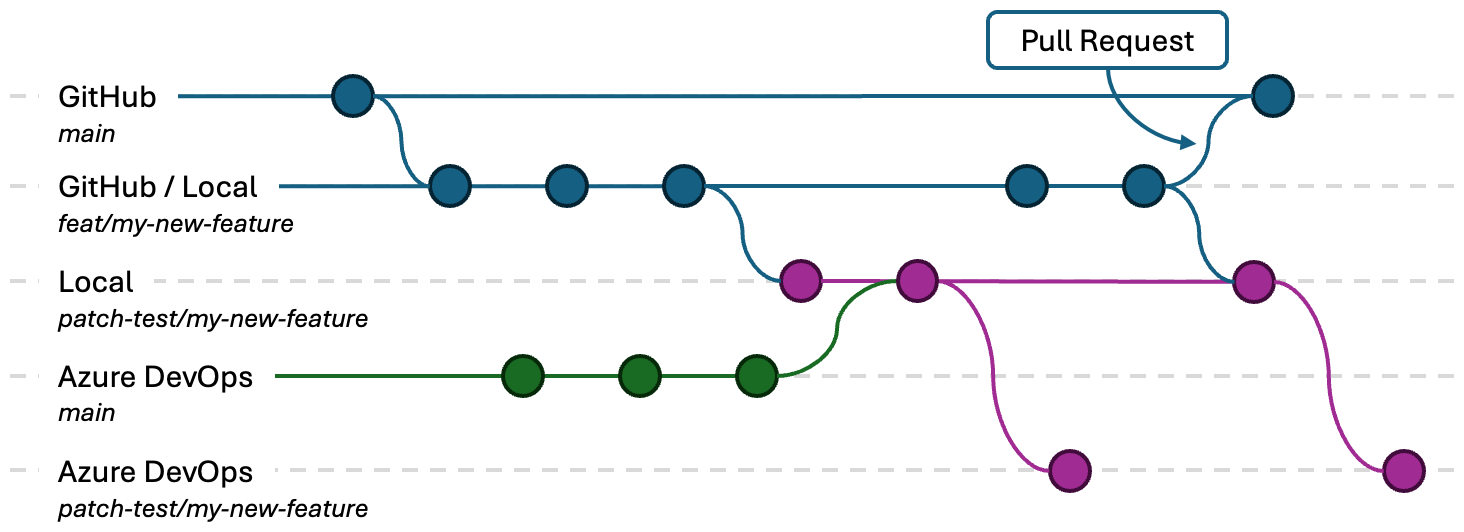
This wasn’t a regular practice, but frequent enough to warrant a process:
-
Let’s assume we already have a feature branch, called
feat/my-new-featureon GitHub. -
Create a new local
patch-test/branch, based on the feature branch:git checkout --no-track -b patch-test/my-new-feature upstream/feat/my-new-feature -
Merge the latest changes from Azure Repos (
origin) intopatch-test/my-new-feature:git fetch origin git merge origin/mainAt this point, it’s important to re-iterate that our synchronization process was one-way. Once a branch was “contaminated” with organization-specific changes, it could not be merged, or pushed, back into GitHub.
-
Push
patch-test/my-new-featureto Azure Repos (origin).git push -u origin patch-test/my-new-feature -
Run any necessary test and deployment pipelines on Azure DevOps from the
patch-test/my-new-featurebranch.
But wait! What if I need to make a change?!
-
It is important to keep new commits isolated from the “contaminated”
patch-test/branch. We start by switching to the original feature branch, that is tracked toupstream:git checkout feat/my-new-feature -
Commit whatever change you need.
-
Then, repeat the merge process:
git checkout patch-test/my-new-feature git merge feat/my-new-feature git push -
Once you are happy with the changes, you can push the feature branch to GitHub, and delete the
patch-test/branch.git checkout feat/my-new-feature git push git branch -d patch-test/my-new-feature
Conclusion
Synchronizing multiple remote Git repositories can be a daunting task. It certainly was for our team. However, the right process can provide a safe and reliable way to keep repositories in sync. With a few simple steps, maintainers and other users of the project, can confidently move open-source contributions downstream. Allowing them to maintain and update a private organization-specific implementation.
Note: The feature image used in this blog was created using AI in Microsoft Designer.