

Overview
This post describes how to serve Swagger UI from an Azure Function Custom Handler and uses Golang web server as an example. This post assumes you have a basic understanding of Azure Functions, Swagger and OpenAPI.
Purpose of an Azure Function Custom Handler
The following statement from the official documentation on Azure Function Custom Handlers describes their purpose:
The primary purpose of the custom handlers feature is to enable languages and runtimes that do not currently have first-class support on Azure Functions. Source: https://docs.microsoft.com/en-us/azure/azure-functions/functions-custom-handlers
So, if you want to use a language that does not have first-class support, you can use a custom handler to do so. The following statement from the same documentation best describes what they are:
Custom handlers are lightweight web servers that receive events from the Functions host. Any language that supports HTTP primitives can implement a custom handler. Source: https://docs.microsoft.com/en-us/azure/azure-functions/functions-custom-handlers
So, if the language has a web server, it can be used as a custom handler.
The Challenge
For our team, the challenge was serving Swagger UI from an Golang Azure Function Custom Handler. To make this work, we primarily considered the following:
- Tooling Options: What tooling does the language offer for generating an OpenAPI spec and serving Swagger UI? In our case, it was Golang, so the question was, “What tooling does Golang offer for generating an OpenAPI spec and serving Swagger UI?”
- The Use Case: Which tooling out of all the options is the best fit?
- Serving the Swagger UI: How do you serve Swagger UI from that tool?
- Locally Serving the Swagger UI from an Azure Function Custom Handler
Key Considerations
Tooling Options
For Golang, there were many options for generating an OpenAPI spec and serving Swagger UI. For your language, you’ll need to do some research to find out what options are available. For Golang, the following options were discovered:
| Tool | Description |
|---|---|
| Go-Swagger | Go-Swagger is a CLI tool to mainly generate or analyze source code. |
| Swaggo/Swag | Swag CLI is a Golang tool for generating an OpenAPI spec from Go code. |
| Swagger | A CLI that generates the documentation as JSON, according to the Swagger Spec, and then displays it using Swagger UI. |
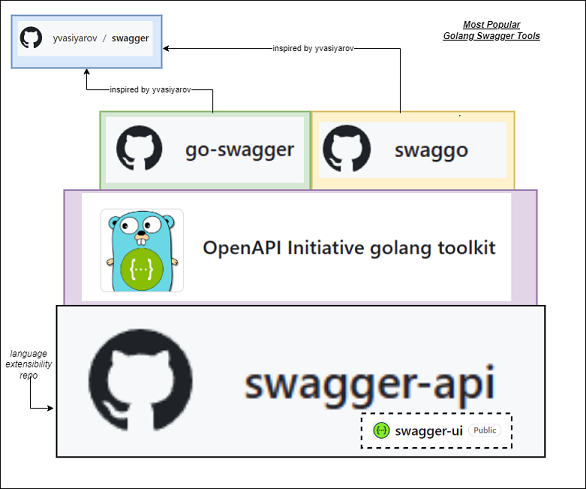
At some point, we realized that many of these were listed directly from Swagger’s open source integrations page. Although it’s not an exhaustive list, it’s a good place to start.
The Use Case
For our team, the decision was between Go-Swagger and Swaggo. The following table compares the two:
| Use-Case | Go-Swagger | Swaggo | Winner |
|---|---|---|---|
| OpenAPI 2.0 | Yes | Yes | Tie |
| OpenAPI 3.0 | No | No | Tie |
| Serving Swagger UI | Docs suggest writing middleware or manually spinning up a separate server. | Simply go get a Swaggo custom handler library and import in code. |
Swaggo |
| Code-First | The cli install docs included a “choose your own path” approach. Not as straightforward as Swaggo. | Simply get install the Swaggo swag library and run swag init against annotated files. |
Swaggo |
| API-First | Available | Not available. | Go-Swagger |
NOTE: When installing Swag CLI, you may need to manually move the cli executable to the GOPATH. For example, if you’re using a Mac, you may need to move the executable to
/usr/local/bin.
We chose to use Swaggo because it was the most straight forward for addressing our code-first spec generation use case. Go-Swagger is a great tool, but it offered more overhead than was needed. For example, Go-Swagger requires you to navigate documentation that’s concerned with the API-First approach. This is great if you’re doing an API-first approach, but we were doing a code-first approach. Swaggo was a better fit for our use case.
The swagger tooling ecosystem is very large and it’s easy to get lost in the options. The following diagram showcases how the Swagger tooling ecosystem is layered on top of the Swagger-API code base. The diagram is golang specific, but the concept spans languages.
Lastly, a great way to narrow down options when searching for a tool is to consider the code-first use-case versus the API-first use-case. This approach also spans languages. For example, here’s a table that categorizes Swagger tooling for both .NET and Golang:
| Language | Code-First Swagger Tooling | API-First Swagger Tooling |
|---|---|---|
| .NET | Swashbuckle | NSwag |
| Golang | Swaggo | Go-Swagger |
Can you think of more examples? If so, please share them in the comments.
Serving the Swagger UI
After you’ve installed the needed Swagger CLI, you’ll need to figure out how to use the tool and then serve Swagger UI. Here are the high-level steps we took with Swaggo:
- Generate the OpenAPI spec with the Swaggo CLI.
- Annotate the Go code with Swaggo annotations.
- Run the Swaggo CLI against the annotated Go code.
- Setup the Swagger UI for your application.
- Install the Swaggo custom handler that matches the web framework you’re using. For example, if you’re using gorilla/mux, you’ll need to install the Swaggo http-swagger custom handler. If you’re using gin, you’ll need to install the Swaggo gin-swagger custom handler.
- Import the Swaggo custom handler into your application as a path. This will allow you to serve Swagger UI from the path.
- Serve the Swagger UI from the Golang application.
- Serve the Swagger UI from the path.
go run *.go
- Serve the Swagger UI from the path.
- Navigate to the Swagger UI.
- You should see the Swagger UI. (ex.
http://localhost:8080/docs/swagger/index.html)
- You should see the Swagger UI. (ex.
Locally Serving the Swagger UI from an Azure Function Custom Handler
Serving the Swagger UI from an Azure Function Custom Handler requires a considerable number of more steps than simply serving it directly from your application. To get started, you’ll first need to setup an Azure Function Custom Handler locally because the Azure portal does not provide a way to do it from the portal. The local steps are as follows:
- Install the Azure Functions Core Tools.
- Follow the VS Code how-to for creating a custom handler or follow the Core Tools how-to for using the cli to create a custom handler.
- The starting point of your project will be different based on the option you choose and the difference is very subtle. For example, if you follow the VS Code path which streamlines the setup, the output will result in a project structure that has both the host files and a function folder already included. Unfortunately, this gives the impression that the Http Trigger is limited to a single route. The following is an example of the project structure:
. (root)
├── host.json
├── local.settings.json
├── HttpExample # function 1
│   └── function.json
└── main
    └── main.go
Therefore, if you wanted to add an additional route for the Swagger UI, it looks like it’s not possible. To make matters worse, the official docs recommend deploying Azure API Management (APIM) for exposing OpenAPI definitions.
- With the cli approach, you’ll likely init the project first (i.e.
func init --worker-runtime custom) and then add the custom handler second (i.e.func new --template "Http Trigger" --name HttpExample). This is a better experience in that the project initialization and route creation are separate steps. The following is an example of the initialized project structure:. (root) ├── host.json ├── local.settings.json └── main └── main.go
- The starting point of your project will be different based on the option you choose and the difference is very subtle. For example, if you follow the VS Code path which streamlines the setup, the output will result in a project structure that has both the host files and a function folder already included. Unfortunately, this gives the impression that the Http Trigger is limited to a single route. The following is an example of the project structure:
The Solution
After inspecting how the core tool cli can be used for adding a separate route (i.e. func new --template "Http Trigger" --name Swagger) and also how other platforms like .NET add separate routes, we discovered we could avoid the overhead of APIM and instead expose Swagger UI directly. The following is an example of the final project structure:
. (root)
├── host.json
├── local.settings.json
├── HttpExample # function 1
│   └── function.json
├── Swagger # function 2
│   └── function.json
└── main
    └── main.go
However, simply adding a new function as a route was not a complete solution. The following sections include additional details about important steps we took to serve Swagger UI from an Azure Function Custom Handler.
Adding the Swagger Route
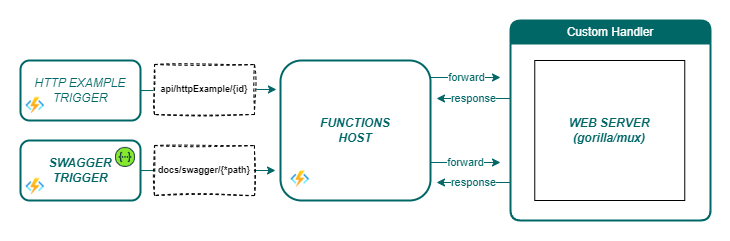
When adding the function.json for the Swagger Route, we needed to include a wildcard path to provide the Golang application the full flexibility of rendering all possible paths needed to render the full Swagger UI experience. For example, the /docs/swagger/index.html path would request the default Swagger UI page and the /docs/swagger/v1/swagger.json path would request the Swagger JSON file for version 1 of the API.
The following code snippet shows the function.json file:
{
    "bindings": [
        {
            "authLevel": "anonymous",
            "type": "httpTrigger",
            "direction": "in",
            "name": "req",
            "methods": [
                "get"
            ],
            "route": "docs/swagger/{*path}"
        },
        {
            "type": "http",
            "direction": "out",
            "name": "res"
        }
    ]
}
Azure Function Port Handling
The following statement from the official document best describes why port handling is needed:
In the customHandler section, add a property named enableForwardingHttpRequest and set its value to true. For functions consisting of only an HTTP trigger, this setting simplifies programming by allow you to work with a typical HTTP request instead of the custom handler request payload. Source: https://learn.microsoft.com/en-us/azure/azure-functions/create-first-function-vs-code-other?tabs=go%2Clinux
With port handling enabled, the Golang application could live as a stand-alone application and only need to detect when it was running within the context of an Azure Function Host runtime. The Azure Function host changes the listening address and port of the underlying web server and comes with several environment variables like the FUNCTIONS_CUSTOMHANDLER_PORT which can be used to detect the forward port. This variable is set by the Azure Function host. It’s dynamic and should not be set by the application. The following code snippets shows how to detect and account for the new listening address and Azure Function port:
HOST := os.Getenv("HOST")
HTTP_PORT := os.Getenv("HTTP_PORT")
FORWARD_PORT := os.Getenv("FUNCTIONS_CUSTOMHANDLER_PORT")

func isAzureFunction() bool {
    return FORWARD_PORT != 0
}

// Serves swagger ui
func serveSwaggerUI(router *mux.Router) {
    docs.SwaggerInfo.Host = fmt.Sprintf("%v:%v", HOST, HTTP_PORT)
    if (isAzureFunction()) {
        docs.SwaggerInfo.Host = fmt.Sprintf("%v:%v", HOST, FORWARD_PORT)
    }
    router.PathPrefix("/docs/swagger").Handler(httpSwagger.WrapHandler)
}

// Add http port to allowed origins if forward port is available
func addAllowedOrigin(router *mux.Router) http.Handler {
    var handler http.Handler = router
    if (isAzureFunction()) {
        c := cors.New(cors.Options{
            AllowedOrigins: []string{
                fmt.Sprintf("%v:%v", HOST, HTTP_PORT)
            },
            AllowedMethods: []string{"GET", "OPTIONS"},
        })
        handler = c.Handler(router)
    }
    return handler
}

func formListeningAddr(host string, httpPort int) string {
    listenAddr := fmt.Sprintf(":%v", httpPort)
    if (isAzureFunction()) {
        listenAddr = fmt.Sprintf(":%v", FORWARD_PORT)
        log.Printf("Forwarding port %v to %v", httpPort, FORWARD_PORT)
    }
    return listenAddr
}
Execution Steps
The final steps for running the Azure Function locally were as follows:
- Update the
defaultExecutablePathvariable in thehost.jsonfile of project to point to the executable of the Golang application.// mac "defaultExecutablePath": "main//main"// windows "defaultExecutablePath": "main\\main.exe" - Run the Azure Function locally using the following core tool command:
func start --custom --verbose --port 8080 - Navigate to the Swagger UI.
- You should see the Swagger UI. (ex.
http://localhost:8080/docs/swagger/index.html)
- You should see the Swagger UI. (ex.
Conclusion
In conclusion, this blog post serves as a comprehensive guide for developers looking to serve Swagger UI from a Golang Azure Function Custom Handler. It addresses key considerations, tooling options, and execution steps. By being mindful of the steps outlined in this post, developers can successfully integrate Swagger UI into their serverless applications running on Azure Functions with Golang.
Acknowledgements
Special thanks to David Lee and the remainder of the team for findings that helped shaped this article.