
Introduction
In this article, we’ll walk through setting up a Pytest integration test framework for a multi-component system utilizing Dapr and Testcontainers. This setup was initially developed for a customer and later extracted into a sample project to serve as a foundational starting point.
Background
As part of our most recent engagement, we took some time to create a testing framework for the customer that would cover unit tests, end to end tests and integration tests. For our use case, we decided that an integration test was going to be “Any test that works across two or more components, but not all of them”, as that’d be an e2e test.
Furthermore, we wanted to test the real services, or as close to them as we could get. For us that meant Dapr, Redis, Cosmos, and a Storage Account. The last 2 aren’t included in this article.
The problem with testing a real service is that they can be polluted with test and other dev’s data, and the test needs to account for this leading to increased boilerplate code in each test. For example, a test might check that a table has 1 more row after an insert, but what if something else has done an insert in between? True, we can keep track of IDs and such but it’d be a lot easier if we had the guarantee that we’re testing on a brand new clean environment every time. This example might be easy, but you can image how the complexity will increase with multiple services that the dev team is accessing for their own development.
Most real services are, and rightfully so, very well secured behind RBAC, VNets, Firewalls, credentials… you name it. How can we design a test framework that can test the integration with these services without having to go through the sometimes painful process of connecting a dev machine or a pipeline to a real system?
The clue was in the title of this article, Testcontainers. That solved it for us, and I hope this article helps you to decide if our approach would also work for you and your customers.
To help with the clarity of this article, and to have a working and usable sample, we have distilled the solution into a bare bones repository that still maintains most of the components that were used, albeit with the names changed. Here’s a simplified diagram that illustrates the application we’ll be using for this demo.

Test requirements
A test is only useful if it gets run. We were quite mindful about how we designed the test framework to ensure that both us, and the customer, were empowered to write and run more tests, more easily.
- Easy to run:
Pytestintegrates well with most IDEs and test plugins. - Minimal configuration: Avoid maintaining duplicate configurations.
- Real dependencies: Use actual ports and SDKs instead of mocks.
- Test locally: Ensure tests run both in a developer’s machine and in CI/CD pipelines.
Project Structure
The following is a high-level representation of the project structure, showing key components for integration testing:
├── dapr-components
│   └── pubsub-component.yaml
├── order-processor
│   ├── Dockerfile
│   ├── app.py
├── order-publisher
│   ├── Dockerfile
│   ├── app.py
└── tests
    ├── conftest.py
    ├── docker-images
    │   ├── dapr
    │   │   ├── Dockerfile
    │   │   └── pubsub-component.yaml
    │   └── orders
    │       ├── Dockerfile
    │       └── run.sh
    └── test_orders.py
Dockerfile
The Dockerfile that builds the order-processor and order-publisher images is quite simple. It’s just a Python image with the app copied into it.
FROM python:3.11-slim

COPY requirements.txt .
RUN pip install -r requirements.txt

WORKDIR /app
COPY . /app

EXPOSE 8000
CMD ["uvicorn", "app:app", "--host", "0.0.0.0", "--port", "8000"]
order-publisher
This app just sends a json to Dapr on a POST endpoint. It’s a simple app that doesn’t do much, but it’s enough for our sample.
@app.post("/order")
async def publish_order(request: Request):
    order_data = await request.json()

    # Starting the client here uses the default values and the ones in the
    # environment to create the client, therefore there's no extra config here.
    with DaprClient() as client:
        client.publish_event(
            pubsub_name='orders-pubsub',
            topic_name='orders',
            data=json.dumps(order_data),
        )
    return {"status": "Order published"}
order-processor
The order processor makes use of the Dapr SDK to subscribe to the orders topic, once a message is received we just print it the console.
app = Flask(__name__)

# Register Dapr pub/sub subscriptions
@app.route('/dapr/subscribe', methods=['GET'])
def subscribe():
    subscriptions = [{
        'pubsubname': 'orders-pubsub',
        'topic': 'orders',
        'route': 'orders'
    }]
    print('Dapr pub/sub is subscribed to: ' + json.dumps(subscriptions))
    return jsonify(subscriptions)

# Dapr subscription in /dapr/subscribe sets up this route
@app.route('/orders', methods=['POST'])
def orders_subscriber():
    event = from_http(request.headers, request.get_data())

    # More complicated processing would go here in a real application
    print('Received order: ' + event.data, flush=True)
    return 'OK', 200

app.run(port=8001)
Dapr components
And finally, the component that configures Redis to be used with Dapr.
apiVersion: dapr.io/v1alpha1
kind: Component
metadata:
  name: orders-pubsub
  namespace: ${NAMESPACE}
spec:
  type: pubsub.redis
  version: v1
  # Variables documented here
  # https://docs.dapr.io/reference/components-reference/supported-pubsub/setup-redis-pubsub/
  metadata:
    - name: redisHost
      value: 127.0.0.1:6379
Proposed workflow
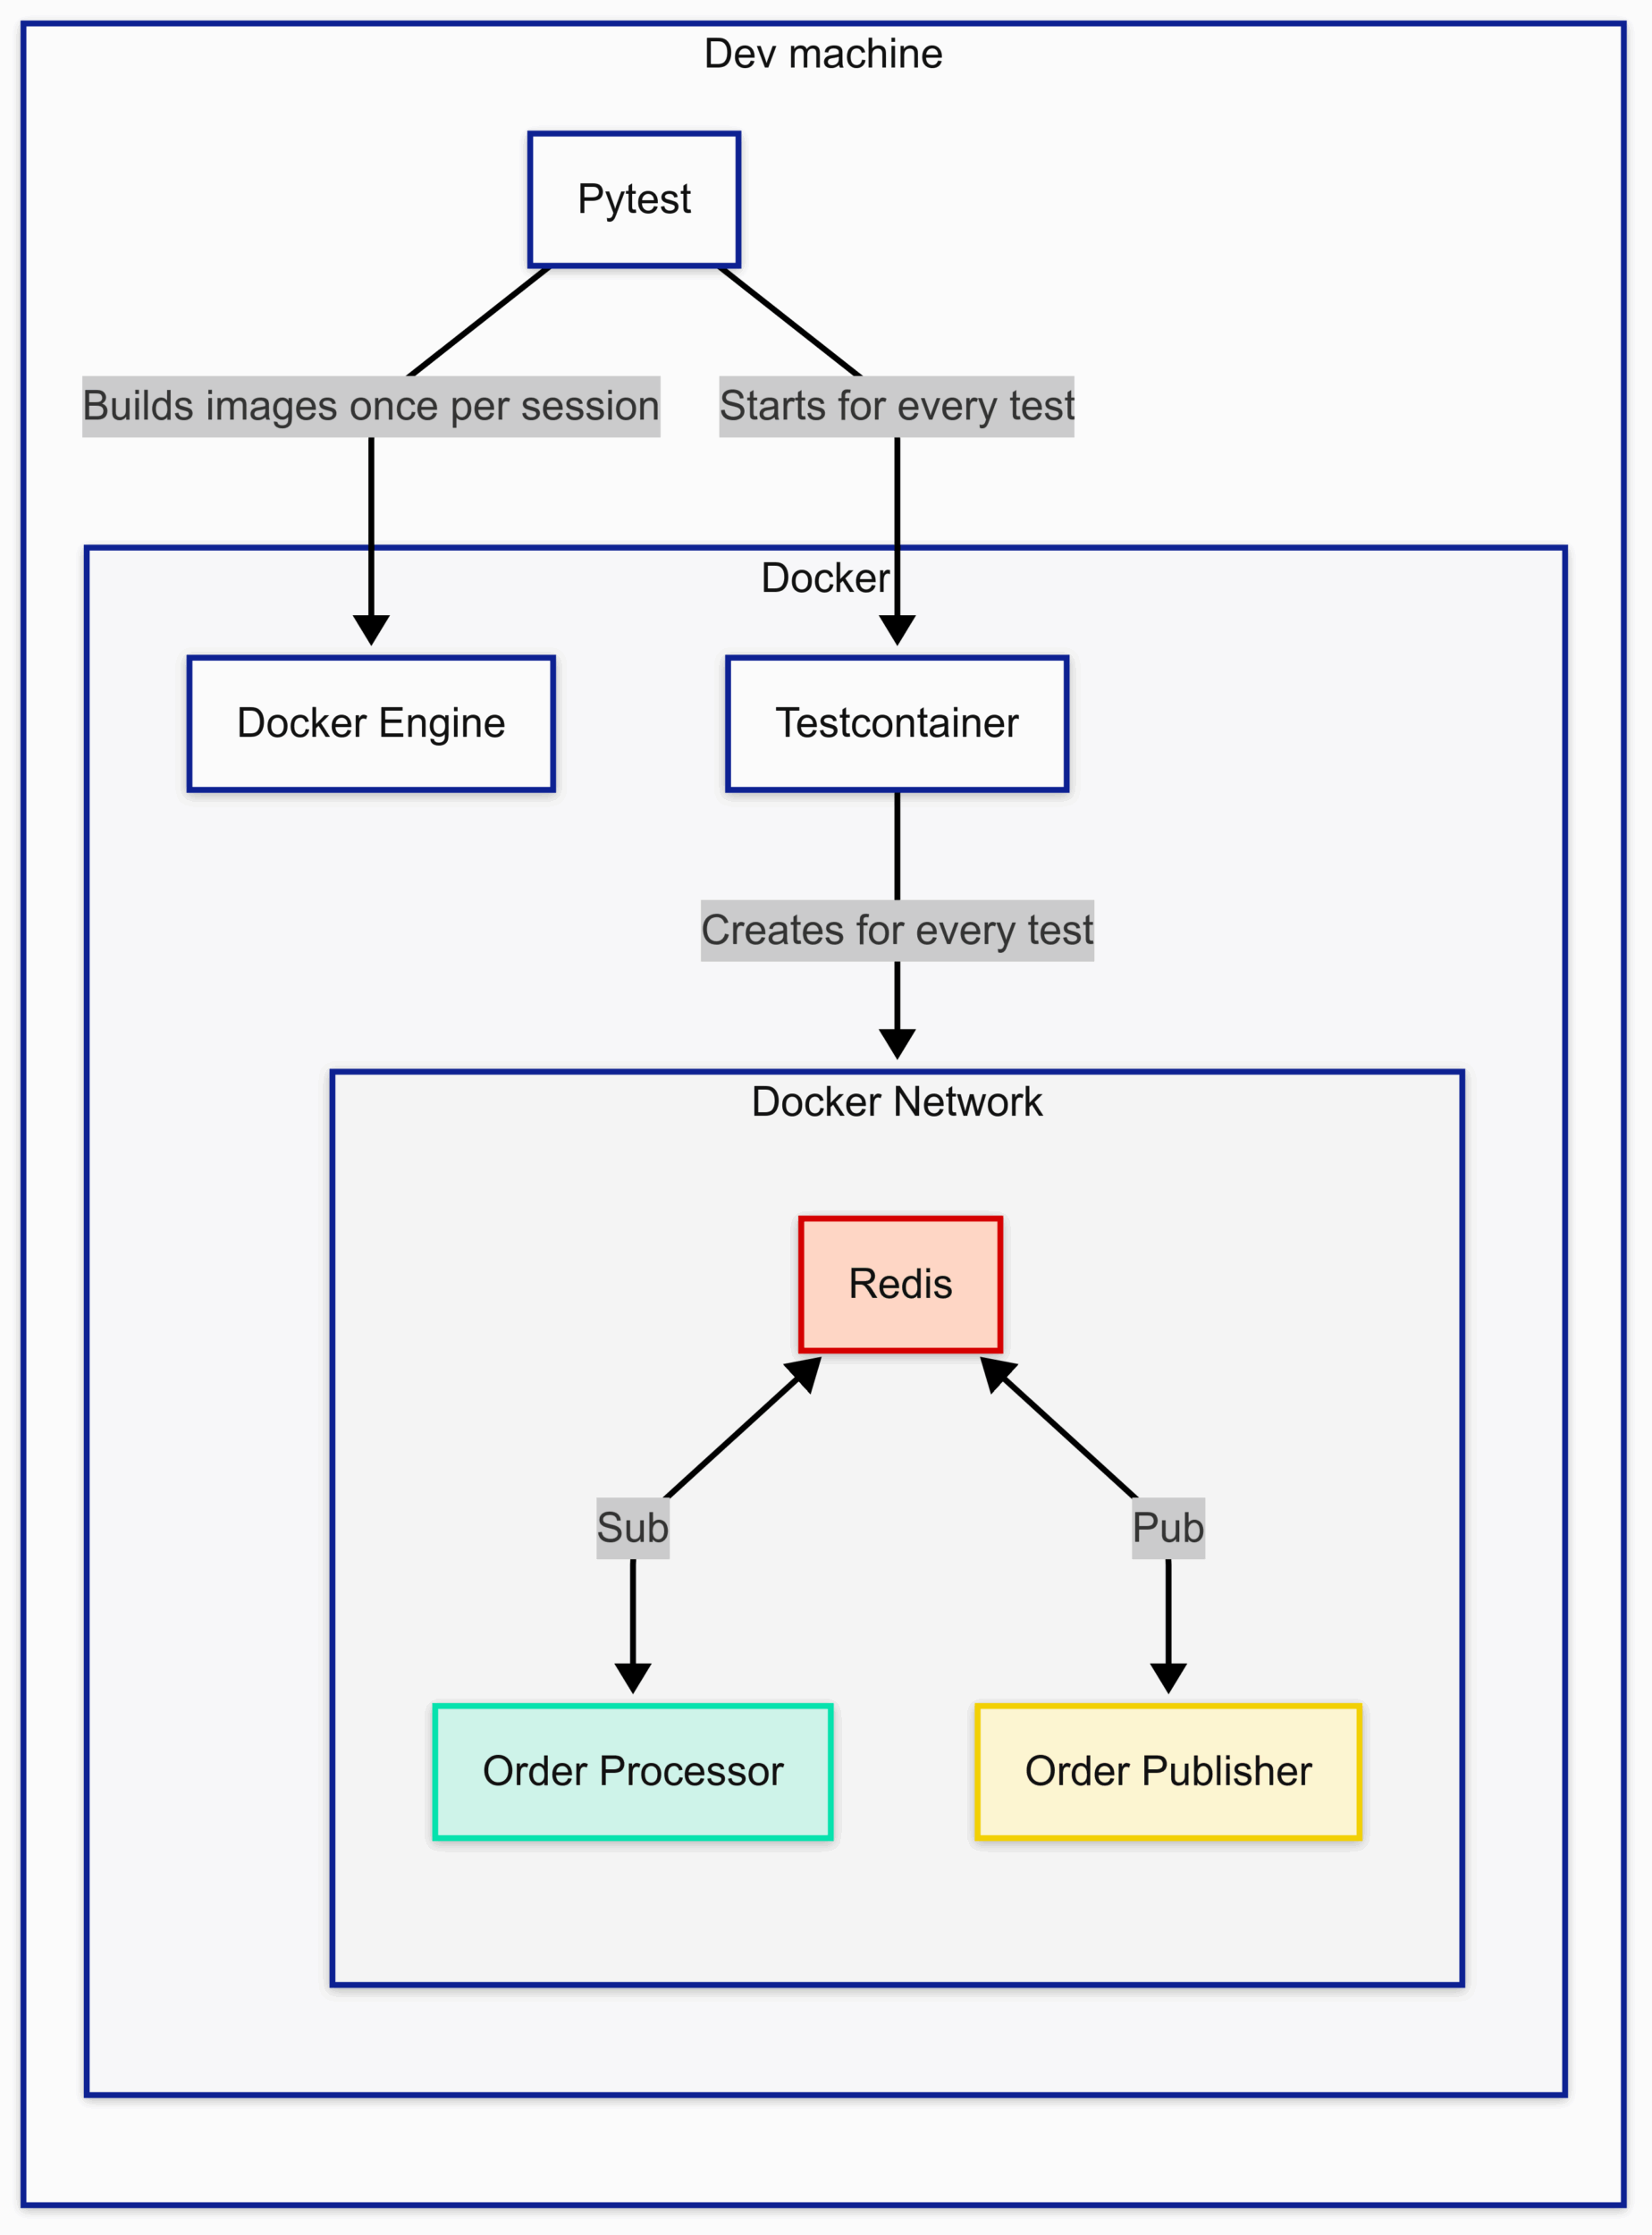
As a brief summary, when an integration test runs, we use Pytest and testcontainers to build, configure and start the necessary containers to run the test in an isolated environment. When the test finishes, we clean everything up for the next run.
Diagram
We’ll jump to the walkthrough very quickly, but first let’s go through a diagram of what happens when a test runs:
Code Walkthrough
TL;DR
This is what happens when you run the tests
1. Build standalone images
2. Build Dapr image
3. Create test image with Standalone and Dapr
4. For each test
   1. Create a Docker Network
   2. Start and configure Containers
   3. Run the test
   4. Cleanup
Using Fixtures to control setup and take down
We decided to use fixtures to control the flow of the test. Fixtures allows us to call bits of code automatically and they have a great feature that’s incredibly useful for this framework so that we can define the scope in which each fixture is called.
We use the scope session for the code that we want to run only once per session. In this case we’re building the Docker images, and that’s something that we can do only once. Also notice the parameter autouse which enables this fixture to be called every time regardless of which test starts the session.
@pytest.fixture(scope="session", autouse=True)
def images():
    # This is just a helper function to simplify the code
    def create_docker_image(path: str, tag: str, buildargs: dict = None) -> DockerImage:
        return DockerImage(path=path, tag=tag).build(buildargs=buildargs)

    # Build the base images as they'd be deployed in production
    create_docker_image("./order-processor", processor_base)
    create_docker_image("./order-publisher", publisher_base)

    # This uses the base images and extends them to include test-specific
    #  dependencies. In this case... just Dapr but it could also include other
    #  things such as az cli or test volumes for sample payloads
    create_docker_image("./tests/docker-images/dapr", dapr)
    create_docker_image("./tests/docker-images/orders", processor,
        buildargs={"image": processor_base)
The rest of the fixtures in conftest.py have the scope of function which means that they’re created and destroyed in every test execution. This guarantees that tests and side effects will not pollute each other.
Another thing to note is the use of the keyword with, which in combination with yield allows us to keep the containers in scope and in Docker until the execution resolves the with at the end of the test. Testcontainers will make sure to stop and cleanup at the end of the with scope.
@pytest.fixture(scope="function")
def network():
    with Network() as network:
        yield network

@pytest.fixture(scope="function")
def redis(network):
    with (RedisContainer(image="redis:7.4.2-alpine")
        .with_network(network)
        .with_name("redis-integration")
        .with_bind_ports(6379, 6380)) as redis_container:
            yield redis_container
Having these fixtures properly configured makes it very easy to cherry pick which containers a test needs to start. in this snippet of code we can see how this particular test would start 2 containers: redis and publisher. Note that the cleanup is managed entirely by the fixture and not the test.
def test_order_publisher(redis, publisher_container):
    # Contents omitted for simplicity
    assert True
Building the images
Each app has its own Dockerfile which creates a standalone image that can be started locally or deployed to Kubernetes. This isn’t enough for our test as we need it to be able to work with Dapr. It’s true that we should also have the Dapr cli installed locally for development but if we were to use that one, there’d be conflicts with app names and ports. Let’s remember that one of our priorities is to test the real configuration and dependencies as much as possible.
By starting the test containers in their own isolated Docker Network we can isolate the test and maintain the same configuration, but we lose access to Dapr without extra work and configuration.
We decided to embed Dapr and the app in the same container, which Dapr tells us that it’s ok to do, albeit for development purposes only.
We start with a basic Dapr image:
FROM alpine:edge

# Install dapr CLI
RUN apk add --no-cache bash
ADD https://raw.githubusercontent.com/dapr/cli/master/install/install.sh /tmp/install.sh
RUN /bin/bash /tmp/install.sh

# Install daprd
ARG DAPR_BUILD_DIR
COPY $DAPR_BUILD_DIR /opt/dapr
ENV PATH="/opt/dapr/:${PATH}"
RUN dapr init --slim

# Install your app
WORKDIR /components
COPY pubsub-component.yaml .

EXPOSE 3500
And when we extend it with the app’s dependencies, it leaves us with a Dockerfile that is able to pull the standalone app’s image, therefore testing the real application, and then extend it to add the testing dependencies. For this sample it’s just Dapr but for our customer we also included the Azure cli in this step, which allowed us to keep the security of the standalone app intact.
# We can reuse the entire image if we just parameterize some of the values
# In more complex scenarios this might not be enough, or maintainable
ARG image

# This is built by us
FROM dapr:integration AS builder

FROM $image

USER root

RUN adduser --disabled-password --gecos '' nonroot

WORKDIR /app
ENV PYTHONPATH=/app

# Copy dependencies from the first stage
COPY --from=builder /usr/local/bin/dapr /usr/local/bin/dapr
COPY --from=builder /root/.dapr /home/nonroot/.dapr
COPY --from=builder /opt/dapr /opt/dapr
COPY --from=builder /components /components

COPY run.sh /app/run.sh
RUN chmod +x /app/run.sh

USER nonroot

ENTRYPOINT ["/app/run.sh"]
Starting the containers
Testcontainers gives us a handful of handy functions to configure a container’s name, network and environment. You might also consider mounting a volume with an environment file to avoid hardcoding the values.
@pytest.fixture(scope="function")
def processor_container(network):
    with (DockerContainer(processor)
        .with_network(network)
        .with_name("processor")
        .with_bind_ports(8001, 8001)
        .with_env("app_id", "order-processor")
        .with_env("port", "8001")
        .with_env("dapr_http_port", "3501")
        .with_env("dapr_grpc_port", "50002")
        ) as processor_container:

        # Wait for the application to start. There are many ways to do this,
        # but checking the logs seems simple enough to me
        wait_for_logs(processor_container, "You're up and running! Both "\
        "Dapr and your app logs will appear here.")

        yield processor_container
Running the tests
The tests can be started by running pytest in the console, or, quite possibly through your IDE’s test window.
The main thing that we need to pay attention to are the test parameters, which as you’ve probably noticed, share the same name as the fixtures defined up above, and in conftest.py. This is how we tell pytest and our test framework which containers we want to build, start and use.
def test_order_publisher_processor(base_publisher_url, redis,
    publisher_container, processor_container):

    response = requests.post(f"{base_publisher_url}/order",
        json={"order_id": "1", "item": "item1"})
    assert response.status_code == 200

    wait_for_logs(processor_container,
        "Received order: {\"order_id\": \"1\", \"item\": \"item1\"}")

    assert True
As you can see from the code above, this test requests base_publisher_url, redis, publisher_container and processor_container. By the time the code execution enters the actual test function, the fixtures would have taken care of the entire setup. This makes it really easy to create new tests with customisable dependencies.
Future improvements
Here are a few things that we found and shared with the customer during our engagement. These were suggestions for them to take on and implement after we disengaged. I think it’s a good idea to share these here as well, even though they’re not in the provided sample.
Use env files
Right now this sample has hardcoded environment values which are supplied like this
.with_env("app_id", "order-processor")
.with_env("port", "8001")
.with_env("dapr_http_port", "3501")
.with_env("dapr_grpc_port", "50002")
A good improvement would be to mount the same .env file that’s used for either local development or QA. This would ensure that environments are kept, updated and maintained in a single place. One way to do this would be to add it as a volume to the container and make the app load it on startup.
.with_volume_mapping()Use marks
Because of the way that pytest discovers tests, when we run pytest, every single test will fire, to optimise this we can use marks to let pytest know which components each test uses. Let’s use a graphical example.
@pytest.mark.a
def test_component_a():
    pass

@pytest.mark.a
@pytest.mark.b
def test_component_a_b():
    pass

@pytest.mark.b
def test_component_b():
    pass
By having these marks defined, we can run pytest -m {mark} and target specific tests. If this is configured correctly, one can imagine a pipeline that detects which components have been modified, and fire only the tests for the components that need testing.
Conclusion
By integrating Dapr with Testcontainers and Pytest, we established a reliable testing framework that ensures isolated, repeatable, and real-world scenario testing. This approach minimizes configuration overhead while maintaining production-like conditions for validation.
We hope this article provides useful insights for implementing integration testing in your own projects.