

An Essential Guide for Modern Developers
The integration of cloud technologies and artificial intelligence has seen significant advancements, notably with Azure OpenAI. As the use of OpenAI in various industries grows, secure and efficient access to these resources is paramount. Microsoft’s introduction of Workload Identities addresses this need, offering a modern approach to authentication and shifting away from traditional methods.
Key to this development is the need for secure and reliable authentication mechanisms, especially with the increasing reliance on OpenAI technologies. Workload Identities, particularly Azure AD workload identity, provide this security and flexibility. They integrate smoothly with the Azure Identity client library and the Microsoft Authentication Library (MSAL), facilitating easy access to Azure cloud resources.
One major benefit of Workload Identities is their role in simplifying secrets management. This process, often complex and costly, becomes more manageable and cost-effective with Workload Identities, eliminating much of the administrative burden associated with traditional secret management methods.
Additionally, Workload Identities are versatile and compatible with various environments. They support Kubernetes clusters in diverse settings, including various clouds and on-premises, allowing for consistent authentication processes regardless of the hosting environment.
This article will explore the benefits and practical applications of using Azure OpenAI resources in AKS with Workload Identities. It aims to provide valuable insights for both experienced developers and newcomers in the field of cloud and AI integration.
- Consuming Azure OpenAI Resources in AKS with Workload Identities: An Essential Guide for Modern Developers
- Project context
- Pre-requisites
- Running the bot locally
- Lets create the AKS and deploy the platform
- Create the AKS and configure it
- Deploy the service into AKS
- Access it
- So how is it getting the token?
- 1. The Two-Fold Path to Authentication
- 2. Setting Up Your Local Development
- 3. Integrating AAD with Python via LangChain
- In Conclusion
- AKS deployment. Microsoft Entra Workload ID with AKS
- How it works
- Service Account Annotations
- Pod Labels
- Lets see the components in Azure
- Useful docs
- Summary
Project context
Our project was to address a customer challenge that appears to be quite common in large companies: while a wealth of information was available to the Team Members, it was often hard to find and there were occasional concerns regarding its relevance and currency. This led to Team Members either reaching out to Support Teams for help or going directly to subject matter experts, creating inefficiencies in their operations. Collaborating closely, we developed a chatbot system, powered by Azure OpenAI and LangChain, designed to give quick answers to queries in a Q&A format. The deployment had to follow the customer’s production requirements, which included the use of AKS and avoiding the use of secrets. If credentials were used, there had to be a plan to rotate them frequently. The platform was required to integrate with Azure OpenAI, meaning that the chatbot needed credentials to consume the resources. The use of Azure Workload Identities in AKS allowed us to run the platform, consume Azure OpenAI resources and comply with the customer’s requirements in a secure way.
Pre-requisites
- An Azure subscription. Create one for free
- Access granted to Azure OpenAI in the desired Azure subscription. (Currently, you must submit an application to access Azure OpenAI Service. To apply for access, complete this form. If you need assistance, open an issue on this repository to contact Microsoft.)
- VScode with Devcontainer extension
- Clone repository https://github.com/jsburckhardt/gradio-aks
- An Azure OpenAI instance with gpt-35 or gpt4 deployments. You can follow the instructions here to create the resources. As an alternative, a script to deploy resources can be found in the source code.
pre-requisites.sh - Docker (if running locally in Devcontainer)
Running the bot locally
-
Open in devcontainer or GitHub Codespaces
-
Create your
.envfile. For my example it looks like this:OPENAI_API_TYPE=azure_ad OPENAI_API_BASE=<openai url> OPENAI_API_VERSION=2023-08-01-preview TEMPERATURE=0.9 DEPLOYMENT_NAME=gpt-35-turbo -
Instead of using the OpenAI token, we will be using the user’s roles. Run
az login -
Now, by default users don’t have the
Cognitive Services Userrole. Here we will be adding the user role to the resource group hosting the Azure OpenAIexport RG=<rg with ai resource> export user=$(az ad signed-in-user show --query "userPrincipalName" -o tsv) export resourceId=$(az group show -g $RG --query "id" -o tsv) az role assignment create --role "Cognitive Services User" --assignee $user --scope $resourceIdWait couple of minutes for the role to be propagated
-
Time to run the application. Run
make gradio, visit http://localhost:8087 and ask a question – it has memory.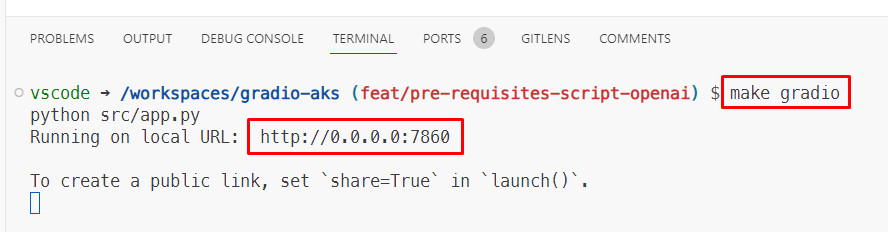
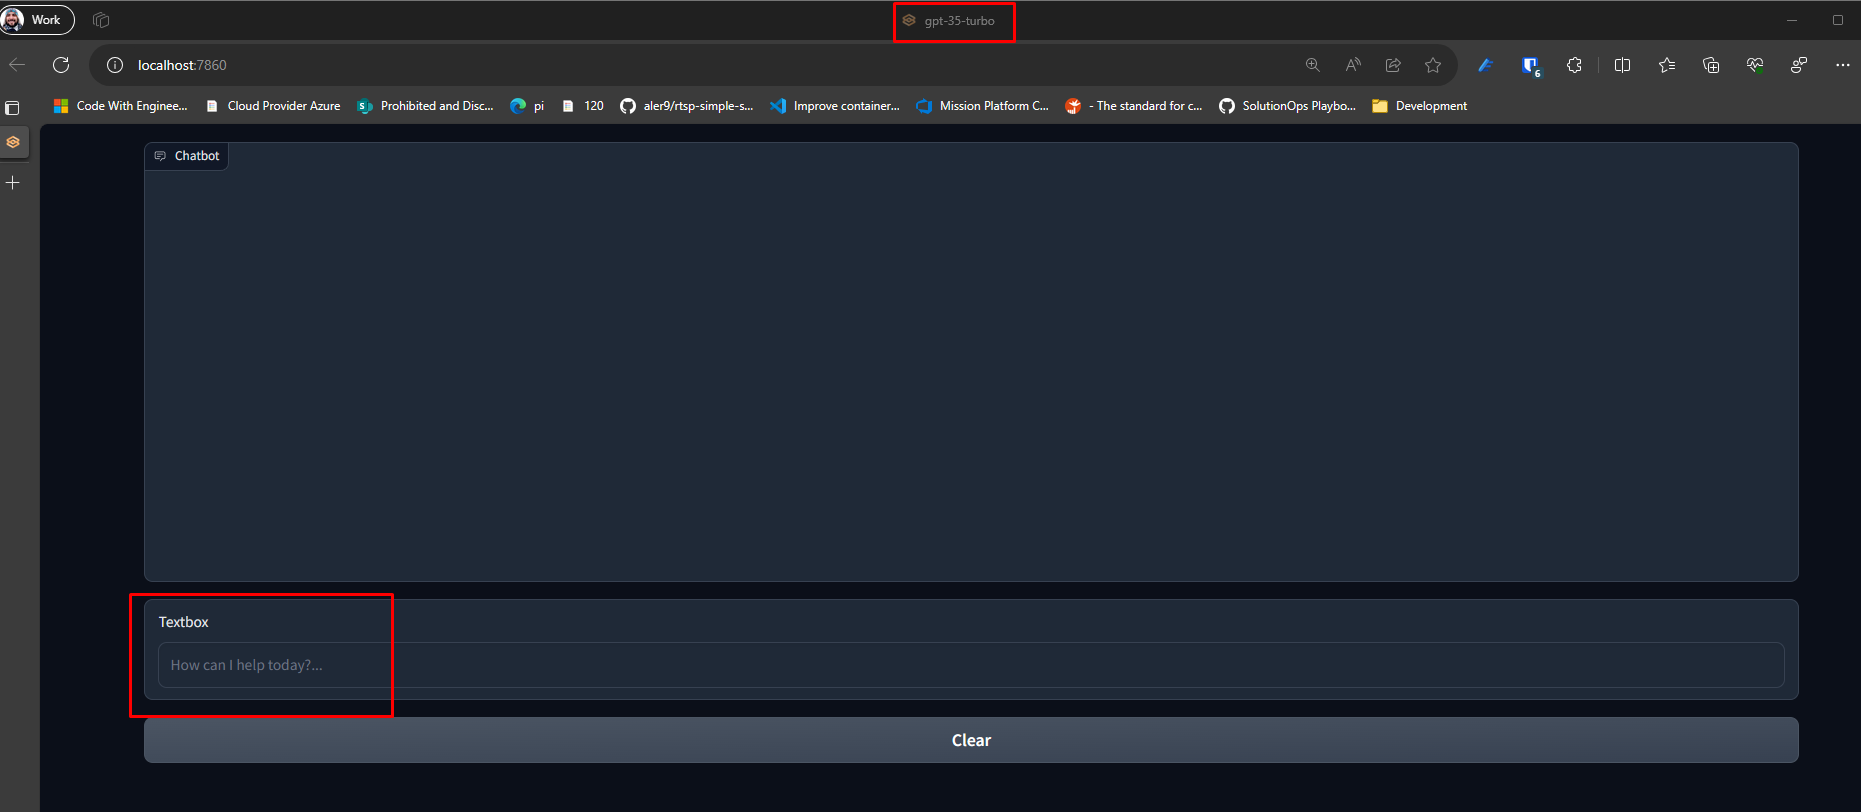
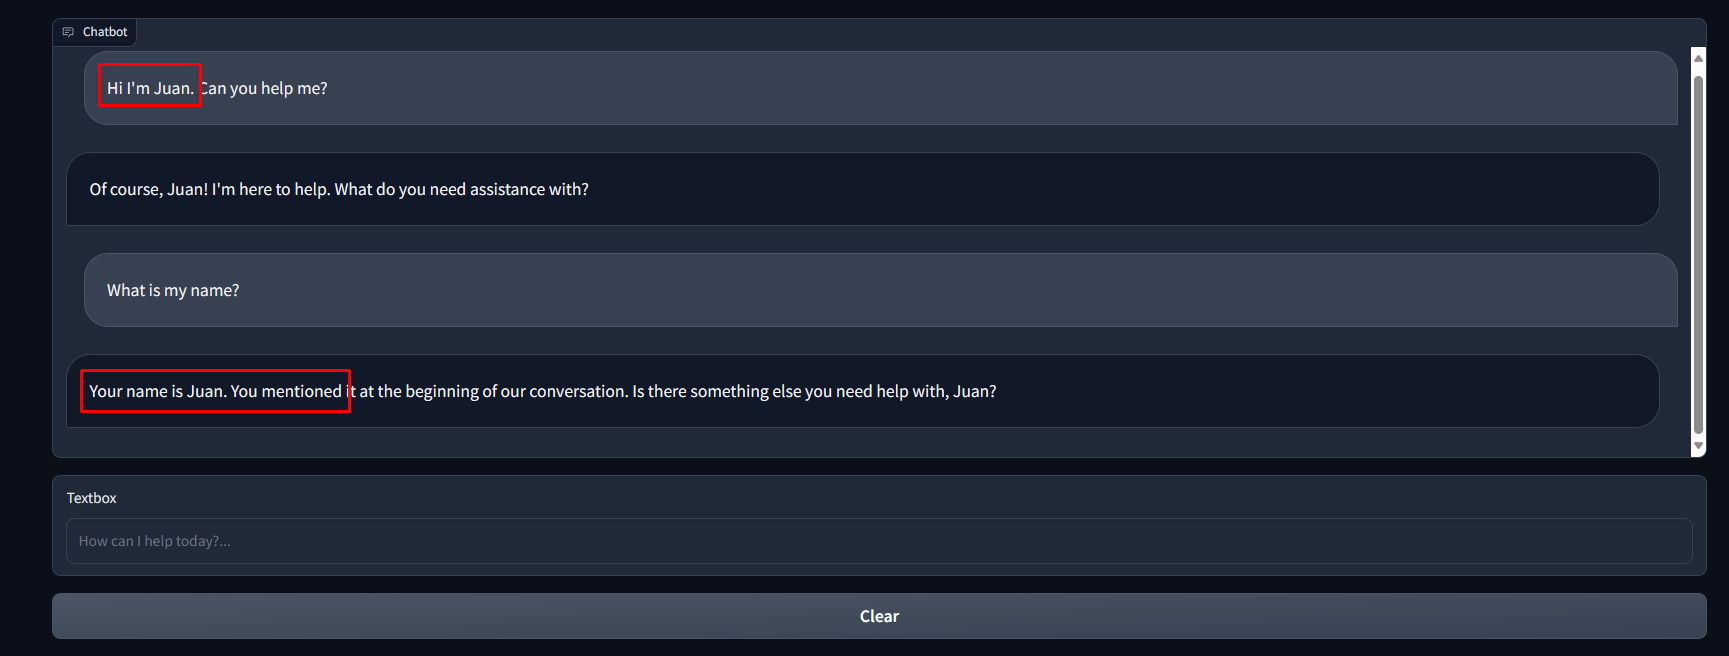
In summary, you can see the application is running without requiring to pull the OpenAI keys.
Lets create the AKS and deploy the platform
Create the AKS and configure it
-
Create the AKS with
oidc-issuer,enable workload-identityandenable managed-identity. More details about the requirements and limitations can be found here. For the example we will be usingdefaultnamespace.# Create AKS cluster az aks create -g "${RESOURCE_GROUP}" -n "${CLUSTER_NAME}" --node-count 1 --enable-oidc-issuer --enable-workload-identity --enable-managed-identity -
Now lets configure the identity. Get OIDC URL, create the identity and assign the
Cognitive Services Userrole.# Get OIDC issuer URL AKS_OIDC_ISSUER="$(az aks show -n "${CLUSTER_NAME}" -g "${RESOURCE_GROUP}" --query "oidcIssuerProfile.issuerUrl" -otsv)" # Create user-assigned identity USER_ASSIGNED_IDENTITY_NAME=<user name> az identity create --name "${USER_ASSIGNED_IDENTITY_NAME}" --resource-group "${RESOURCE_GROUP}" --location "${LOCATION}" # Assign role to user-assigned identity RESOURCE_ID="$(az group show -g "${RESOURCE_GROUP}" --query "id" -o tsv)" az role assignment create --role "Cognitive Services User" --assignee "$(az identity show --resource-group "${RESOURCE_GROUP}" --name "${USER_ASSIGNED_IDENTITY_NAME}" --query 'clientId' -otsv)" --scope "${RESOURCE_ID}" -
Connect to the cluster since we require to deploy the service account that is required for the federation
az aks get-credentials -g "${RESOURCE_GROUP}" -n "${CLUSTER_NAME}" -a -
Create the service account in AKS in
defaultnamespace e.g.SERVICE_ACCOUNT_NAMESPACE=default# Create Kubernetes service account cat <<EOF | kubectl apply -f - apiVersion: v1 kind: ServiceAccount metadata: annotations: azure.workload.identity/client-id: $(az identity show --resource-group "${RESOURCE_GROUP}" --name "${USER_ASSIGNED_IDENTITY_NAME}" --query 'clientId' -otsv) name: "${SERVICE_ACCOUNT_NAME}" namespace: "${SERVICE_ACCOUNT_NAMESPACE}" EOF -
Federate the account and the managed identity.
FEDERATED_IDENTITY_CREDENTIAL_NAME="gradio-app-federated-credential"

az identity federated-credential create --name "${FEDERATED_IDENTITY_CREDENTIAL_NAME}" --identity-name "${USER_ASSIGNED_IDENTITY_NAME}" --resource-group "${RESOURCE_GROUP}" --issuer "${AKS_OIDC_ISSUER}" --subject "system:serviceaccount:${SERVICE_ACCOUNT_NAMESPACE}:${SERVICE_ACCOUNT_NAME}"
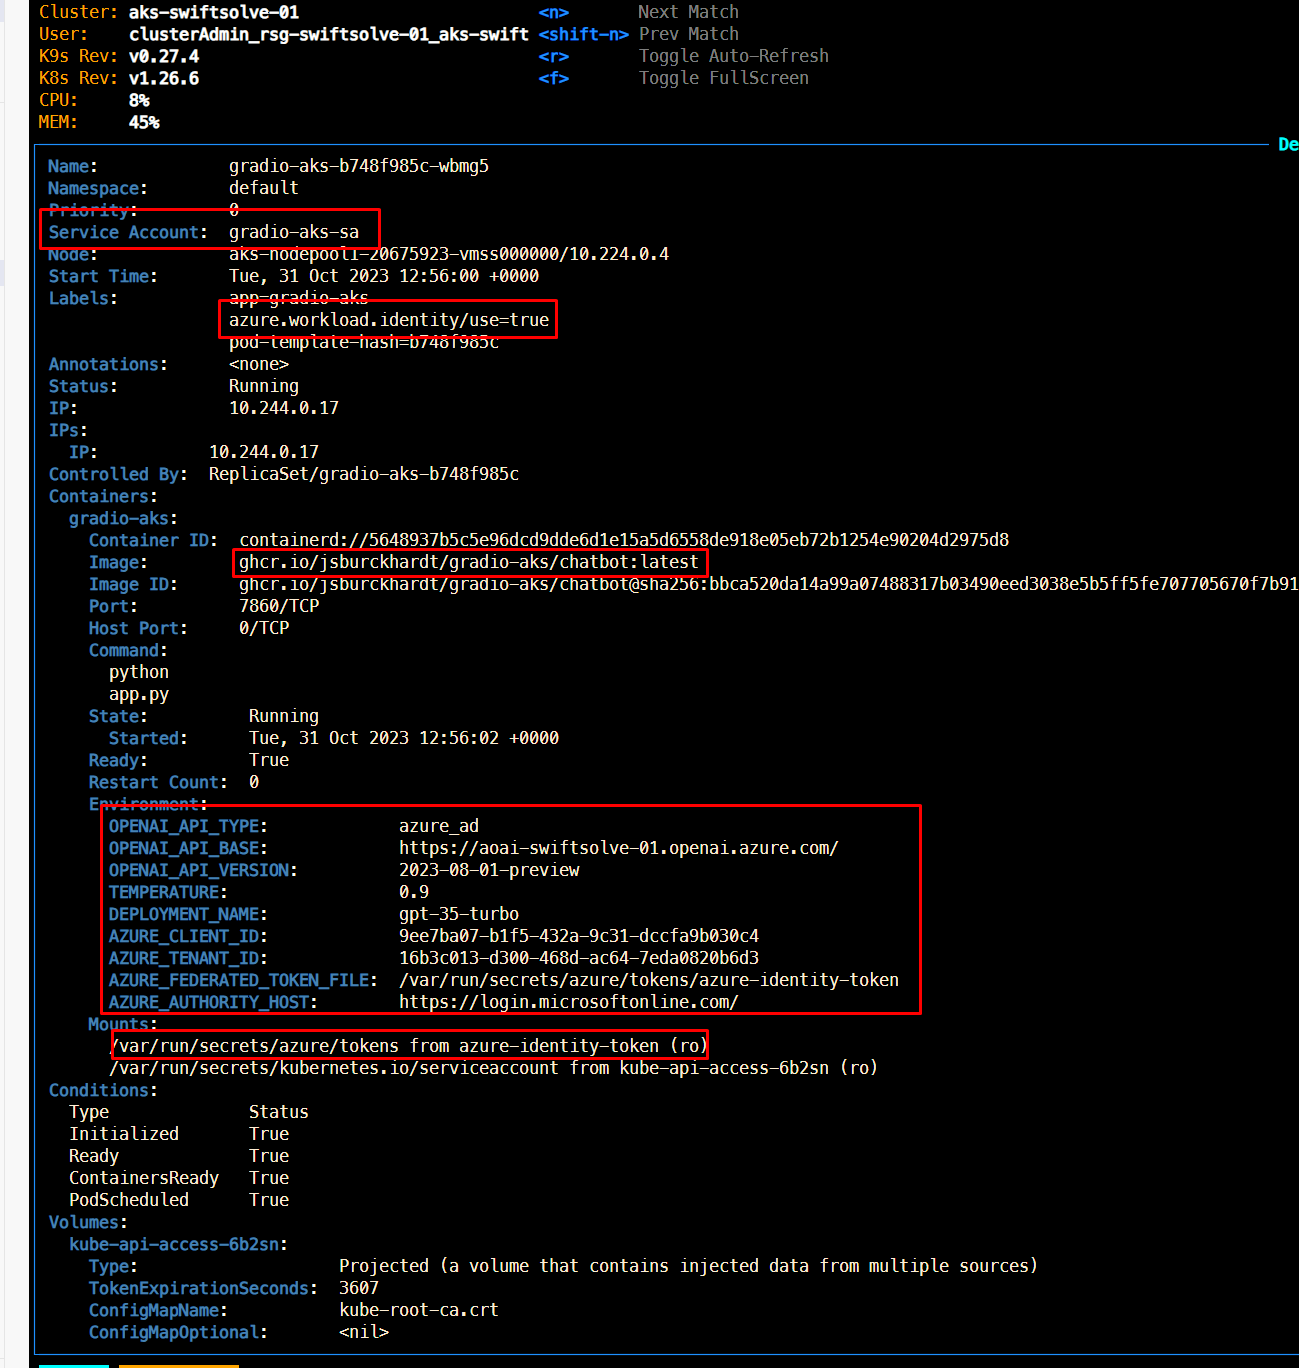
Deploy the service into AKS
Now we have everything we need to deploy the application. It is required for the pod to use the service account and have the label azure.workload.identity/use: "true". For deploying into the cluster, we will be using the container created in the source code repository. In other words ghcr.io/jsburckhardt/gradio-aks/chatbot:latest. So, lets get into the deployment:
-
Update the values under the
releasefolder. There are two manifests that were used to deploy in parallel two chats with different engines. -
If you use the code in the repository, all you have to update is the environment section with your resources. Update both files if you want to deploy two resources in parallel:
release/manifest-gpt4.yamlandrelease/manifest.yaml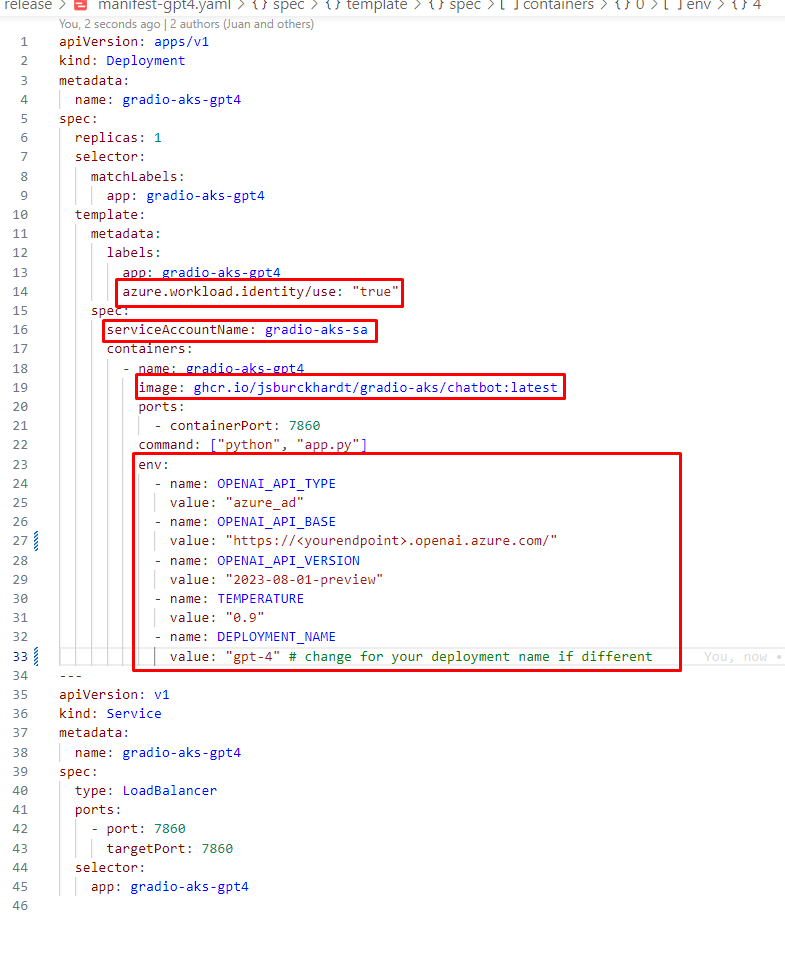
-
Apply the manifest
kubectl apply -f release
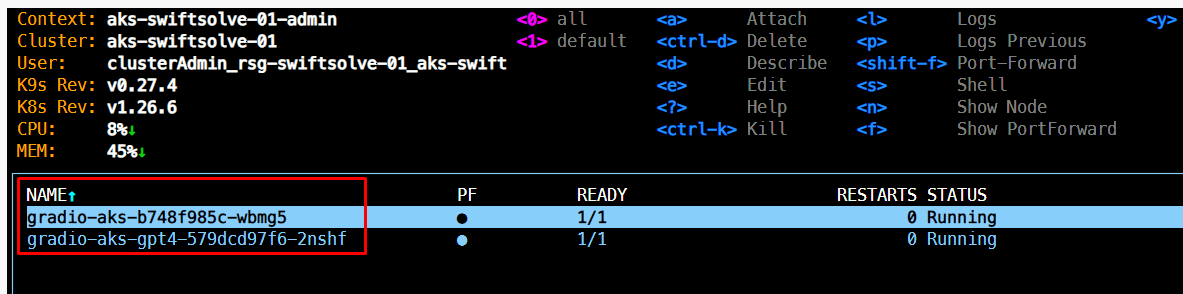
Access it
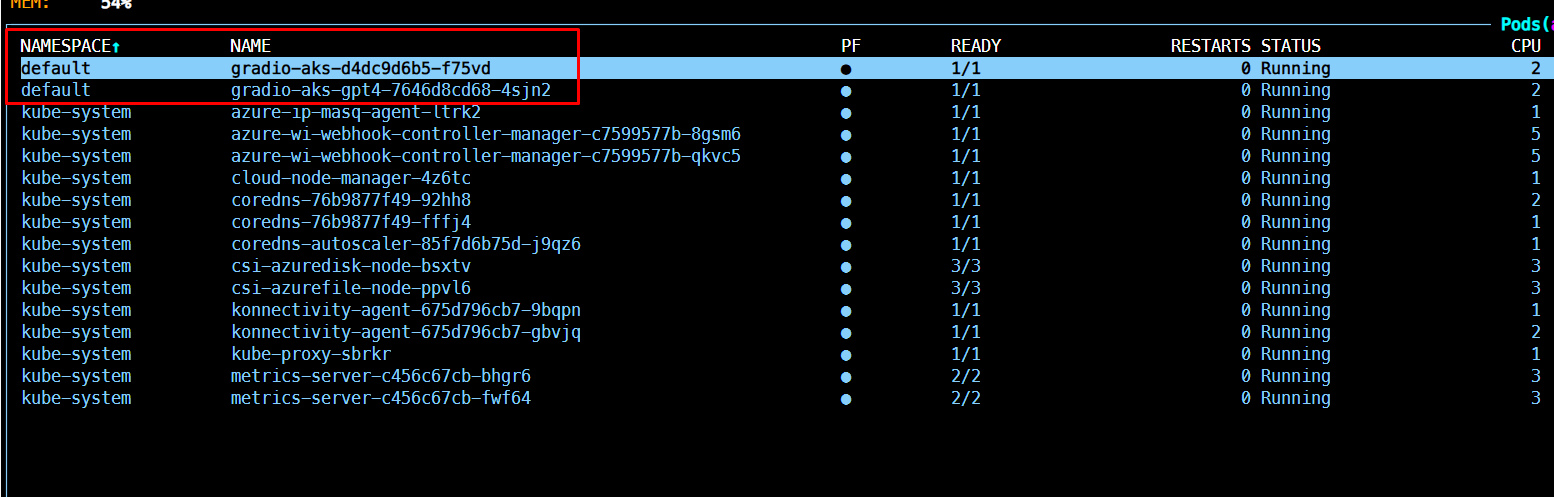
Once the resources are deployed, you can use k9s inside the devcontainer to check the pods running. You should see something similar to this:
To get the endpoint, inside k9s list the services:

Now you can use the external IP to access the resource.

So how is it getting the token?
To fully harness the capabilities of Azure OpenAI, authentication is the key. Understanding your options and choosing the right method can be the difference between a seamless experience and a tangled web of complexities. So, let’s break down the process.
1. The Two-Fold Path to Authentication
-
API Key: This is the quickest and easiest option. If you’re looking to dive into Azure OpenAI without much ado, your API key is readily available in the Azure portal, specifically within your Azure OpenAI resource section.
-
Azure Active Directory (AAD): For those with intricate security protocols, the AAD offers a more robust solution. Detailed guidelines on integrating AAD with Azure OpenAI are available here.
2. Setting Up Your Local Development
If you’re developing on your local machine, ensure:
-
Azure CLI is Installed: If not, download and install the Azure CLI. Once done, initiate it with the
az logincommand. -
Azure Role Assignment: Grant the “Cognitive Services OpenAI User” role specific to your Azure OpenAI resource. This pivotal step allows you to procure a token from AAD for Azure OpenAI usage. This role can be assigned to a diverse range of entities – from a user or group to a service principal or even a managed identity. Delve deeper into Azure OpenAI RBAC roles here.
3. Integrating AAD with Python via LangChain
-
Install Required Package: Kick off by installing the
azure-identitypackage. In our case we are using python package -
Set Up the Environment: Update the
OPENAI_API_TYPEenvironment variable toazure_ad. We set up the variables in.envfor local development. In the AKS we are using the manifestenvproperty to set the values. -
Fetch the Token: Utilize the
DefaultAzureCredentialclass to obtain your token from AAD. The simple method is invoking theget_tokenfunction. Here’s a snippet:
token = DefaultAzureCredential().get_token()If you want to get more control over the options to generate the token, you can use the class ChainedTokenCredential and provide the list and order of credentials you want to use in your flow. For example, if you want to use ManagedIdentity and fallback to AzureCLI credentials. We could create our credentials instance as:
from azure.identity import ChainedTokenCredential, ManagedIdentityCredential, AzureCliCredential

credential = ChainedTokenCredential(
    ManagedIdentityCredential(),
    AzureCliCredential()
)
DefaultAzureCredential stands as a versatile credential, tailored to handle a myriad of Azure SDK authentication scenarios. The essence of its flexibility stems from its adaptability; the identity it employs is contingent upon the environment. In a bid to fetch an access token, it sequentially requests these identities, halting once a token is obtained:
- Environment-based service principal (EnvironmentCredential details).
- Azure workload identity (through the WorkloadIdentityCredential when set by its webhook).
- Azure managed identity (ManagedIdentityCredential details).
- For Windows users: A Microsoft application sign-in. SharedTokenCacheCredential dives deeper.
- The Azure CLI logged-in identity.
- Azure PowerShell logged-in identity.
- Azure Developer CLI logged-in identity.
While this default procedure serves most, it’s malleable, courtesy of configurable keyword arguments.
Instantiating the DefaultAzureCredential involves several keyword parameters, granting developers fine-grain control. These parameters range from defining the Azure AD endpoint authority to toggling specific credentials on or off.
For instance, if you wish to exclude Azure PowerShell or the Azure Developer CLI, just set exclude_powershell_credential or exclude_developer_cli_credential to True respectively. Each exclusion parameter bears a clear name, making configurations intuitive.
Two primary methods encapsulate the essence of this class:
- close(): To terminate the transport session of each chained credential.
- get_token(scopes, claims, tenant_id): Integral to access token acquisition, this method is invoked automatically by Azure SDK clients. It requisitions an access token for the defined scopes, and can incorporate additional claims or specify a tenant.
To fetch an access token in Python:
token = credential.get_token('desired-scope')In case of authentication failures, an exception (ClientAuthenticationError) is raised, outlining each authentication attempt and the corresponding error.
In Conclusion
The DefaultAzureCredential class embodies the marriage of simplicity with flexibility, rendering Azure SDK authentication a breeze for developers. By offering a range of identities and configurable behaviors, it ensures that diverse scenarios and specific needs are catered to effortlessly.
AKS deployment. Microsoft Entra Workload ID with AKS
When working with Azure Kubernetes Services (AKS), you might need to access resources like Azure Key Vault or Microsoft Graph. That’s where Microsoft Entra Workload ID comes in. It taps into Kubernetes’ built-in features to work with external identity providers.
It uses something called the Service Account Token Volume Projection. This means pods can take on a Kubernetes identity through service accounts. This setup, combined with OIDC federation, lets Kubernetes apps securely tap into Azure resources using the Microsoft Entra ID.
For developers, the good news is that this all plays nice with Azure Identity client libraries and the MSAL suite, especially if you’re into application registration.
How it works
A workload identity flow, is a sequence of steps for authenticating a workload (such as an application or service) running on Azure Kubernetes Service (AKS) and authorizing it to access Azure resources. Here’s a step-by-step summary of the flow:
-
Kubelet: Starts the flow by projecting a service account token to the workload. This token is available at a configurable file path.
-
AKS Workload: The workload retrieves the projected service account token and sends it along with a request for an Azure Active Directory (AD) access token.
-
Azure Active Directory: Receives the service account token, checks the trust on the application (i.e., verifies that the token is from a trusted source), and validates the token.
-
Azure AD: Once validation is successful, Azure AD issues an access token back to the AKS workload.
-
AKS Workload: Uses the received Azure AD access token to access Azure resources.
This flow ensures that only authenticated and authorized workloads can interact with Azure resources, enhancing security by using Azure Active Directory as the central authority for trust and token issuance.
Additional details can be found in the following MS documentation Use Microsoft Entra Workload ID with Azure Kubernetes Service (AKS)
In kubernetes world. For those familiar with Microsoft Entra pod-managed identity, consider a service account as its Kubernetes counterpart – the Azure Identity. But, unlike the Azure Identity, a service account is baked right into the core Kubernetes API, not added as a Custom Resource Definition (CRD). Below, we’ll delve into the various labels and annotations available, guiding you on how to swap the service account token for a Microsoft Entra access token.
Service Account Annotations
There are 3 main annotations to consider azure.workload.identity/client-id, azure.workload.identity/tenant-id and azure.workload.identity/service-account-token-expiration. Have a look in this section for more details Service Account Annotations
Pod Labels
Regarding the pod labels, there are 4 we should consider azure.workload.identity/service-account-token-expiration, azure.workload.identity/skip-containers, azure.workload.identity/inject-proxy-sidecar and azure.workload.identity/proxy-sidecar-port. For specifics, have a look into this section Pod Labels.
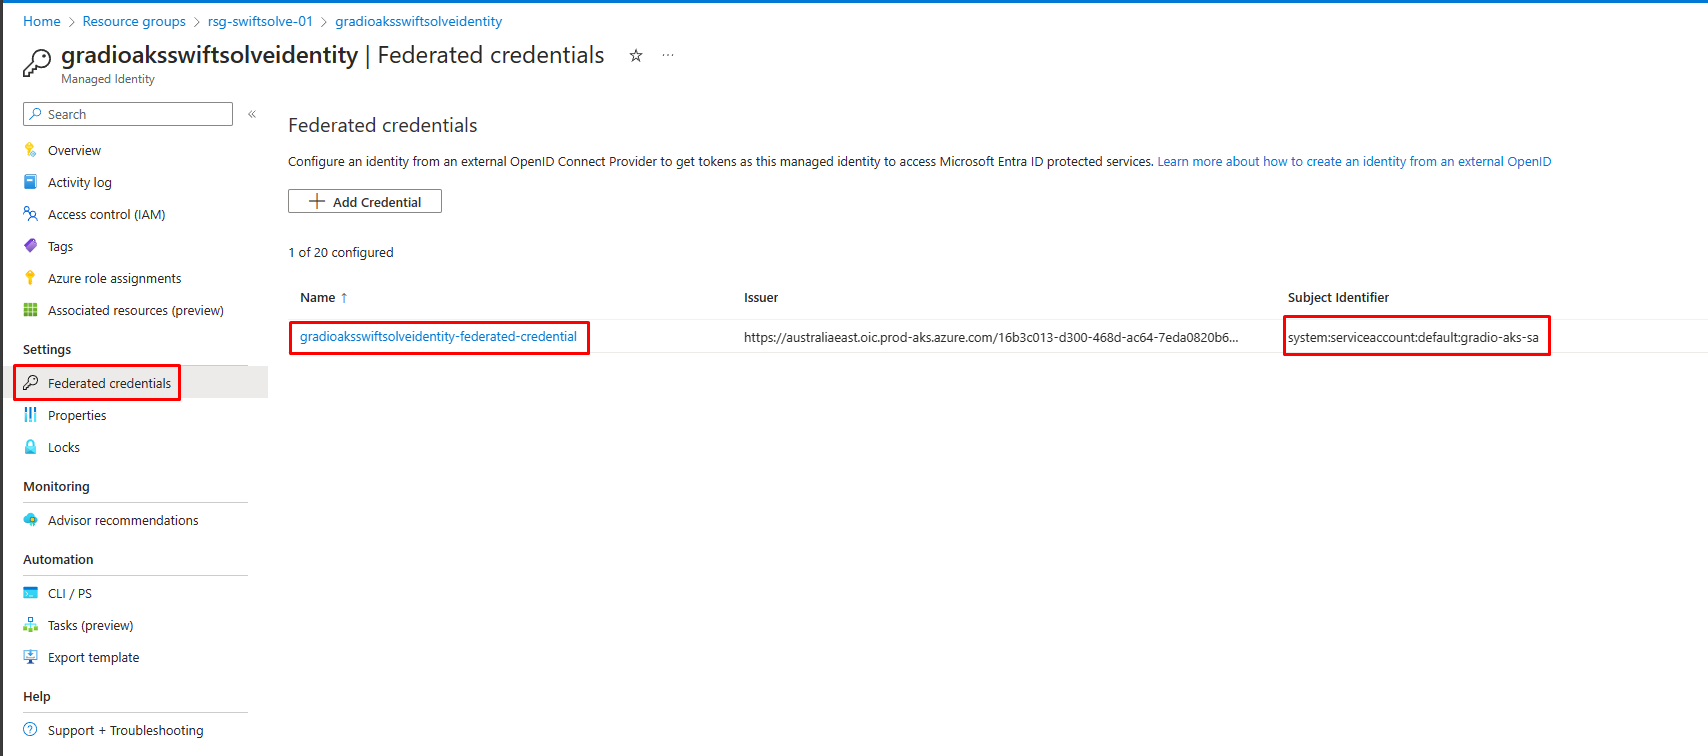
Lets see the components in Azure
-
Managed identity
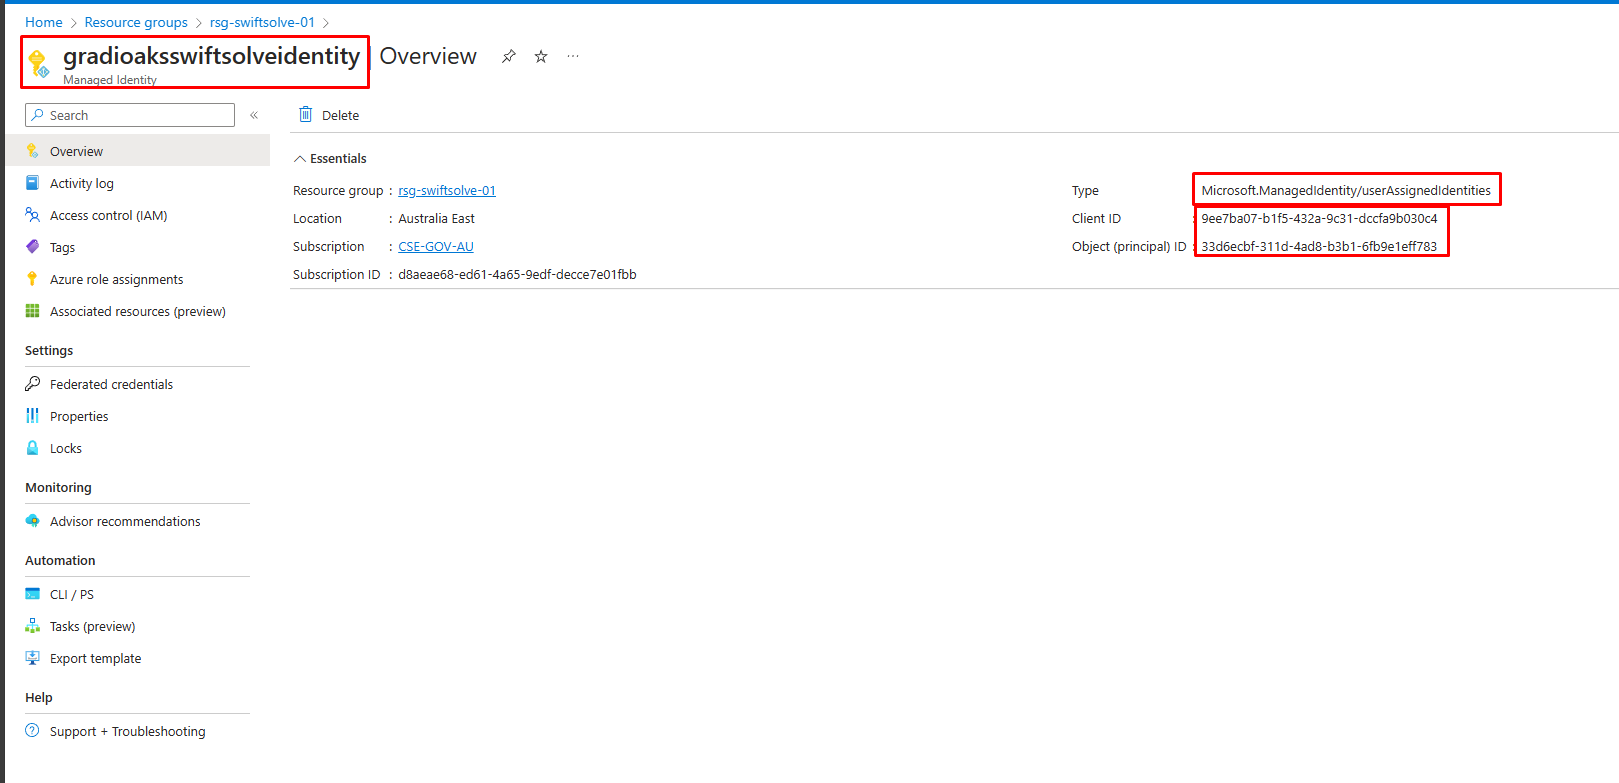
-
Role assigned to the managed identity
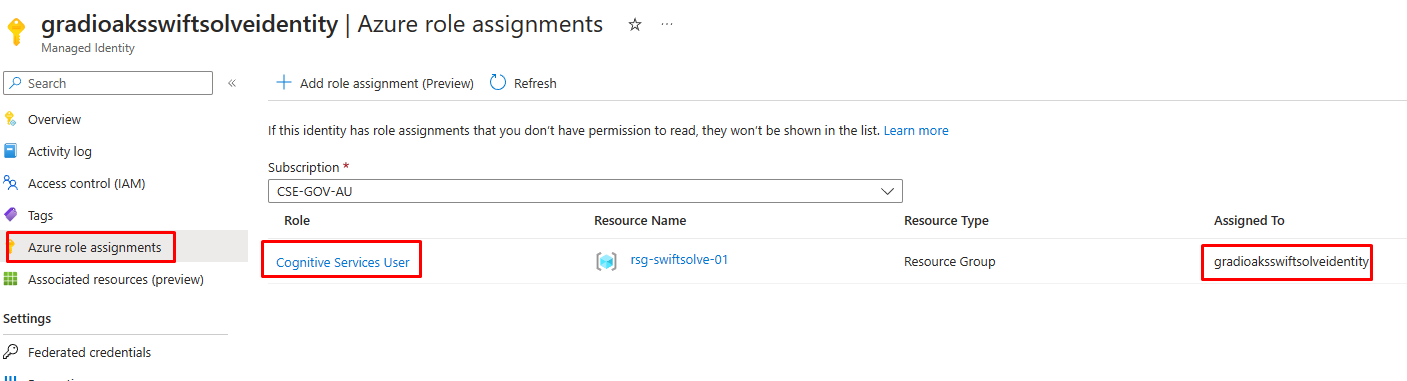
-
Service account with the managed identity client-id
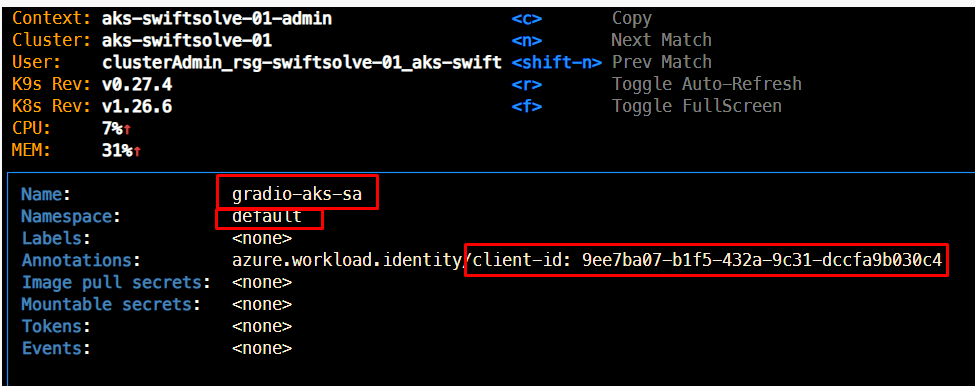
-
Federation
-
Apply
kubectl apply -f release
Useful docs
- Azure Managed Identities with Workload Identity Federation | Identity in the cloud (identitydigest.com)
- Tutorial – Use a workload identity with an application on Azure Kubernetes Service (AKS) – Azure Kubernetes Service | Microsoft Learn
- How to configure Azure OpenAI Service with managed identities – Azure OpenAI | Microsoft Learn
- Comparing Azure pod vs workload identity
- Azure AD workload identity federation with Kubernetes
- Azure Managed Identities with Workload Identity Federation
Summary
This blog post examines the integration of Azure OpenAI with Azure Kubernetes Services (AKS) through Workload Identities. It outlines the security and efficiency benefits of using Workload Identities for application authentication, eliminating the need for secret management. The adaptability of Workload Identities across different hosting environments is also highlighted.
The post details the setup process for Azure AD authentication and the utilization of Microsoft Entra Workload ID for Azure resource access within AKS. It provides a practical guide on running applications locally, creating an AKS, deploying services to AKS, and accessing these services.
Furthermore, the blog discusses key Azure components such as Managed Identity and Federation, essential in this integration process. This guide is designed to assist developers in effectively using Azure OpenAI resources in AKS, leveraging the capabilities of Workload Identities.