

Background
Watch this episode of the Decoded Show for an in-depth look with Gary Bradski, the inventor of OpenCV, and the Nestlé team.
In the Global Burden of Disease Study 2015, Acne was identified as the 8th most common disease in the world and is estimated to affect as many as 700 million people globally. This skin health condition medically known as acne vulgaris occurs when pores become clogged with dead skin cells and oil from the skin creating blackheads, whiteheads and, as inflammation worsens, red pimples.
Due to the common nature of the ailment, there are numerous treatments available in markets around the world. However, for consumers suffering from acne it can be challenging to self-assess their acne lesions, to choose the products they should use, and to monitor the impact of treatments. Not all consumers can seek or want to seek help from qualified dermatologists. To date there have been limited digital tools available universally which allow consumers to safely and adequately self-assess, treat and monitor the progress of their acne.
To tackle this issue, Nestlé Skin Health SHIELD (Skin Health, Innovation, Education, and Longevity Development), the cross-discipline global innovation network of Nestlé Skin Health, partnered with Microsoft to develop a deep learning model powered mobile app able to assess acne severity using only uploaded selfie images as a source.
Our mobile app allows users to self-assess the severity of their own acne with roughly the same accuracy as a dermatologist’s assessment. With the input of additional demographic information — such as age, gender, race, skin type, acne history — the app is also able to suggest treatment plans appropriate to the specific level of severity of the user’s acne as well as guide users towards intelligent choices for skin care products, indoor or outdoor activities, nutritional suggestions, etc..
While the app is not intended to replace a visit to dermatologist for clinical assessment in all cases, it provides Nestlé Skin Health the opportunity to actively engage with their customers, make dermatological expertise user-friendly and accessible universally, and address their customers’ needs promptly. This application significantly shortens the feedback loop for their products with real-time customer data, thus enabling the company to proactively design new or improve existing products.
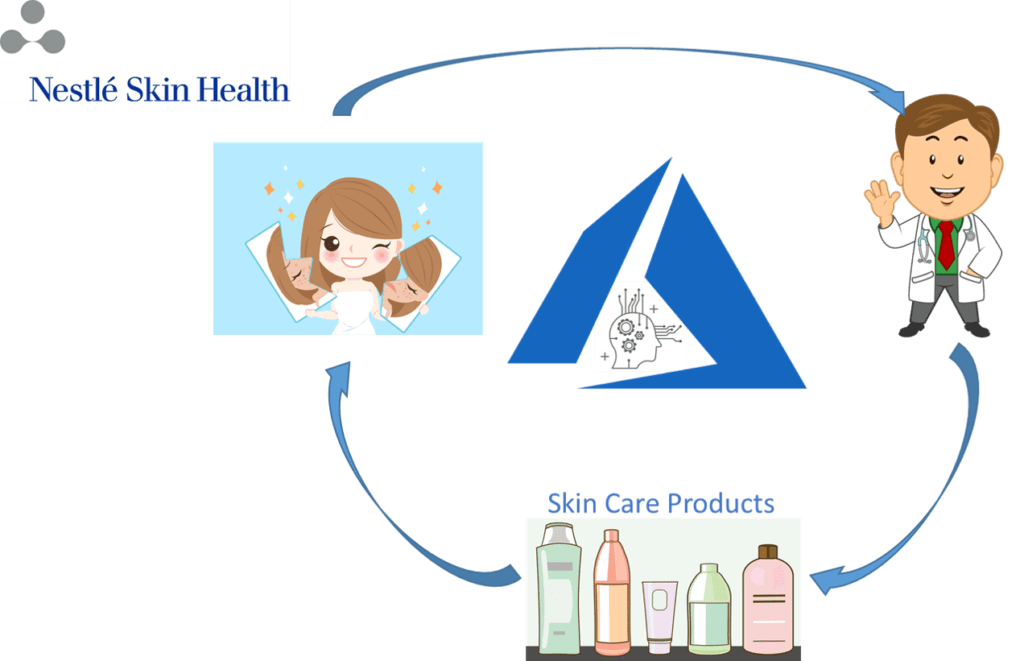
Figure 1. AI empowers consumers with cost-effective curated, useful scientific knowledge-based solutions. With expert assessment, treatment and management on demand and right in the palms of their hands, consumers have a high-quality option to the unyielding and expensive health care system, to help them solve their simplest health problems.
Challenges and Technical Overview
In previous experiments, teams had attempted to detect and classify acne lesions by applying the texture method, the HSV ((hue, saturation, value) method and ‘k-means’ techniques, but were not able to find a suitable application to accurately determine the severity of specific user’s acne. The Nestlé Skin Health internal data science team had also explored the texture method with reasonable success but could not match the targeted Root- Mean-Square- Error (RMSE) of their in-house dermatologist labelled images.
The Microsoft team partnering with Nestlé Skin Health explored the typical image classification deep learning methodology convolutional neural network (CNN). We confronted the following challenges:
- Prepare the labeled images in order to train the CNN model.
To train and evaluate CNN models, every image in the training and testing sets has to be labeled. We developed a web app in Azure to allow Nestlé Skin Health dermatologists to label the images by just using their web browsers.
- Train the CNN model on a limited number of images with substantial noises in both images and labels.
We applied a facial landmark detection model and the one-eye open-cv model to detect and extract skin patches on faces, and then developed an innovative image augmentation method to help the trained CNN model to generalize better on testing data. Due to the limited number of images in the training data, we applied the pre-trained ResNet-152 model as a feature extractor and trained a full-connected neural network just on the feature set of the training images. We then applied transfer learning methodologies.
- Operationalize the CNN model so that any application can use it to predict the severity of acne.
We built a web service API using Python Flask. A docker image was created to hold the built model and all the dependencies and published to Azure Container Service (ACS). Then the docker image was pushed into Azure Kubernetes Service (AKS) cluster and hosted in Azure.
Approaches
Image Labeler Web App on Azure
The joint Microsoft and Nestlé Skin Health teams used a total of 4700 unlabeled selfie images that included 230 images selected by a Nestlé Skin Health dermatologist as ‘golden set’ testing images, and the remaining 4470 images which were used as training images. The golden set images were separated from the model training process and used to evaluate the performance of the CNN models.
To train and test the CNN models, we first needed to label the images. The 4470 training images were randomly split into 11 even folds, and each fold was assigned to one of the 11 Nestlé Skin Health dermatologists to be labeled. In addition to that, each dermatologist was also assigned the entire golden set images, meaning each training image was only labeled once, whereas each golden set image was labeled 11 times. The dermatologists were not told which images were from the golden set to ensure the experiment was fair.

Figure 2. The image allocation mechanism.
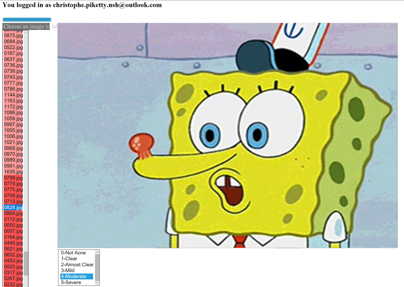
To facilitate this labeling process, we developed a simple Python Flask web app on Azure as shown in Figures 3.1 and 3.2. This web app allowed the dermatologists to check and label each image by just using a web browser. The access to images through the web application was secured through Azure Active Directory (AAD) to ensure that only those dermatologists whose Microsoft accounts were added to the AAD were able to access the labeling web app. More details about how we built an AAD-secured web app using Python and Azure SQL Database for image labeling will be shared in a future code story.
|
|
|

Data Augmentation
The selfie images used in this application varied dramatically in quality and backgrounds. This presented a big challenge for the CNN model since it introduced a significant level of background noise to the training data, especially considering the number of training images was limited. We took the following steps to augment the images so that the trained CNN models could generalize efficiently on the golden set images:
Step 0. Prescreened images with poor quality. The quality of the selfie images posed a big challenge for classification. Among the 4430 training images, there were a significant number of images with bad environment control, such as over or under-exposed images or images with very low resolution. Therefore, the first step we took was to manually pre-screen the training images and remove images with low resolution or bad exposure, leaving about 1000 images.
Step 1. Extracted skin patches from facial skins. This step was implemented in Jupyter Notebook – Extract Forehead, cheeks, and chin skin patches from raw images using facial landmark model and One Eye model. In this step, we extracted different skin patches from the forehead, both cheeks, and chin of each face image by applying the pretrained Shape Predictor 68 Face Landmarks (landmark model) published by Akshayubhat on github.com. Sample Python codes of applying landmark model in detecting facial features can be found here. We found that the landmark model did not work as well if there was only one eye clearly visible in the image, such as when a selfie is taken from a profile perspective. To extract skin patches from these types of profile images, we employed the One Eye model in opencv to detect the location of the single eye, and then inferred the regions of the forehead, the cheek side, and the chin skin patches.
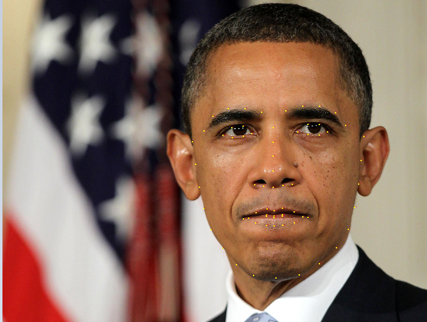
Figure 4.1. Detected Facial Landmarks
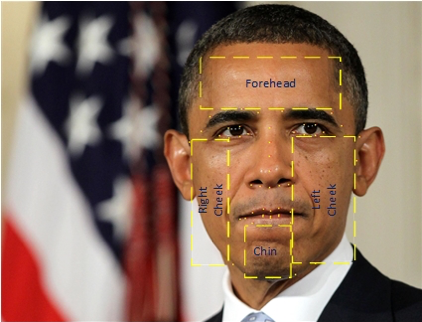
Figure 4.2. Extracted Facial Skin Patches
For skin patches taken from training images, the labels of the images were used to differentiate between the skin patches. Here are some sample Python codes for facial landmark detection:
def get_landmarks(im):
rects = detector(im, 1)
if len(rects) > 1:
raise TooManyFaces
if len(rects) == 0:
raise NoFaces
return np.matrix([[p.x, p.y] for p in predictor(im, rects[0]).parts()])
def read_im_and_landmarks(fname):
im = cv2.imread(fname, cv2.IMREAD_COLOR)
im = cv2.resize(im, (im.shape[1] * SCALE_FACTOR,
im.shape[0] * SCALE_FACTOR))
s = get_landmarks(im)
return im, s
Step 2. Rolling skin patches to help the CNN models generalize better on the validation and golden set images. To help CNN models generalize better on the validation and golden set images, we first had to roll the skin patches. This proved to be a critical data augmentation in this application by mitigating the spatial sensitivity of CNN models.
In CNN models, the features extracted from a certain region will be projected onto a certain location (neuron) in the feature space. Generally, the CNN model will not be able to recognize the acne lesion well if the acne lesion on the testing image appears on new locations that the CNN model had never registered before. Unfortunately, as a condition, the seriousness of acne is not dependent on location, but instead the volume and severity of acne lesions on a patient’s face.
This was implemented in Step 2. Roll the skin patches and balance classes of images, and move the rolled skin patches to directories based on image labels, with a few lines of Python codes that define the image rolling function as follows:
def roll_and_save(img, dest_path, file_name_wo_ext, image_names, x_or_y, pixels):
img_height, img_width = img.shape[0:2]
img2 = copy.copy(img)
if x_or_y == ‘x’:
img2[:, 0:(img_width-pixels),:] = img[:,pixels:img_width,:]
img2[:,(img_width-pixels):img_width,:] = img[:,0:pixels,:]
else:
img2[0:(img_height-pixels), :, :] = img[pixels:img_height, :, :]
img2[(img_height-pixels):img_height, :,:] = img[0:pixels,:, :]
img2 = cv2.cvtColor(img2, cv2.COLOR_BGR2RGB)
dest = join(dest_path, file_name_wo_ext+”roll“+x_or_y+”_”+str(pixels)+”.jpg”) #rolled image file name e.g., 0001_roll_x_112.jpg
misc.imsave(dest, img2)
image_names.append(dest)
return image_names
Converting Classification to Regression Problems
Another challenge we faced was in cleaning up the labels on our images, as many of the image labels provided by the dermatologists featured noise. When organizing our samples, we noticed that there were multiple identical or close-to-identical images in the training image set, which had been labeled differently, by different dermatologists, which would have posed a challenge when training our classification models. To mitigate the impact of label noise on the model, instead of going down the route of building an image classification model, we instead decided to build a regression CNN model.
In the regression CNN model, we assigned ordinary numerical values to the five acne severity levels as follows: 1-Clear, 2-Almost Clear, 3-Mild, 4-Moderate, and 5-Severe. Our team decided that assigning ordinary numerical values to the severity levels made sense here considering that a higher numerical value does necessarily mean the user has more severe acne lesions.
Transfer Learning Model
For the next part of the process, we used a pre-trained deep learning model in CNTK, ResNet-152, to extract features from the training image skin patches. We then trained a full-connected neural network model on these features, to make the entire deep learning model specific to the acne severity classification domain.
The features we extracted were from the last max pooling layer of the pre-trained ResNet-152 model. The trained full connected neural network was then stored for future scoring pipeline. The Transfer Learning Model was implemented in Step3_Training_Pipelinejupyter notebook.
The feature extraction from ResNet-152 model was implemented in the following function:
def extract_features(image_path):
img = Image.open(image_path)
resized = img.resize((image_width, image_height), Image.ANTIALIAS)
bgr_image = np.asarray(resized, dtype=np.float32)[…, [2, 1, 0]]
hwc_format = np.ascontiguousarray(np.rollaxis(bgr_image, 2))
arguments = {loaded_model.arguments[0]: [hwc_format]}
output = output_nodes.eval(arguments) #extract the features from the pretrained model, and output
return output
The features of the training image patches were used to train a full-connected neural network (fcnn) with three hidden layers, each with 1024, 512, and 256 hidden neurons. The following lines defined and trained the fcnn model:
from sklearn.neural_network import MLPRegressor
clf_regr = MLPRegressor(hidden_layer_sizes=(1024, 512, 256), activation=’relu’, random_state=random_seed)
clf_regr.fit(train_dataset, train_labels) #Start training the regression model using the training data
The trained fcnnmodel was then saved and used to predict the labels of the golden set images. This image scoring process was implemented in Step4_Scoring_Pipelinejupyter notebook.
Performance Metrics and Bar
Since we had built CNN regression models to tackle the problem, we chose RMSE to measure the performance of the model on the golden set images. Since each image on the Golden set had 11 labels from all 11 dermatologists, after replacing acne severity levels with numerical values, we used the average of the 11 numerical labels to represent the ground truth rating of the severity level of each image.
As we mentioned earlier in the image augmentation section, multiple skin patches were extracted from each selfie image, and the model was trained on the individual skin patches and used to predict the severity levels of each sample. We chose to use the average of predicted severity values of the multiple skin patches as the final predicted severity level of each selfie image.
Nestlé Skin Health and Microsoft decided to set the performance bar of this CNN model to be at least as good as the highest RMSE among the 11 dermatologists. In the following figure, the RMSEof dermatologist iis calculated as follows, is the label provided by dermatologist ion image k, and Nis the number of golden set images. It describes how far the labels provided by the dermatologist are away from the consensus of all 11 dermatologists on the golden set images.
The following table lists the RMSE of all 11 dermatologists. This meant that RMSE=0.517 was set as the performance figure that the CNN model had to beat to be considered a success.
| ID | 1 | 2 | 3 | 4 | 5 | 6 | 7 | 8 | 9 | 10 | 11 |
| RMSE | 0.517 | 0.508 | 0.500 | 0.495 | 0.490 | 0.484 | 0.454 | 0.450 | 0.402 | 0.400 | 0.388 |
Performance of Our Deep Learning Models
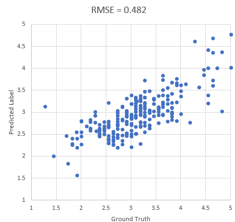
Figure 5.1 shows the scatter plot of real consensus acne severity levels (ground truth) vs. predicted severity levels (average of severity levels of skin patches) of the golden set images.
We can see that the CNN model achieved RMSE=0.482, which is better than the target performance bar 0.517 we set at the beginning of this engagement. As such, it appears there is a strong positive correlation (0.755) between the predicted and actual target values.
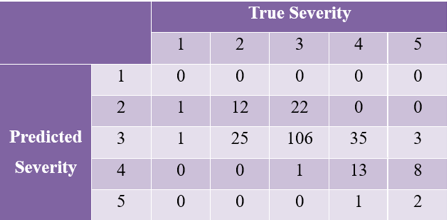
If we use [1.5, 2.5, 3.5, 4.5] as the list of edges to discretize the ground truth and the predicted severity levels into categorical severity levels – with the severity label < 1.5 labeled as 1, and severity labels in the range of 1.5 – 2.5 are labeled as 2 — we get a confusion matrix as shown in Figure 5.2.
We can see that the model is extremely accurate for images of mild acne (82%), but had more difficulty differentiating Almost Clear (label 2) from Mild (label 3), Moderate (label 4) from Mild, and Severe (label 5) from Moderate.
This was consistent with what we observed in the original training images labels, where some identical images were labeled differently by different dermatologists.
|
|
|
Operationalizing the Scoring Pipeline in Containers and Azure Kubernetes Services for Scalability
We then operationalized the trained CNN model, together with the image augmentation steps as a Python Flask web service API using Azure Container Service (ACS) and Azure Kubernetes Service (AKS) so that a selfie image could be sent to the web service API and an acne severity score could be returned. Assuming that you have installed dockeron your local machine, cloned the github repository to a local directory, and changed the directory to it, you can take the following steps to create a docker image with the Flask web service API, and deploy this image to AKS:
Step 1. Run the following command to build a docker image nestleapi.
docker build -t ‘nestleapi’
Step 2. Tag the nestleapiimage with the login server of the container registry on ACS.
docker tag nestleapi <acrName>.azurecr.io/nesteapi:v1
Step 3. Push the nestleapi image to the registry.
docker push <acrName>.azurecr.io/nestleapi:v1
Step 4. Depoly the application to an AKS cluster:
kubectl apply -f nestledeploy.yml
The web service API in this example takes the URL of an image as the input. To test this web service API, you can run the following shell command:
curl -i -H “Accept: application/json” -H “Content-Type: application/json” http://<external_ip>/url/ImageURL=<testimage URL>
Conclusion and Future Recommendations
During this collaboration, our team built a CNN deep learning model to assess the severity level of acne lesions from selfie images. This will allow Nestlé Skin Health to develop an application which will make it easier for acne sufferers all over the world to self-assess their condition, choose the most appropriate products for treatment and monitor the response of their acne over time.
The biggest challenge in building an image classification CNN model with a level of accuracy comparable to that of a human dermatologist, was reducing the background noise in the selfie images as much as possible. Experience shows us that this type of noise would have had a significant impact on the accuracy of the model, and the ability of the model to generalize effectively when using a small set of training data.
During the process, our team first applied the landmark and one-eye models to extract skin patches from different sectors of the face, and designed a special image augmentation technique, image rolling, to help the model generalize well on the testing images. Our results show that transfer learning is an extremely effective method to train a domain-specific model when using a small sample training set.
The authors feel the model could be further improved. In the current model the team used the label of the entire face image as the label of each skin patch. In retrospect this potentially introduced additional noise to the labels of the training skin patches in the case that most of the face was clear and only one skin patch has moderate acne lesion. Furthermore, although the trained deep learning model outperformed the performance bar, the model could potentially be improved if more labeled images with less noise and better-controlled environment factors such as low resolution and over exposure were addressed. Finally, if the training images included metadata, additional correction could have been implemented which may have also improved the model significantly.
While GPU is immensely powerful in training deep learning models and scoring new images, it is expensive, which could limit its use in certain applications. As an additional test, our team assessed the performance of the solution using ResNet-50 (instead of ResNet-152 as aforementioned) as the feature extractor and kept everything else unchanged. Using this technique, we achieved approximately the same performance as reported previously, still accounting for better than the performance bar. This means that for future projects it would be possible to migrate an image scoring pipeline onto Microsoft’s Brainwave (FPGA) platform to achieve high throughput while reducing costs at the same time.
Nestlé Skin Health plans to make this application globally available to the millions of people who are affected by acne. Using the app will make the consumer’s journey a more individualized experience with instantaneous analysis of selfie images and personalized guidance for treatment and management using interactive coaching. Nestlé Skin Health and Microsoft hope this will not only have a positive impact to consumers but also provide healthcare professionals around the world with new insights on acne based on learning from the deep neural network
For anyone interested in tackling the problem of facial dermatological problems using a similar model, you can find codes samples in the relevant GitHub repository.
Acknowledgements
We would like to acknowledge the great support on this collaborative work from our colleagues Thierry Roulette and Laurent Chantalat at Nestle Skin Health. We would also like to acknowledge the significant contributions from Microsoft colleagues, including Tingting Zhao (Applied Scientist II), Jacob Spoelstra (Data Scientist Director), and Vikram Paramasivan (Principal Program Manager Lead).