.NET Core 3.0 Preview 4 is now available and it includes a bunch of new updates to ASP.NET Core.
Here’s the list of what’s new in this preview:
- Razor Components renamed back to server-side Blazor
- Client-side Blazor on WebAssembly now in official preview
- Resolve components based on
@using - _Imports.razor
- New component item template
- Reconnection to the same server
- Stateful reconnection after prerendering
- Render stateful interactive components from Razor pages and views
- Detect when the app is prerendering
- Configure the SignalR client for server-side Blazor apps
- Improved SignalR reconnect features
- Configure SignalR client for server-side Blazor apps
- Additional options for MVC service registration
- Endpoint routing updates
- New template for gRPC
- Design-time build for gRPC
- New Worker SDK
Please see the release notes for additional details and known issues.
Get started
To get started with ASP.NET Core in .NET Core 3.0 Preview 4 install the .NET Core 3.0 Preview 4 SDK
If you’re on Windows using Visual Studio, you also need to install the latest preview of Visual Studio 2019.
If you’re using Visual Studio Code, check out the improved Razor tooling and Blazor support in the C# extension.
Upgrade an existing project
To upgrade an existing an ASP.NET Core app to .NET Core 3.0 Preview 4, follow the migrations steps in the ASP.NET Core docs.
Please also see the full list of breaking changes in ASP.NET Core 3.0.
To upgrade an existing ASP.NET Core 3.0 Preview 3 project to Preview 4:
- Update Microsoft.AspNetCore.* package references to 3.0.0-preview4-19216-03
- In Razor Components apps (i.e. server-side Blazor apps) rename _ViewImports.cshtml to _Imports.razor for Razor imports that should apply to Razor components.
- In Razor Component apps, in your Index.cshtml file, change the
<script>tag that references components.server.js so that it references blazor.server.js instead. - Remove any use of the
_RazorComponentIncludeproperty in your project file and rename and component files using the .cshtml file extension to use the .razor file extension instead. - Remove package references to Microsoft.AspNetCore.Components.Server.
- Replace calls to
AddRazorComponentsinStartup.ConfigureServiceswithAddServerSideBlazor. - Replace calls to
MapComponentHub<TComponent>withMapBlazorHub. - Remove any use of the
Microsoft.AspNetCore.Components.Servicesnamespace and replace withMicrosoft.AspNetCore.Componentsas required. - In Razor Component apps, rename the host Razor Page from Index.cshtml to _Host.cshtml replace the
{*clientPath}route in the host page with “/”. - Update any call to
UseRoutingin yourStartup.Configuremethod to move the route mapping logic into a call toUseEndpointsat the point where you want the endpoints to be executed. Add a call toMapFallbackToPage("_Host")inUseEndpoints.
Before:
app.UseRouting(routes =>
{
    routes.MapRazorPages();
});

app.UseCookiePolicy();

app.UseAuthorization();
After:
app.UseRouting();

app.UseCookiePolicy();

app.UseAuthorization();

app.UseEndpoints(routes =>
{
    routes.MapRazorPages();
    routes.MapFallbackToPage("_Host");
});
Razor Components renamed back to server-side Blazor
For a while, we’ve used the terminology Razor Components in some cases, and Blazor in other cases. This has proven to be confusing, so following a lot of community feedback, we’ve decided to drop the name ASP.NET Core Razor Components, and return to the name Server-side Blazor instead.
This emphasizes that Blazor is a single client app model with multiple hosting models:
- Server-side Blazor runs on the server via SignalR
- Client-side Blazor runs client-side on WebAssembly
… but either way, it’s the same programming model. The same Blazor components can be hosted in both environments.
In this preview of the .NET Core SDK we renamed the “Razor Components” template back to “Blazor (server-side)” and updated the related APIs accordingly. In Visual Studio the template will still show up as “Razor Components” when using Visual Studio 2019 16.1.0 Preview 1, but it will start showing up as “Blazor (server-side)” in a subsequent preview. We’ve also updated the template to use the new super cool flaming purple Blazor icon.

Client-side Blazor on WebAssembly now in official preview
We’re also thrilled to announce that client-side Blazor on WebAssembly is now in official preview! Blazor is no longer experimental and we are committing to ship it as a supported web UI framework including support for running client-side in the browser on WebAssembly.
- Server-side Blazor will ship as part of .NET Core 3.0. This was already announced last October.
- Client-side Blazor won’t ship as part of the initial .NET Core 3.0 release, but we are now announcing it is committed to ship as part of a future .NET Core release (and hence is no longer an “experiment”).
With each preview release of .NET Core 3.0, we will continue to ship preview releases of both server and client-side Blazor.
Resolve components based on @using
Components in referenced assemblies are now always in scope and can be specified using their full type name including the namespace. You no longer need to import components from component libraries using the @addTagHelper directive.
For example, you can add a Counter component to the Index page like this:
<BlazorWebApp1.Pages.Counter />
Use the @using directive to bring component namespaces into scope just like you would in C# code:
@using BlazorWebApp1.Pages

<Counter />
_Imports.razor
Use _Imports.razor files to import Razor directives across multiple Razor component files (.razor) in a hierarchical fashion.
For example, the following _Imports.razor file applies a layout and adds using statements for all Razor components in a the same folder and in any sub folders:
@layout MainLayout
@using Microsoft.AspNetCore.Components.
@using BlazorApp1.Data
This is similar to how you can use _ViewImports.cshtml with Razor views and pages, but applied specifically to Razor component files.
New component item template
You can now add components to Blazor apps using the new Razor Component item template:
dotnet new razorcomponent -n MyComponent1
Reconnection to the same server
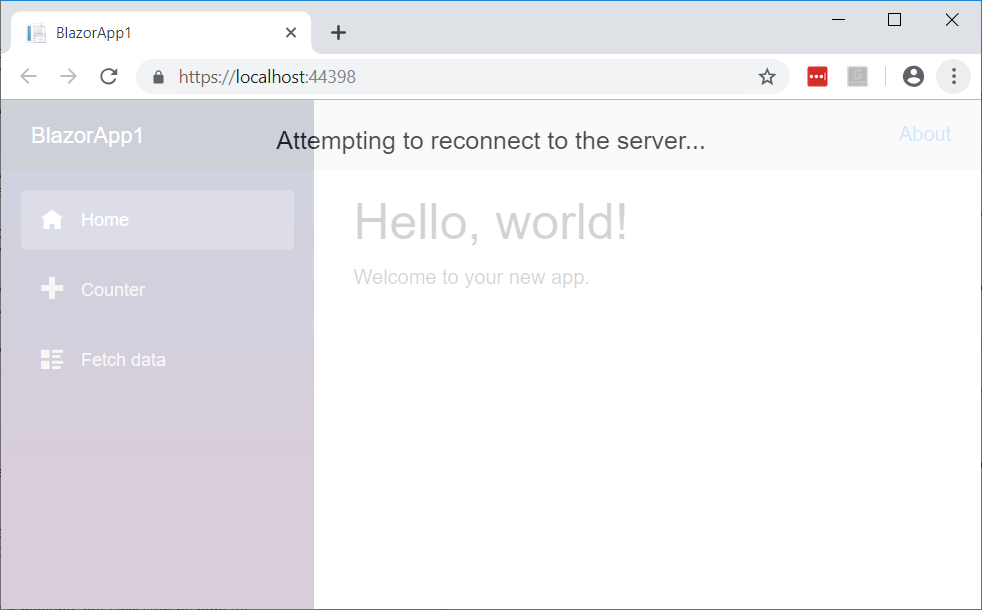
Server-side Blazor apps require an active SignalR connection to the server to function. In this preview, the app will now attempt to reconnect to the server. As long as the state for that client is still in memory, the client session will resume without losing any state.
When the client detects that the connection has been lost a default UI is displayed to the user while the client attempts to reconnect:

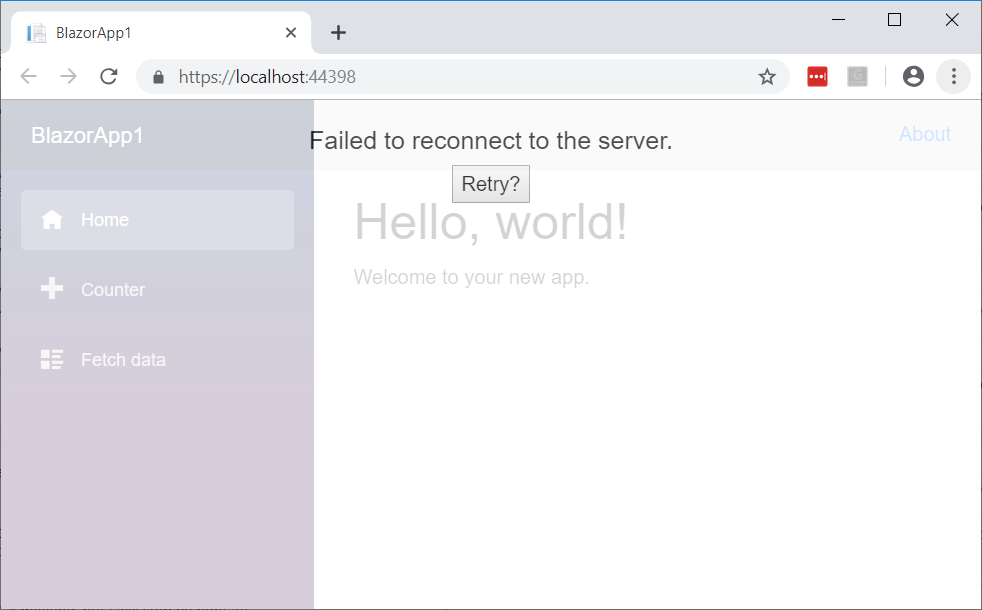
If reconnection failed the user is given the option to retry:

To customize this UI define an element with components-reconnect-modal as its ID. The client will update this element with one of the following CSS classes based on the state of the connection:
components-reconnect-show: Show the UI to indicate the connection was lost and the client is attempting to reconnect.components-reconnect-hide: The client has an active connection – hide the UI.components-reconnect-failed: Reconnection failed. To attempt reconnection again callwindow.Blazor.reconnect().
Stateful reconnection after prerendering
Server-side Blazor apps are setup by default to prerender the UI on the server before client connection back to the server is established. This is setup in the _Host.cshtml Razor page:
<body>
    <app>@(await Html.RenderComponentAsync<App>())</app>

    <script src="_framework/blazor.server.js"></script>
</body>
In this preview the client will now reconnect back to the server to the same state that was used to prerender the app. If the app state is still in memory it doesn’t need to be rerendered once the SignalR connection is established.
Render stateful interactive components from Razor pages and views
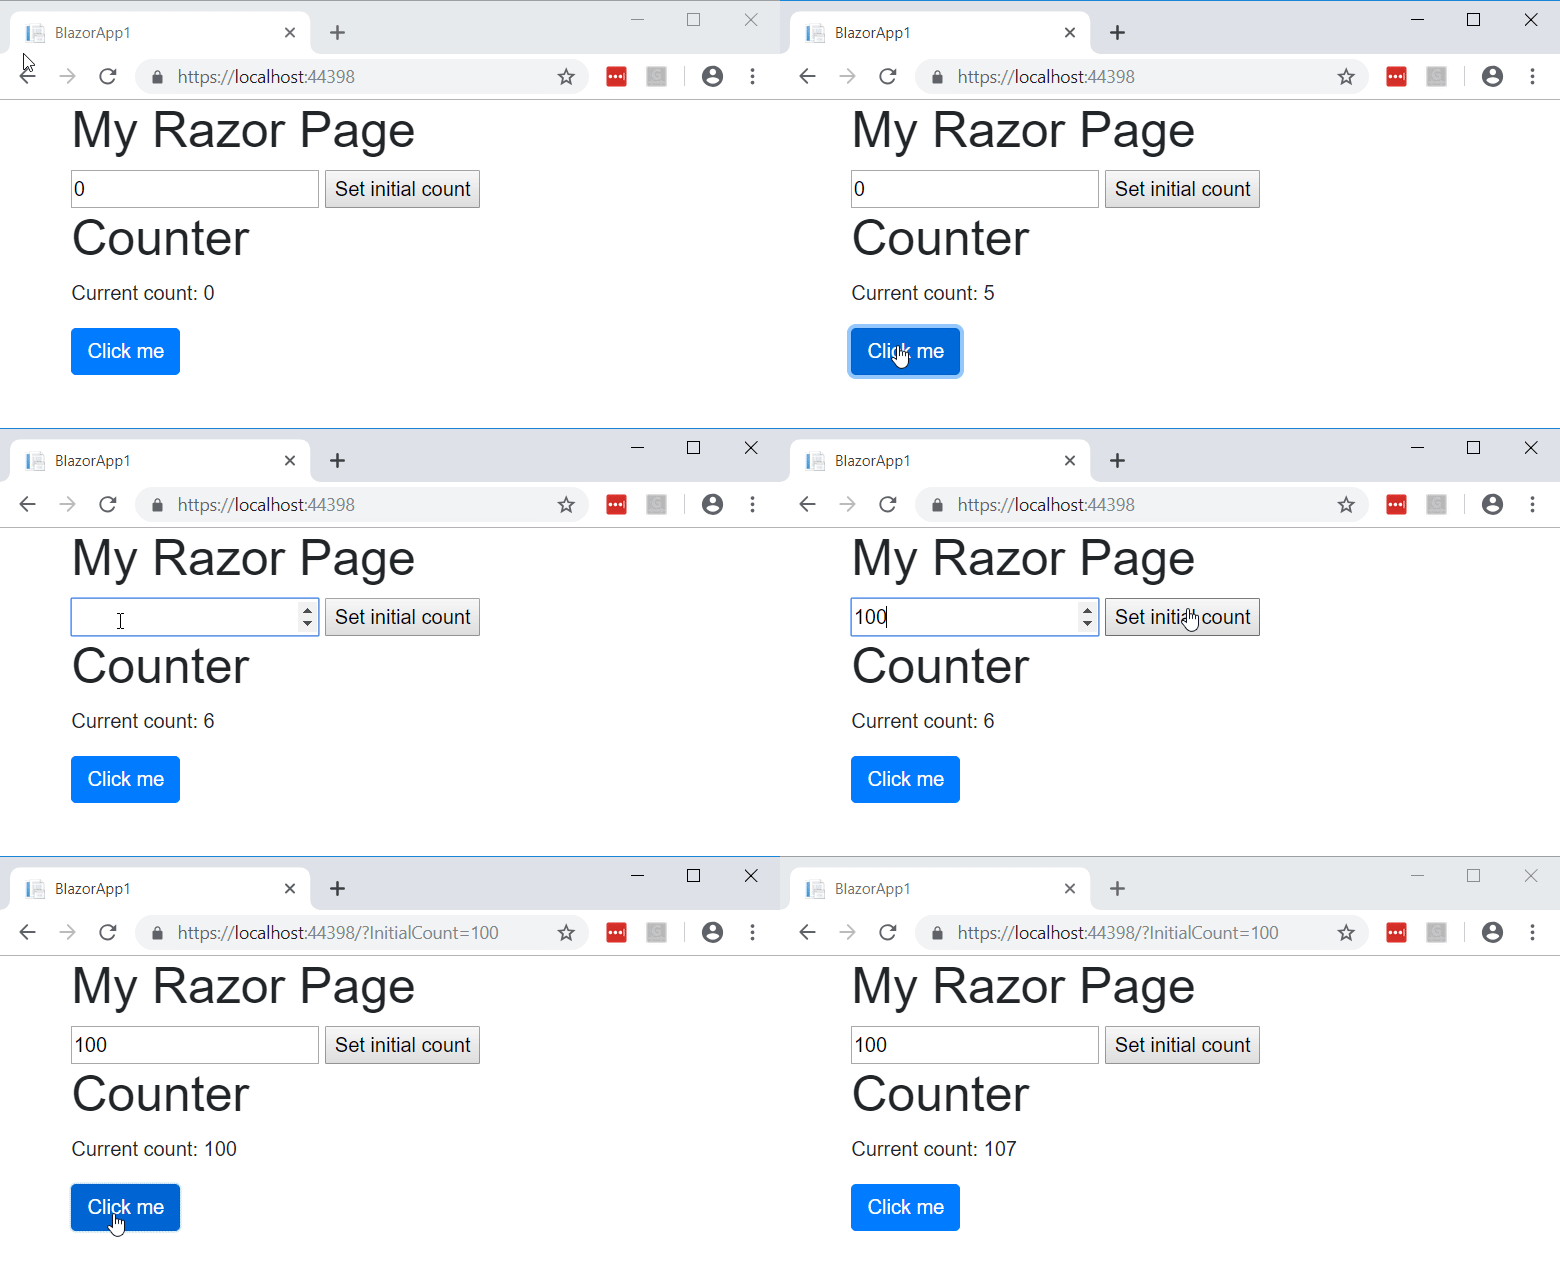
You can now add stateful interactive components to a Razor page or View. When the page or view renders the component will be prerendered with it. The app will then reconnect to the component state once the client connection has been established as long as it is still in memory.
For example, the following Razor page renders a Counter component with an initial count that is specified using a form:
<h1>My Razor Page</h1>
<form>
    <input type="number" asp-for="InitialCount" />
    <button type="submit">Set initial count</button>
</form>

@(await Html.RenderComponentAsync<Counter>(new { InitialCount = InitialCount }))

@functions {
    [BindProperty(SupportsGet=true)]
    public int InitialCount { get; set; }
}

Detect when the app is prerendering
While a Blazor app is prerendering, certain actions (like calling into JavaScript) are not possible because a connection with the browser has not yet been established. Components may need to render differently when being prerendered.
To delay JavaScript interop calls until after the connection with the browser has been established you can now use the OnAfterRenderAsync component lifecycle event. This event will only be called after the app has been fully rendered and the client connection established.
To conditionally render different content based on whether the app is currently being prerendered or not use IsConnected property on the IComponentContext service. This property will only return true if there is an active connection with the client.
Configure the SignalR client for server-side Blazor apps
Sometimes you need to configure the SignalR client used by server-side Blazor apps. For example, you might want to configure logging on the SignalR client to diagnose a connection issue.
To configure the SignalR client for server-side Blazor apps, add an autostart="false" attribute on the script tag for the blazor.server.js script, and then call Blazor.start passing in a config object that specifies the SignalR builder:
<script src="_framework/blazor.server.js" autostart="false"></script>
<script>
    Blazor.start({
        configureSignalR: function (builder) {
            builder.configureLogging(2); // LogLevel.Information
        }
    });
</script>
Improved SignalR connection lifetime handling
Preview 4 will improve the developer experience for handling SignalR disconnection and reconnection. Automatic reconnects can be enabled by calling the withAutomaticReconnect method on HubConnectionBuilder:
const connection = new signalR.HubConnectionBuilder()
    .withUrl("/chatHub")
    .withAutomaticReconnect()
    .build();
Without any parameters, withAutomaticReconnect() will cause the configure the client to try to reconnect, waiting 0, 2, 10 and 30 seconds respectively before between each attempt.
In order to configure a non-default number of reconnect attempts before failure, or to change the reconnect timing, withAutomaticReconnect accepts an array of numbers representing the delay in milliseconds to wait before starting each reconnect attempt.
const connection = new signalR.HubConnectionBuilder()
    .withUrl("/chatHub")
    .withAutomaticReconnect([0, 0, 2000, 5000]) // defaults to [0, 2000, 10000, 30000]
    .build();
Improved disconnect & reconnect handling opportunities
Before starting any reconnect attempts, the HubConnection will transition to the Reconnecting state and fire its onreconnecting callback. This provides an opportunity to warn users that the connection has been lost, disable UI elements, and mitigate confusing user scenarios that might occur due to the disconnected state.
connection.onreconnecting((error) => {
  console.assert(connection.state === signalR.HubConnectionState.Reconnecting);

  document.getElementById("messageInput").disabled = true;

  const li = document.createElement("li");
  li.textContent = `Connection lost due to error "${error}". Reconnecting.`;
  document.getElementById("messagesList").appendChild(li);
});
If the client successfully reconnects within its first four attempts, the HubConnection will transition back to the Connected state and fire onreconnected callbacks. This gives developers a good opportunity to inform users the connection has been reestablished.
connection.onreconnected((connectionId) => {
  console.assert(connection.state === signalR.HubConnectionState.Connected);

  document.getElementById("messageInput").disabled = false;

  const li = document.createElement("li");
  li.textContent = `Connection reestablished. Connected with connectionId "${connectionId}".`;
  document.getElementById("messagesList").appendChild(li);
});
If the client doesn’t successfully reconnect within its first four attempts, the HubConnection will transition to the Disconnected state and fire its onclosed callbacks. This is a good opportunity to inform users the connection has been permanently lost and recommend refreshing the page.
connection.onclose((error) => {
  console.assert(connection.state === signalR.HubConnectionState.Disconnected);

  document.getElementById("messageInput").disabled = true;

  const li = document.createElement("li");
  li.textContent = `Connection closed due to error "${error}". Try refreshing this page to restart the connection.`;
  document.getElementById("messagesList").appendChild(li);
})
Additional options for MVC service registration
We’re adding some new options for registering MVC’s various features inside ConfigureServices.
What’s changing
We’re adding three new top level extension methods related to MVC features on IServiceCollection. Along with this change we are updating our templates to use these new methods instead of AddMvc().
AddMvc() is not being removed and will continue to behave as it does today.
public void ConfigureServices(IServiceCollection services)
{
    // Adds support for controllers and API-related features - but not views or pages.
    //
    // Used by the API template.
    services.AddControllers();
}
public void ConfigureServices(IServiceCollection services)
{
    // Adds support for controllers, API-related features, and views - but not pages.
    //
    // Used by the Web Application (MVC) template.
    services.AddControllersWithViews();
}
public void ConfigureServices(IServiceCollection services)
{
    // Adds support for Razor Pages and minimal controller support.
    //
    // Used by the Web Application template.
    services.AddRazorPages();
}
These new methods can also be combined. This example is equivalent to the current AddMvc().
public void ConfigureServices(IServiceCollection services)
{
    services.AddControllers();
    services.AddRazorPages();
}
These methods return an IMvcBuilder that can be chained to access any of the methods that are available today from the builder returned by AddMvc().
We recommend using whichever option feels best based on your needs.
Motivations
We wanted to provide some more options that represent how users use the product. In particular we’ve received strong feedback from users that want an API-focused flavor of MVC without the overhead for having the ability to serve views and pages. We tried to provide an experience for this in the past through the AddMvcCore() method, but that approach hasn’t been very successful. Users who tried using AddMvcCore() have been surprised by how much they need to know to use it successfully, and as a result we haven’t promoted its usage. We hope that AddControllers() will better satisfy this scenario.
In addition to the AddControllers() experience, we’re also attempting to create options that feel right for other scenarios. We’ve heard requests for this in the past, but not as strongly as the requests for an API-focused profile. Your feedback about whether AddMvc() could be improved upon, and how will be valuable.
What’s in AddControllers()
AddControllers() includes support for:
- Controllers
- Model Binding
- API Explorer (OpenAPI integration)
- Authorization
[Authorize] - CORS
[EnableCors] - Data Annotations validation
[Required] - Formatter Mappings (translate a file-extension to a content-type)
All of these features are included because they fit under the API-focused banner, and they are very much pay-for-play. None of these features proactively interact with the request pipeline, these are activated by attributes on your controller or model class. API Explorer is an slight exception, it is a piece of infrastructure used by OpenAPI libraries and will do nothing without Swashbuckle or NSwag.
Some notable features AddMvc() includes but AddControllers() does not:
- Antiforgery
- Temp Data
- Views
- Pages
- Tag Helpers
- Memory Cache
These features are view-related and aren’t necessary in an API-focused profile of MVC.
What’s in AddControllersWithViews()
AddControllersWithViews() includes support for:
- Controllers
- Model Binding
- API Explorer (OpenAPI integration)
- Authorization
[Authorize] - CORS
[EnableCors] - Data Annotations validation
[Required] - Formatter Mappings (translate a file-extension to a content-type)
- Antiforgery
- Temp Data
- Views
- Tag Helpers
- Memory Cache
We wanted to position AddControllersWithViews() as a superset of AddControllers() for simplicity in explaining it. This features set also happens to align with the ASP.NET Core 1.X release (before Razor Pages).
Some notable features AddMvc() includes but AddControllersWithViews() does not: – Pages
What’s in AddRazorPages()
AddRazorPages() includes support for:
- Pages
- Controllers
- Model Binding
- Authorization
[Authorize] - Data Annotations validation
[Required] - Antiforgery
- Temp Data
- Views
- Tag Helpers
- Memory Cache
For now this profile includes basic support for controllers, but excludes many of the API-focused features listed below. We’re interested in your feedback about what should be included by default in AddRazorPages().
Some notable features AddMvc() includes but AddRazorPages() does not:
- API Explorer (OpenAPI integration)
- CORS
[EnableCors] - Formatter Mappings (translate a file-extension to a content-type)
Endpoint Routing updates
In ASP.NET Core 2.2 we introduced a new routing implementation called Endpoint Routing which replaces IRouter-based routing for ASP.NET Core MVC. In the upcoming 3.0 release Endpoint Routing will become central to the ASP.NET Core middleware programming model. Endpoint Routing is designed to support greater interoperability between frameworks that need routing (MVC, gRPC, SignalR, and more …) and middleware that want to understand the decisions made by routing (localization, authorization, CORS, and more …).
While it’s still possible to use the old UseMvc() or UseRouter() middleware in a 3.0 application, we recommend that every application migrate to Endpoint Routing if possible. We are taking steps to address compatibility bugs and fill in previously unsupported scenarios. We welcome your feedback about what features are missing or anything else that’s not great about routing in this preview release.
We’ll be uploading another post soon with a conceptual overview and cookbook for Endpoint Routing in 3.0.
Endpoint Routing overview
Endpoint Routing is made up of the pair of middleware created by app.UseRouting() and app.UseEndpoints(). app.UseRouting() marks the position in the middleware pipeline where a routing decision is made – where an endpoint is selected. app.UseEndpoints() marks the position in the middleware pipeline where the selected endpoint is executed. Middleware that run in between these can see the selected endpoint (if any) or can select a different endpoint.
If you’re familiar with routing from using MVC then most of what you have experienced so far will behave the same way. Endpoint Routing understands the same route template syntax and processes URLs in a very similar way to the in-the-box implementations of IRouter. Endpoint routing supports the [Route] and similar attributes inside MVC.
We expect most applications will only require changes to the Startup.cs file.
A typical Configure() method using Endpoint Routing has the following high-level structure:
public void Configure(IApplicationBuilder app, IWebHostEnvironment env)
{
    // Middleware that run before routing. Usually the following appear here:
    if (env.IsDevelopment())
    {
        app.UseDeveloperExceptionPage();
        app.UseDatabaseErrorPage();
    }
    else
    {
        app.UseExceptionHandler("/Error");

    }

    app.UseStaticFiles()

    // Runs matching. An endpoint is selected and set on the HttpContext if a match is found.
    app.UseRouting();

    // Middleware that run after routing occurs. Usually the following appear here:
    app.UseAuthentication()
    app.UseAuthorization()
    app.UseCors()
    // These middleware can take different actions based on the endpoint.

    // Executes the endpoint that was selected by routing.
    app.UseEndpoints(endpoints =>
    {
        // Mapping of endpoints goes here:
        endpoints.MapControllers()
        endpoints.MapRazorPages()
        endpoints.MapHub<MyChatHub>()
        endpoints.MapGrpcService<MyCalculatorService>()
    });

    // Middleware here will only run if nothing was matched.
}
MVC Controllers, Razor Pages, SignalR, gRPC, and more are added inside UseEndpoints() – they are now part of the same routing system.
New template for gRPC
The gRPC template has been simplified to a single project template. We no longer include a gRPC client as part of the template. For instructions on how to create a gRPC client, refer to the docs.
.
├── appsettings.Development.json
├── appsettings.json
├── grpc.csproj
├── Program.cs
├── Properties
│   └── launchSettings.json
├── Protos
│   └── greet.proto
├── Services
│   └── GreeterService.cs
└── Startup.cs

3 directories, 8 files
Design-time build for gRPC
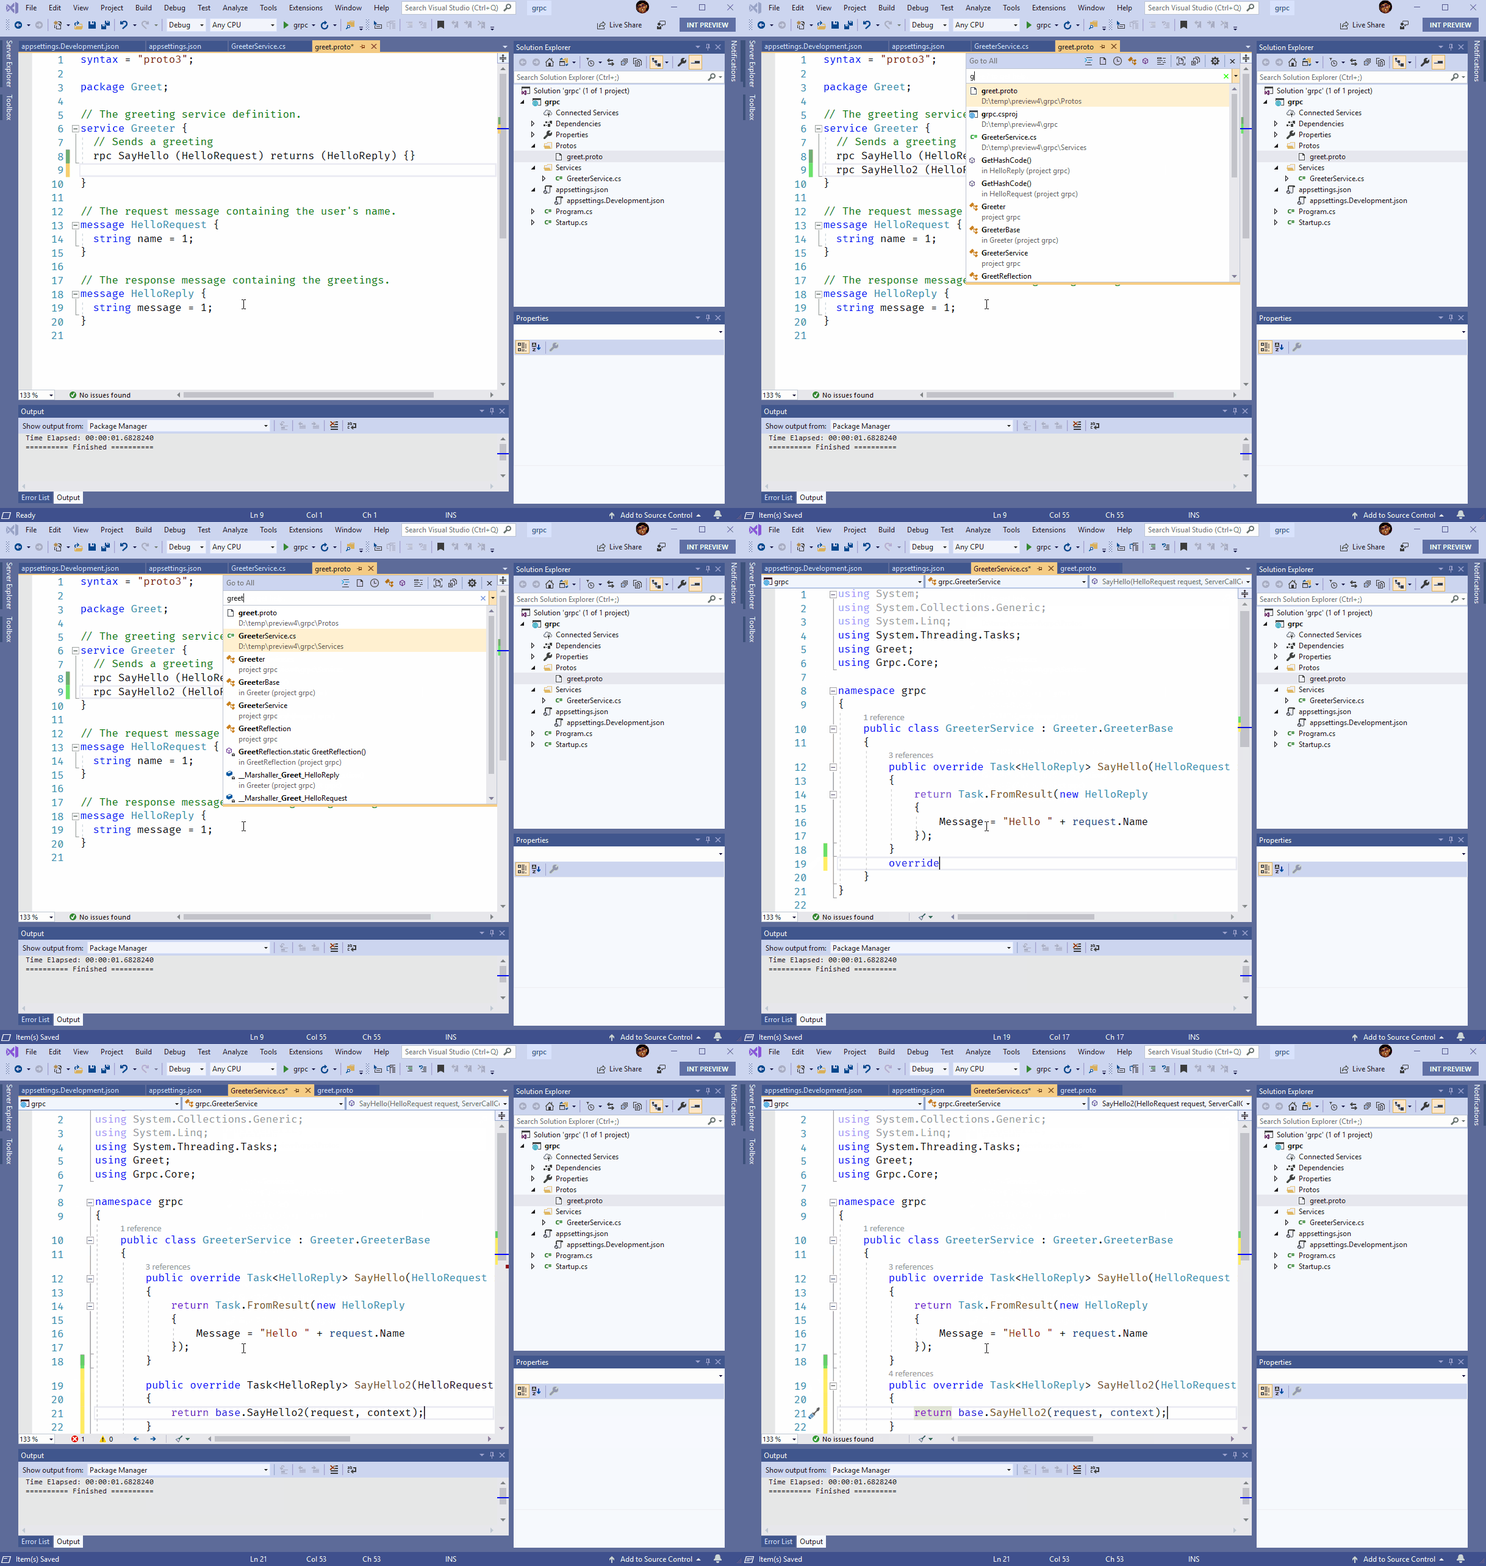
Design-time build support for gRPC code-generation makes it easier to rapidly iterate on your gRPC services. Changes to your *.proto files no longer require you to build your project to re-run code generation.

Worker SDK
In Preview 3 we introduced the new Worker Service template. In Preview 4 we’ve further decoupled that template from Web by introducing its own SDK. If you create a new Worker Service your csproj will now look like the following:
<Project Sdk="Microsoft.NET.Sdk.Worker">

  <PropertyGroup>
    <TargetFramework>netcoreapp3.0</TargetFramework>
    <UserSecretsId>dotnet-WebApplication59-A2B1DB8D-0408-4583-80BA-1B32DAE36B97</UserSecretsId>
  </PropertyGroup>

  <ItemGroup>
    <PackageReference Include="Microsoft.Extensions.Hosting" Version="3.0.0-preview4.19216.2" />
  </ItemGroup>
</Project>
We’ll have more to share on the new Worker SDK in a future post.
Give feedback
We hope you enjoy the new features in this preview release of ASP.NET Core! Please let us know what you think by filing issues on GitHub.

What about using *.blazor file extension instead of *.razor since Razor Components renamed back to server-side Blazor? I propose simplify it with *.blz or *.blzr
Hello,
very nice work! In article is typo instead
routes.MapFallbackToPage(); useroutes.MapFallbackToPage(“/_Host”);Thanks! Should be fixed now.
for me the config by addmvc is confusing enough, what happens backyards, what dependencys in which order of the request pipeline …
to add new AddRazor or AddController makes it more complex, cause I can never remember what happens and what influence another (can I addRazor and Addcontroller – in which order) and so on
I would prevere a more visible way, like modules in web.config
Why not give Server-side Blazor a brand new and unique name, such as Blazerver (Blazor + Server), this makes it short and recognizable, and the new name mostly helps when developers use search engine to solve problems.
Please, thanks!
Why isn’t the Memory Cache into AddControllers? Memory cache seems to be useful in all kinds of web scenarios.
Its not there because you can add it youself. The other scenarios have features that are dependent on the MemoryCache (the cache tag helper etc) so its was about required dependencies more than anything else.
Thanks, that makes sense.
After the upgrade I can’t put my child components in other folder than the page component with @page directive. So if my Index.razor page is in /pages folder, I cannot render on that page any component that is placed in another folder, for example in /components.
Starting with this release components are now resolved based on the in scope namespaces, just like normal C# types. The namespace of a component is determined by it’s folder path, so components in different folders will have different namespaces. Make sure you have the appropriate usings in place or fully qualify the component name with its namespace. Also, if you’re working in Visual Studio, make sure you’re using the latest release on the Visual Studio 2019 Preview channel.
Since upgrading my server side blazor app I am receiving the following error in the console and my hub connection is stopped:
Error: System.InvalidOperationException: Received a notification for a rendered batch when not expecting it. Batch id ‘3’.
Anyone else running in to that?
I’m sorry about this inconvenience! For folks hitting this issue, please open an issue on http://github.com/aspnet/aspnetcore and we’ll take a look.
Same here!
The issue went away after replacing:
endpoints.MapBlazorHub<App>(“app”)
with:
endpoints.MapBlazorHub()
Thanks, that solved the issue for me too!
I’m getting this error as well after the preview 4 upgrade. And then I lose connection.
I’m also seeing these errors: “System.InvalidOperationException: Received a notification for a rendered batch when not expecting it. Batch id…”
This is when published as self contained / win-x86 on a default App Service without ASP.Net Core site extensions installed.
Same here
The ‘Get started’ section should mention
(1) The need to install/update the VS Blazor extension
(2) The installation of the dotnet cli updated templates
Since this post is specific to the ASP.NET Core updates in .NET Core 3.0 we decided to treat the client-side Blazor updates in a separate blog post: https://devblogs.microsoft.com/aspnet/blazor-now-in-official-preview/
Your migration example didn’t work (under “To upgrade an existing ASP.NET Core 3.0 Preview 3 project to Preview 4”). I ended up using:
app.UseEndpoints(endpoints => { endpoints.MapControllerRoute( name: “default”, pattern: “{controller=Home}/{action=Index}/{id?}”); endpoints.MapRazorPages(); });
I have a question about gRPC – it is always mentioned in contex of APS.NET. Will we be able to use gRPC separatly of ASP.NET?
That’s a good question. You can but it won’t be the integration described here. There are 2 parts the the gRPC integration, a piece that plugs into ASP.NET Core’s routing system and a piece that works on top of HttpClient. Google still has a version of the .NET server that relies on their native C server that can be used outside of ASP.NET Core applications (see https://github.com/grpc/grpc-dotnet#the-plan for more details on the above interop)