.NET Aspire is a new cloud-ready stack tailored for .NET, enabling developers to quickly and easily develop distributed applications. You’ve probably seen demos showing large .NET solutions with lots of fancy cloud dependencies and thought, well, maybe I’d use that someday if I’m starting on a giant enterprise Redis Kafka Postgres cloud-a-ganza, but it’s not really something I can use today.
But .NET Aspire is not just about cutting-edge technology and green-field apps; it’s also about making your current applications more straightforward. With .NET Aspire, you can streamline the startup process, improve monitoring, and increase the reliability of your applications. Plus, you can use service discovery to enhance your apps, even if you’re not ready to use more complex features or services like Redis or containerized deployment.
In this post, we’ll look at how easy it is to make your existing solutions better – just easier to maintain and add the kind of features you’re already working on. And, sure, it’s nice that you can more easily integrate more sophisticated cloud dependencies and features… but even if you never do it’s still a win.
TLDR: In under 5 minutes you can add .NET Aspire to your existing apps and get a dashboard, health checks, and more… all without changing how your apps work, your CI/CD pipeline, or deployment process.
What even is .NET Aspire?
If you ask five people, you will most likely get five different answers. Honestly, it’s a little hard to describe, and attempts to do it briefly can turn into a bit of buzzword bingo. Really, it’s just a way to solve a problem: building distributed applications is hard. Even just running your app requires starting up one or more services and a front-end and making sure they can talk to each other can be frustrating. Wouldn’t it be nice if that was easier? That is what .NET Aspire aims to do, be your building blocks for your distributed applications making them more observable, resilient, scalable, and manageable.
Let’s take a look at how a lot of applications evolve over time. A lot start as a single monolithic proof of concept. You’ve got an app with a database.
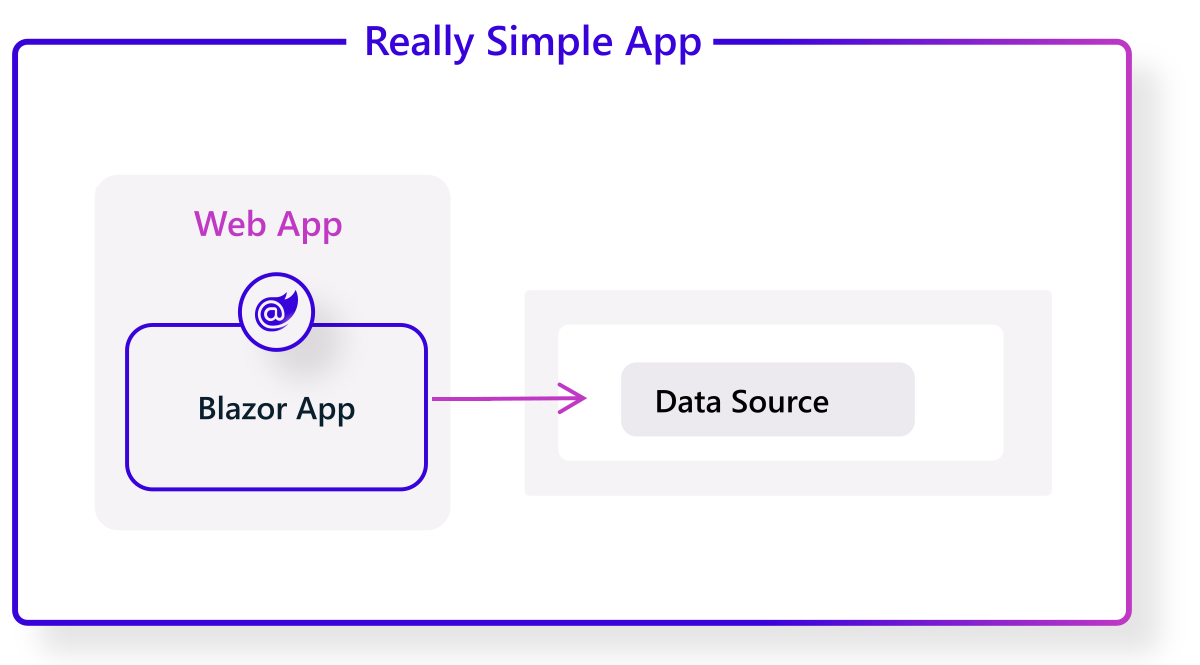
Assuming your proof of concept is successful, just about every modern app evolves to include at least a front and back-end, in addition to the database.
And then, maybe, if our app’s usage and functionality keeps growing over time, the app will become really distributed, relying on a large set of distributed dependencies.
But here’s the important thing! Even in the really simple Proof Of Concept phase, and definitely in the Frontend-Backend-Database phase, we can benefit from .NET Aspire! With just a few lines of code, and without messing with our CI or deployment, we can really simplify our day-to-day developer experience.
Step 1: Turn on .NET features we’ve been too busy to turn on with ServiceDefaults
The ASP.NET Core team has been lighting up features for cool features for things like tracing, health checks, and resiliency for years. I’ve done half a dozen conference talks on “The One Hour ASP.NET Makeover” where we just turn on and configure all these cool features that have been in the box for years. But here’s the thing… it takes an hour to do that talk, after reading the docs and practicing! What if I could just flip an “Enable Pro Mode” switch instead?
That’s what Service Defaults does for you. You can just turn on Service Defaults and you’ve got smart logging, health checks, resiliency, etc. based on what the .NET team recommends for ASP.NET Core apps and services. If you want, you can easily edit the Program.cs file in the ServiceDefaults project, but you don’t have to. Just turn it on.
Adding a ServiceDefaults project
Let’s look at an example with a simple Frontend – Backend app. I’ll use Jeff Fritz’s new MyWeatherHub sample from the Let’s Learn .NET Aspire event series, starting with the start-with-api code.
Opening the solution, we’ll see that we’ve got two projects:
- MyWeatherHub – Web front-end project which displays live weather data
- API – Minimal API project which exposes live weather data from the US National Weather Service via a set of HTTP API endpoint
Let’s add Service Defaults to this solution so we get health checks, logging, and other recommended features to both our front and back ends.
In Visual Studio 2022 or Visual Studio Code with the C# Dev Kit installed, here’s all we need to do:
- Right-click on the solution and select Add > New Project.
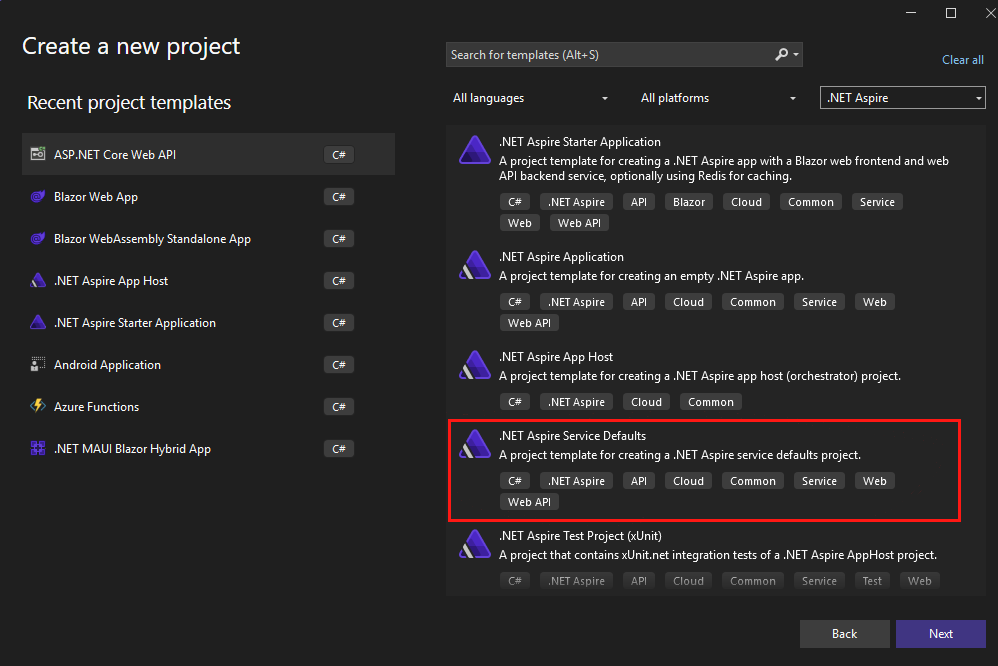
- Select the .NET Aspire Service Defaults project template.
- Name the project ServiceDefaults (any name would work if you’re feeling creative, but the instructions in this post assume you’re using ServiceDefaults).
- Click Next > Create.
Here’s how that looks in Visual Studio 2022:
And in Visual Studio Code, it looks like this:

You can also add Service Defaults from the command line by using:
dotnet new aspire-servicedefaults -n ServiceDefaultsAll the above options just drop a new project that knows the best settings for most ASP.NET Core distributed apps into your solution. However, none of your existing apps are using it yet. We’ll hook that up next.
Configure Service Defaults
Add a reference to the ServiceDefaults project in the Api and MyWeatherHub projects:
-
Right-click on the Api project and select Add > Reference.
-
Check the ServiceDefaults project and click OK.
-
Right-click on the MyWeatherHub project and select Add > Reference.
-
Check the ServiceDefaults project and click OK.
Visual Studio 2022 tip
In Visual Studio 2022, you can drag and drop the project onto another project to add a reference. -
In both the Api and MyWeatherHub projects, update their
Program.csfiles, adding the following line immediately after theirvar builder = WebApplication.CreateBuilder(args);line:builder.AddServiceDefaults(); -
In both the Api and MyWeatherHub projects, update their
Program.csfiles,adding the following line immediately after theirvar app = builder.Build();line:app.MapDefaultEndpoints();
Run the application
To start with, we’re going to the application using a multiple-project launch configuration. This is fine, it’s how we’ve been doing things for years, but I have to admit I don’t really love it. Keep in mind that we’re going to make this easier in the next step. We’re doing this in two steps to make it clear what’s going on in Service Defaults and which parts are added by the AppHost.
If you’re using Visual Studio 2022, right click on the MyWeatherHub solution and go to properties. Select the Api and MyWeatherHub as startup projects, select OK.
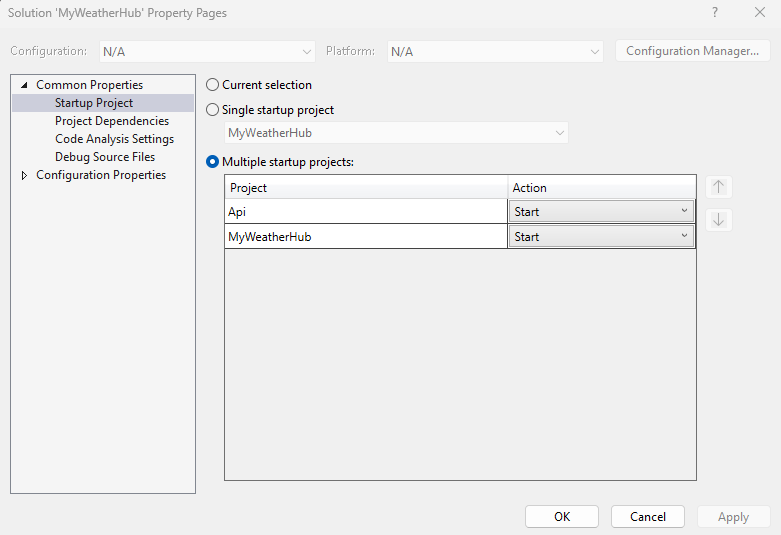
Now click Start to start and debug both projects.
If you’re using Visual Studio Code, run the Api and MyWeatherHub projects using the Run and Debug panel. The sample project already includes a launch.json file with the necessary configurations to run both.
Test the Service Defaults changes
-
Test the application by navigating to the following URLs:
- https://localhost:7032/swagger/index.html – API
- https://localhost:7274/ – MyWeatherHub
-
You should see the Swagger UI for the API and the MyWeatherHub home page.
-
You can also view the health checks for the API by navigating to https://localhost:7032/health.
-
You can also view the health checks for the MyWeatherHub by navigating to https://localhost:7274/health.
-
View the logs in the terminal to see the health checks and other telemetry data such as resiliency with Polly:
Polly: Information: Execution attempt. Source: '-standard//Standard-Retry', Operation Key: '', Result: '200', Handled: 'False', Attempt: '0', Execution Time: '13.0649' -
Click on 5 different cities and a “random” error will be thrown. You will see the Polly retry policy in action.
Polly: Warning: Execution attempt. Source: '-standard//Standard-Retry', Operation Key: '', Result: '500', Handled: 'True', Attempt: '0', Execution Time: '9732.8258'
Polly: Warning: Resilience event occurred. EventName: 'OnRetry', Source: '-standard//Standard-Retry', Operation Key: '', Result: '500'
System.Net.Http.HttpClient.NwsManager.ClientHandler: Information: Sending HTTP request GET http://localhost:5271/forecast/AKZ318
And that all works… the output for each application pops up in a separate console window, and we can see the health checks and logs in the terminal. So, it’s great that we’ve got all these features turned on, but it’s a bit of a pain to manage all these URLs, browser tabs, and console windows. You end up alt-tabbing between them all, and it’s a really disjointed experience.
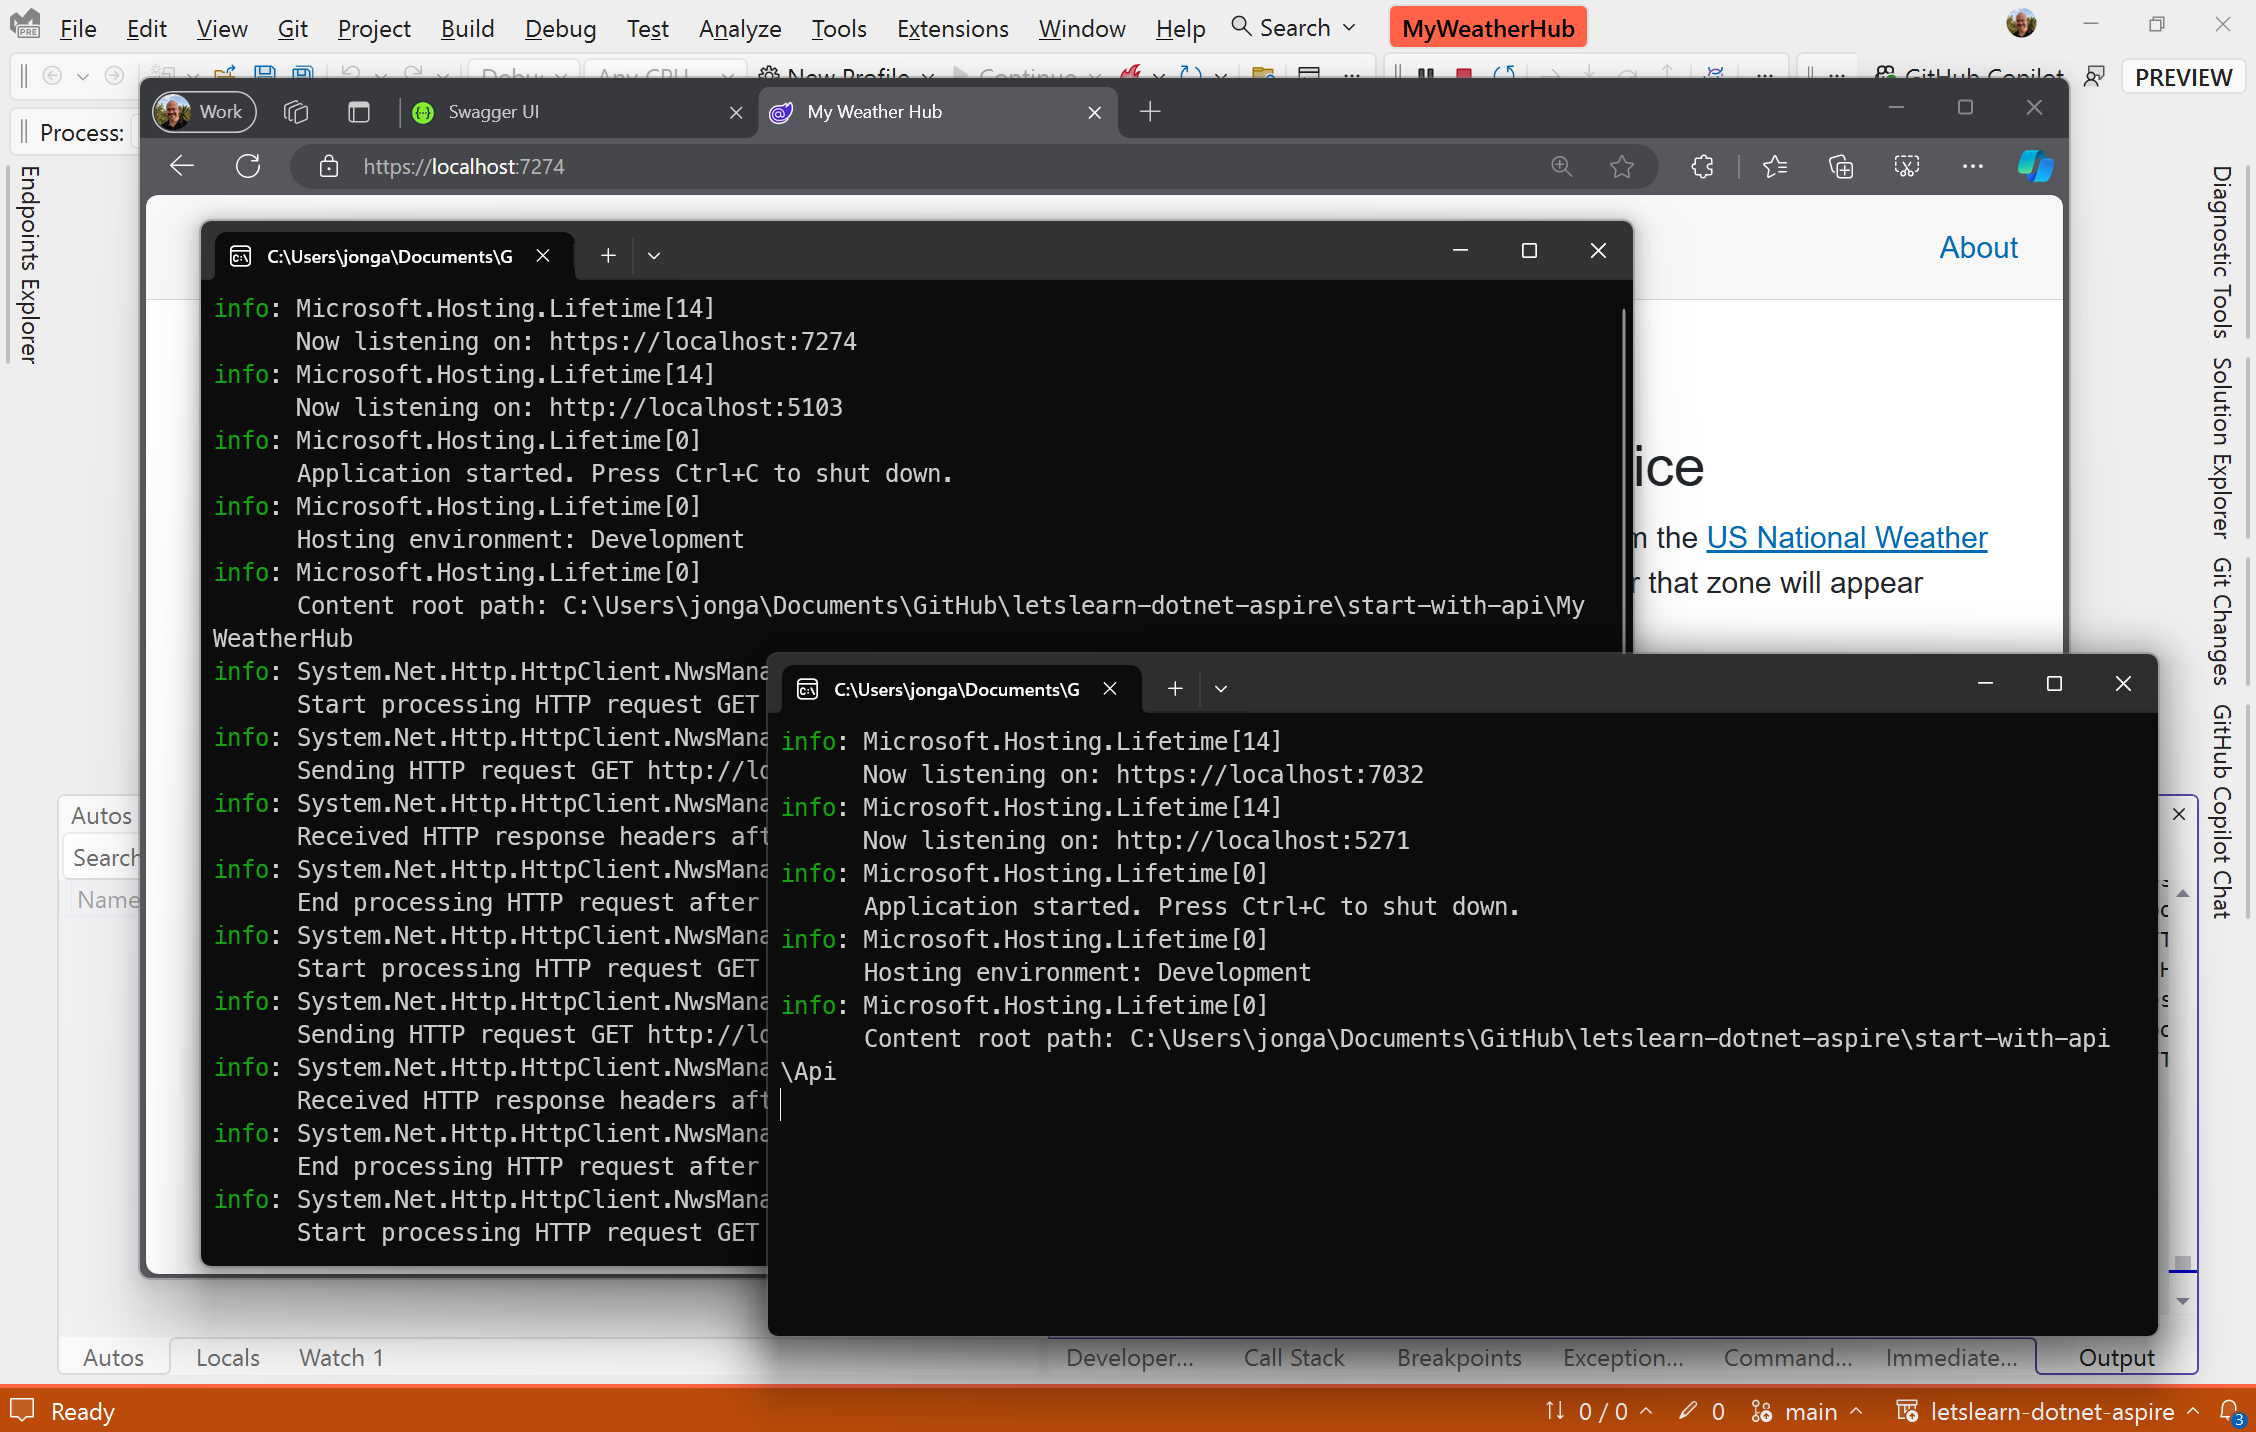
Service Defaults works great on the individual project level, but it doesn’t help us manage multiple projects in a solution. That’s where the AppHost comes in.
Step 2. Simplify launch and add a fancy dashboard with AppHost
Okay, that was pretty cool! We added a project to our solution and two lines of code, and we got health checks, logging, resiliency, and more.
But we can make that even better by adding an AppHost. That multiple-project configuration thing works, but it’s a bit annoying to set up and keep updated as we add other projects to the solution. Once we’re running we have to browse to a bunch of urls with different ports and manage each project separately. For instance, if we want to see logs or output, we have to check in each project’s console window. This gets even worse as we add more APIs and services to the solution – more URLs to manage, more console windows to check, etc. We’ve probably got some fancy dashboards and monitoring set up in production, but that doesn’t help me while I’m developing.
The AppHost has a lot of great features, but two of my favorite are the solutions to the problems above: it simplifies project launch and it adds an amazing dashboard to monitor and manage my app in my development environment. The best way to understand what it’s doing it to just add it to our solution.
Adding an AppHost project
This is the standard “add project” steps we ran through before with ServiceDefaults, but this time we’re going to pick “.NET Aspire App Host” as the project template. In Visual Studio 2022 or Visual Studio Code with the C# DevKit installed:
- Right-click on the solution and select Add > New Project.
- Select the .NET Aspire App Host project template.
- Name the project AppHost (again, any name would work).
- Click Next > Create.
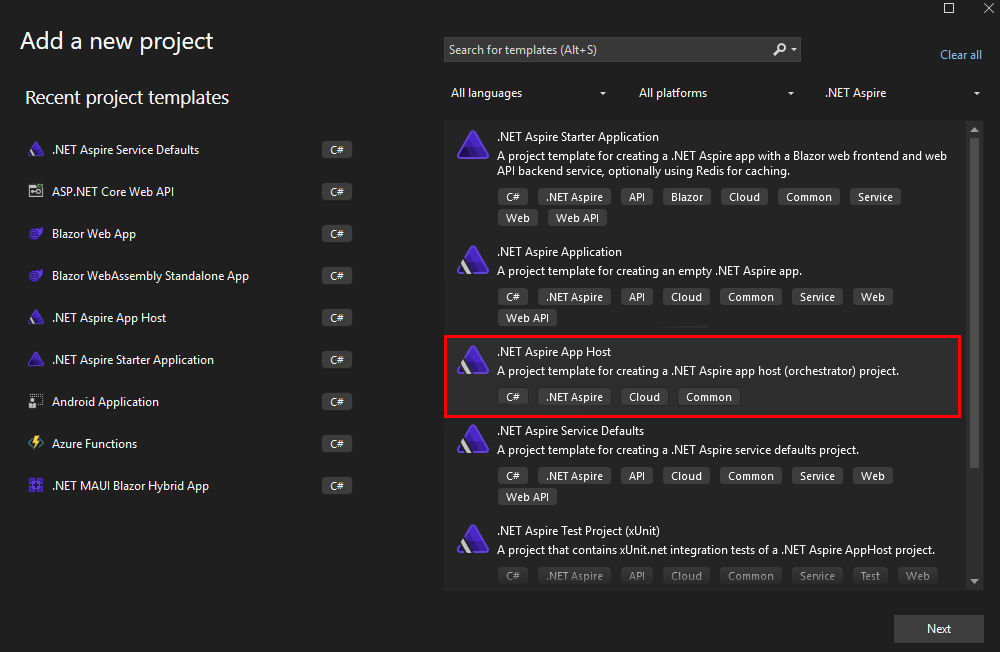

And from the command-line, you can do that with:
dotnet new aspire-apphost -n AppHostJust like when we added the Service Defaults, we need to add project references and a few lines of code to put the AppHost to work.
Add project references
Add a reference to the Api and MyWeatherHub projects in the new AppHost project:
- Right-click on the AppHost project and select Add > Reference.
- Check the Api and MyWeatherHub projects and click OK.
Note: Bonus points if you remembered the earlier tip that you can drag and drop the project onto another project to add a reference.
When these references are added Source Generators automatically generate the necessary code to reference the projects in the App Host.
Orchestrate the Application
In the AppHost project, update the Program.cs file, adding the following line immediately after the var builder = DistributedApplication.CreateBuilder(args); line:
 var api = builder.AddProject<Projects.Api>("api");
 var web = builder.AddProject<Projects.MyWeatherHub>("myweatherhub");
Run the application… the easy way!
Previously, we set up a multi-project launch profile. That still works, but from now on, you won’t have to bother with that. Instead, set the AppHost project as the startup project. It knows about all the other projects, and will launch them all automatically. That means that if you add an AppHost at the beginning (or use either the .NET Aspire Starter Application template or the .NET Aspire Application template), you never need to set up a multi-project launch profile again. And even better, if you add more services to your solution, the AppHost will automatically pick them up, too.
In Visual Studio, you can set the AppHost project as the startup project in Visual Studio by right clicking on the AppHost and clicking Set Default Project and hitting Start.
If you’re using Visual Studio Code, replace the contents of your launch.json file with the following and then hitting Run in the Run and Debug panel.
 {
        "version": "0.2.0",
        "configurations": [
            {
                "name": "Run AppHost",
                "type": "dotnet",
                "request": "launch",
                "projectPath": "${workspaceFolder}\\AppHost\\AppHost.csproj"
            }
        ]
    }
Hey, we’ve got a dashboard!
Remember how we had to browse to a bunch of different URLs to see our app and its health checks? Now, the AppHost will automatically launch a dashboard with all our services and their dependencies. It rolls up all the health checks, traces, logs, and information like environment variables in one place. And, if we add more services to our solution, they’ll automatically show up in the dashboard. Let’s take a look.

First, let’s take a look at the resources. This is a handy listing of all the resources in our solution. We can see the API and MyWeatherHub projects and watch their state as they start up. We also get clickable links to their endpoints, logs, and traces.
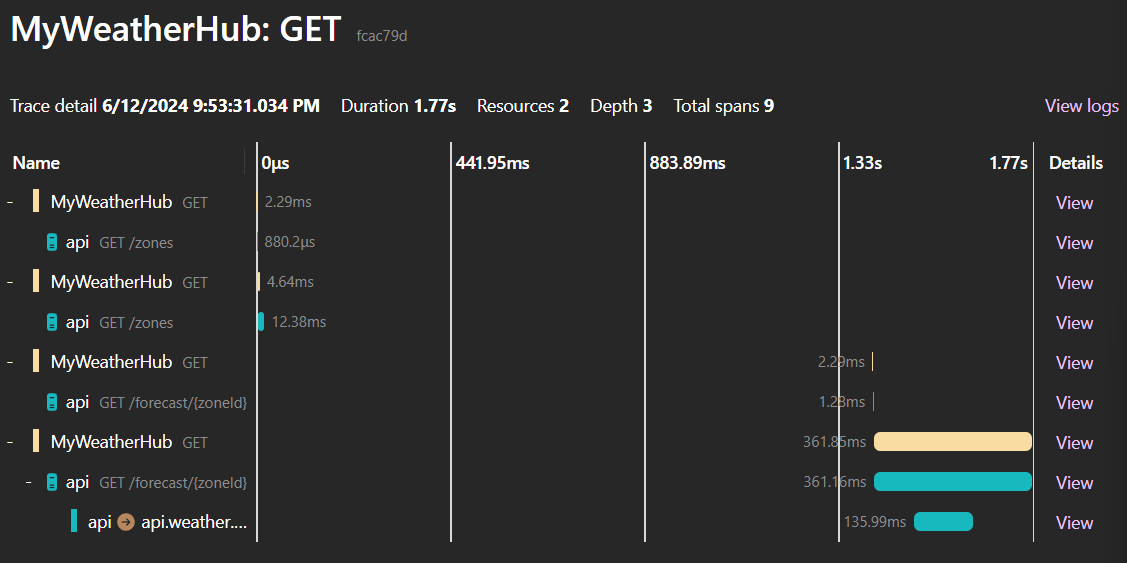
The ServiceDefaults project we added earlier automatically configures tracing for all of our projects. We can see that in the Traces tab. This is a great way to understanding timing and dependencies in our app.
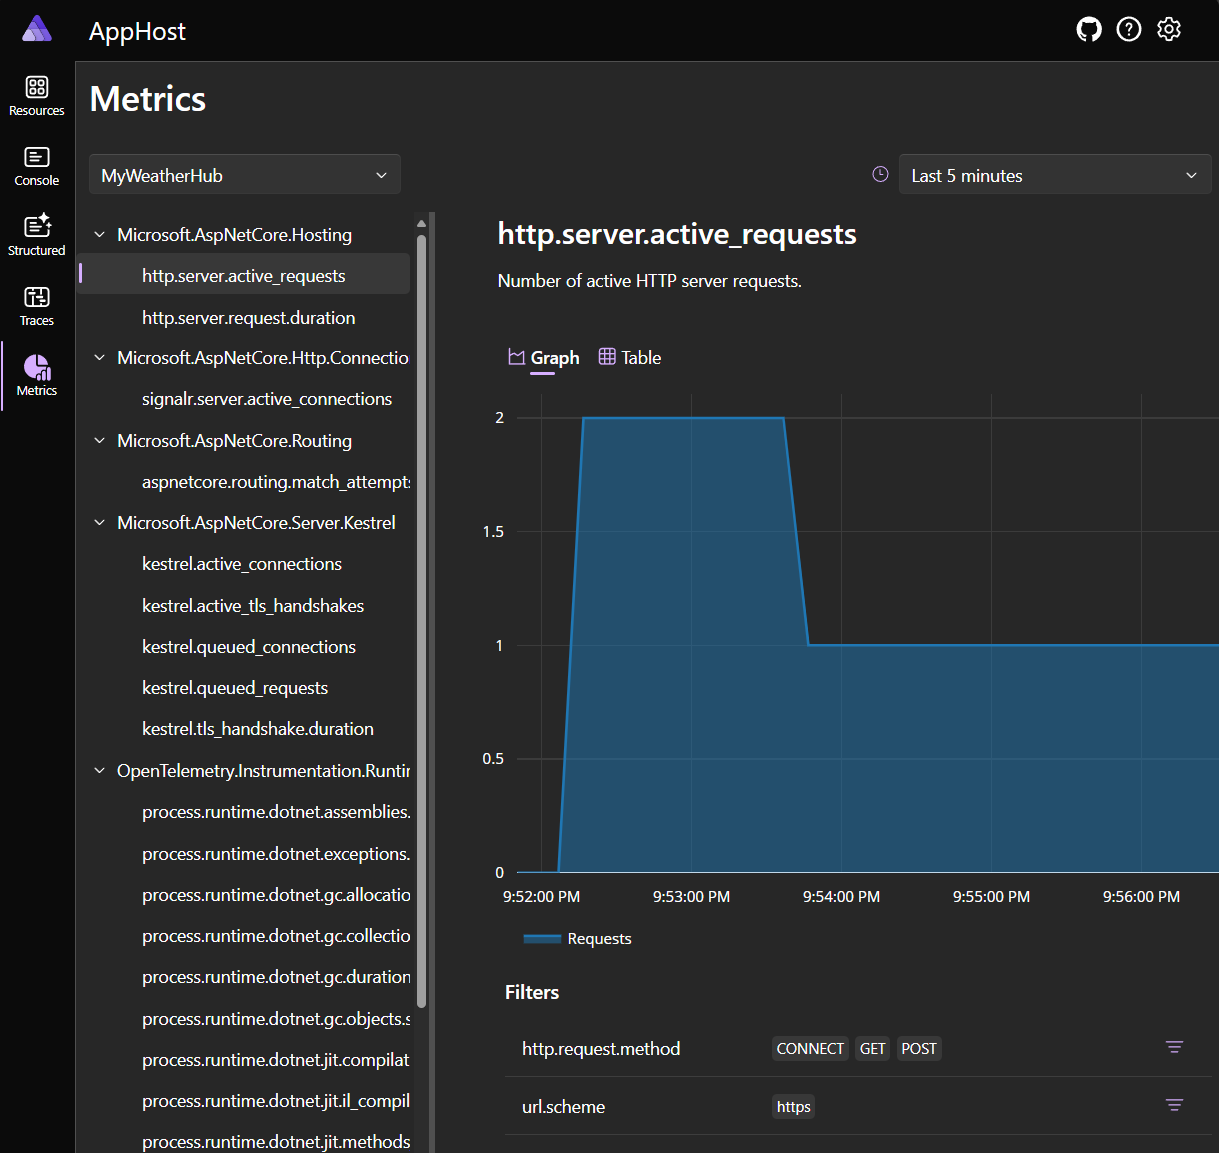
The Metrics tab shows us a lot of information about our app, including CPU and memory usage, and the number of requests and errors. Again, this is all automatically set up for us by the ServiceDefaults project and exposed in the AppHost dashboard.
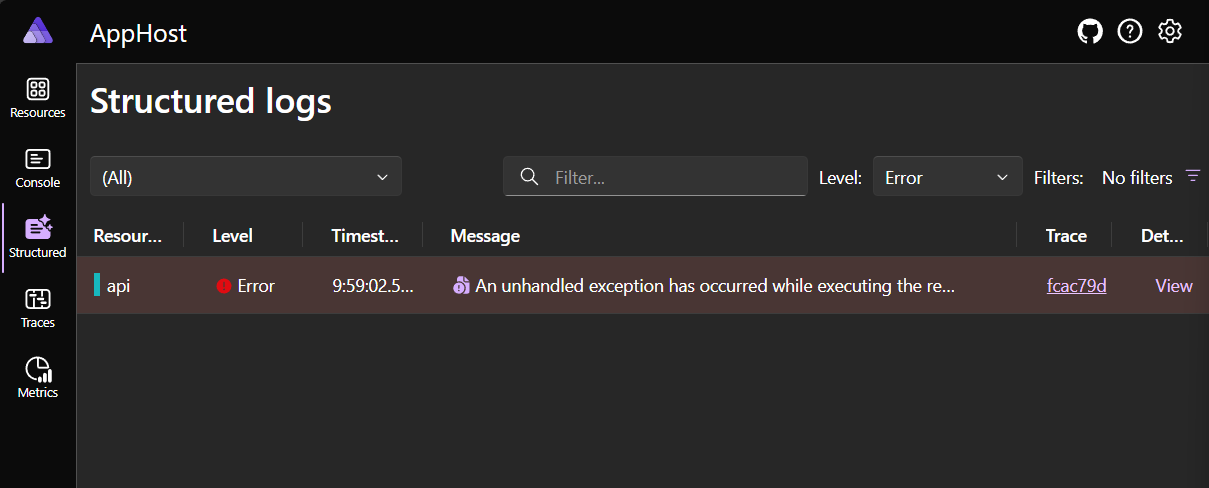
The Structured tab shows us all the structured logs from our app. This is a great way to see errors and other important information in our app.
Summary
The point is, .NET Aspire isn’t just for new apps or giant enterprise solutions. It’s for you, right now, to make your existing apps better. You can add it to your existing solutions and get a lot of benefits with just a few lines of code. And, if you’re not ready to use more advanced features like service discovery or containerized deployment, that’s okay. You can still benefit from the simplicity and reliability that .NET Aspire brings to your apps.


This is what I was looking for, thanks a bunch! As someone else has mentioned too, I cannot understand how the deployment and execution is going to work, though. Here is my real-world problem: Currently I have one web APIs microservice as a gateway, and several web APIs microservices as adapters. The main app (WPF) sends requests to the gateway and based on some business logic, the gateway relays the request to one of the adapters. The gateway and all the adapters are ASP.NET core web API projects and they currently get hosted on a Windows service, on the same...
Very interesting and helpful. The post ends without describing how the AppHost is deployed. For example, if i have a client only Blazor WASM application and a serverless C# API doing the heavy lifting including accesing an Azure SQL server instance, where and how will the AppHost be deployed? Is there a followon post or some documentation about this?
And another question – is it possible to add monitoring of the SQL Server to the dashboard?
Love what the team has been doing with Aspire and the overall direction of an opinionated, full back-end stack is so helpful to have so that we don’t all have to keep reinventing the wheel.
Can’t wait for us to be able adopt this in our future projects – or perhaps for the team to release an AI-based “convert to Aspire” utility that could take our existing projects and re-build our Startup files as an Aspire-based one.
We are in the process of converting an existing on-prem Windows service to .NET Core IIS hosted with background worker services, and fronting it with an API. Per the article, besides development, Aspire framed apps are meant to be run in a container. Can Aspire apps be hosted in IIS? i.e., can/will it be a supported deployment model? If possible, is there some guidance to make this happen? There are a lot of great features in Aspire that would be helpful even in a non-container deployment model.
How resilient are Aspire apps? Is there any sort of supervisor (a la Elixir/Erlang)...
Regarding IIS support, it can be made to work as far as I am aware but it's not a supported deployment target today.
Regarding resilience, there are several parts to it:
* At the process level:
* In dev/test, Aspire doesn't currently restart crashed processes for you.
* In production, the cloud platform (eg Azure Container Apps) is responsible for restarting your services and performing restart back-off, etc.
* At the request level: Aspire libraries have in-built resiliency provided by Polly. This means that individual requests will be retried, if they can be safely retried, following...
Thanks for the comprehensive description of Aspire.
The more I read about Aspire, the more I think it is NOT for me.
I only create WPF applications.
So far I have not seen anything that makes me think that Aspire can be used in a desktop application. (WPF, WinForms, or even MAUI)
I might be wrong, but I have just not found anything about Aspire for desktop applications.
Great question! .NET Aspire can be used with client apps. There's a sample here working with both WinForms and WPF: https://learn.microsoft.com/en-us/samples/dotnet/aspire-samples/aspire-client-apps-integration/
The key focus is in working with distributed applications, so I think it would be most applicable for your WPF apps that use backing services and dependencies. I think it would technically work with a standalone WPF app and would help some with displaying metrics, logging, and tracing, but not sure it would be worth the effort in that case.
There's also been some work on additional support for .NET MAUI with .NET Aspire that's still in the experimental phase. You...
Hi Jon,
Thanks a bunch for such a great article.
For: Configure Service Defaults => Add a reference to the ServiceDefaults project in the Api and MyWeatherHub projects:
It should be
3. Right-click on the
Api=> MyWeatherHub project and select Add > Reference.4. Check the
MyWeatherHub=>ServiceDefaults project and click OKGreat catch, thanks! Fixed.
The Aspire Dashboard is great, at my company we use it during development and staging... but without any k8s and docker imaging... just the plain app. It's a single app, that either runs as a service, a standalone console app (--console) or as an aspire host (--aspire) that just pretends to be an aspire project/host and spawns itself again as the actual service connected to the aspire host. It works great.
But otherwise, I don't trust Aspire. "building distributed applications is hard" that's true. But I prefer "hard" a mile long over "expensive". Cloud providers make the most money with "lost"...
That’s great! Exactly the thinking behind putting this blog post together – you can use individual features in .NET Aspire, like the dashboard, to simplify your dev / stage process. Great to hear it!
If you have an existing deployment technology (like Terraform), you should of course continue to use it. While it’s technically possible to deploy container apps with .NET Aspire, that’s in no way a required part of using .NET Aspire. I’ll agree that it’s great for debugging and development, and useful tools aren’t at all toys in my book!