
This week I have had two questions that involved the need to create a load test plugin. In the latest scenario the person wanted Cloud-based load test to ramp up the user count randomly.
Yes plugins work the same for both on-premises and Cloud-based load testing. In this post i will walk through creating a load test plugin that randomly increments the user count every second (this is how often the heartbeat event is fired).
Step 1. Create a new load test
With Visual Studio Enterprise click on the File menu and click New > Project and choose Web Performance Test

Step 2. ****Add a reference to the Load Test Framework
From within your solution right click on the project and select “Add > References” in search type “Load Test” and add the the
**QualityTools.LoadTestFrameworks **assembly

Step 3. Add a new class library
We need to extend the Load Test architecture and you do this using a class library. To do this right click on the project and select New Item>Class.

Step 4. Implement LoadTestPlugin interface
In the class library you added to the solution, implement the ILoadTestPlugin interface with the code below.
using System;
using Microsoft.VisualStudio.TestTools.LoadTesting;
namespace MyPlugin
{
public class ChucksPlugin : ILoadTestPlugin
{
LoadTest m_loadTest;
int m_userload = new int();
#region ILoadTestPlugin Members
public void Initialize(LoadTest loadTest)
{
m_loadTest = loadTest;
m_loadTest.Heartbeat += new System.EventHandler(m_loadTest_Heartbeat);
}void m_loadTest_Heartbeat(object sender, HeartbeatEventArgs e) //runs every second
{
Random rnd = new Random();
m_loadTest.Scenarios[0].CurrentLoad = m_loadTest.Scenarios[0].CurrentLoad + rnd.Next(0, 15);}
}
}
Step 5. Add a load test to the solution
In your project add a new load test. To do this right click on the project and select New Item>Load Test. After you have finished with the Load Test Wizard right click on the root node and select “Add Load Test Plug-in…”.

In the resulting dialog you will see the name of the class you named your Plugin. If you used the code above you should see the name: ChucksPlugin…

Step 6. Run your Load Test
Now when you run your load test you will see the user count increment by random amounts from 0-15.
This plugin will work with either Cloud-based load tests or with on-premises Load Tests. Below is a screen of a Cloud-based Load Test –note the purple user count line in the graph.

I am also including below Sean Lumley’s great post on this same topic:
Load Test Plug-ins
This blog post is going to go over creating a load test plug-in and show a few different ways you can use a plug-in to modify your load test. These plug-ins are a powerful extensibility point of the load test architecture. They give you the opportunity to do things such as change the selected test, change the userload, add data to the web test context, modify the test environment before the test runs or clean up the environment when the test completes.
Overview
1) Here are the following events that you can connect to:
a. Heartbeat – This event is raised every second. If you want to monitor some vairable and then modify user load based on that variable, this would be a good event to connect to.
b. LoadTestStarting – This event is raised when the load test starts. This is a good event for things such as setting up the envoironment or maybe starting logging for a report you might want to create.
c. LoadTestFinished – This event is raised when the load test completes. This is a good event for things such as cleaning up the envoironment or maybe stopping logging for a report you might want to create.
d. LoadTestAborted – This event is raised if a load test is aborted.
e. WarmupComplete – This event is raised if you are using a warmup period and when the warmup period completes.
f. TestSelected – This event is raised when a test has been selected to be executed. You can change what test is about to be executed from this event.
g. TestStarting – This event is raised when a test iteration is about to start. You can add items to the test context from this event.
h. TestFinished – This event is raised when a test completes. You get information about the test that was just executed.
i. ThresholdExceeded – This event is raised when a threshold rule has been exceeded. You are given information about the counter that caused the rule to fire.
2) Creating a LoadTest Plug-in
a. Open the test project that contains your load test.
b. Add a new class file
c. Add a using statement for
using Microsoft.VisualStudio.TestTools.LoadTesting;
d. Have the class implement the ILoadTestPlugin interface.
public class Class2 : ILoadTestPlugin
e. There is one method in the interface that you have to implement:
public void Initialize(LoadTest loadTest)
f. Here is an example plugin:
using Microsoft.VisualStudio.TestTools.LoadTesting;
namespace TestProject3
{
public class PluginExample : ILoadTestPlugin
{
LoadTest m_loadTest;
region ILoadTestPlugin Members
public void Initialize(LoadTest loadTest)
{
m_loadTest = loadTest;
}
endregion
}
}
g. To set the plugin on your load test, first compile the plugin. Then right click on the root node of the load test and select “Set Load Test Plug-in…”. In the dialog that appears, select your plug-in.
Examples
Now let’s create some examples.
Storing extra information with a run
The first example we will create is storing extra information along with your load test. One common question we get is I would also like to store build number or something like that with my load tests. Then the users would like to be able to use this information in a report they are creating.
First we will create a separate table in the load test results store to hold the new info. Part of the key for all load test tables in the LoadTestRunId. Here is a simple table definition:
CREATE TABLE [dbo].[LoadTestBuildInfo](
[LoadTestRunId] [int] NOT NULL,
[Build] [nvarchar](100) NULL,
CONSTRAINT [PK_LoadTestBuildInfo] PRIMARY KEY CLUSTERED
(
[LoadTestRunId] ASC
) ON [PRIMARY]
So we need three things to write to this table. The connection string, the run id and the build. We will add the build information as a Load Test Context parameter. The connection string we will make an option parameter. The run id we will get from the database.
Unfortunately, we do not give you the runid through an API, so we will just query the LoadTestRun table for the max run id. Unless you have multiple runs going at once, this will be the value you need.
First here is a hlper class that contains the sql operations:
using System;
using System.Globalization;
using System.Data.SqlClient;
namespace ApiDemo
{
class SqlHelper
{
static string s_connectionString;
public static void SetConnectionString(string connectionString)
{
s_connectionString = connectionString;
}
public static int GetRunId()
{
string sql = “SELECT MAX(LoadTestRunId) FROM LoadTestRun”;
using (SqlConnection connection = new SqlConnection(s_connectionString))
{
connection.Open();
using (SqlCommand sqlCommand = new SqlCommand(sql, connection))
{
using (SqlDataReader dataReader = sqlCommand.ExecuteReader())
{
if (dataReader.Read())
{
return dataReader.GetInt32(0);
}
}
}
}
throw new Exception(“Unable to get the run id”);
}
public static void StoreBuild(int id, string build)
{
string sql = string.Format(“INSERT INTO LoadTestBuildInfo (LoadTestRunId,Build) Values ({0},'{1}’)”, id, build);
using (SqlConnection connection = new SqlConnection(s_connectionString))
{
connection.Open();
using (SqlCommand sqlCommand = new SqlCommand(sql, connection))
{
sqlCommand.ExecuteNonQuery();
}
}
}
}
}
Second, here is the load test plugin:
using Microsoft.VisualStudio.TestTools.LoadTesting;
namespace ApiDemo
{
public class PluginExample : ILoadTestPlugin
{
LoadTest m_loadTest;
static string s_connectionString = “Data Source=”.\SQLEXPRESS”;Initial Catalog=LoadTest;Integrated Security=True”;
public void Initialize(LoadTest loadTest)
{
m_loadTest = loadTest;
m_loadTest.LoadTestStarting += new System.EventHandler(m_loadTest_LoadTestStarting);
}
void m_loadTest_LoadTestStarting(object sender, System.EventArgs e)
{
//first get the connection string
if (m_loadTest.Context.ContainsKey(“ConnectionString”))
{
SqlHelper.SetConnectionString(m_loadTest.Context[“ConnectionString”].ToString());
}
else
{
SqlHelper.SetConnectionString(s_connectionString);
}
//now we need to get the runid.
int loadTestRunId = SqlHelper.GetRunId();
//now store the build info
if (m_loadTest.Context.ContainsKey(“Build”))
{
SqlHelper.StoreBuild(loadTestRunId, m_loadTest.Context[“Build”].ToString());
}
}
}
}
Now that you have the build stored with the run id, you can easily add this to any custom reports.
Changing the Selected Test
This sample will show you how to change the test that the engine has selected. Maybe you have a situation in which your test mix has 4 tests. After a certain amount of time, you no longer want to run Test4. So any time it is selected, you want to replace it with one of the other 3. You can do this from the TestSelected event. We will also use the heartbeat event to keep track of how much time has been executed. In the heartbeat event, we will increase a counter once warm-up is complete. Then in the TestSelected event, after 120 seconds, we will always switch WebTest1 with WebTest2. You can make this more intelligent by selecting a test from the list of tests in the scenario specified in the event args.
using Microsoft.VisualStudio.TestTools.LoadTesting;
using System.Collections.Generic;
using System.Linq;
namespace ApiDemo
{
public class PluginExample2 : ILoadTestPlugin
{
LoadTest m_loadTest;
int count = 0;
public void Initialize(LoadTest loadTest)
{
m_loadTest = loadTest;
m_loadTest.TestSelected += new System.EventHandler
m_loadTest.Heartbeat += new System.EventHandler
}
void m_loadTest_Heartbeat(object sender, HeartbeatEventArgs e)
{
if(e.IsWarmupComplete)
{
count++;
}
}
void m_loadTest_TestSelected(object sender, TestSelectedEventArgs e)
{
if (count > 120 && e.TestName.Equals(“WebTest1”))
{
e.TestName = “WebTest2”;
}
}
}
}
Change the User Load
This sample will show you how you can change the user load of a running load test. You can create your own custom load profiles with this extensibility point. In this example we will create a plugin which reads the load from a text file and then changes the load of the running test to that value.
The file name that stores the user load can be set from a load test context parameter. Then we will read that file at every heartbeat event, and change the load to that value. Another good demo of this would be to create a simple winforms app that writes the new user load to a file or registry location. Then have the plugin read from that location. Then you could turn a knob or enter the user load that way. With the way this sample is written, you would simply add a number to the text file and save it. You can change the value while the test is running.
using System;
using System.IO;
using Microsoft.VisualStudio.TestTools.LoadTesting;
namespace ApiDemo
{
public class PluginSample3 : ILoadTestPlugin
{
LoadTest m_loadTest;
string m_fileName;
public void Initialize(LoadTest loadTest)
{
m_loadTest = loadTest;
m_loadTest.Heartbeat += new System.EventHandler
//initialize the file name
if (m_loadTest.Context.ContainsKey(“FileName”))
{
m_fileName = m_loadTest.Context[“FileName”].ToString();
}
else
{
m_fileName = @”c:Userload.txt”;
}
}
void m_loadTest_Heartbeat(object sender, HeartbeatEventArgs e)
{
int load = GetUserLoadFromFile();
if (load != -1)
{
m_loadTest.Scenarios[0].CurrentLoad = load;
}
}
private int GetUserLoadFromFile()
{
int newLoad = -1;
try
{
using (StreamReader streamReader = new StreamReader(m_fileName))
{
string load = streamReader.ReadToEnd();
try
{
if (!string.IsNullOrEmpty(load))
{
newLoad = int.Parse(load);
}
}
catch (FormatException)
{
//ignore
}
}
}
catch (IOException)
{
//ignore
}
return newLoad;
}
}
}
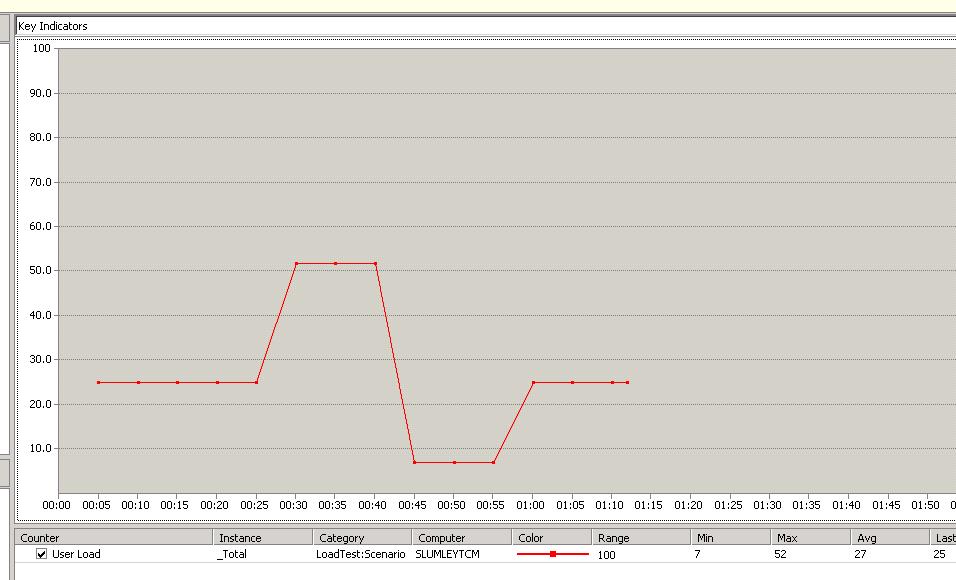
Here is a picture of my userload. I start at 25, up to 52, down to 7 and back to 25.
Adding values to Test Context
This sample will show you how you can modify the test context that is being passed to a test. You do this from the test starting event. Maybe there is a value you are reading in from a database or some other value that you want to pass into each test. Another problem is that load test context parameters are not copied to test context of unit tests. This plug-in would copy those values:
using System;
using System.Collections.Generic;
using System.Text;
using Microsoft.VisualStudio.TestTools.LoadTesting;
namespace Blog
{
public class CopyParamtersPlugin : ILoadTestPlugin
{
//store the load test object.
LoadTest mLoadTest;
public void Initialize(LoadTest loadTest)
{
mLoadTest = loadTest;
//connect to the TestStarting event.
mLoadTest.TestStarting += new EventHandler
}
void mLoadTest_TestStarting(object sender, TestStartingEventArgs e)
{
//When the test starts, copy the load test context parameters to
//the test context parameters
foreach (string key in mLoadTest.Context.Keys)
{
e.TestContextProperties.Add(key, mLoadTest.Context[key]);
}
}
}
}
0 comments