

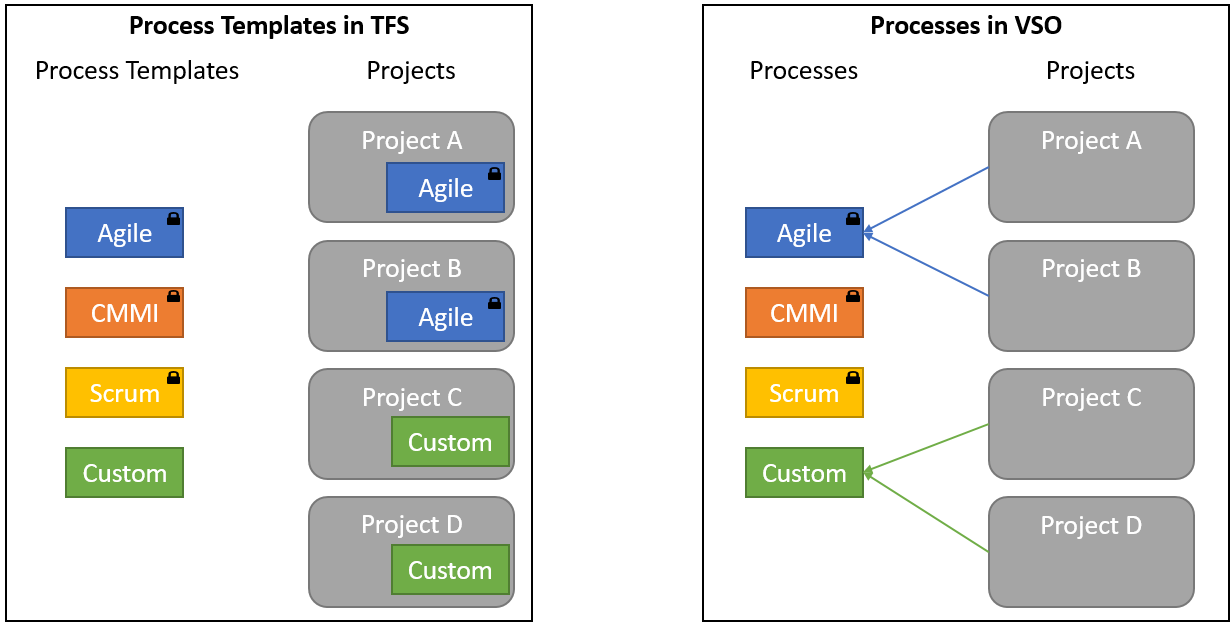
- Processes can be shared across multiple projectsWe’ve seen customers with multiple team projects struggle to keep them all aligned when managing process updates. In VSTS, processes are stored at the collection level and when a process changes, all team projects referencing that process see the change. This is a change from our current model in TFS where the process is stored in each team project.
- Updates to the product will work on any processMost customers want to use our “out of the box” processes (Agile, Scrum, CMMI) but want to make a few tweaks to make the process fit well with their organization. In VSTS, you can use our processes as a base and create an inherited process to store your own customizations. As we move our processes forward with updates and enhancements, you can expect to inherit all new changes while preserving your own customizations.
- UX built into the productYou shouldn’t need a PHD in TFS to make customizations! We have built experiences into our web portal to allow process administrators to make the changes they want through a simple and approachable UI without having to muck with XML files or additional tools.
Shared and inherited process
As discussed above and in the last
2 posts on customization, the first change from the existing TFS process customization is moving to a shared process model. Customizations will no longer be scoped to a team project. Rather, process will be its own entity and team projects will reference a process to get the definition of work item types, fields, links, etc. In addition, we will allow a one-level inheritance tree where an inherited process can augment and override the choices made by the process it’s inheriting from.
|
| Figure 1. In TFS today, projects make a copy of process templates to define their initial process. The project is then the target of all customizations. In the new world, projects reference a process and the process is the target of all customizations. |
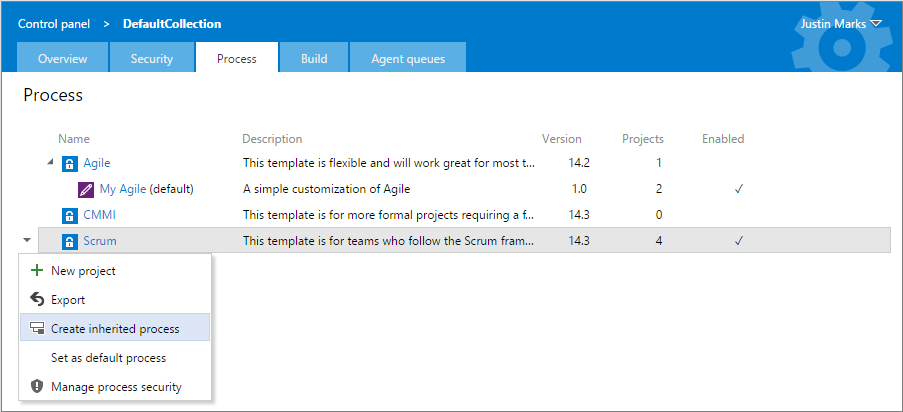
On the admin site at the collection level, we have a new Process page (figure 3) that allows you to view and interact with all the processes in the collection.
|
| Figure 2. Process overview admin site. Custom Agile is the default process used when creating new projects. Agile and CMMI are disabled so new projects cannot be created using these processes. |
You can easily create new team projects from the context menu. When creating a project, a user can only use processes which are enabled… so if you want to enforce that all new projects are “Custom Agile”, just disable the rest! You can also drill into a process to view and modify the types, fields, etc. that are defined inside the process. Over time we’ll be adding more customizations but right now you can modify the fields on work item types. But before you can do that, you need to create an inherited process.
Creating an inherited process
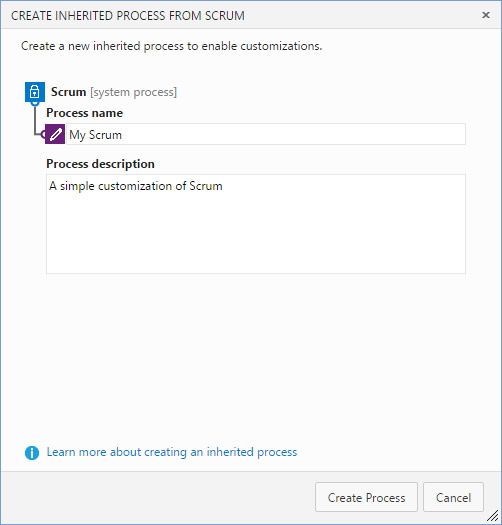
The first step to enable customization is creating an inherited process. Inherited processes can be created from any of the “out of the box” system processes. As shown in Figure 3 above, right clicking on a system process shows a context menu with “Create inherited process”. This action opens a wizard (figure 3) where you create the inherited process which is the container for all customizations. Once you have created the inherited process, you can create new projects or start customizing it.
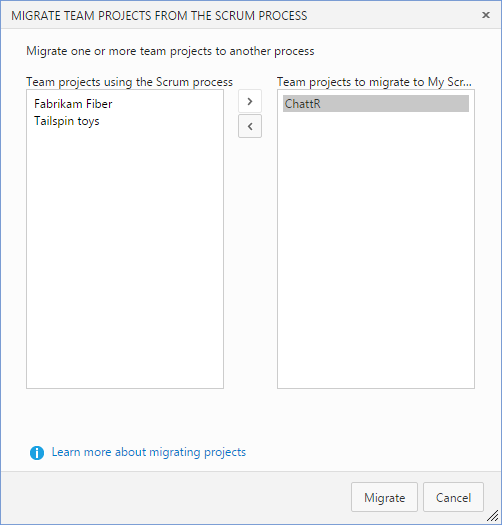
You may be wondering how you can customize existing projects since they were created using system processes. Project migration is your answer. As part of the create process wizard, you can optionally migrate a project to use the inherited processes (figure 4). Once a project is migrated all customizations in the inherited process will immediately be seen in that project. This process is 100% reversible, simply migrate the project back to the system process. You can migrate projects between system and its inherited processes at any time by right clicking on the current process the projects are using and choosing “Migrate projects” from the context menu. History for existing work item types is preserved so there is no data loss.
Currently there is no way to migrate team projects laterally, i.e. you can’t convert an Agile project to Scrum, but that’s on our long term backlog.
|
|
| Figure 3. Creating an inherited process is as simple as choosing a name and optionally providing a description. | Figure 4. Once the new inherited process is created, you are offered the chance to migrate existing projects to the new process. In this example, we’re taking an existing project “Chatter” and enabling customization by migrating it to the newly created inherited process “My Scrum”. This action is reversible and the project will lose the customizations. |
Process security
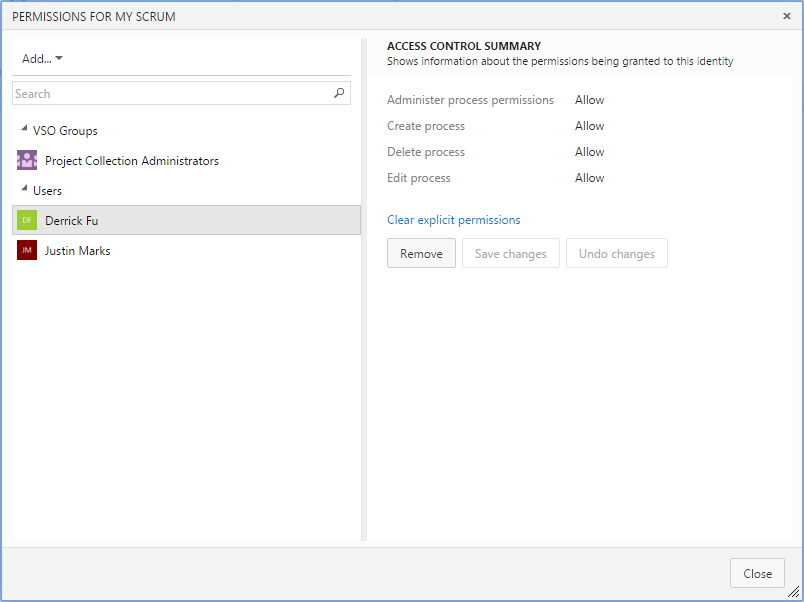
We’ve made some improvements to the security model around process as well. Each process is a securable unit and has individual ACLs for creating inherited processes, editing the process and deleting the process. At the collection level, team project collection administrators can choose which processes can be inherited from and by whom. When a new inherited process is created, the creator of the process, as well as team project collection administrators, has full control of the process and can also set individual ACLs for which users and groups can edit and delete the process (figure 5).
|
| Figure 5. Justin Marks is the owner of “My Scrum” process and has full control but he has also granted Derrick Fu the ability to edit the process. |
Now the moment you’ve all been waiting for, let’s add a field…
Add custom fields to existing work item types
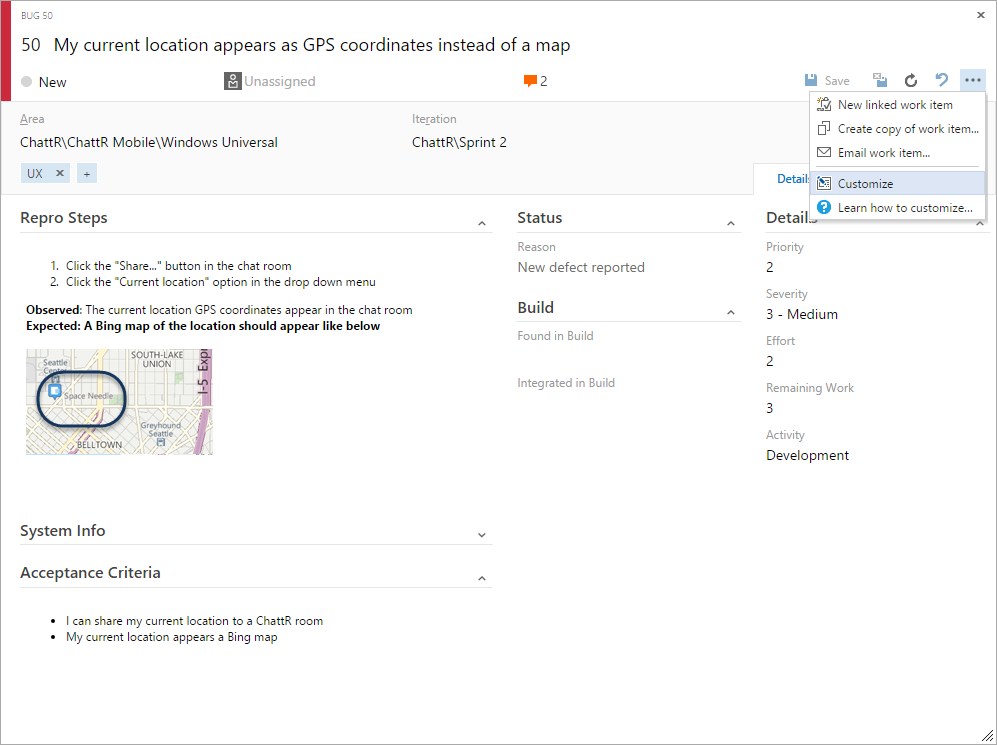
When we talk to customers about process customization, the most common ask we hear is something like, “Why can’t I add a ‘Date due’ field to the Scrum bug?” Now you can! Let’s go through that exact scenario and add a date field called “Date due” to the bug work item type (figure 6)…
|
| Figure 6. I want to add a “date due” field to the bug work item type. |
We have provided the beginnings of a full process editor as part of the admin site (figure 7). You can navigate to the admin site by clicking the customize button on the work item toolbar (figure 6) or by clicking on a process name from the process overview page (figure 2).
|
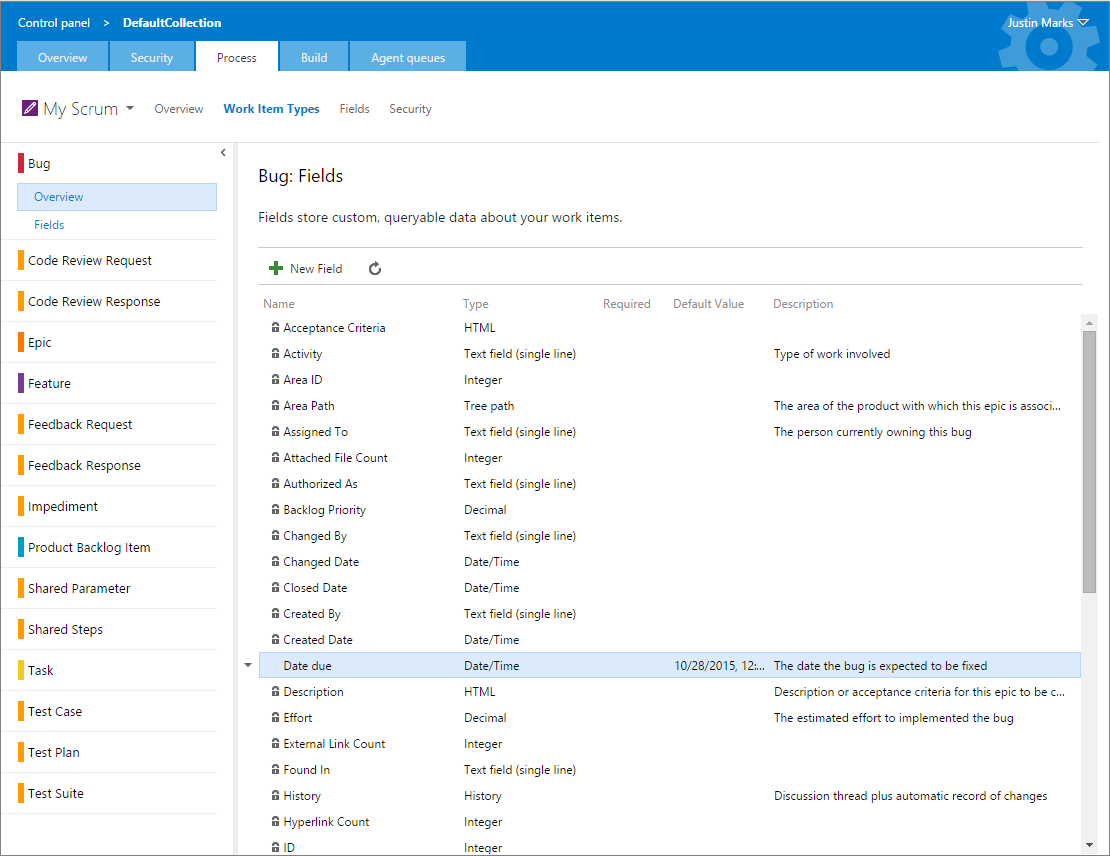
| Figure 7. The process admin site shows all fields included on each work item. |
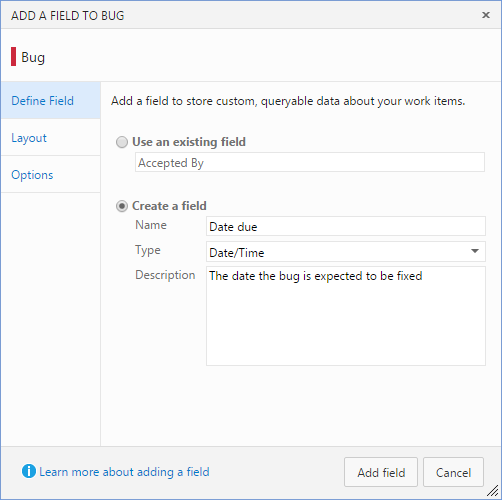
The process editor allows you to see all fields on each work item type and access the add a field experience by clicking the “New field” button in the toolbar. This opens the “Add a field” dialog (figure 8) where users can create a brand new field or use an existing field that’s not already associated with the work item type. When you add a new field, you have to provide a name for the field, choose the type (e.g. integer, date/time, string, etc.) and optionally provide a description for what the field is. Clicking the “add field” button will add the field to the work item type and display the field on the form (figure 11). It’s that easy!
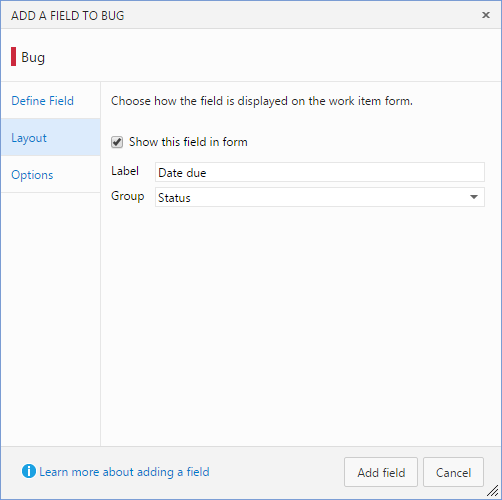
In addition to defining the field itself, you can use the Layout and Options tabs to provide more options:
- The Layout tab allows you choose how the field will appear on the work item form. You can hide the field from the form, customize the field label, and choose which group the field appears in (figure 9).
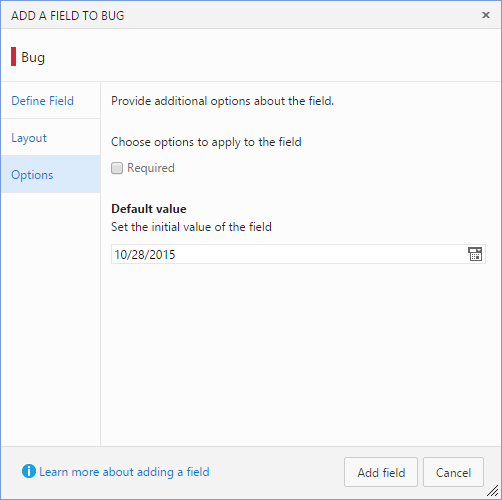
- The Options tab allows you provide additional options about the field such as whether the field is required and its default value (figure 10).
These options are also available from the process editor by right clicking on a field in the grid. You can also see a rollup of all fields across the process by clicking on the Fields tab at the top of the page.
These added fields have all the same functionality of any other field: you can query for them, set alerts on them, use them as pivots in charts, show them on the backlog, etc.
|
|
|
| Figure 8. The “Define Field” tab of the add a field dialog allows you to choose from existing fields or create a new custom field. | Figure 9. The “Layout” tab of the add a field dialog allows you to choose whether the work item appears on the form, with what label, and in which group. | Figure 10. The “Options” tab of the add a field dialog allows you to optionally make the field required or set a default value for the field. |
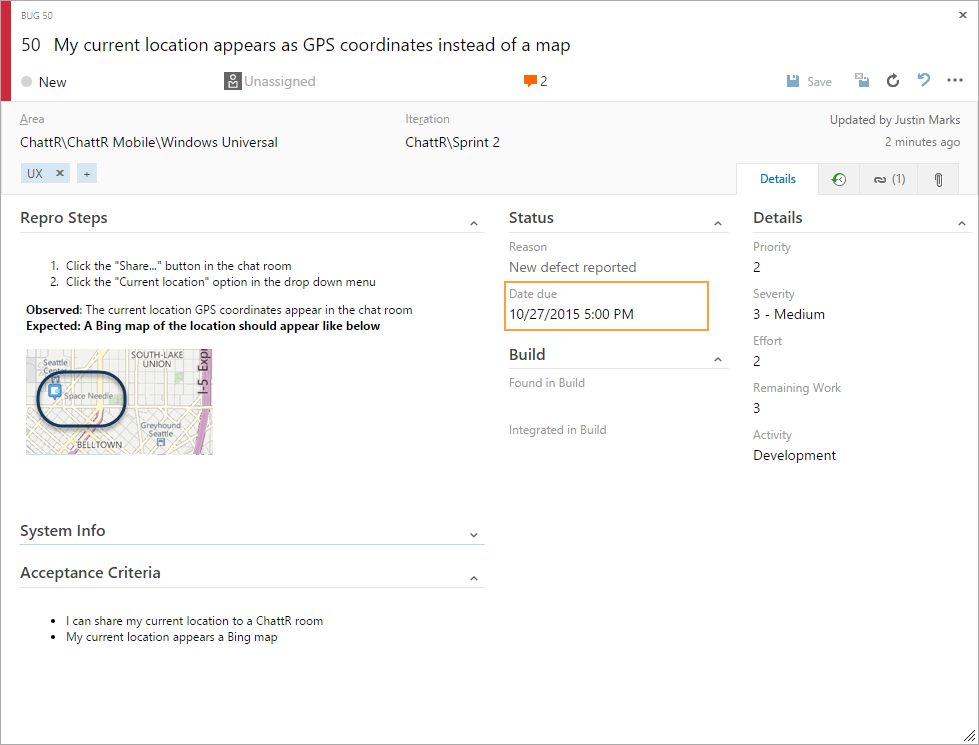
|
| Figure 11. The bug work item with the newly created “Date due” field added to it (highlighted in orange). The field has the default value provided in the add a field dialog. |
That wraps it up for our first phase of process customization. Check out our customization futures blog post to stay up to date with what’s coming next and our overall rollout plan.
Happy Customizing!
-Justin Marks
Q&A
Q: How can I make process changes to a single project?
A: If you wish to have a project have its own process, simply create an inherited process and migrate the project to use it. Just because processes are shared doesn’t mean you need multiple projects using it J
Q: When I migrate a project from “Agile” to “My custom agile”, what happens?
A: Once a project is migrated, the work item appears in the UI no differently than if it was created that process all along; the newly added fields will simply appear on the work item form. If any new required fields have been added, the work item will be in an invalid state and won’t be able to be saved until the required fields are populated.
Q: What happens to the work item data when it’s migrated from an inherited process “My custom agile” back to the system process “Agile”?
A: All data is retained in the work item history so looking at the history tab will show you all the changes made regardless of the current process. Some fields may not be on the form since they are not part of the process but the data is still accessible through REST APIs and Query. These fields are essentially locked from changes and appear as read-only values.
Q: Can I change the name or type of a field?
A: The type can never be changed but the name of user defined fields can be changed from the process fields page but note that this affects all instances of the field across all work item types.
Q: What types of fields can I create?
A: Currently, we support the following field types: Decimal, Date/Time, Integer, String (single-line). While this is a small list, we are working to add more to this list over the next couple sprints. We’ll have Boolean, HTML, and String (multi-line) very soon after release and we’re working to bring picklist/drop downs right after the holidays.
Q: Can I remove fields from OOB templates that we don’t use?
A: Inherited processes don’t allow you to remove fields from the system process they inherit from. You will be able to hide the fields from the form next sprint.
Q: What should I do if I have more questions or need help?
A: If you run into trouble, feel free to email VSTS Customization Help and we’ll be happy to help you out!
0 comments