
Background
At a recent collaboration with a customer, we learned about a few integrations they had wanted to build for Bots running with the Microsoft Bot Framework. One such integration was with a payments service provider, like PayPal. We had created an example of this integration with the C# SDK for Bot Framework, but no such example existed for the Node SDK. As such, I’d like to demonstrate how straightforward it is to build a PayPal integration for bots made using Bot Framework’s Node SDK.
Set up an application
You will need to register the bot application with PayPal to generate the requisite keys to access the Paypal APIs. After logging into PayPal, go to the developer center page to create an application. Copy the Client ID and the Client Secret (the Client Secret will be hidden from you until you select ‘Show’ with your cursor).
We additionally need to create a test user to use with the PayPal sandbox. When testing in the sandbox environment, you can use this test account, which doesn’t require adding a credit card or funding the account.
Setup Node and grab the sample
The following steps assume you have Node.js, npm, and a Bot Framework Emulator installed on your computer. To install Node and npm, visit the Node download page and select ‘Current.’ At the time of writing, the current iteration of Node is version 6.7.0, but any version that is 4.x or above should work. We do not recommend lower versions as the semantics of some keywords have changed between versions.
The cross platform Bot Framework Emulator is available to download here.
From here on, we’ll reference and discuss the code available on Github. Using git, clone the repository onto your computer in your terminal of choice: git clone https://github.com/bnookala/node-paymentbot, cd into this directory and run npm install to download the module dependencies.
Running the sample
cdinto thenode-paymentbotdirectorynpm installto install the module dependencies- Set the
PAYPAL_CLIENT_ID,PAYPAL_CLIENT_SECRET, andPAYPAL_CLIENT_MODEenvironment variables in your terminal to the copied Client ID from PayPal, the copied Client Secret from PayPal, and “sandbox” respectively. You can optionally set thePORTenvironment variable to customize which port the application is bound to, but it will default to 3978. - run
node app.js, note the URL that it writes the console, i.e.,restify listening to http://[::]:3978 - To configure the Bot Framework Emulator, start the emulator application, and enter the bot messaging endpoint. For a locally running bot it should be:
http://localhost:3978/api/messages - Start interacting with the bot!
Building a payment flow from scratch
PayPal offers many APIs and products for creating and executing payments between users and businesses. To keep our integration straightforward, we’ll focus on one relatively simple flow, which involves user approval of payment before we’re able to execute and receive a payment. The full flow is described in PayPal’s documentation in detail, but we’ll be using PayPal’s Node SDK to remove some of the boilerplate in creating and executing the payments.
Integrating PayPal into a Bot
To use the PayPal Node SDK, we must require it as a module, and configure it with the Client ID and Client Secret variables we generated from the PayPal dashboard earlier. PayPal also provides a sandbox environment for testing transactions. We’ll use this environment here to test payments. In practice, when deploying to a production service, you’ll likely want to use different credentials. One popular way to achieve this bucketed approach to deployment is through the underlying system’s environment variables. This way, your code can be environment-agnostic, and you won’t need to keep your Client ID and Client Secret variables in your code. When configured, the paypal module will be able to create and execute payments and transactions:
File: paypal_ex.js
------------------

const paypal = require('paypal-rest-sdk');

paypal.configure({
    'mode': process.env.PAYPAL_CLIENT_MODE,
    'client_id': process.env.PAYPAL_CLIENT_ID,
    'client_secret': process.env.PAYPAL_CLIENT_SECRET
});
To set up our bot, we’ll need to create an instance of a ChatConnector and an instance of a UniversalBot. We’ll also need to create an HTTP server, for the ChatConnector instance to listen on. A ChatConnector allows our Bot to listen and respond on multiple types of messaging channels. Bot Framework currently supports numerous popular messaging channels, and is consistently adding more. We’ll use the UniversalBot instance to define our bot’s logic (i.e. how it should respond and react when a user performs an action):
File: bot_ex.js
---------------

const restify = require('restify');
const builder = require('botbuilder');

// A connector connects a bot on bot framework to various messaging services that a bot
// can talk to.
let connector = new builder.ChatConnector({
    appId: undefined,
    appPassword: undefined
});

// A bot listens and reacts to messages that the connector picks up on.
let bot = new builder.UniversalBot(connector);

// We're using restify here to set up an HTTP server, and then adding the queryParser middleware,
// which will parse the query string into on object on any requests.
let server = restify.createServer();
server.use(restify.queryParser());

// The server will start listening on this port defined in the environment.
server.listen(process.env.PORT, function () {
   console.log('%s listening to %s', server.name, server.url);
});

// Messages are posted to this endpoint. We ask the connector to listen at this endpoint for new messages.
server.post('/api/messages', connector.listen());
This setup is great, but our bot doesn’t do anything yet; we haven’t defined any logic for it. Let’s step back and define a use case for this bot: a city government charges a resident for their parking fine and the resident logs on to complete that payment. This example is straightforward enough that we can build it using a single dialog combined with a waterfalled conversation. For more background on dialogs and conversation, please read the related section of the Bot Framework documentation. A stubbed out example is as follows:
File: bot_dialog_stubbing.js
----------------------------

// The root dialog of our bot simply just jumps straight into the
// business logic of paying a fine.
bot.dialog('/', function (session, args) {
        session.beginDialog('listFines');
});

// Simple three step dialog to list 'fines' that a user has received, and allow
// a user to 'pay' them.
bot.dialog('listFines', [
    function (session, args) {
        console.log('List Fines Dialog');
        session.send('You have 1 outstanding fine:');

        session.send('Parking Fine Violation');
        builder.Prompts.choice(session, "What would you like to do?", ["Pay fine", "Cancel"]);
    },
    function (session, results, next) {
        let choice = results.response;

        if (choice.entity === 'Cancel') {
            return;
        }

        // TODO: Create a payment, and ask the user to act on it.
    },
    function (session, results) {
        session.send('Thanks for your payment!')
    },
]);
Now, our bot will be able to respond to conversation. Let’s test it in the bot framework emulator:
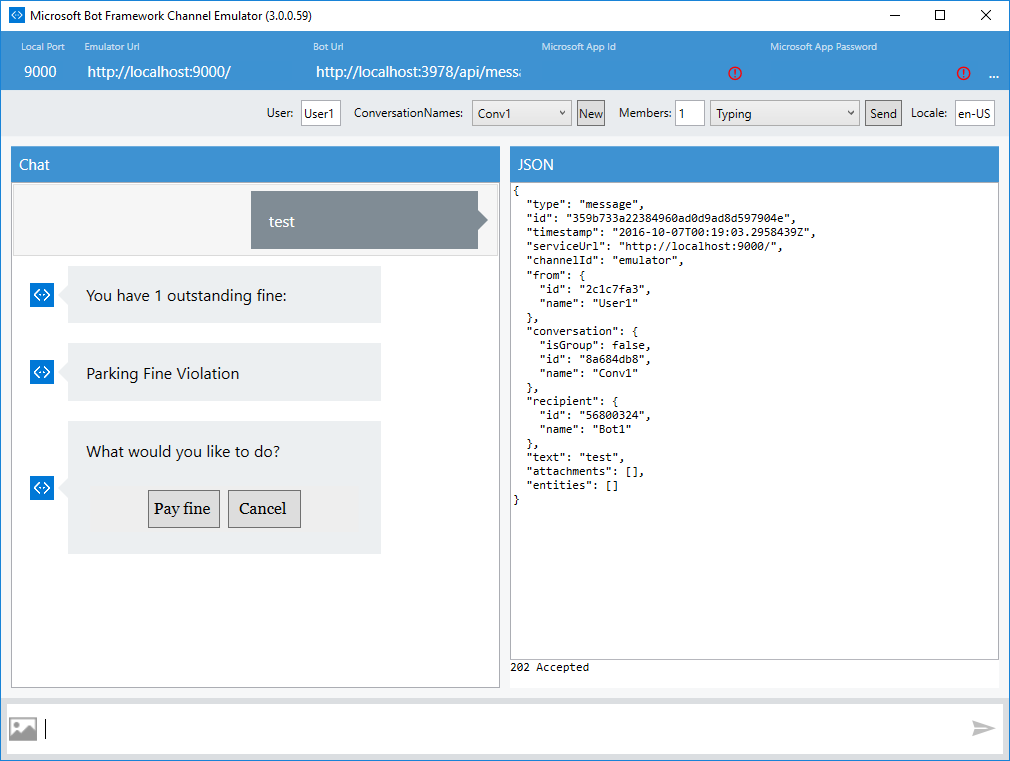
Our bot can now recognize that we want to pay our fine, but it does not yet know how to process that fine. Line 24 of the above gist describes a “TODO”: creating a payment and asking the user to approve it. This point is the first step in our two-step approval/execution flow for collecting payment from a user. Let’s create a function, createAndSendPayment, that can create the payment using the PayPal Node SDK, and provide a link that the user can go to the approve the payment. We’ll use the function paypal.payment.create that the Paypal Node SDK offers to create this payment. The first argument to this function is a JSON object, and the second is a callback that is executed upon success or failure. The schema of the JSON object defines the payment that the user will approve, and includes the name, description, amount, and URLs that PayPal will redirect to on approval or cancellation. The full schema of the JSON object that PayPal requires for payment creation is described in their documentation. The code as follows describes a function that builds our payment JSON, and one that takes this built JSON, creates a payment and asks the user to approve it:
File: payment_json_ex.js
------------------------


/**
 * This function creates and returns an object that is passed through to the PayPal Node SDK
 * to create a payment that a user must manually approve.
 *
 * See https://developer.paypal.com/docs/api/payments/#payment_create_request for a description of the fields.
 */
function createPaymentJson (returnUrl, cancelUrl) {
    return {
        "intent": "sale",
        "payer": {
            "payment_method": "paypal"
        },
        "redirect_urls": {
            "return_url": returnUrl,
            "cancel_url": cancelUrl
        },
        "transactions": [{
            "item_list": {
                "items": [{
                    "name": "Fine",
                    "sku": "ParkingFine",
                    "price": "1.00",
                    "currency": "USD",
                    "quantity": 1
                }]
            },
            "amount": {
                "currency": "USD",
                "total": "1.00"
            },
            "description": "This is your fine. Please pay it :3"
        }]
    };
}
/**
 * Creates a payment on paypal that a user must approve.
 */
function createAndSendPayment (session) {
    console.log('Creating Payment');

    let paymentJson = createPaymentJson('http://localhost', 'http://localhost');

    paypal.payment.create(paymentJson, function (error, payment) {
        if (error) {
            throw error;
        } else {
            // The SDK returns a payment object when the payment is successfully created.
            // This object has a few properties, described at length here:
            // https://developer.paypal.com/docs/api/payments/#payment_create_response
            // We're looking for the 'approval_url' property, which the user must go to
            // to approve the transaction before we can actively execute the transaction.
            for (var index = 0; index < payment.links.length; index++) {
                if (payment.links[index].rel === 'approval_url') {
                    session.send("Please pay your fine: " + payment.links[index].href);
                }
            }
        }
    });
};
The callback (starting at Line 44) passed as the second parameter looks through the payment object received as an argument and searches for an approval_url property, which can be presented to the user. The user must visit this URL and approve the payment before we can continue and execute the payment. We use a Bot Framework built-in, builder.Prompts.text, to display the approval URL to the user.
With the user having visited the URL and approved a payment, we must now execute the payment. To do that, we must create a redirect_url and provide that in the JSON object for payment creation. PayPal will then redirect our user to this endpoint, which will be hosted by us on the HTTP server we had set up earlier. Soon, we’ll use this endpoint to perform the payment execution. Our code now has a endpoint (lines 3 through 6) that PayPal will redirect to:
File: redirect_ex.js
--------------------

// This endpoint describes the approval redirect endpoint that you can provide in the JSON blob passed to PayPal.
// When a user approves a payment, PayPal will redirect the user to this.
server.get('approvalComplete', function (req, res, next) {
    console.log('User approved payment!');
    res.send(200);
});

function createReturnUrl () {
    let url = require('url');
    // This object encodes the endpoint that PayPal redirects to when.
    // a user approves the payment
    let urlObject = {
        protocol: 'http',
        hostname: 'localhost',
        port: configuration.PORT,
        pathname: 'approvalComplete',
    }

    return url.format(urlObject);
};

function createAndSendPayment (session) {
  let returnUrl = createReturnUrl();
  let paymentJson = createPaymentJson(returnUrl);

  // create payment, etc…
};
To execute an approved payment, we use the paypal.payment.execute function provided by PayPal’s Node SDK. This function takes three arguments: a payment ID, a JSON blob with a few fields describing the payment to be executed, and a callback that is run on success or fail. When PayPal redirects to our endpoint, it modifies the query parameters of the redirect URL, adding a paymentId and a PayerID. These parameters must be used to execute the payment, with paymentId corresponding to the first argument of paypal.payment.execute, and PayerID corresponding to a field within the JSON blob:
File: payment_execution_ex.js
-----------------------------

server.get('approvalComplete', function (req, res, next) {
    console.log('User approved transaction');
    executePayment(req.params);
    res.send(200);
});

function executePaymentJson (payerId) {
    return {
        "payer_id": payerId,
        "transactions": [{
            "amount": {
                "currency": "USD",
                "total": "1.00"
            }
        }]
    };
}

function executePayment(params) {
     console.log('Executing an Approved Payment');

    // Appended to the URL by PayPal during the approval step.
    let paymentId = parameters.paymentId;
    let payerId = parameters.PayerID;

    // Generate the sample payment execution JSON that paypal requires:
    let paymentJson = executePaymentJson(payerId)

    // Finally, execute the payment, and tell the user that we got their payment.
    paypal.payment.execute(paymentId, paymentJson, function (error, payment) {
        if (error) {
            console.log(error.response);
            throw error;
        } else {
            console.log('Payment Executed Successfully');
            // TODO: Inform the user on their bot channel.
        }
    });
};
We now have the full payment flow, except the very last step which involves informing the user (via the bot, and on the user’s native messaging channel) that their payment has been successfully processed. Since we’re no longer operating within the context of the bot, but rather within the context of the HTTP server, we’ll have to get creative.
We’ll need to modify our code a bit and build up an Address, a Bot Framework model that identifies the channel and user with which a message is associated. These properties are all encoded on the session.message object normally, and can thus be re-encoded as query arguments in the return_url of the approval step. PayPal does not strip these parameters, so they get returned again when the user is redirected to the approvalComplete endpoint. When the payment is executed, we can pass these parameters along and create a message to be sent to the user, even in the context of the HTTP Server, without an active session object.
File: redirect_bot_message_ex.js
--------------------------------

function createReturnUrl (address) {
    console.log('Creating Return Url');

    // The address passed in is an Object that defines the context
    // of the conversation - the user, the channel, the http endpoint the bot
    // exists on, and so on. We encode this information into the return URL
    // to be parsed out by our approval completion endpoint.
    let addressEncoded = encodeURIComponent(JSON.stringify(address));

    // This object encodes the endpoint that PayPal redirects to when.
    // a user approves the transaction.
    let urlObject = {
        protocol: 'http',
        hostname: 'localhost',
        port: configuration.PORT,
        pathname: 'approvalComplete',
        query: addressEncoded
    }

    return url.format(urlObject);
}

function executePayment (parameters) {
    console.log('Executing an Approved Payment');

    // Appended to the URL by PayPal during the approval step.
    let paymentId = parameters.paymentId;
    let payerId = parameters.PayerID;

    // Generate the sample payment execution JSON that paypal requires:
    let paymentJson = executePaymentJson(payerId)

    // Grab the encoded address object, URL decode it, and parse it back into a JSON object.
    let addressEncoded = decodeURIComponent(parameters.addressEncoded);
    let address = JSON.parse(addressEncoded);

    // Finally, execute the payment, and tell the user that we got their payment.
    paypal.payment.execute(paymentId, paymentJson, function (error, payment) {
        if (error) {
            console.log(error.response);
            throw error;
        } else {
            console.log('Payment Executed Successfully');
            respondToUser(payment, address);
        }
    });
}

function respondToUser (payment, address) {
    let message = new builder.Message().address(address).text('Thanks for your payment!');

    // Asks the bot to send the message we built up above to the user.
    bot.send(message.toMessage());
}

bot.dialog('listFines', [
    function (session, args) {
        console.log('List Fines Dialog');
        session.send('You have 1 outstanding fine:');

        session.send('Parking Fine Violation');
        builder.Prompts.choice(session, "What would you like to do?", ["Pay fine", "Cancel"]);
    },
    function (session, results, next) {
        let choice = results.response;

        if (choice.entity === 'Cancel') {
            return;
        }

        // Starts the payment flow.
        createAndSendPayment(session);
    },
]);
Line 8 identifies the Address of the message to be encoded into the return_url. When the payment is executed, lines 34-35 pull these same encoded parameters out of the query string, and pass it along to a new function, respondToUser, which uses the address to build up a builder.Message. All messages that pass through the Bot Framework are represented internally through this model. Thus, we can create a response here, and send it along to our bot at line 53. Our complete interaction now looks like this:
Conclusion
The code highlighted above consists mostly of snippets and examples that intend to illustrate how we implemented payments with Bot Framework. A working code example is available on GitHub.
Through this tutorial, I’ve identified a common third party service integration, PayPal, and integrated it with a Bot built on Bot Framework’s Node SDK. I’ve also demonstrated that Bot Framework is a flexible tool for integrating conversation into your platform and can coexist with many popular existing integrations.