
“There’s no worse punishment than worthless, hopeless labor.” — The Myth of Sisyphus by Albert Camus
Configuring a development environment for a non-trivial C++ project is a process that can be error-prone, tedious, and time-consuming. For would-be contributors to projects, struggling with these initial steps can be a frustrating introduction to a project. Even seasoned developers may run into issues with their existing development environments when working on projects that have different, and sometimes conflicting, dependencies.
A GitHub Codespace provides a cloud-hosted development container that can be customized specifically for a project, even permitting different customizations for different branches. In this walkthrough, you’ll learn how to create a codespace, customize the development container, and configure Visual Studio Code’s C++ extensions by walking through the steps for the vcpkg-tool repository.
Preparation
Availability of GitHub Codespaces
GitHub Codespaces are currently available to GitHub accounts that are members of organizations on a GitHub Team or GitHub Enterprise Cloud plan. Access for individual users is currently in beta testing. An organization owner can enable or disable codespaces for an organization and set spending limits with only a few clicks. Organization owners can also apply policies that restrict what machine types are available to repositories in order to prevent excessive resource usage. If you are a C++ developer that currently does not have access to this feature, we’d like to learn more (survey link) about your environment and interest in the feature.
Preparing your vcpkg-tool repository
vcpkg-tool is the repository for the front-end executable of the vcpkg dependency manager, which helps you manage C and C++ libraries for your project. The vcpkg ecosystem currently has around 2000 distinct packages in its catalog. You can learn more about vcpkg at the Microsoft C++ Blog. Since you are unlikely to have permissions to modify the microsoft/vcpkg-tool directly, you should use GitHub’s fork feature to obtain a copy of the repository into an account that you control. Navigate to https://github.com/microsoft/vcpkg-tool, login, and click the Fork button for the repository. On the following page, click the Create fork button.
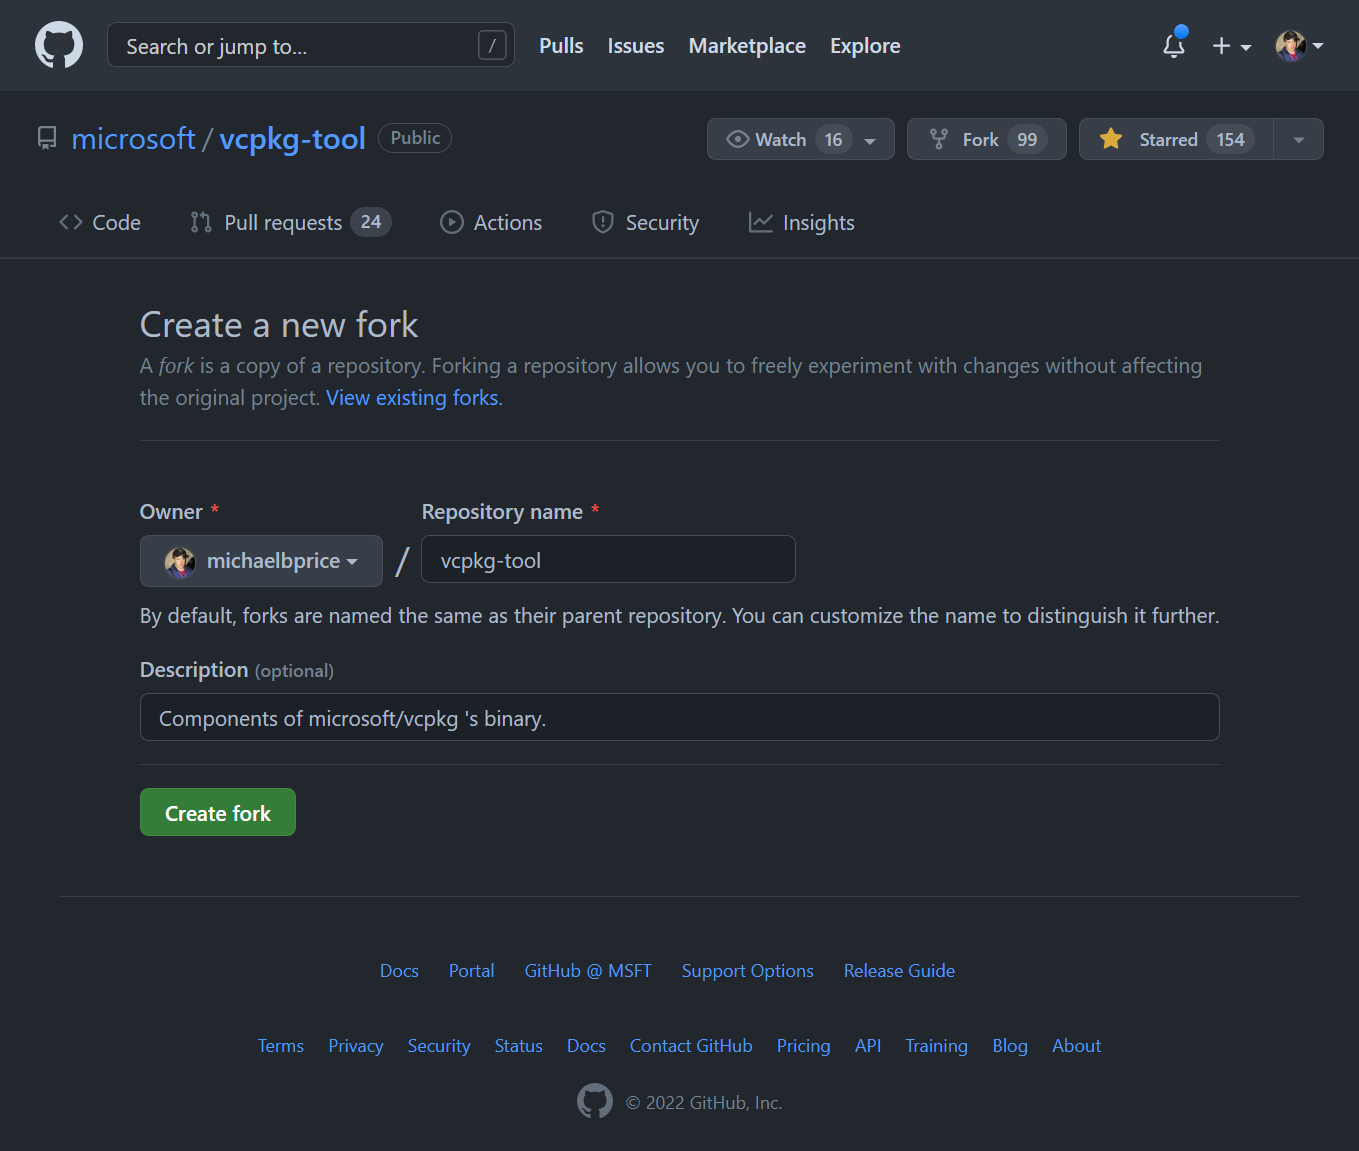
After a few seconds, you should have a vcpkg-tool repository that you control and from which you can submit pull requests to the upstream repository. Since this is an active repository, the requirements for building it might have changed since this was written. So that you can reliably follow along, you should create a branch from commit 48006ab and work from that point in history. To create a branch from that specific commit, append /tree/48006ab to the URL for your forked vcpkg-tool repository to browse the repository at that point in history, then click the dropdown branch button on the left of the page (it should show the commit hash 48006ab73a), type in the desired name for your branch, and then click Create branch: <your-branch-name-here> from ‘48006ab’. Now, let’s explore the repository some to get an understanding of what is required to be able to build and test the project.
Using github.dev to Explore a Repository with Visual Studio Code
github.dev is an instance of Visual Studio Code running in the browser, with no backing computation or storage behind it. It allows you to use many of the editor features of Visual Studio Code, including source control operations and many extensions, without requiring a clone of the repository or any tools beyond a web browser. It is a great way to explore a repository or to make simple changes that do not require building or testing your code. We’ll use it to explore our newly created repository so that we know what we need to do to properly set up a build and test environment for our codespace later on. This allows us to do a lot of the “busy work” without incurring charges for a codespace environment.
Press the . (period) key on your keyboard to open up github.dev for that repository. Alternatively, you can change the github.com domain for the URL to github.dev and load that web page. This works for any GitHub repository. After Visual Studio Code loads in the browser, you should notice that the Remote “Quick Access” status bar button in the lower left will indicate that you are connected directly to GitHub.

Feel free at this time to familiarize yourself with the features of Visual Studio Code by opening up the Command Palette by pressing Ctrl+Shift+P (Cmd+Shift+P on macOS) and running the Get Started: Open Walkthrough... command and selecting a walkthrough. Once you feel comfortable progressing, continue on with our exploration of the repository.
Build and Test Prerequisites
If you read through the Markdown (.md) files in the root of the repository and in the docs/ directory, you’ll find a handful of tools that will need to be installed in order to build and test the repository. You may find further requirements in the root CMakeLists.txt file, such as requiring a C++17-capable compiler. The collection of things that must exist on the system in order to work in the project are:
- A C++17-capable compiler that CMake recognizes
- CMake 3.15 or higher
- A build system that CMake can generate files for (e.g. Ninja)
- A copy of the primary vcpkg repository, and an environment variable
VCPKG_ROOTthat you’ve set to its location - clang-format for formatting source code according to the style provided by the
.clang-formatfile
Now we are ready to create our codespace!
Creating and Managing Your Codespace
There are several ways you can create a new codespace for your newly forked vcpkg-tool repository.
- On the default page for your repository on github.com, you can click the <> Code button, click the Codespaces tab, and click the Create codespace on <branch-name> button where <branch-name> is the name of the currently selected branch.. This button is actually a split button, that allows you to select customizations for your codespace environment such as the checked-out branch, the machine type, the region to use for the the GitHub-managed cloud instance, and the development container (i.e. devcontainer) configuration file to use.
- At https://github.com/codespaces, you can click the New codespace button and select the repository and the customization options you’d like (as described above).
- From within Visual Studio Code, you can create a codespace in two ways:
- Open the Command Palette and run the Codespaces: Create New Codespace command and follow the prompts to provide the repository and customization options you’d like.
- If you have the GitHub Codespaces extension installed, you can open the Remote Explorer in the side bar, hovering your mouse over the GITHUB CODESPACES section and clicking the + icon. You will be prompted for options similar to those if you ran the command from the Command Palette.
- You can create, manage, and connect to a codespace by using the GitHub CLI tool and the
gh codespaces createcommand.
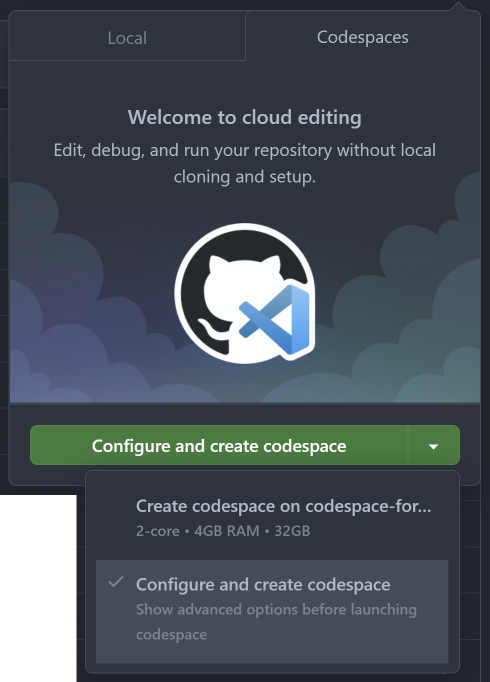
Because we should already have our default page for the newly forked repository open, we’ll use that method. Click the <> Code button, click the Codespaces tab, and click the selection arrow on the Create codespace… split button and select Configure and create codespace. Now click the split button to load the page where we can select our customizations.
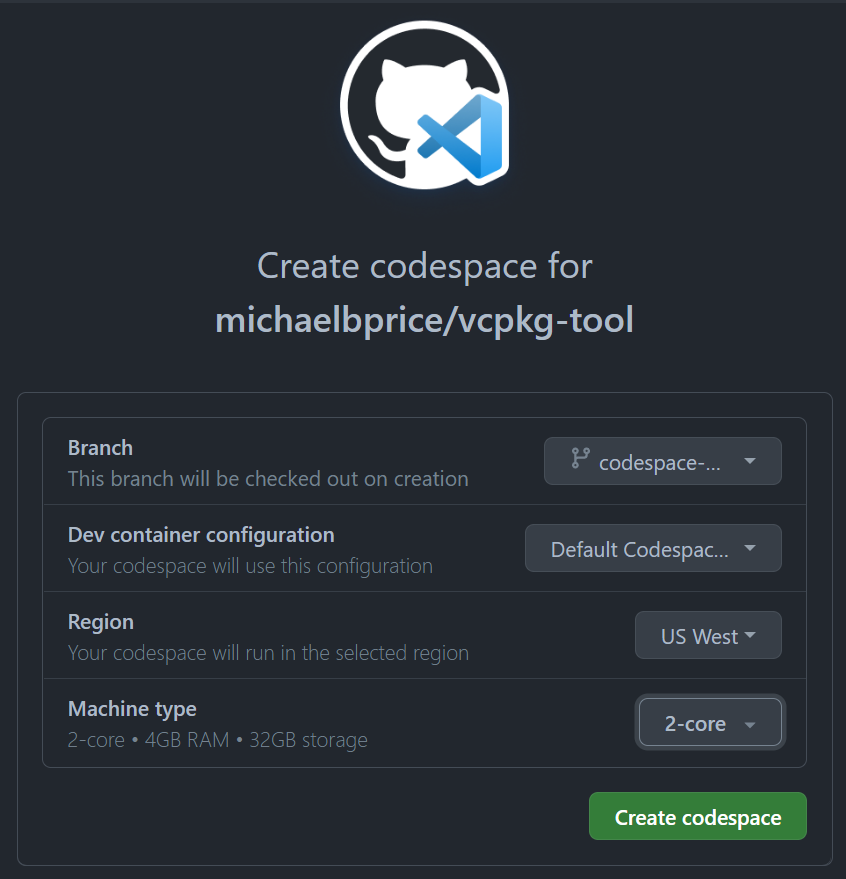
On the next page, select the options you’d like. Make sure that the branch you created earlier is selected, so that the codespace loads with the correct branch already checked out. Normally, you should let Region remain the default unless you know that you want your devcontainer virtual machine to be created in a specific cloud region. We’ll come back to Dev container configuration later on in the walkthrough.
Selecting a Machine Type
The most impactful option to choose when you are creating a new codespace is the machine type. The machine type is the combination of virtualized hardware resources that will be available to your codespace, including number of CPU cores, amount of RAM, and the size of filesystem storage. The machine types that are allowed for a codespace are controlled by a combination of organization and account settings and constraints specified by the repository for which the codespace is being created. Currently, the available machine types and their costs (storage is an additional $0.07/GB-month) are*:
- 2-core, 4GB RAM, 32GB disk – $0.18/hour
- 4-core, 8GB RAM, 32GB disk – $0.36/hour
- 8-core, 16GB RAM, 64GB disk – $0.72/hour
- 16-core, 32GB RAM, 128GB disk – $1.44/hour
- 32-core, 64GB RAM, 128GB disk – $2.88/hour
* Monetary units are in USD
We’ll choose the cheapest available machine type while we work to get the codespace and the development container created and customized. Select the 2-core option from the Machine type drop-down button and click Create codespace.
You should see a new page load in the browser that shows status information on the starting of the codespace and the initiation of a connection to the codespace. Once the codespace is ready to go, an instance of Visual Studio Code will load in the browser, remotely connected to the codespace.
Managing Your Codespace
Your cloud-hosted codespace is available for you to connect to for as long as it exists. In order to control costs, a codespace will automatically shut down after a period of no activity, meaning you don’t have to worry about running up a large bill because you forgot to stop it before ending your workday. When you restart the codespace and reconnect, it will be in the same state it was when it shut down. Any non-committed or not-yet-pushed changes are still present, just as you left them.
You can manage your codespace directly from within Visual Studio Code by choosing one of the Codespaces: commands in the Command Palette, or you can execute the fundamental commands (starting, stopping, etc…) from the GitHub Codespaces web page. You can also use the GitHub CLI to manage your codespaces if you prefer working from a terminal window or scripting actions. A subset of the Command Palette commands are also available if you click on the Remote “Quick Access” status bar button, which now shows you that you are connected to a codespace.

Let’s go ahead and stop your newly created codespace and reconnect, so that you are comfortable with the experience. Run the Codespaces: Stop Current Codespace from the Command Palette. You could restart the codespace by clicking on the Restart codespace button, but let’s see what the experience is like from the main GitHub Codespaces web page. Navigate in your browser to https://github.com/codespaces. There, you should see your new codespace listed. If you click on the … to the right of your codespace entry, you’ll get a menu of management commands. If you would like to try out Visual Studio Code outside of the browser, and have it installed, click on Open in Visual Studio Code. Otherwise, click Open in browser to restart and connect to the codespace.
After you start your codespace, you can see a change on the GitHub Codespaces web page: your codespace has the Active label applied to it, and there’s a new Stop codespace action available. Now that you know how to start and stop your codespace and connect to it in different ways, let’s customize the development container used for it so that we can build the vcpkg-tool repository.
Customizing Your Development Container
Development containers, or devcontainers, are customized environments capable of building a specific project, delivered using a container technology like Docker. Codespaces uses devcontainers for customizing the codespace environment, but the idea and tools are distinct and can be used for local container environments as well. In order to enable the use of devcontainers by the tools that recognize them, you have to add certain files into your repository. This allows the definition of your devcontainer to evolve along with the project itself, including tracking evolving requirements along different branches of your repository. Let’s add a devcontainer specification to our vcpkg-tool fork. GitHub recently added the ability to have multiple devcontainer definitions in your repository. If you have multiple devcontainer definitions, you will be prompted for which one to use whenever you initially create a codespace.
From within your codespace, run the Codespaces: Add Development Container Configuration Files… command from the Command Palette. Follow the prompts and select the C++ container configuration definition, the ubuntu21.04 operating system version, and any of the additional features to install that you want (you won’t strictly need them for this walkthrough). Visual Studio Code will create a .devcontainer directory in the root of your project and it will contain a devcontainer.json file, a Dockerfile file, and a reinstall-cmake.sh file. The reinstall-cmake.sh file is just a helper file used by Dockerfile to help customize the version of CMake that gets installed on the system, and we can ignore its contents. You may also notice two notifications from Visual Studio Code asking whether you’d like to install recommended extensions for Docker or if you’d like to rebuild the container. Ignore them for now. Let’s take a look at the two relevant files and how we need to change them.
The Dockerfile
Dockerfile is the file that Docker uses to assemble a container image. The syntax is well documented by Docker and is fairly straightforward to understand. The Dockerfile that was created for us specifies the base container image to use, copies the CMake helper script to it, and optionally runs it on the container that is being built. The Dockerfile also has commented-out commands that would use vcpkg to install specific libraries and another set of commented-out commands that would install additional packages provided by the operating system’s package manager.
For our case, you’ll want to make the following changes (shown in “diff” format) to make sure that we are using a capable version of CMake, clang-format is installed, and that we have a copy of the vcpkg repository with the VCPKG_ROOT environment variable set. If you have additional packages you’d like installed, you can add them to the command after clang-format. After you make the changes, save the file.
diff --git a/.devcontainer/Dockerfile b/.devcontainer/Dockerfile
index 7072fc9..4c8e31a 100644
--- a/.devcontainer/Dockerfile
+++ b/.devcontainer/Dockerfile
@@ -6,7 +6,7 @@ FROM mcr.microsoft.com/vscode/devcontainers/cpp:0-${VARIANT}

 # [Optional] Install CMake version different from what base image has already installed.
 # CMake reinstall choices: none, 3.21.5, 3.22.2, or versions from https://cmake.org/download/
-ARG REINSTALL_CMAKE_VERSION_FROM_SOURCE="none"
+ARG REINSTALL_CMAKE_VERSION_FROM_SOURCE="3.23"

 # Optionally install the cmake for vcpkg
 COPY ./reinstall-cmake.sh /tmp/
@@ -19,5 +19,9 @@ RUN if [ "${REINSTALL_CMAKE_VERSION_FROM_SOURCE}" != "none" ]; then
 # RUN su vscode -c "${VCPKG_ROOT}/vcpkg install <your-port-name-here>"

 # [Optional] Uncomment this section to install additional packages.
-# RUN apt-get update && export DEBIAN_FRONTEND=noninteractive
-#     && apt-get -y install --no-install-recommends <your-package-list-here>
 No newline at end of file
+RUN apt-get update && export DEBIAN_FRONTEND=noninteractive
+    && apt-get -y install --no-install-recommends clang-format
+
+# Obtain vcpkg repository and set VCPKG_ROOT
+RUN git clone --depth 1 https://github.com/microsoft/vcpkg /vcpkg
+ENV VCPKG_ROOT="/vcpkg"
 No newline at end of file
devcontainer.json
devcontainer.json is the file that the tools use to drive the devcontainer creation process. It has an open and evolving specification and should soon have a published reference implementation as well. Currently, the syntax for the JSON is documented by Visual Studio Code documentation.
We’ll want to make the following change (shown in “diff” format) to our devcontainer.json file. This change will tweak the Visual Studio Code extensions that are installed. Feel free to add any additional extensions to the list that you are interested in using. After you make the change, save the file.
diff --git a/.devcontainer/devcontainer.json b/.devcontainer/devcontainer.json
index 60ce4dc..11560db 100644
--- a/.devcontainer/devcontainer.json
+++ b/.devcontainer/devcontainer.json
@@ -15,8 +15,8 @@

        // Add the IDs of extensions you want installed when the container is created.
        "extensions": [
-               "ms-vscode.cpptools",
-               "ms-vscode.cmake-tools"
+               "ms-azuretools.vscode-docker",      // Tools for working with Dockerfiles
+               "ms-vscode.cpptools-extension-pack" // Collection of C and C++ extensions, including CMake
        ],

        // Use 'forwardPorts' to make a list of ports inside the container available locally.
Now that we’ve modified our container configuration files, we need to rebuild the codespace container for the changes to apply. If the notification from Visual Studio Code about rebuilding the devcontainer is still visible, you can click Rebuild Now on that notification, otherwise, you can rebuild the container by clicking the Remote “Quick Access” status bar button and selecting Rebuild Container or by running the Codespaces: Rebuild Container command from the Command Palette.
Since a new Docker container image has to be created, this could take a short while. GitHub offers the ability to use GitHub Actions to generate prebuilt images if it turns out that you might need to create these custom container images regularly.
Once the codespace is restarted and Visual Studio Code has reconnected, we should check and make sure that we have suitable C++ compilers installed on the system. We can do that by running some commands in the Terminal pane, which you can open up by pressing Ctrl+` (note: that is a ‘backtick’). The commands and your results should look like:
@michaelbprice ➜ /workspaces/vcpkg-tool (main ✗) $ which g++ && g++ -dumpversion && g++ -std=c++17
/usr/bin/g++
10
g++: fatal error: no input files
compilation terminated.
@michaelbprice ➜ /workspaces/vcpkg-tool (main ✗) $ which clang++ && clang++ -dumpversion && clang++ -std=c++17
/usr/bin/clang++
12.0.0
clang: error: no input files
@michaelbprice ➜ /workspaces/vcpkg-tool (main ✗) $
You will also notice that on the Activity Bar on the left side of Visual Studio Code, we now have icons for Docker and CMake, just as we expected. Next, we’ll configure the extensions in the C/C++ Extension Pack so that we can build, test, and work with the C++ code in the project.
Configuring Visual Studio Code for C++
We have been consistently making improvements to the C++ experience in Visual Studio Code, much of which we’ve documented in blog posts on the Microsoft C++ Blog. This section will describe the changes you need to make, but won’t go into a lot of the details. We suggest exploring our other blog posts and documentation to get a better understanding.
Configuring CMake with CMakePresets.json
CMake introduced a presets feature in version 3.19 which has continued to evolve in subsequent releases. This feature allows for the definition of idiomatic configuration, build, and test command lines for a project. This increases consistency for developers and reduces the startup overhead for new contributors. It also provides a useful way to document the common patterns in a way that is “live” and is less likely to become stale documentation. In addition to all of those benefits for individual users, it also simplifies automated systems like continuous integration systems.
For our purposes, you should add the following CMakePresets.json file in the root of the repository. It must live directly beside the project’s root CMakeLists.txt file in order for CMake to locate it. You can do this via the Command Palette by making sure the root of the repository is selected in the Explorer and running the command File: New File. Then provide the name CMakePresets.json and copy the contents from here into the open JSON file in the source editor.
{
    "version": 3,
    "configurePresets": [
        {
            "name": "base",
            "hidden": true,
            "generator": "Ninja",
            "binaryDir": "${workspaceRoot}/out",
            "cacheVariables": {
                "CMAKE_INSTALL_PREFIX": "${workspaceRoot}/out/install/${presetName}"
            }
        },
        {
            "name": "benchmark-base",
            "hidden": true,
            "cacheVariables": { "VCPKG_BUILD_BENCHMARKING": "On" }
        },
        {
            "name": "debug",
            "displayName": "Debug",
            "cacheVariables": { "CMAKE_BUILD_TYPE": "Debug" }
        },
        {
            "name": "release",
            "displayName": "Release",
            "cacheVariables": { "CMAKE_BUILD_TYPE": "Release" }
        },
        {
            "name": "debug-benchmarks",
            "displayName": "Debug + Benchmarks",
            "inherits": [ "debug", "benchmark-base"]
        },
        {
            "name": "release-benchmarks",
            "displayName": "Release + Benchmarks",
            "inherits": [ "release", "benchmark-base" ]
        }
    ]
}
After saving that file, delete the existing CMake cache and reconfigure by running the CMake: Delete Cache and Reconfigure command from the Command Palette. Select whichever configuration you are interested in. After configuration completes you should now be able to build the project! Click the Build button in the status bar or press the F7 key.
Configuring IntelliSense for Visual Studio Code
Congratulations! Because this project is using CMake and we are using the Visual Studio Code CMake extension, IntelliSense was set up based on the information that the CMake extension determined. There’s nothing additional you need to do in order to enable IntelliSense and use all of its great productivity features.
Summary
Using GitHub Codespaces and Visual Studio Code makes it easy to set up a repeatable, isolated, and accessible development environment for your C++ projects on GitHub. You can configure your environment to have all of the tools and features that a new contributor would need to get started quickly and be productive. Say goodbye to the days of new contributors struggling through hours or days of trying to get a system working, and bid farewell to having to push your not-yet-ready changes just so you can work from a different system.
Call to Action
If you are a member of an organization using GitHub Team or GitHub Enterprise Cloud, contact your organization owner today to get started. If you aren’t a member of such an organization, sign up for the GitHub Codespaces beta program now and optionally fill out our survey to help us understand the demand from the C++ community. Once you have access, use this walkthrough to guide you to setting up your first codespace for C++ and then try it out on your own projects!
The vcpkg ecosystem is currently an active, open-source community. If you are interested in contributing to the vcpkg or vcpkg-tool projects, we’d love to have your help (we are also currently hiring), and we encourage you to read and carefully follow the contribution sections of the respective repositories. We want to hear about your experiences with GitHub Codespaces and C++ in Visual Studio Code. Please let us know more what you liked and what improvements you’d like to see by contacting us on Twitter @VisualC or by using the #CodespacePlusPlus hashtag. You can also email us at visualcpp@microsoft.com. If you have specific features to request or bugs to report, you can open a discussion on GitHub Codespaces or you can file bugs with us at the Microsoft Developer Community site.
Happy Coding!
0 comments