Organizations migrating relational data to Azure Cosmos DB meet different challenges, from moving large amounts of data, to performing the transformations required to properly store the data in a format that will provide the performance required. The first step on this type of migrations is to come up with the non-relational model that will accommodate all the relational data and support existing workload characteristics. Luckily, there are good guidelines on how to approach this modeling effort. There are also good examples on how to perform the transformation using different approaches. I used Theo’s as inspiration for mine. My approach leverages Azure Data Factory to perform efficient parallel copying and PySpark to perform the required transformations at scale.
One-To-Many Relationships using the Embedding Approach
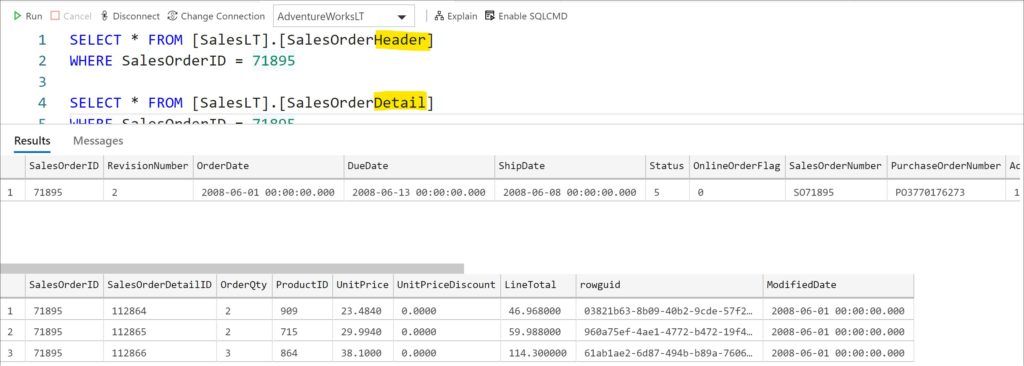
In some One-to-Many scenarios, the recommended approach is to Embed the many side into the one side, thus eliminating the need for joins. A common example is when we have a master/detail pair of tables like Order Header and Order Detail.
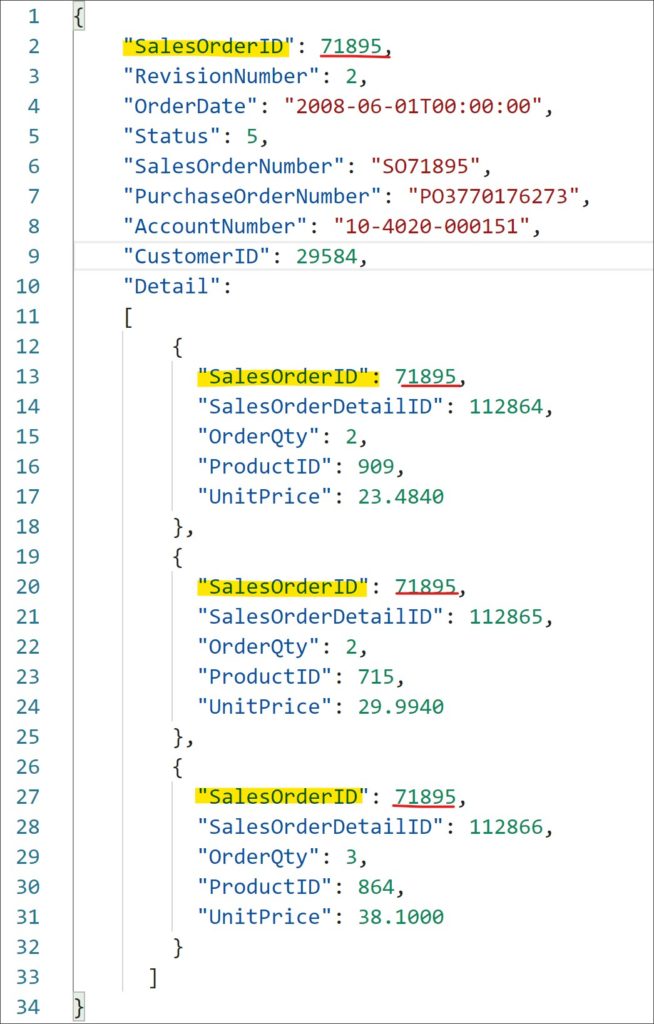
Here we have one record for the Order Header and three corresponding records for the Order Detail. In a relational world, we are required to join these two tables (by SalesOrderID) to get a complete picture of sales data. When using the embedded approach to migrate this data to an Azure Cosmos DB (Core SQL API), the data will look like a single document with data for the order, and an array of elements representing data for the detail..
Notice that I left the SalesOrderID element on the embedded documents just for reference. The final implementation will remove these elements as they are not necessary anymore.
The Solution
The solution has a single ADF Pipeline with three activities, one to bring the relational data to ADLS, another one to transform the data, and a final one to load the data into Azure Cosmos DB.
Step 1: Copy Data from Relational Sources to ADLS Gen 2
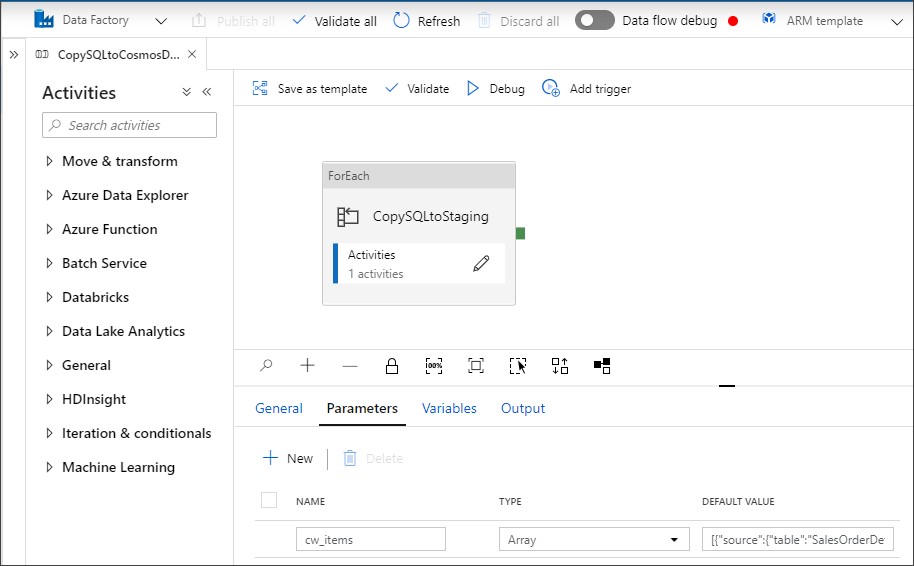
The first step uses Azure Data Factory (ADF) Copy activity to copy the data from its original relational sources to a staging file system in Azure Data Lake Storage (ADLS) Gen 2. I choose ADF copy activity because it allows me to source data from a large and increasingly growing number of sources in a secure, reliable, and scalable way. ADF is also used to orchestrate the entire pipeline as it provides monitoring capabilities. A single ForEach activity loops thru a Copy Activity to move the necessary datasets from the relational source. This can also be accomplished using two separated Copy activities. This example uses Azure SQL Database as relational data source. I used Parquet as the destination file format to keep the incoming data types and speed up PySpark processing downstream
At the end of this step, we will have two files on ADLS, one representing Sales Order Header, and another resenting Sales Order Detail.
Step 2: Transform Relational to Non-relational using Embedded approach
Now that we have our files in ADLS, we can use Azure Databricks to code a PySpark process to perform the required transformations. We need to merge the two incoming master/detail datasets into a single collection of documents. Before you continue, make sure you have follow the steps required to grant your Databricks cluster access to the ADLS Gen2 filesystem. You can find those detailed steps here. For this example, I’ve mounted the ADLS folder into a /mnt/staging path. I used a single Notebook that is called from ADF using the Azure Databricks Notebook activity. First, we read the two parquet files into Dataframes:
orderHeaderDF = spark.read.parquet('/mnt/staging/SalesOrderHeader.parquet')
orderDetailDF = spark.read.parquet('/mnt/staging/SalesOrderDetail.parquet')
Since we used Parquet, Spark automatically recognize the structure and data types on each dataset. Next, we transform the Order Detail Dataframe so it is ready to use as embedded document. The code first create a new structure element using all the elements (attributes) from the Order Detail Dataframe (except SalesOrderID). Then it groups the records by SalesOrderID, collecting all the records with the same SalesOrderID into an Array. This will reduce the granularity of the original Sales Order Detail Dataframe.
from pyspark.sql.functions import *

embeddedElementName = 'Details'
joinColumnName = 'SalesOrderID'
orderDetailEmbeddedDF = (orderDetailDF.withColumn(embeddedElementName
         ,(struct([col(colName) for colName in orderDetailDF.columns if colName != joinColumnName ])))
         .select(joinColumnName,embeddedElementName)
         .groupby(joinColumnName)
         .agg(collect_list(embeddedElementName).alias(embeddedElementName)))
Once the transformation is completed, the new Order Detail Dataframe has the right structure to be used in the final step. Noticed that the column used for aggregations is the same I will use to join back to the Sales Order Header Dataframe (SalesOrderID).
The final transformation first joins Order Header with the newly formatted Order Detail Dataframe using SalesOrderID as join condition. Then it selects all the element from the Order Header Dataframe and only the Details element from the new Order Detail Dataframe as we don’t need two copies of SalesOrderID in the same document.
from pyspark.sql.functions import col

orderCombinedDF = (orderHeaderDF.alias('OH')
                   .join(orderDetailEmbeddedDF.alias('OD')
                         ,col('OH.'+ joinColumnName) == col('OD.' + joinColumnName))
                   .select([col('OH.'+colName) for colName in orderHeaderDF.columns]
                           + [col('OD.' + embeddedElementName)]) )
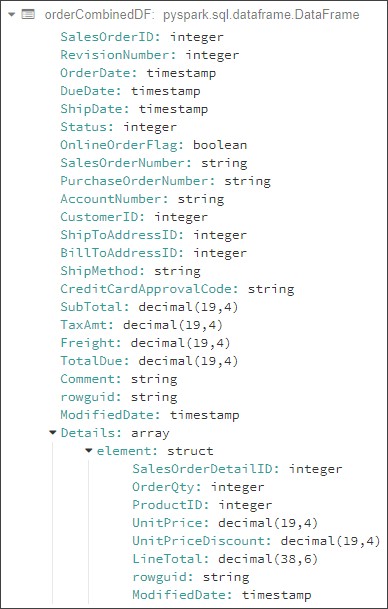
As you can see, the code is dynamic and will work with any number of columns in both Header and Source. The final Dataframe, ready to be loaded to Cosmos DB, is written to a JSON file on ADLS. its final schema looks like this:
Step 3: Load the Transformed Data into Azure Cosmos DB
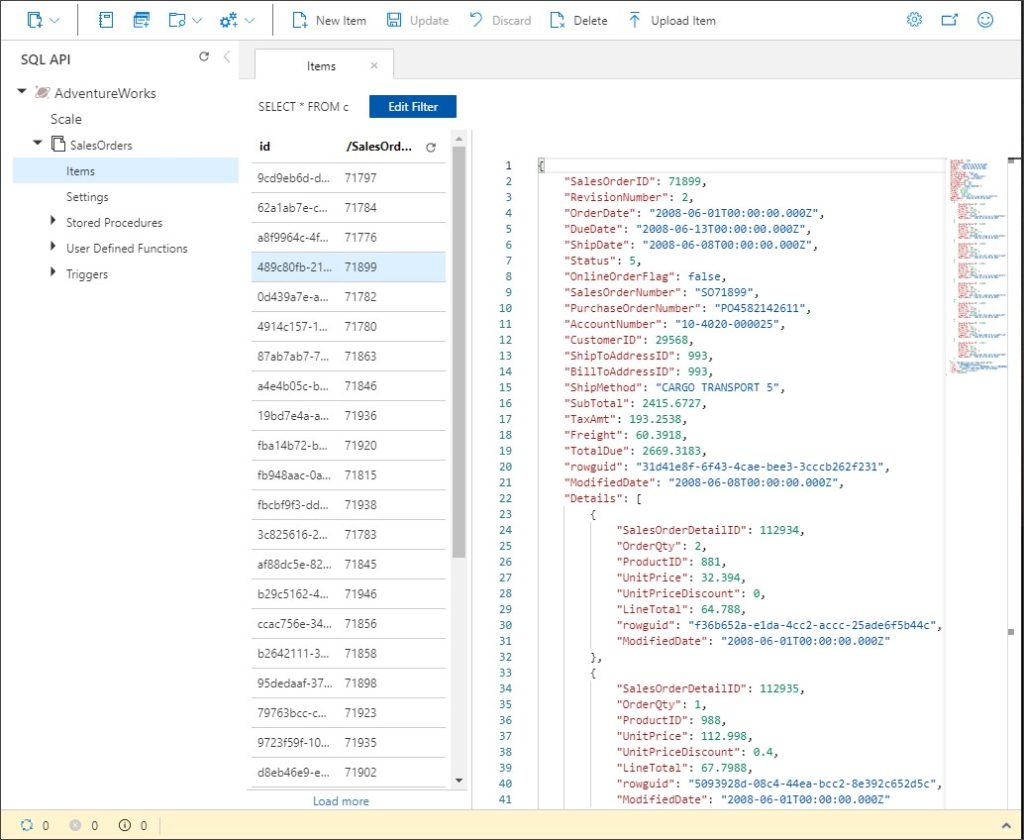
Finally, I use an ADF Copy Activity to load the JSON file created on the previous step into an Azure Cosmos DB collection. There is no need to specify any mapping. Once loaded into the colleciton, documents will look like this from Azure Cosmos DB Data Explorer
Implementation Notes
The Spark code is not completely generic. However, it should be relatively easy to add parameters to the notebook to include the input and output files, and the names of the fields use for joins and embedding.
The Spark code is short and could eventually be replaced with a native Azure Data Factory Mapping Data Flow operator, providing a simpler and easier to maintain solution.
I used Azure Databricks to run the PySpark code and Azure Data Factory to copy data and orchestrate the entire process. Once available, this could be accomplished by using only Azure Synapse.
Get started
Create a new account using the Azure Portal, ARM template or Azure CLI and connect to it using your favorite tools. Stay up-to-date on the latest Azure #CosmosDB news and features by following us on Twitter @AzureCosmosDB. We are really excited to see what you will build with Azure Cosmos DB!
About Azure Cosmos DB
Azure Cosmos DB is a globally distributed, multi-model database service that enables you to read and write data from any Azure region. It offers turnkey global distribution, guarantees single-digit millisecond latency at the 99th percentile, 99.999 percent high availability, with elastic scaling of throughput and storage.



0 comments