Always encrypted for Azure Cosmos DB provides encryption support on the client-side to protect sensitive data by encrypting data such as credit card numbers or national identification numbers, before it gets transferred over the wire to be stored in Azure Cosmos DB. Always encrypted allows clients to protect JSON property values which are deemed sensitive, by means of client encryption policies which can be configured on the containers just like any other policy such as indexing policy etc.
How to start using always encrypted
Let us try to run the sample code. Encrypting data using always encrypted requires an initial setup as always encrypted relies on Azure Key Vault (when the KeyEncryptionKeyResolver selected is Azure Key Vault – I will get to that in a bit) to store wrapped data encryption keys which are encrypted using a customer-provided key encryption key created (and stored) in Azure Key Vault. In this case, Azure Key Vault provides all the required services to wrap (Encrypt) and unwrap (Decrypt) the data encryption key in use.
Step 1: Enable client application access
When you have an application that connects to your Azure Cosmos DB instance, you can create an identity for the app. This identity is known as a service principal. Access to resources is restricted by the roles assigned to the service principal, giving you control over which resources can be accessed and at which level.
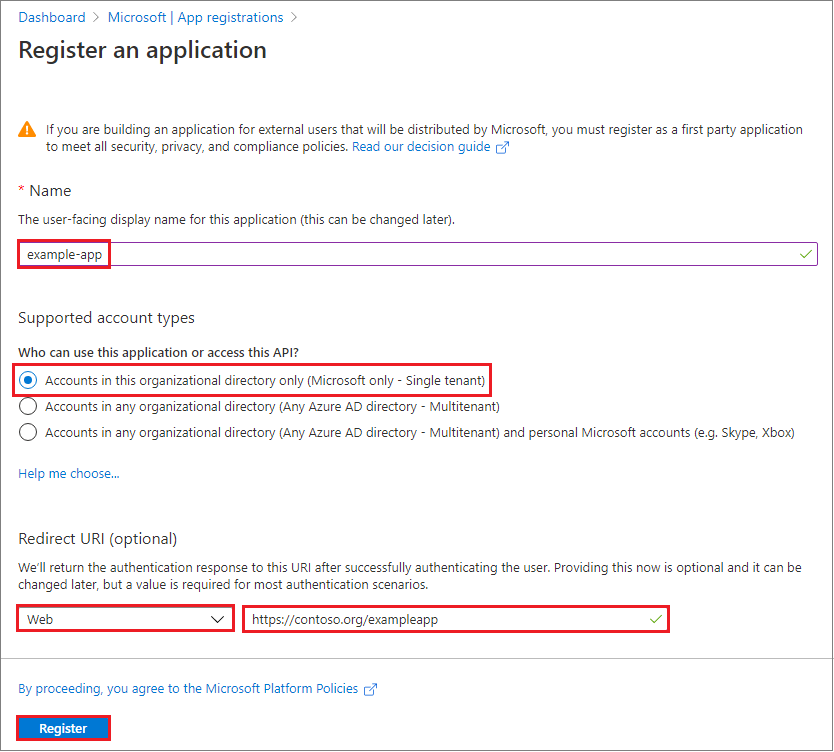
Let us look at how to use the portal to create the service principal in the Azure portal. Let us focus on a single-tenant application where the application is intended to run within only one organization.
- Sign into your Azure Account through the Azure portal.
- Select Azure Active Directory/App registrations.
- Select New registration.
- Name the application. Select a supported account type, which determines who can use the application.
There you go, now you have your app registered.
Step 2: Get tenant and app ID values for signing in
You would need these two IDs to create an instance of the ClientCertificateCredential class (which is a token credential that can provide an OAuth Token) with the details needed to authenticate against Azure Active Directory with a certificate, when using certificate-based authentication. This is how Azure Key Vault would allow the set of operations like wrapping and unwrapping of data encryption keys. To get those values, use the following steps:
- Select Azure Active Directory/App registrations in Azure AD, select your application.
- Copy the Directory (tenant) ID and store it in your application app settings.


Step 3: Authentication: Two options
Let’s look at couple of authentication methods available for service principals: password-based authentication (application secret) and certificate-based authentication. We recommend using a certificate so this is shown as part of the sample code, but you can also create an application secret to get a token via ClientCredential
Option 1: Upload a certificate.
You can use an existing certificate if you have one. Optionally, you can create a self-signed certificate for testing purposes only. To generate a certificate, you can use Azure Key Vault.
To generate the certificate using Azure Key Vault:
- On the Key Vault properties pages, select Certificates.
- Click on Generate/Import.
- On the Create a certificate screen choose the following values:
- Method of Certificate Creation: Generate.
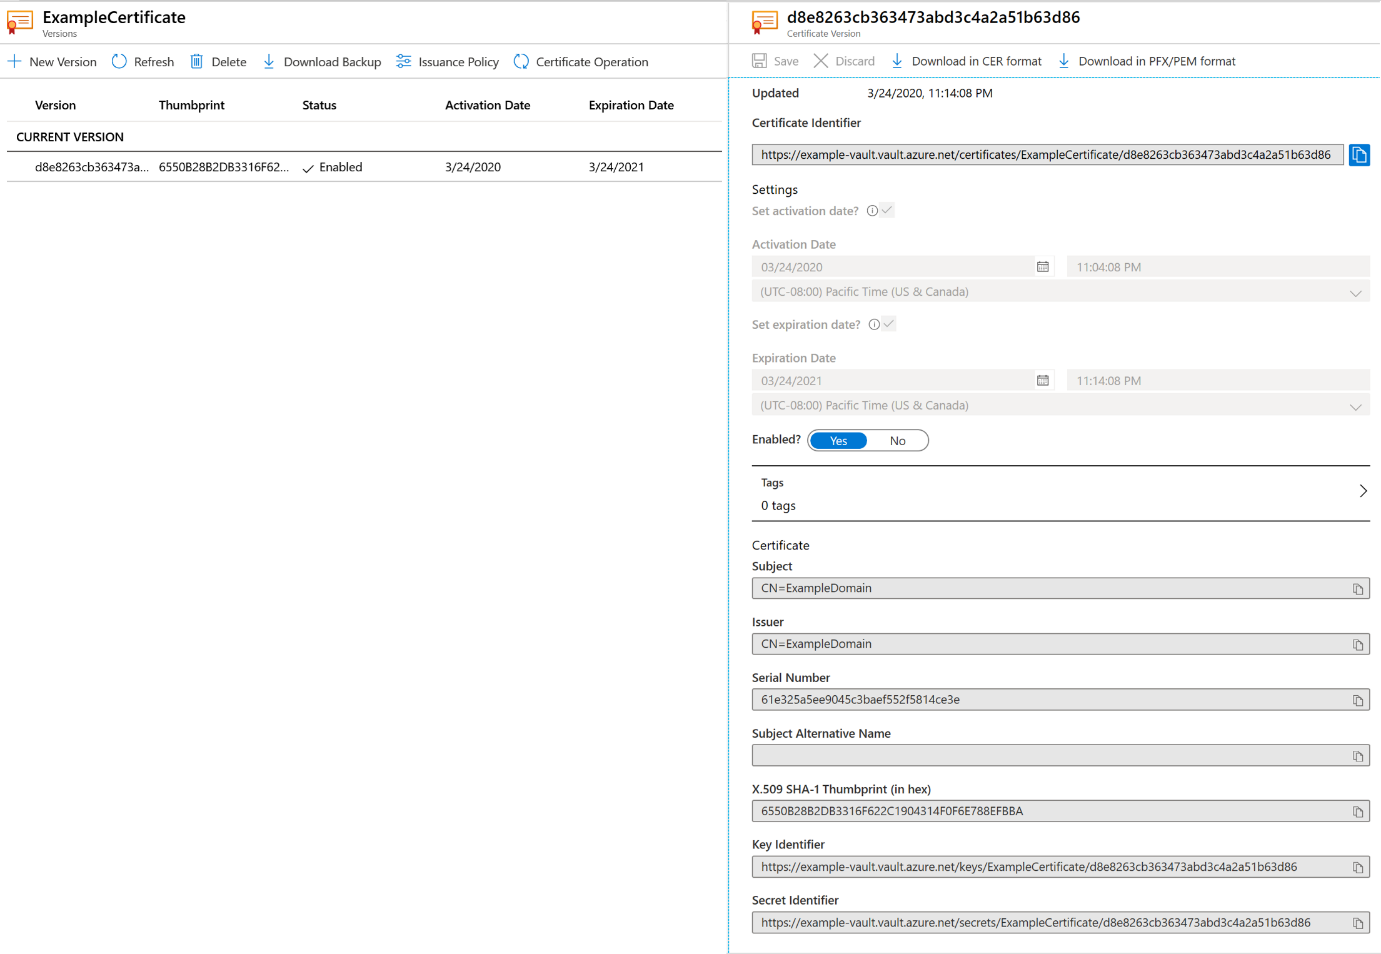
- Certificate Name: ExampleCertificate.
- Subject: CN=ExampleDomain
- Leave the other values to their defaults.
Click Create. This may take some time to create and enable. Once that is done and you have received the message that the certificate has been successfully created, you may click on it on the list. You can then see some of the properties.
Export/Download certificate from Azure Key Vault:
By clicking “Download in PFX/PEM format” button, you can download the certificate. Once you have downloaded it, you need to install it under the current user on the client machine which will run always encrypted Azure Cosmos DB client. (The steps to create an Azure Key Vault are provided in the later section).

To upload the certificate:
- Select Azure Active Directory/App registrations in Azure AD, select your application.
- Select Certificates & secrets.
- Select Upload certificate and select the certificate.

Option 2: Create a new application secret.
If you choose not to use a certificate, you can create a new application secret.
- Select Azure Active Directory.
- From App registrations in Azure AD, select your application.
- Select Certificates & secrets.
- Select Client secrets -> New client secret.
- Provide a description of the secret, and a duration. When done, select Add.
After saving the client secret, the value of the client secret is displayed.

Step 5: Create an Azure Key Vault using the Azure portal
Sign into the Azure portal at https://portal.azure.com.
Create a key vault:
- From the Azure portal menu, or from the Home page, select Create a resource.
- In the Search box, enter Key Vault.
- From the results list, choose Key Vault.
- On the Key Vault section, choose Create.
- On the Create key vault section provide the following information:
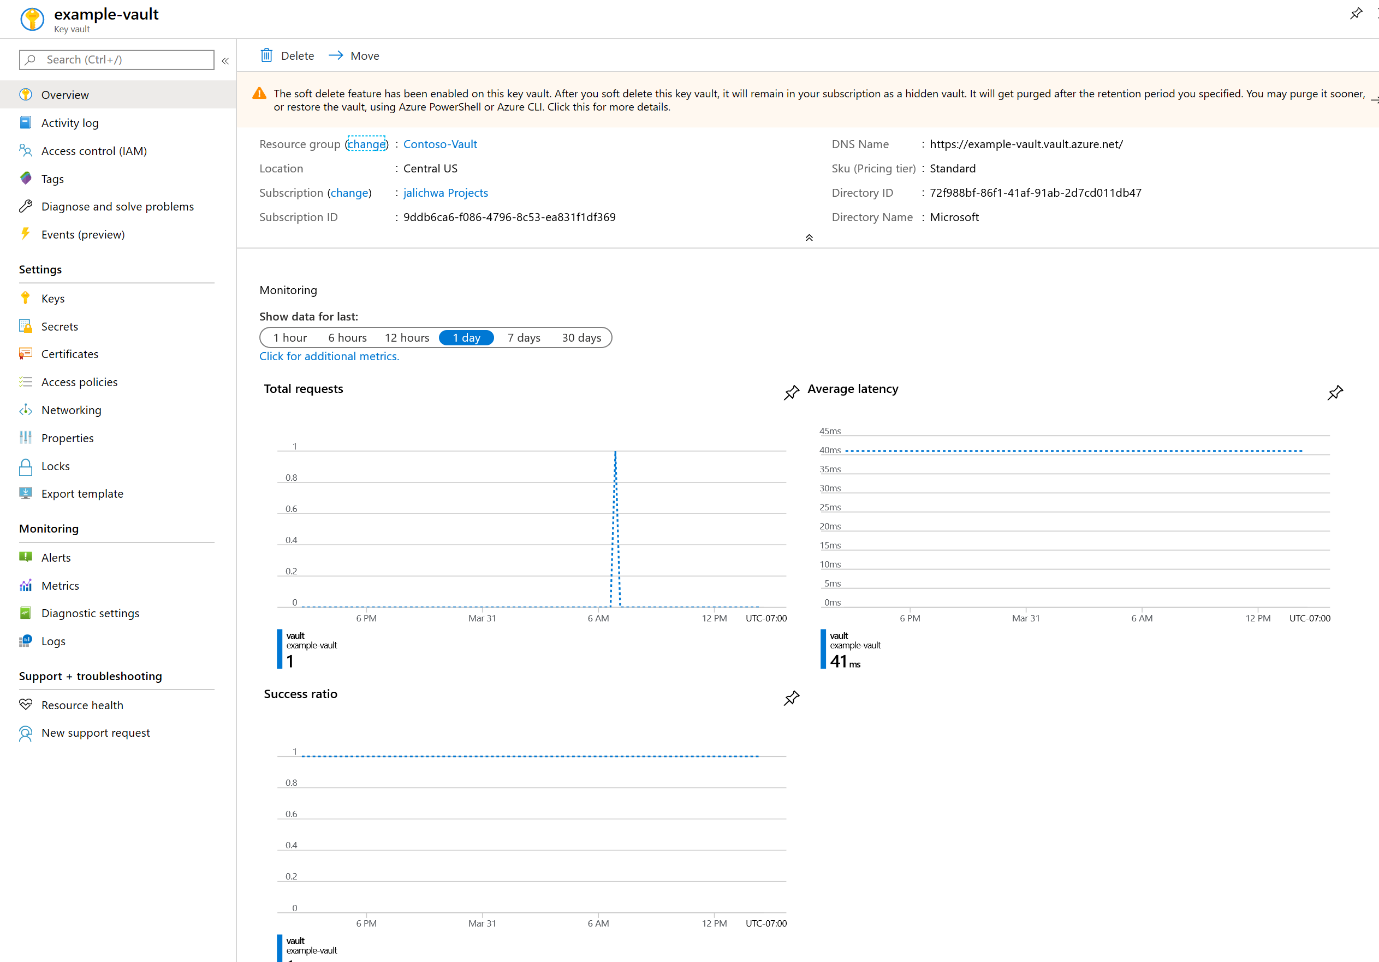
- Name: A unique name is required let us use example-vault.
- Subscription: Choose a subscription.
- Under Resource Group, choose Create new and enter a resource group name.
- In the Region pull-down menu, choose a region.
- Leave the other options to their defaults.
- After providing the information above, select Create.
Step 6: Configure access policies on resources
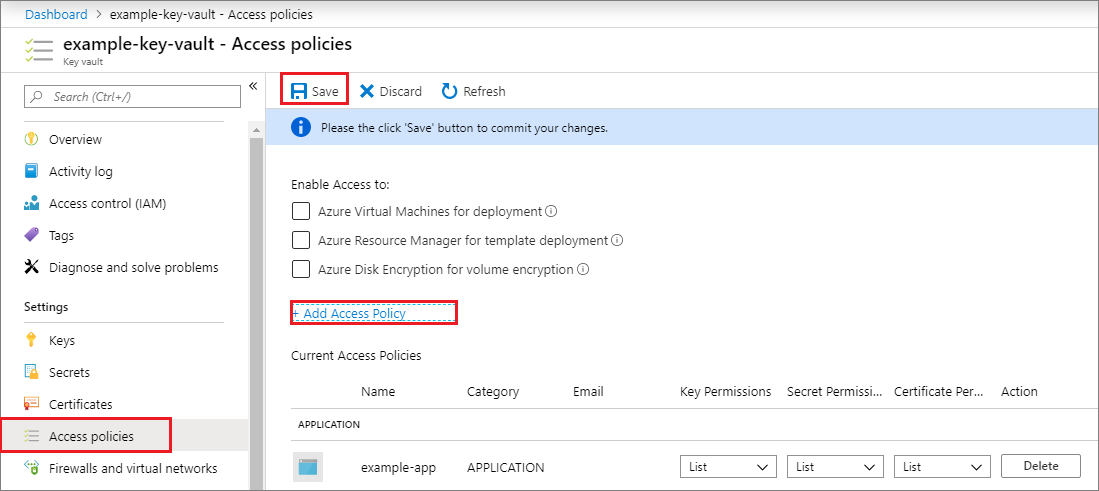
Now that your client app is configured and you have your application ID, it is time to configure its access policy so you and your application can access the vault’s secrets (key encryption keys). The get, list, sign, verify, wrapKey, and unwrapKey permissions are required for creating a new data encryption key which is used by Always encrypted Azure Cosmos DB to encrypt the data.
- In the Azure portal, navigate to your key vault and select Access policies.
- Select Add access policy, then select the key, secret, and certificate permissions you want to grant your application. Select the service principal you created previously.
- Select Add to add the access policy, then Save to commit your changes.
Step 7: Add a key to the Key Vault
To add a key to the vault, you just need to take a couple of additional steps. In this case, we add a key that will be used by Always Encrypted for Azure Cosmos DB. The key is called ExampleKey.
- On the Key Vault properties pages, select Keys.
- Click on Generate/Import.
- On the Create a key screen choose the following values:
- Options: Generate.
- Name: ExampleKey.
- Leave the other values to their defaults. Click Create.
Once that you have received the message that the key has been successfully created, you may click on it on the list.
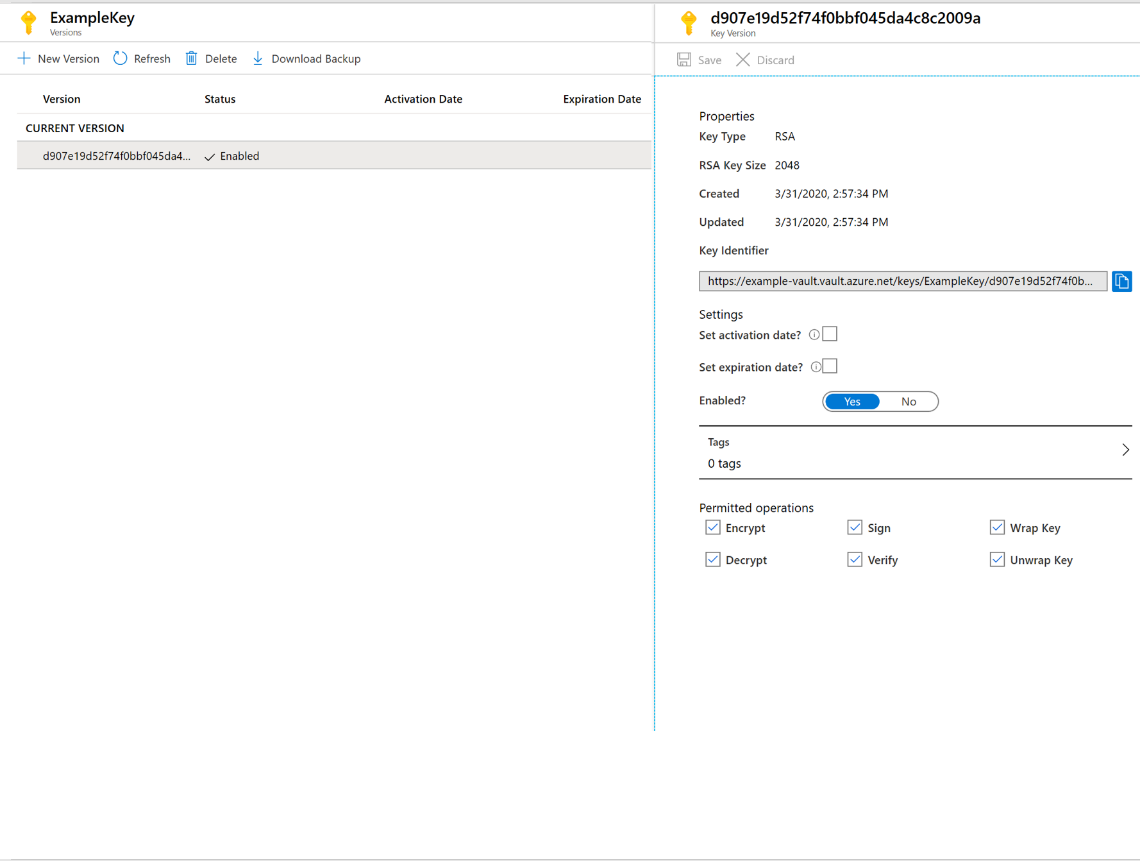
Make sure you note the Key Identifier which will be later used in the sample code, where we would use it as part of EncryptionWrapMetaData while creating a new data encryption key.
There you go, you have registered an application and provided the desired permission for the application in the Key Vault.
How to build applications using Always Encrypted for Azure Cosmos DB
With Always Encrypted, the Azure Cosmos DB SDK has now exposed a bunch of new APIs that can help configure few things like the container-level encryption policies and corresponding data encryption keys. This is required before you start using your regular Azure Cosmos DB SDK API like CreateItemAsync(), ReadItemAsync() etc. which have remained unchanged with respect to function signature.
To begin with, you must initialize your KeyEncryptionKeyResolver interface with either Azure Key Vault based KeyResolver or you can implement your own IkeyEncryptionKeyResolver interface if necessary. However, we recommend using the KeyResolver which comes implemented out of the box and relies on Azure Key Vault as a key store to store your key encryption key (which is used to encrypt your data encryption keys) and provide services like wrapping and unwrapping.
TokenCredential to access Azure Key Vault services
The TokenCredential class is the representation of a credential which can provide OAuth token used to prove an identity between Azure Key Vault and a registered application via Azure Active Directory.
So, every call we make to Azure Key Vault to wrap or unwrap a data encryption key is through a token obtained by authenticating with Azure AD (Active Directory). This token is in turn used by Azure Key Vault to validate the application identified with Azure AD.
So, the setup with respect to registering your application with Azure AD and Azure KeyVault were carried out to enable this support and thus obtain the TokenCredential to use Key Vault services.
Enable Container with Encryption Capabilities
The WithEncryption() extension on CosmosClient enables encryption on containers created using this client.
KeyEncryptionKeyResolver, which is passed as a parameter, internally provides all the functionality around managing securely your data encryption keys.
keyCacheTimeToLive optional parameter allows a user to set the cache time to live value that determines how long the unwrapped data encryption keys are cached. After expiry, we refresh the cache by making a call to Azure Key Vault to unwrap the wrapped data encryption keys that are stored in Azure Cosmos DB. By default, keyCacheTimeToLive is set to 1 hour.
To configure a ClientEncryptionPolicy, you need to first create a data encryption key which you will use to encrypt your document properties.
The EncryptionKeyWrapMetadata requires the key encryption key URL, which was earlier noted during the setup. This key is used to encrypt/wrap the data encryption key created via this call and stored securely in Azure Cosmos DB.
A client Encryption Policy is configured by providing a ClientEncryptionIncludedPath, which specifies:
- the property you want to encrypt.
- the data encryption key you want the policy to use for this property.
- the encryption type which is either Deterministic or Randomized.
- the encryption algorithm to use.
If you are looking to run queries on encrypted properties, then Deterministic encryption type must be selected. The keys must be created first, before you create a ClientEncryptionPolicy which uses the keys.
Currently, only top-level paths are supported and if the top-level path is an Object or say an Array type, then all the corresponding nested/child properties are encrypted with the same Client Encryption Policy. You now have a container configured with an encryption policy and all documents created inside this container will have the corresponding properties specified in the policy, encrypted.
Key Encryption Key (Master Key) Rotation via RewrapClientEncryptionKeyAync
The RewrapClientEncryptionKeyAync(…) can be used to rewrap an existing data encryption key, which is useful when you want to rotate the Key Encryption Key. If you want to revoke the existing Key Encryption Key, this must be done after the rewrap operation has completed. For example, one way to do it would be to use the QueryIterator available over ClientEncryptionKey and run a query to fetch all the keys with their Azure Key Vault key encryption key ”value” field. Or if you have configured a unique name, you can use the “name” field to fetch all the keys which were encrypted using this key encryption key and rewrap them with a new key.
Running queries on Encrypted Documents
Running queries on encrypted documents requires the use of parameterized query using an AddParameterAsync(…) extension provided with QueryDefinition(…).
Since the containers configured with an encryption Policy have properties that are encrypted, you cannot run queries with a WHERE clause without the use of AddParameterAsync(…) extension since that would result in sending plaintext data and failing, since the property might be encrypted.
The third argument passed above in AddParameterAsync(…) should be the property path that was used in the client encryption policy to encrypt the property.
Are there any known limitations?
- Encryption Policy – Client encryption policies are immutable, once a container is configured with a client encryption policy, we do not allow changing the client encryption policy.
- Query Support – There are limitations with respect to what type of queries are supported on encrypted documents. Client-side encryption relies on the encryption policy configured on the container to decrypt the encrypted properties in the document, when a document is read, the policy is retrieved, and paths are iterated over and for each of the included path, the corresponding property values in the document are decrypted. However, in certain cases for example when queries are performed on container where the query seeks to retrieve only a subset of the document, say, a particular nested/child property of document, the decryption would fail since the document returned does not have the parent property name(included top-level path) in the name-value pair objects of the document, hence the corresponding value is not decrypted. So if you want to query on encrypted documents, make sure to design your queries in such a way that the document retrieved as part of the query results does include the top-level path.
For example. Let us consider this encrypted document. This includes a property “Items” with nested properties, and since “/Items” was part of the client encryption policy the property along with all its nested properties, “OrderQty”,”ProductId”, “UnitPrice”, “LineTotal” were encrypted.
{
  "id": "myorderId1",
  "ponumber": "PO18009186470",
  "ttl": 2592000,
  "OrderDate": "BQGG49bnwZHqo/90VQTCXsL2ArsBfLdILZI0BIxqz1CNm1rm5IftOyknMTcjbA==",
  "ShippedDate": "0001-01-01T00:00:00",
  "AccountNumber": "Account1",
  "SubTotal": "AwHCJH/7s0W2tDQnGBuSq2+mexJiWyA0pP9Nwo6j7mg",
  "TaxAmount": 12.5838,
  "Freight": "AwHTstIOb5fb0Jcn8Rle8FOETrqxqtRBrXPazIQ8vmVUR2MGNLhf38tKe08tJ3YQ",
  "TotalDue": 985.018,
  "Items": [
    {
      "OrderQty": "BAFHrzTqEotjFYoUcq9aphO/efTFgY6IWydLCrejEFrQlnej6dKlRyLThm",
      "ProductId": "BAEWqWPCRgsPiR5N+n5QmjTy71fvdPT1AN3FOXFVSyPLzim8ZUlgK",
      "UnitPrice": "AwF8o5vUXV6w9KNnm3J18gA2S2r3uSWPoFnXgIa+6XZSE4FPlt25rWs",
      "LineTotal": "BAFHrzTqEotjFYoUcq9aphO/efTFgY6IWydLCrejEFrQlnej6dKlRyLThm"
    },
    {
      "OrderQty": "BAFHrzTqEotjFYoUcq9aphO/efTFgY6IWydLCrejEFrQlnej6dKlRyLThm",
      "ProductId": "BAHZh0aWe4pC1IqfE3YxgZIYQJfYC59T+4CRlJYtR /xjE+Bq3pMSr7vZ",
      "UnitPrice": "AwF8o5vUXV6w9KNnm3J18gA2S2r3uSWPoFnXgIa+6XZSE4FPlt25rW",
      "LineTotal": "BAFHrzTqEotjFYoUcqadsfaphasdf/ef6IWydLCrejEFrQlnej6dKlRyLThm"
    }
  ],
}
Now lets say you decide to write a query to fetch just the “ProductId” which is a child property of “Items”. This query would fail since the document fetched does not contain the top-level path “/Items” here. So in order to perform query on encrypted documented, the queries have to be designed in such a way that the query result has documents with top-level paths as part of the document schema.
{
  "_rid": "ngwiAOGDqDM=",
  "Documents": [
    {
      "ProductId": " BAEWqWPCRgsPiR5N+n5QmjTy71fvdPT1AN3FOXFVSyPLzim8ZUlgK "
    },
    {
      "ProductId": " BAHZh0aWe4pC1IqfE3YxgZIYQJfYC59T+4CRlJYtR /xjE+Bq3pMSr7vZ "
    },
  ],
  "_count": 2
}
The other limitation is in regards to using LINQ in query, we currently only support parameterized queries on encrypted properties only using AddParameterAsync(…) extension provided with QueryDefinition(…).
Next steps
Try client-side encryption for Azure Cosmos DB by following this sample.
Use Azure Cosmos DB emulator version 2.11.13.0 or higher to use Always Encrypted.

0 comments