

I recently wrote an article for Smashing Magazine that covers how I set up my personal development environment to use the Windows Subsystem for Linux version 2 (WSL 2). One of the things that I cover in that article is how to get SSH setup in WSL with Github. I mention in that section that you can share SSH keys between Windows and WSL, but I never showed exactly how to do it. There’s a good reason for that.
I couldn’t figure it out.
An SSH key is specific to a machine. Your machine. The problem is that the Linux distro you install in WSL see’s itself as it’s own operating system, and it wants its own set of SSH keys. The primary value propositions of WSL is that you can have both Linux AND Windows. As a developer, this is quite compelling as you can develop for both platforms on both platforms but with only one machine and without having to constantly switch OS’s. This means that you would need a set of SSH keys for Linux and one for Windows, ultimately treating your machine as 2 machines instead of one.
A better solution would be to share the same set of SSH keys between Windows and WSL so that you have one set of keys for one machine.
Setup SSH on Windows first
My recommendation is that you set up SSH on the Windows side first. Follow the instructions over on Github’s documentation to do this. It will walk you through generating the key, starting the agent and then adding your key to Github.
Copy keys to WSL
To use this same set of keys in WSL, you first need to copy them over. The keys are almost always located at c:\Users\<username>\.ssh. That’s a folder. You will need to copy that entire folder from Windows, to WSL.
Open a terminal instance attached to WSL. Might I recommend the free Windows Terminal? You’ll love it. I promise. If you’re not 100% satisfied, you can get your money back – no questions asked.
Execute the following command to copy the keys from Windows to WSL.
cp -r /mnt/c/Users/<username>/.ssh ~/.ssh
Note that if you installed Github desktop, you do not need to setup SSH keys on the Windows side, and the .ssh folder will not be present. Make sure you follow the Github instructions above to generate the SSH keys on Windows.
Fix permissions
If you were to try and push something to Github from WSL, it will warn you that it doesn’t recognize the remote host and it will ask you if you want to connect. Type “yes”. Then you will get an error that looks something like this…
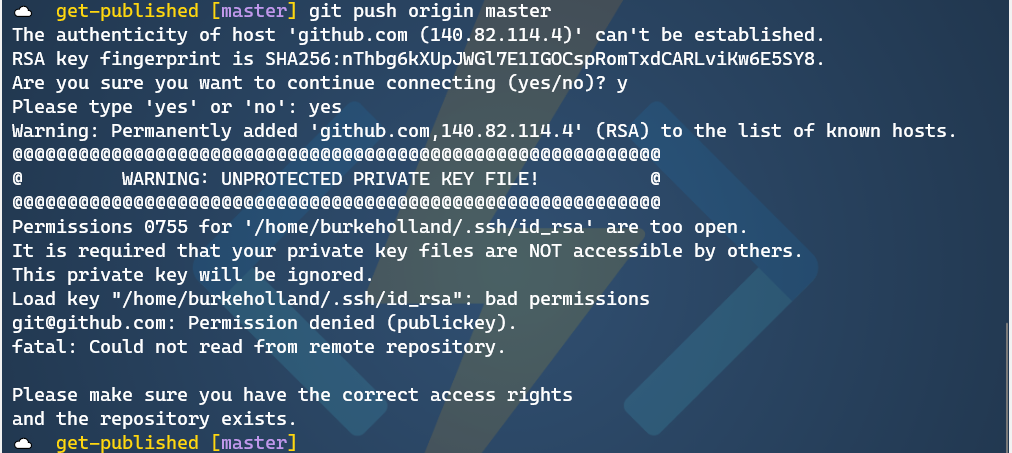
Like nearly everything that goes wrong on Linux, this is a permissions issue. You need to adjust the permissions on the key file to get this working. To do that, run the following command from WSL.
chmod 600 ~/.ssh/id_rsa
What this does is set Read/Write access for the owner, and no access for anyone else. That means that nobody but you can see this key. The way god intended.
Now try and push to Github…

Success!
Now, you will be asked to enter your passphrase every single time you try and push to Github. That’s going to get old in a hurry. This is because the ssh agent isn’t running on the Linux side. To get the agent running when WSL starts, first install keychain.
sudo apt install keychain
Then add the following line to your ~/.bashrc file…
eval ``keychain --eval --agents ssh id_rsa
Each time you reboot, you’ll have to enter your passphrase. But you only have to do it one time until you reboot or terminate WSL.
There are other ways to auto-start the ssh-agent in WSL. There are instructions in this article that show how to do with with Zsh.
Sharing is caring
While you can set up SSH keys on both the Linux and the Windows side, it feels a bit redundant. It also feels a bit like I’m not utilizing the full potential of WSL, which is that it lets me move between the two operating systems as if they were one. Sharing the same set of keys feels a bit more like I’m on one system instead of two.
I care because I’m always looking for the one “right way” to do things. The reality is that there is no one “right way” to do anything. You can setup SSH keys on both WSL and Windows, or you can set them up just in Windows and share them with WSL. It’s your world. The ssh keys just live in it.
I made a bash script to simplify this process and allow me to run it on startup (with support for ignoring SSH sessions). It is available on GitHub here: https://gist.github.com/emabrey/034c399f087263a6ab6cc860a314a486 . Word of warning- I have not tested this on WSL 2 yet. It also will clobber your setting, though it should be fairly simple to use to save/restore state if that is important to you. I wrote and use this on a Debian install, so I do not know how well it will transfer to other linux installs/versions of SSH/etc.
I found a way to avoid to prompt ssh passphrase after each boot. It is based on windows credential. Please give a look here: https://medium.com/@glsorre/windows-subsystem-for-linux-never-prompt-your-ssh-passphrase-again-353db7c931ab
I’m using https://github.com/BlackReloaded/wsl2-ssh-pageant.
It allows hosting the SSH keys in PuTTY Pageant or Gpg4Win then sharing them with WSL2.
Good tips. I found a typo:
Should be
SSH Agent Forwarding can be used when you’re SSHing from Windows into WSL. You leave your keys on Windows only.
I’m not using WSL right now: I have a development container on a remote Debian host and I use VS Code to SSH into it and remotely develop. From the VS Code terminal I can push to GitHub or anything that needs the keys from Windows and it just works without having to copy the keys to the container. Same idea.
I usually use ssh-copy-id to move my public key only. If you use the same private key on all your systems if it gets compromised then all your system are accessible..
My 2 cents
Cheers
“I couldn’t figure it out”
Really? It’s the exact same procedure for using the same SSH keys on any other two environments: cp.
That and the spelling mistakes – this low quality article is just clutter in my feed.
I remember when I installed Linux on my Chromebook - I had a duel boot ChromeOS and Ubuntu device.
I was 27 and I had only ever used Windows and Android in the past.
I realized how much Windows holds a users hand for everything. I had no idea how networking worked, no idea about UNIX fundamentals or how the back end of a system worked. I had never seen the 'inside' of a server before, heck I rarely ever used command/power-shell..
I learned quickly, but I learned A LOT. Moving to Linux from Windows made me feel like I...
I have had no problem using a linked directory.
First, from powershell:
scoop install ssh-agent-wsl
Then, from WSL:
ln -s $USERPROFILE/.ssh ~/.ssh
Finally, in ~/.profile
eval $($USERPROFILE/scoop/apps/ssh-agent-wsl/2.5/ssh-agent-wsl -r)
The final line lets you use ssh without having to provide the password every time.
@Rob Cannon what is “scoop” as used in your post?
Go to the website https://scoop.sh and you might love it @Mike Moore
Basically, a package installer for Windows that is no fuss.
Hello @Rob Cannon, have you been able to the the reverse? Run the windows 10 agent.exe from PowerShell? I get an access denied even thought I am in an elevated state.
Cheers
Pasquale
Can you explain why you recommend copying from Windows to WSL specifically? What I did on my machines was generate the keys in WSL and then copy them over to Windows. I don’t remember having any major issues; surely you can go in either direction and be fine?
Thanks for article but is hard to say that copying could be called sharing. Maybe instead of cp command, ln could be used to bring real sharing experience? But then, probably, we need to solve issue with permissions most probably.