**UPDATE April 25, 2017** This blog post describes our old deployment process. We now use VS Team Services Release Management to deploy VSTS.
We use VS Release Management (RM) to deploy Visual Studio Online (VSO), and this post will describe the process. Credit for this work goes to Justin Pinnix, who’s been the driving force in orchestrating our deployments with RM. This documentation will help you get familiar with how RM works and how you can use it to deploy your own services, and you can find even more details in the user guide.
Terminology
First, let’s briefly cover some terminology. RM has the notion of stages of a release, which are the steps to run your release. Each stage deploys a VSO scale unit.
VSO consists of a set of scale units that provide services like version control, work item tracking, and load testing. There are scale units in multiple data centers. Each scale unit consists of a set of Azure SQL Databases with customer data and virtual machines running the application tiers that serve the web UI and provide web services and job agents running background tasks. We limit how many customers are located in a given scale unit and create more to scale the service as it grows, which is currently at seven scale units. We also have a central set of services that we call Shared Platform Services (SPS) that includes identity, account, profile, client notification and more that nearly every service in VSO uses.
One of our scale units (SU0) is special in that it is the scale unit used by our team for our day-to-day work, and changes are rolled out first on this scale unit. SU0 is called our “dogfood” scale unit – something that others have called a “canary.” Whether you want to think of it as us eating our own dogfood first or as the canary in the coal mine, the goal is that we find problems with our team before they become problems for our customers. This has proved to be invaluable in catching issues before they affect customers.
We currently use what’s called “VIP swap” to deploy new VMs. This means that we create a new set of VMs with the new release in a “staging slot” and then swap the VMs in production with the ones in the staging slot. The VIP, which is the virtual IP address that every client uses to talk to VSO, never changes while the VMs behind it are swapped out en masse. This is not the best approach. Because of the way that the software load balancers in Azure work, there are connections that get severed in the process, resulting in a small percentage of user requests failing and generating monitoring alerts. Later this year we plan to change the service to support a rolling upgrade where we’ll upgrade one VM at a time and then tell the service to begin serving the updated experiences once all VMs are updated in a scale unit. This better approach is the approach recommended by Azure.
Roles
For a given update, there are a set of people involved who play particular roles. Here are the roles that we use.
Engineer – An individual on the product team who has built a hotfix or configuration change to be deployed. This person will be responsible for driving the process of getting it deployed.
Release Manager – An individual on the product team who will be responsible for driving a sprint deployment. Duties are similar to that of “engineer” except they are working with a larger payload that represents many teams’ work over a sprint or more.
Release Approver – Someone who is charged with reviewing and approving hotfixes and configuration changes. This person is usually a group engineering manager (GEM) but may be someone else designated by a GEM. Approvers should be well versed in product technology and release practices. They are responsible for protecting the health of the service from errant changes. For compliance reasons, this may NOT be the same person as the Engineer for a particular release.
Overview of the release process
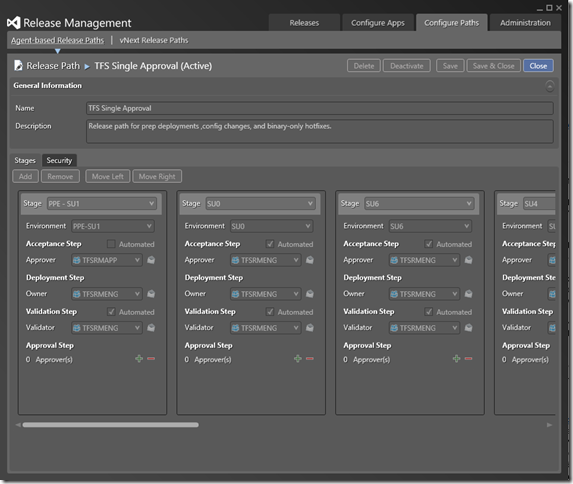
We use a stage per scale unit, and the stages run in sequence. This acts as a promotion model, starting with pre-production, then internal customers, followed by external customers. Each scale unit (stage) executes an identical set of approximately 10 steps including the binary update, several database update steps, and an automated health check that rolls back the deployment if it’s not healthy. Most of the DB steps run synchronously, except for the part that upgrades each customer account – those run asynchronously and in parallel over a period of days for sprint updates (hotfixes are much quicker).
We currently have two kinds of deployment execution environments. The first uses agents and the other doesn’t use any agents. We already had a significant investment in internal deployment tools before Release Management became available. These tools are PowerShell cmdlets that run on dedicated deployment VMs that are on-premises. Our VS RM release templates simply connect to agents on these deployment VMs and drive the existing deployment cmdlets. It works great because VS RM fills in the gaps in what these tools didn’t do a good job of – delegating execution of the scripts, approval workflows, sequencing of the scale units, and storing logs for auditing and debugging/purposes.
The services that use agentless templates work the same way. They just use remote PowerShell to execute the PowerShell cmdlets. Eventually, we will do away with the agents and use remote PowerShell for all deployment executions.
We also use RM to manage configuration changes to the system, including their auditing and approval. For example, if someone wants to make change to a setting in a service or make a database change, it’s done with an RM release.
Here’s an example of what the stages look like.
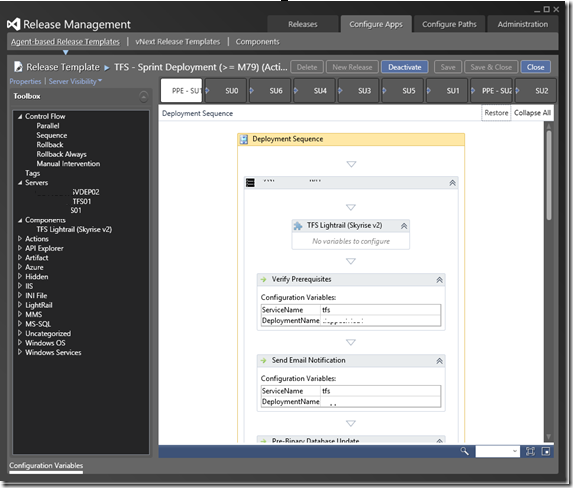
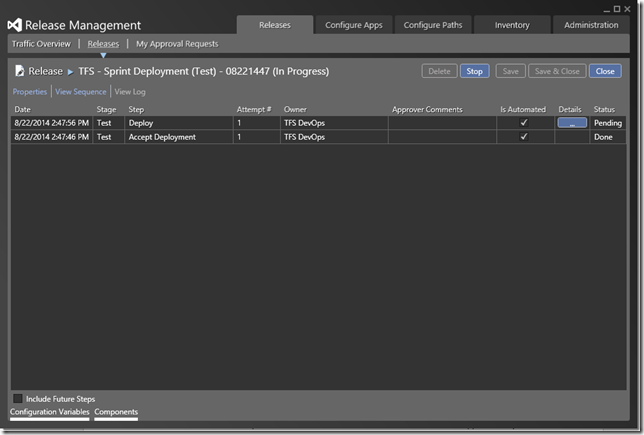
Below you can see part of the workflow for a given stage (each stage deploys a scale unit, starting with pre-production). The workflow consists of the following sequence (the screen shot shows only the first two).
- Verify prerequisites
- Send email notifications
- Pre-binary database update
- Update service binaries
- Verify service health
- At this point roll back if there is a problem
- Clean up the staging slot
- Update configuration database
- Update partition databases
- Post-partition database update
Approvals
The Release Manager queues a release in RM using the appropriate build and “Sprint Deployment” template after making sure no other releases are in progress for this service. If it’s a binary hotfix or a configuration change, the Engineer queues the release.
Next the release will enter the “acceptance” portion of the pre-production stage. The Release Approver must enter the acceptance approval.
Upon acceptance approval, the pre-production stage will execute. After the VIP swap, the RM template will call the Verify-ServiceDeployment script to ensure the new binaries are healthy. If a problem is encountered, the deployment will be automatically rolled back. Upon success (approximately 6 minutes), the staging slot will be deleted and the release will progress. Once the pre-production stage completes, it will be automatically be marked as validated and the release will progress to the “acceptance” phase of the SU0 stage.
For sprint deployments, each scale requires a manual acceptance approval. This approval should be done by the engineer and is simply there to control timing.
For binary hotfix deployments, the deployments will automatically roll out and check service health at each stage.
For other hotfix deployments, wait 30 minutes after SU0 is deployed before moving to other SUs.
Steps
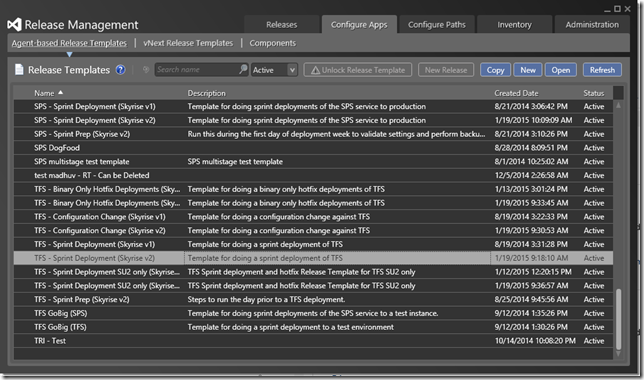
After selecting a build based on the test results, the Release Manager or Engineer goes to the “Configure Apps” tab of the RM client and chooses “Agent-based Release Templates” and selects the appropriate template (a sprint deployment in this case).
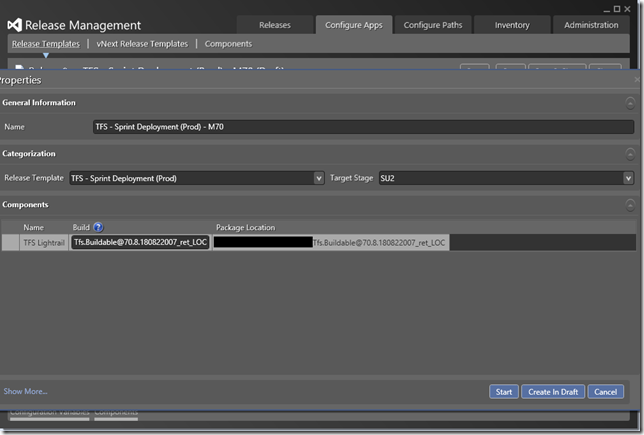
After clicking “New Release,” enter the build path and choose a meaningful name for the release (“ServiceName Sprint Deployment (Prod) MSprintNumber BuildNumber”).
The client will transition to the “Releases” screen showing the status of the release.
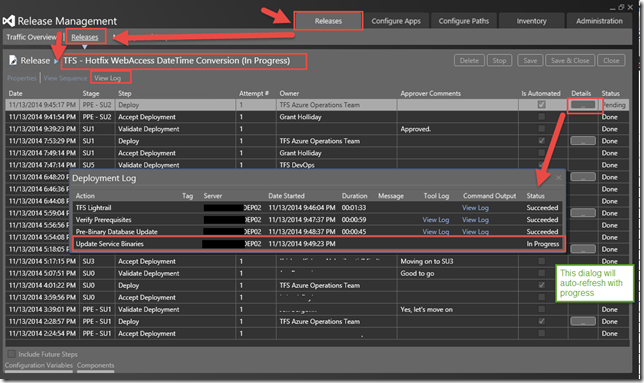
Once the “Deploy” step begins, clicking the “…” button will show a more detailed view of the deployment’s progress.
The process will be repeated for the remaining production SUs. Once the last stage is signed off, the release will move into the “Released” stage.
Conclusion
When we started deploying VSO, it was a manually orchestrated process with someone logged into a designated machine running a special environment and often copying and pasting commands for the custom parts of each deployment. It was a tedious and error prone process! We’ve long since put an end to that, and RM has helped us run fully automated deployments and configuration changes that anyone on the team can watch and for which we have history/audit logs.
Now you have some insight into how we deploy VSO using the VS RM product. Hopefully this gives you some ideas that will help you define your own releases.
[Update April 9, 2015] I’ve added a few more details in the Overview section.
[UPDATE April 25, 2017] This blog post describes our old deployment process. We now use VS Team Services Release Management to deploy VSTS.
Follow me at twitter.com/tfsbuck

0 comments
Be the first to start the discussion.