
Backing up and restoring a TFS server can be daunting. There are potentially a lot of services and a lot of steps. As soon as we shipped TFS 2010, I knew we had to do something to improve it and we began talking about how we were going to simplify the process. For a thorough understanding of what is involved, see: http://msdn.microsoft.com/en-us/library/bb552295.aspx. The primary customer I have been concerned about is the small team who doesn’t have a data center operations team and SQL DBAs who know the ins and outs of SQL backup.
A few months ago, we hatched a plan to build a new Power Tool that would greatly simplify backing up and restoring a TFS server. I’m proud to announce that we are almost done with the Power Tool and it will be included in our next Power Tools release (no date at this time but within the next couple of months).
Among the more frustrating things about our currently published backup instructions is that every time you add a new project collection to your server, you are supposed to go and install some new stored procedure goo in the new database to ensure it is gets a consistent snapshot with all of the other databases. I just know most people are going to forget to do that. While, it’s by no means the end of the world, it’s not going to give you the most seamless restore experience if you forget. One of the coolest features of this new tool is that it automatically scans all of your project collections every time you take a back up and ensures that all of the right snapshot goo is installed so there is nothing additional backup related work you have to do when you create a new collection. The new collection is automatically configured and added to your existing backup plan.
The more complicated your deployment, the more complicated it’s going to be. For the purpose of this discussion I’m going to focus on TFS Basic users because the simplification there is the greatest but this Power Tool can help simplify the process for many users.
When we set out to build this Power Tool, we decided to exercise an unpublished feature of our new 2010 admin console: Extensibility. We designed the admin console to support a pluggable architecture but we haven’t documented the interfaces yet because we really haven’t done enough testing of them. This is kind of the first real test and I hope that in the future, we will be able to open up the interfaces for 3rd party plugins as well.
Let me walk you through the new backup experience while telling you a bit about what it does.
Configuring a Backup Plan
After installing the next Power Tools release on your TFS 2010 server (yes, this only works for TFS 2010), you will notice that there is a new tab in the admin console called “Team Foundation Backups”. When you click on it you will see a screen like this that allows you to begin the configuration of your TFS backup plan.

If you click “Create Backup Plan”, it will launch a wizard to guide you through the process. Here’s what the wizard welcome page looks like:

Clicking Next gives you the first page where you enter the location for backups and the # of days you want to keep backups around for (it will automatically delete backups older than this). Of course you can delete backups yourself if you want to too – they are just files in the specified directory.

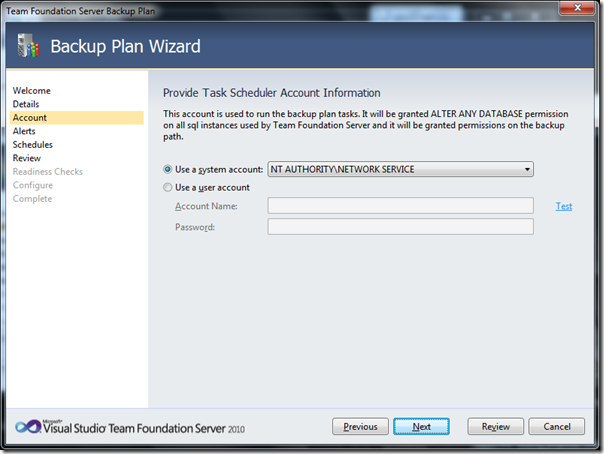
Click Next again and you can provide the account that will run automated backups and see what SQL permission that account will need. As you’ll see later backups don’t have to be automated but they can be.
Click Next again and you can configure the backup service to send you emails about any failures in the backup process. In this case, I didn’t have my TFS server configured with an SMTP host, so my only option was No Email Alerts. This uses the same email host and from address that other TFS notifications use, only the recipient can be specified here. If you want more than one recipient, you can separate them with commas.

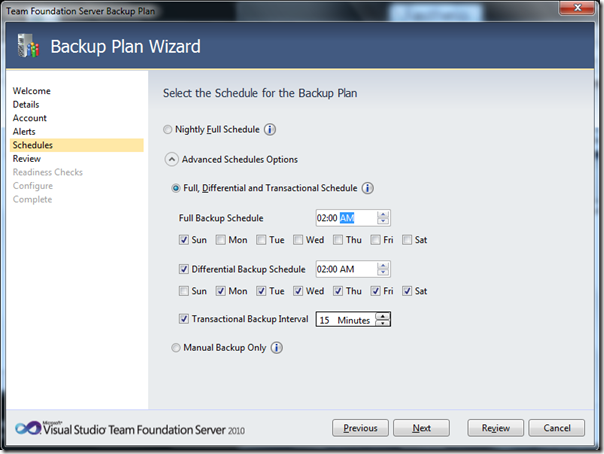
Click Next again and you can configure the schedule. The default is to run every night and do a full backup of your TFS. For small TFS installations, this is a simple and sufficient backup strategy. Choosing this option will run the full backup at 2:00AM every morning. If you want more control than that, you can click the Advanced Schedules Options.

If you choose Advanced Schedules, you get two more options 1) a Full, Differential and Transactional Schedule and 2) a Manual Backup Only option. If you choose manual backup only, it will not run any backups automatically but rather only perform a backup when you run the admin console and click the “Take Full Backup Now” button (more on this later). Here I have chosen the Full, Differential and Transactional schedule – this is a pretty typical enterprise kind of backup strategy. I have configured it to do a full backup every Sunday at 2:00AM, a Differential (sometimes called incremental) backup every other day of the week at 2:00AM. And a transactional backup every 15 minutes. This means I should never lose more than 15 minutes of data yet the performance and storage cost for this is quite modest. This is something that is totally cool about SQL’s backup capabilities.
Once I’ve configured my schedule, clicking Next lets me review my settings.
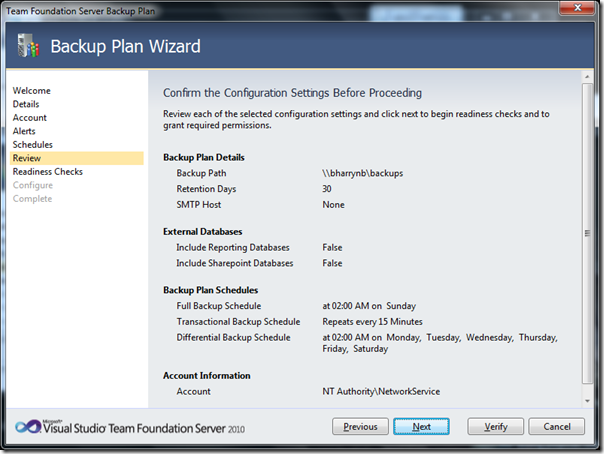
Clicking Next again will verify that the settings I’ve provided should work. You don’t want to have to wait until 2:00 AM the next morning to find out you fat fingered something 🙂 In this case I get a warning because I already had a backup plan configured and I’m overwriting it. This tool only supports one backup schedule per TFS server.

Clicking Configure will make all of the changes necessary to configure your TFS server for backup.

Click Next again and you are done! Your server is fully configured for backups (compare that to the docs :)).

Taking a Backup
Of course, if you’ve created a schedule, backups will happen automatically at the specified time but I really can’t show you cool screen shots of that – there’s nothing to see :). Regardless of whether you’ve created a schedule or not, at any time, you can manually take a full backup. Once a backup plan has been configured, the panel for Team Foundation Backups will look more like this. It will show you many of your settings and provide a set of administrative actions (on the right).

If you click Take Full Backup Now, it will perform a back up and put it in the file system location specified in the plan. That’s it, it’s that easy!

Restoring a Backup
Restoring a backup is a bit trickier and it depends on exactly what you are trying to do. There are two basic scenarios that we enable:
1) Restore one or more Team Project Collections (but not the whole server). You would do this if one team screwed up their database and wanted it restored but all the other teams using the server don’t want to be interrupted.
2) Restore the entire Team Foundation Server data (maybe you lost the data drive).
The process is mostly the same but I’ll call out a few differences. Please take these steps only as demonstrative and look at the docs that come with the Power Tools to get a more thorough understanding of what you need to do based on your configuration.
The first thing you have to do is get the server ready for the restore.
If you are restoring the whole server you should go to a command prompt and run “tfsservicecontrol quiesce” from the Tools directory of your TFS 2010 server installation. This will shutdown all of the TFS services and release any database locks.
If you are only restoring individual collections, the tool will prompt you to take any collections you are restoring offline and will automatically copy the replaced collection aside.
This tool is conservative. It won’t overwrite any data. So, except in the case of restoring individual collections, if you plan to restore a backup of a database that already exists, you must first delete the database. You can use SQL Server Management Studio or SQL Server Management Studio Express to do this easily. What I prefer to do is to detach the databases and move them aside but you can also just delete the databases. All of this can be done using the right click context menu on the database in SQL Server Management Studio.
Now you are ready to restore. In the TFS admin console, on the Team Foundation Backups tab, you click “Restore Databases”. This will launch a wizard to walk you through the process.
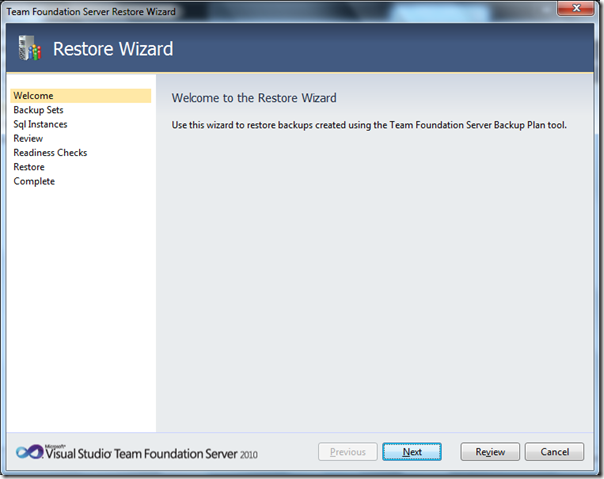
After clicking Next on the welcome screen, you will get the opportunity to browse the list of backups and choose a backup set to restore (based on the date and time of the backup).

After clicking Next, you need to choose which of the databases in the set you wish to restore and to which SQL instance you wish to restore them. By blanking out the “SQL Server” field for a database, it means not to restore that database. In this case I’m restoring all the databases to the same SQL instance but I could have chosen to restore them to different SQL Instances if this were a multi-SQL server, scaled out TFS server.

Click Next again and you can review your choices.
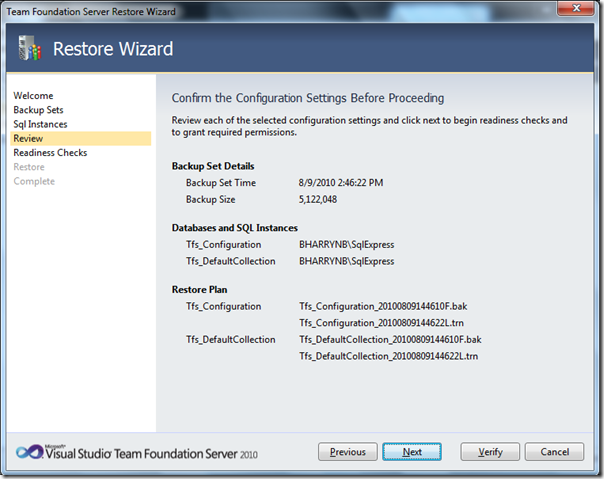
Clicking Next or Verify will make sure that the restore is likely to work.

Clicking Restore will restore the SQL databases.

And finally, clicking Next again shows a victory screen 🙂 It also includes an “informational warning” that you probably want to go delete the cache on your application tier as well because you don’t want it to be out of sync with the database you just restored.

The last thing you must do, if you ran tfsservicecontrol quiesce, is run “tfsservicecontrol unquiesce” to bring the TFS server back on line.
Conclusion
That’s it! If you’ve done a backup/restore of a TFS server before, you’ll recognize this as being WAY easier. I didn’t cover every caveat (that’s what docs are for) and as with any backup strategy, don’t count on it unless you’ve tested it. Make sure whatever you do works – you can back up and successfully restore all of your data and please, please, please don’t torch your system in the process by accidentally reformatting or deleting data you haven’t backed up, etc. You might even try it all out on a dummy or “pre-production” system first before you try it on a production system with real data.
I’m SUPER excited about this new Power Tool. It’s the next step in making managing a TFS server as easy as we can possibly make it. As I say, this will be available with some other cool stuff in the next Power Tools release. I’ll let you know as soon as it is available. As always, feedback is welcome.
Thanks,
Brian
0 comments
Be the first to start the discussion.